Hood design-Week 2
AIM :-
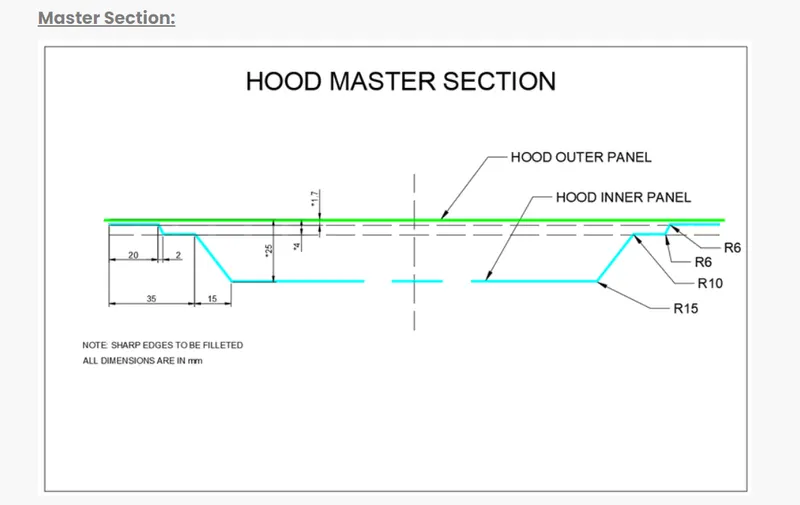
To design the Hood or Bonet of the front driving car by using the master section and standard procedure which is used in the OEM Manufacturer's.
OBJECTIVE :-
Design Exterior panel cover, interior panel and reinforcements required according to the Master section mentioned with the design parameter and a detailed report about the Hood Design which includes a detailed explanation about hood and its components, Latch trajectory, Mastic data, Emboss definitions, manufacturing process like deep drawing and hemming, and all the parameters followed in the design.
ABSTRACT :-
The project report covers the explanation of the steps and procedure followed during the development of the HOOD assembly of a car using CATIA V5. Using the styling surface and the main section as an entrance, we were able to create an outer panel and an inner panel with features such as embossing and mastic points. Having created the exterior and interior panels of the FUME HOOD, we have created a complete set of FUME HOOD including the exterior panel, interior panel, latch, hinge and reinforcements. In the end, a preliminary analysis was also performed using the main tooling axis to verify that the components were manufactured.
INTRODUCTION :-
The bonnet is an opening body panel that is the front portion of the BIW enclosure in a front-mounted motor vehicle. It is composed of a panel outside and inside. The interior panel provides durability while the exterior panel works as a metal cover. That's a very important piece because of the front-end crash requirements and the safety of pedestrians and passengers. The bonnet design is essential as it affects the airflow around the car.
Certainly! With regard to hood design, there are several considerations. The bonnet of a car plays an important part in the aesthetics and functionality of the vehicle. Here are some things to remember:
- Shape and contours: The shape of the hood can have a considerable impact on the general appearance of the car. It can be designed with smooth and fluid contours or more aggressive and angular lines, according to the style you want. The shape should also incorporate aerodynamics to minimize drag and improve energy efficiency.
- Materials: Fume hoods are usually steel, aluminum or carbon fiber. Each material has its own pros and cons. Steel is strong but heavy, whereas aluminium is lighter but less rigid. Carbon fiber is light and heavy but more expensive. Choosing the equipment depends on factors such as performance, weight loss goals and cost considerations.
- Functional characteristics: Hoods can incorporate different functional characteristics. A common characteristic is the inclusion of vents or bailers to allow air flow and engine cooling. These vents can be designed in various shapes and sizes to complete the overall aesthetics while ensuring an efficient air flow.
- Safety: Fume hoods must also be designed taking safety into account. They must ensure adequate protection of the engine compartment and occupants in the event of a collision. Hood locking mechanisms must be secured to prevent inadvertent opening while operating.
- Brand Identity: Hood design is often reflective of the brand identity of the vehicle manufacturer. Various brands have distinctive design elements and style indices that are transported through their product ranges. These design elements may include the form of the grille, the location of the lights, or the overall design language.
- Personalization: In certain cases, car owners can choose to customize their hoods according to their personal preferences. It can be adding bailers, stickers or even custom paint stains to create a unique look.
It is important to note that hood design is subject to regulations and standards imposed by safety and environmental agencies in different areas. These regulations ensure that fume hoods meet specific requirements in terms of pedestrian safety, collision safety, and emission control.
Overall, the bonnet design is a mixture of functionality, aesthetics and brand identity, taking into account the desired style of the vehicle while meeting safety and performance requirements.
Methodology :-
- Creating Hood Inner Panel
- Creating Hood Outer Panel
- Creating Embossment for Hinge
- Creating Embossment for Latch
- Creating Reinforcements
- Assembling the components
- Performing Draft Analysis on CAD Model
AVAILABLE DATA :-
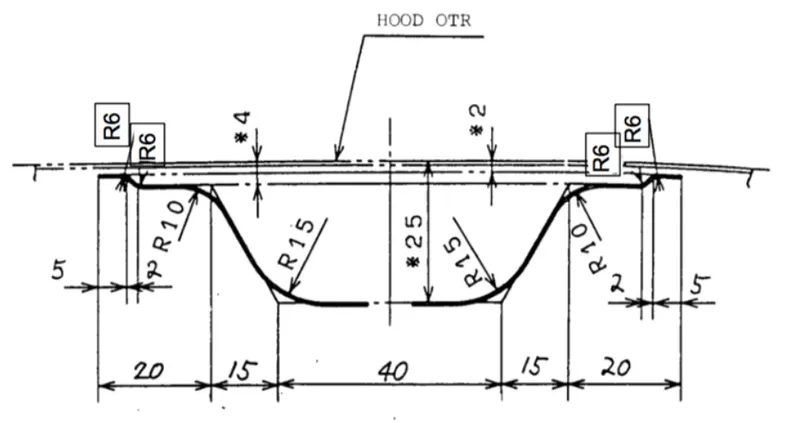
Hood Thickness Information
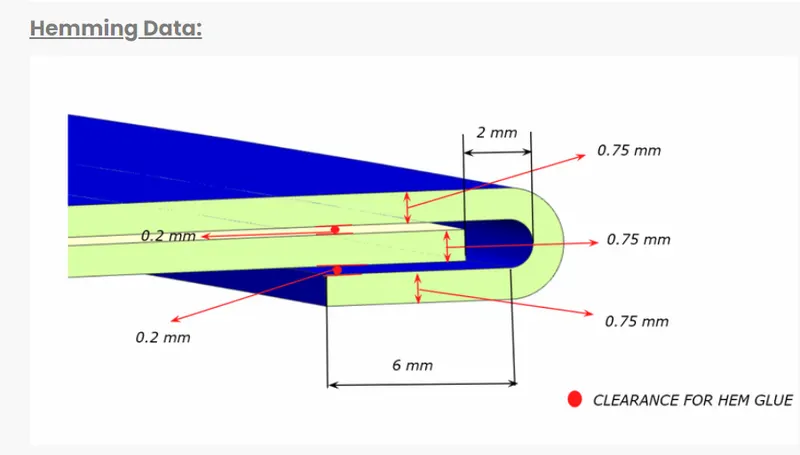
- Outer Panel Thickness = 0.75mm
- Inner Panel Thickness = 0.75mm
- Reinforcement Thickness = 1.5mm
OPERATIONS :-
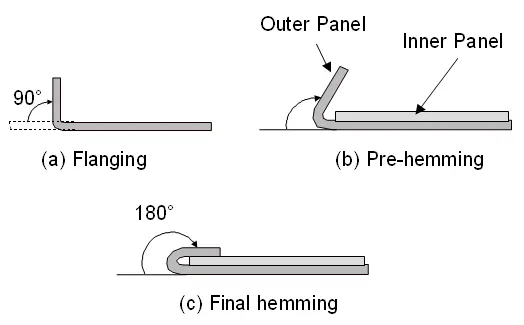
- Hemming: Crimping is a sheet metal forming process where the sheets are folded to 180 degrees. Body panels and automotive parts such as deck covers, trunk covers, doors, cowlings and tailgates are formed by the crimping process. In this process, a leaf is typically folded using the inner leaf in three different steps.
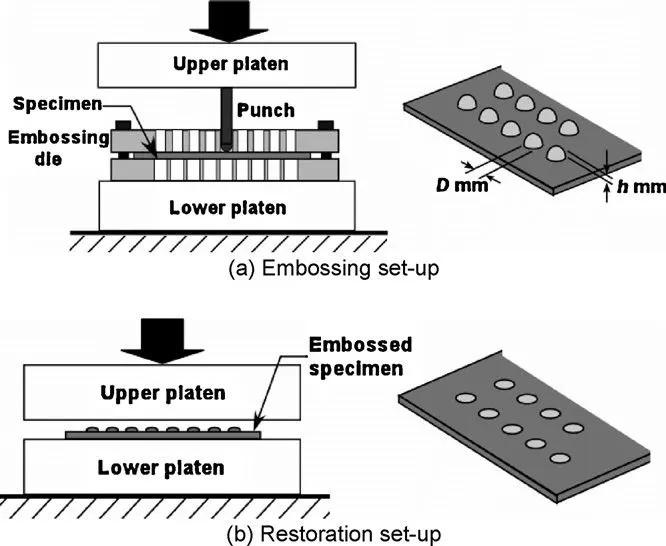
2. Embossing: Embossing of the sheet is a stamping process which makes it possible to produce relief or relief motifs in the sheet. This process can be achieved by means of matching male and female roller dies, or by passing a sheet or metal band between the rolls of the desired model. It is frequently associated with embossing to create a brilliant 3D effect.
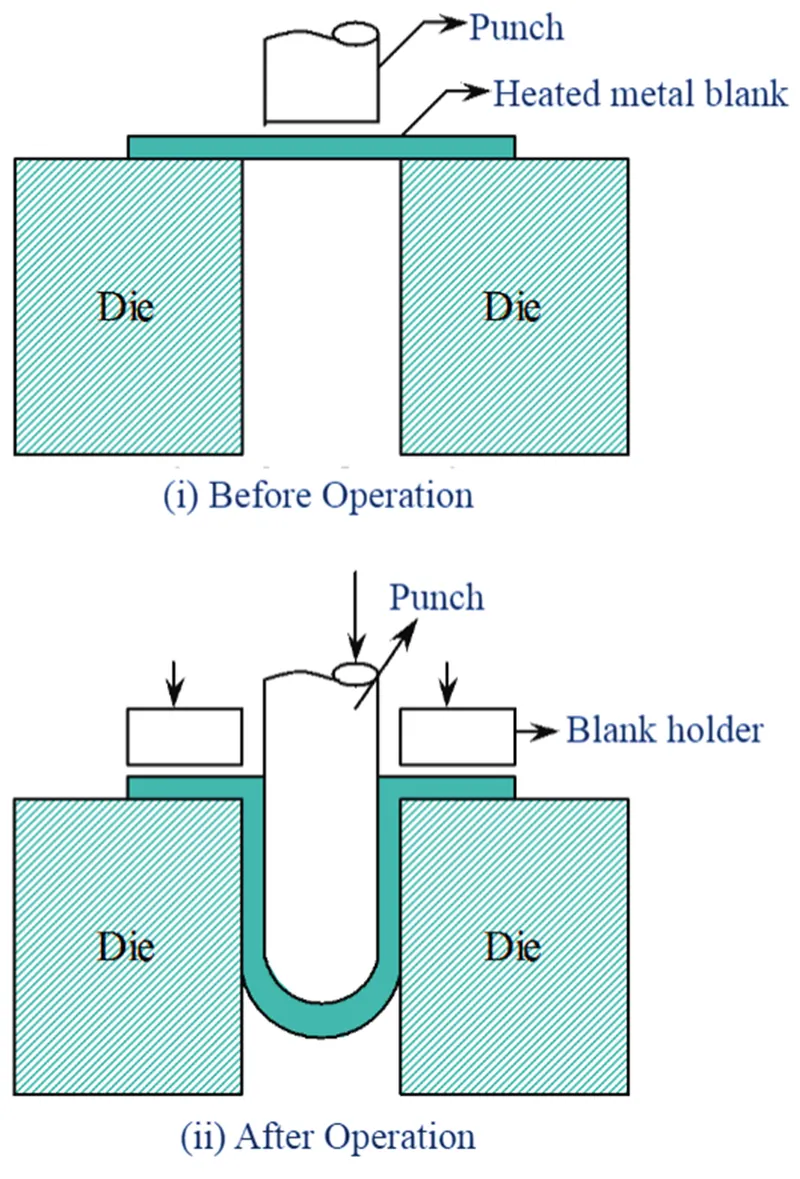
3. Deep Drawing: Deep drawing is a plate forming process in which a sheet white is stretched radially in a forming matrix by the mechanical action of a punch. So it's a form-transforming process with physical retention. The process is considered to be a "deep" drawing when the depth of the stretched piece is greater than its diameter.
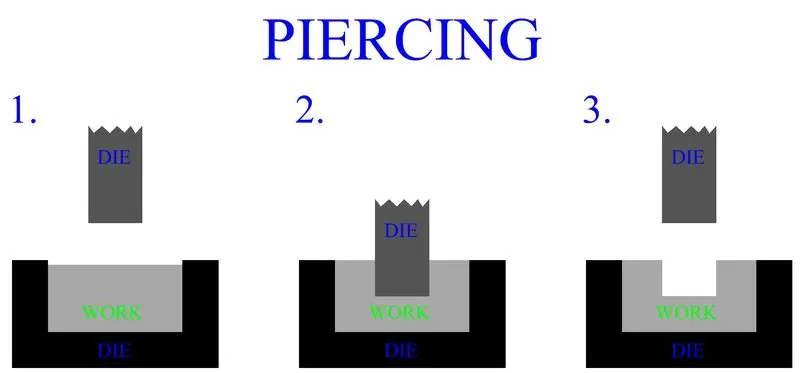
4. Piercing: Drilling is a shearing process in which the raw metal is drilled using a machining tool and a circular or other hole is created. Since the crude metal is drilled, the metal from the newly created hole is considered scrap metal.
COMPONENTS :-
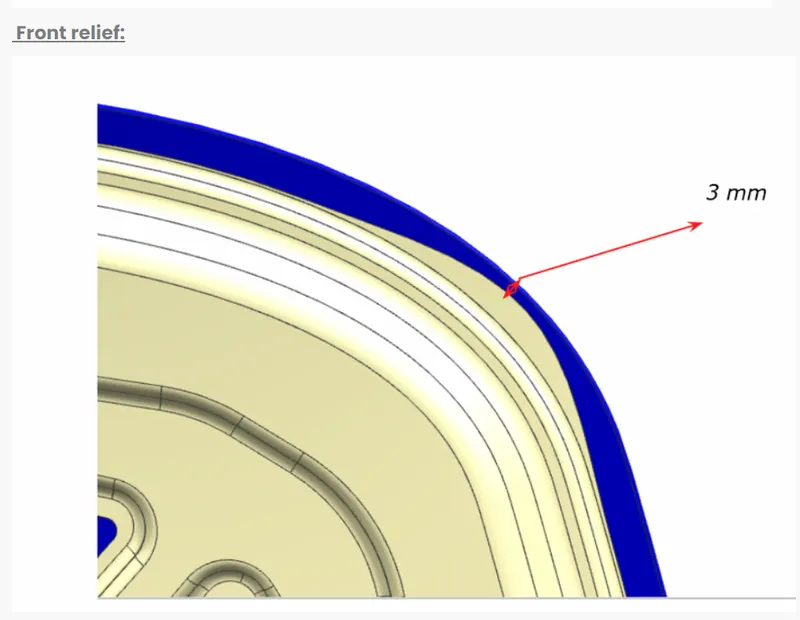
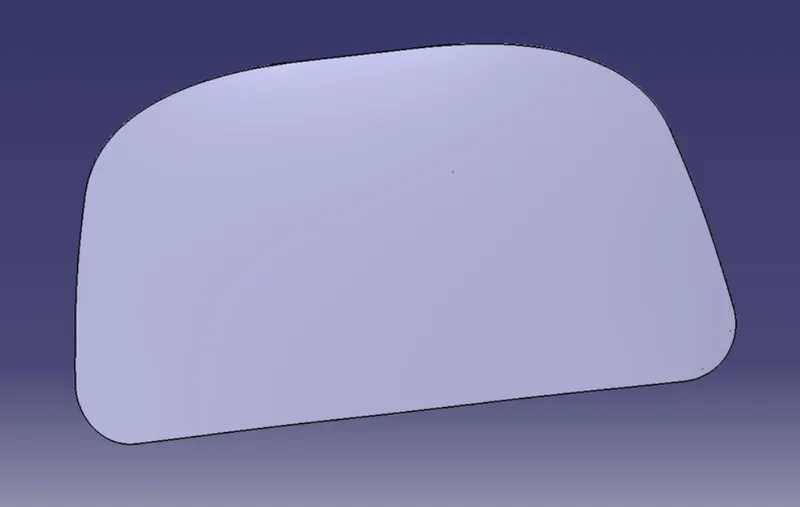
- Outer Panel: Outer panel is the largest part of the hood to make the car in a very good aesthetic proportion. So that the exterior panel is perfectly done insense to realize the aesthetic requirement. So that, the sheet metal operation result which is visible on the outer panel or it reduces the aesthatic value means, those operations are strictly not to be followed to make the outer panel. This is why the crimping process is used to attach the exterior panel with the interior panel, instead of using welding methods.
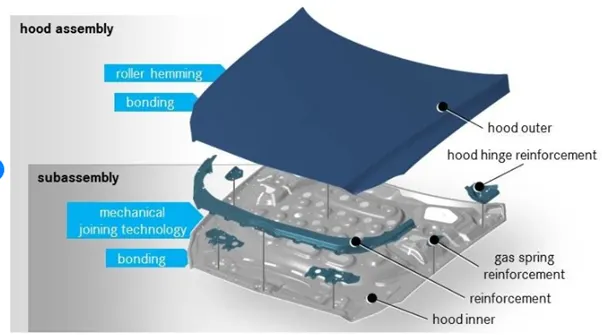
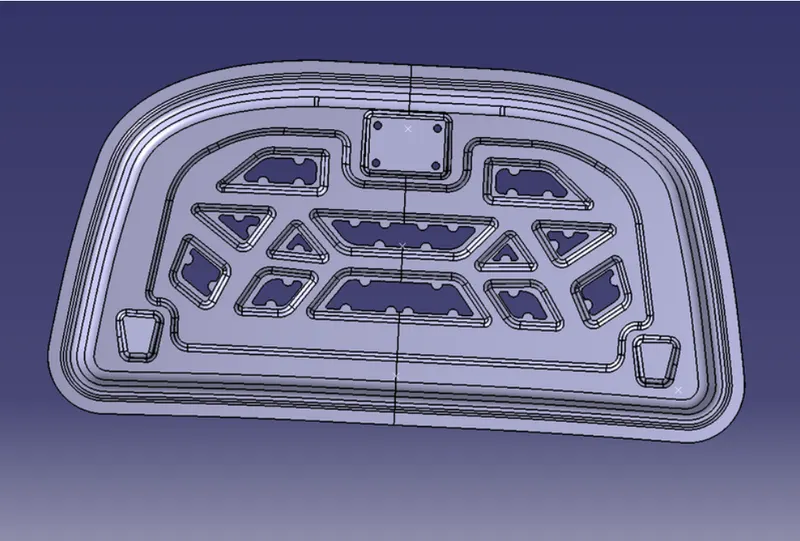
2. Inner Panel: Inner Panel is the major part that ensures the rigidity of the hood and It is used to diverts the impact to outwards of the hood however possible when the collision occurs. It can be achieved through the correct interior panel design and embossing direction within the interior panel. A lot of design changes and research are being done and going on in the interior panel only to achieve pedestrian safety and passenger safety to make the standards. In this inner panel, the required holes are made to transport the hood from one station to other and fix the hood in fixture by using this hole as budding holes. In addition, the interior panel has embosses and putty points.
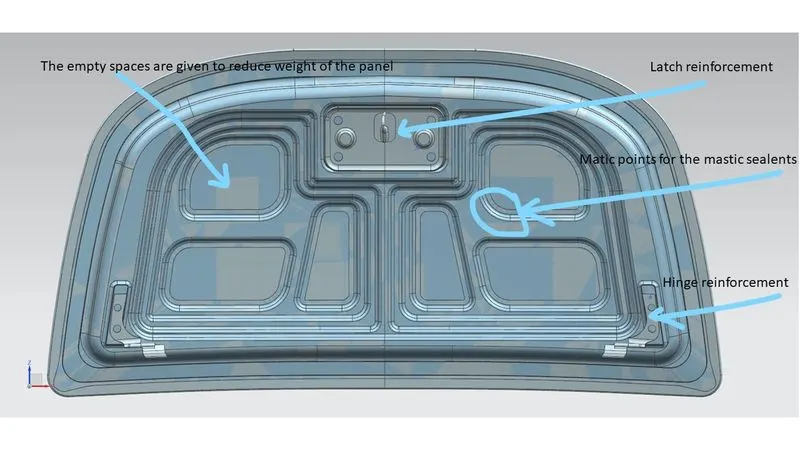
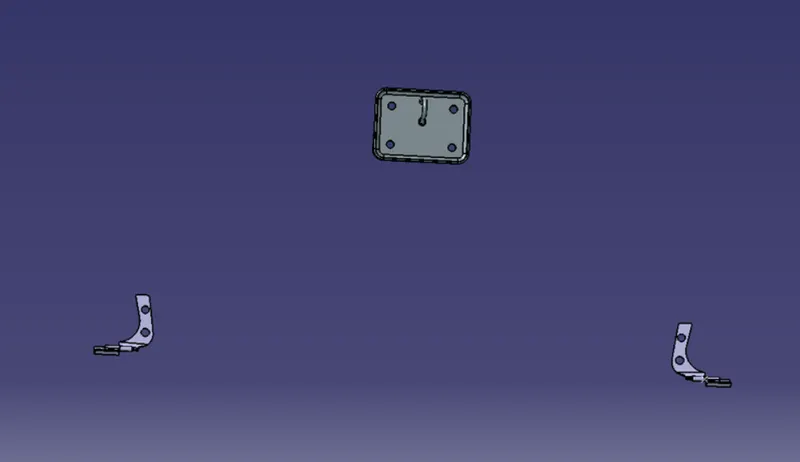
3. Reinforcement: The striker and hinges are attached to the lower side of the inner panel. It it can be done by directly then more stress can act at the particular area in the inner panel, it may cause deformation of the inner panel at that particular region. To have the reinforcement arrive and placed between the striker and the cover, the hinge and the cover. It can reduce to distortion and reinforcement of the interior panel to that particular region.
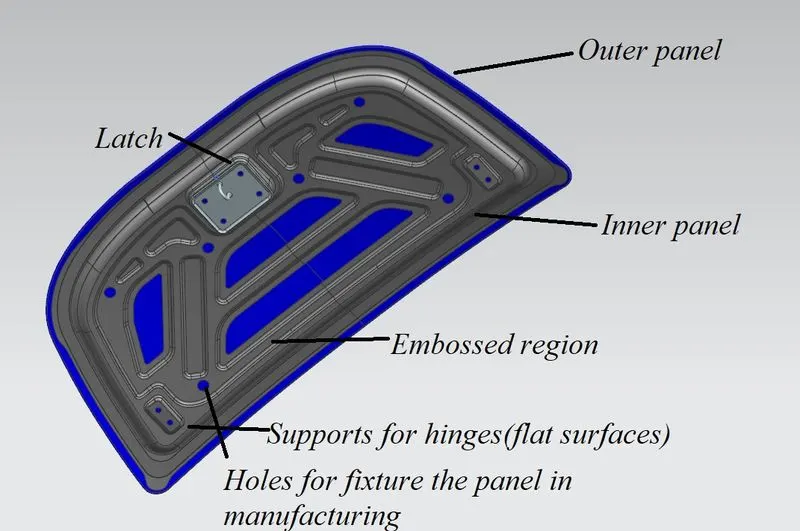
4. Striker-Latch: Striker is the part which is used to hold the hood with the engine compartment by using the latch which it is attached in the engine compartment, when the hood not require to open up. The strie is attached at the bottom of the inside panel and it hits the latch and locked with it, when the hood fell down. The driver is provided with a lever inside the cab to release the locking pressure. Once it can be done, the bonnet will open in one inch, so we can open the bonnet more.
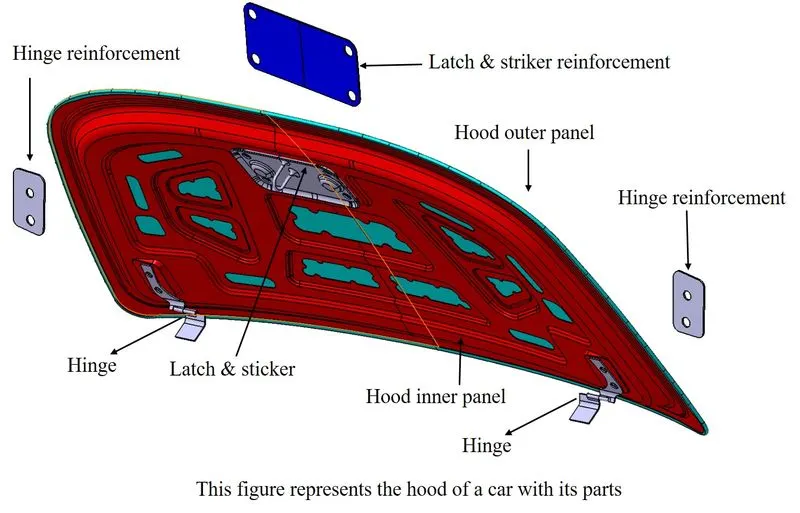
5. Hinge Assembly: It serves to secure the hood to the engine compartment. For any component must be opened and closed with an axis, then hinge plays a major part. It has two single parts (one hinge on the hood, another hinge on the engine compartment) and is assembled with the single axle. A hinge is affixed to each end of the bonnet and engine compartment.
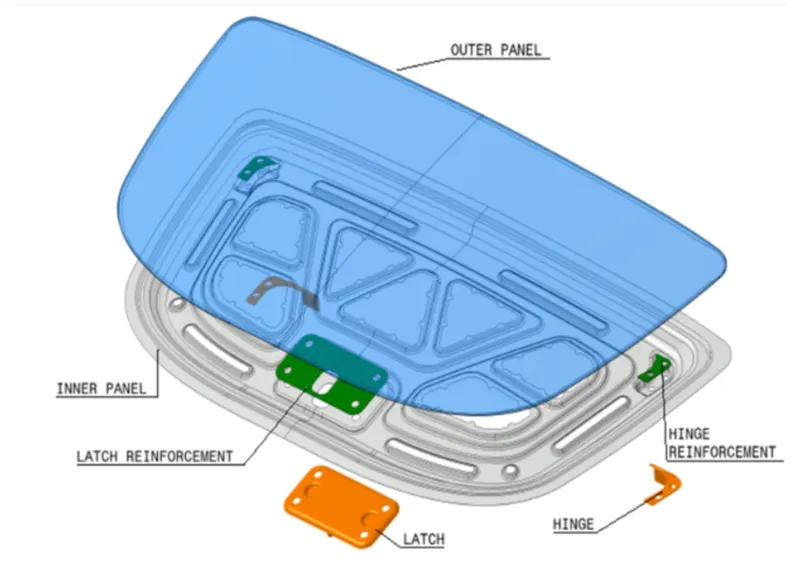
6. Position of Striker and Hinge Assembly: Mounting the firing pin onto the hood interior panel follows the defined steps.
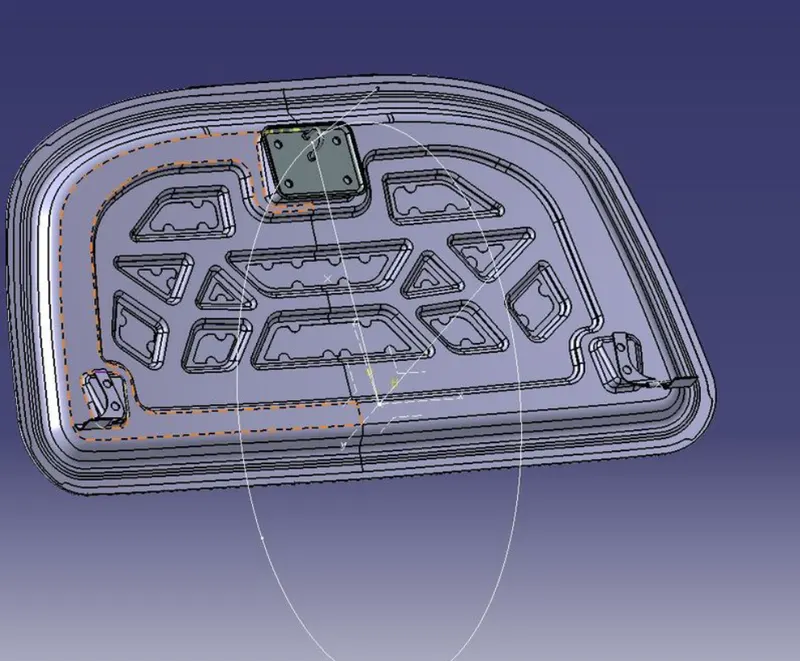
To do this, the hinge is initially fixed/assembled at each outside end of the inner panel through the reinforcement of the hinge. A line then follows along the axis of both hinges. A circle is created at the midpoint of that line and another line is created tangent to this circle and then the ref line has created within the circle with particular angle. Then, depending on the required location of the striker, the diameter of the circle and the angle of the cloth were changed. In addition, another line was created along with the attacker's hook from the attacker's striking point. Next, assemble the two lines and the firing pin onto the interior panel by reinforcing the firing pin using the mounting constraints.
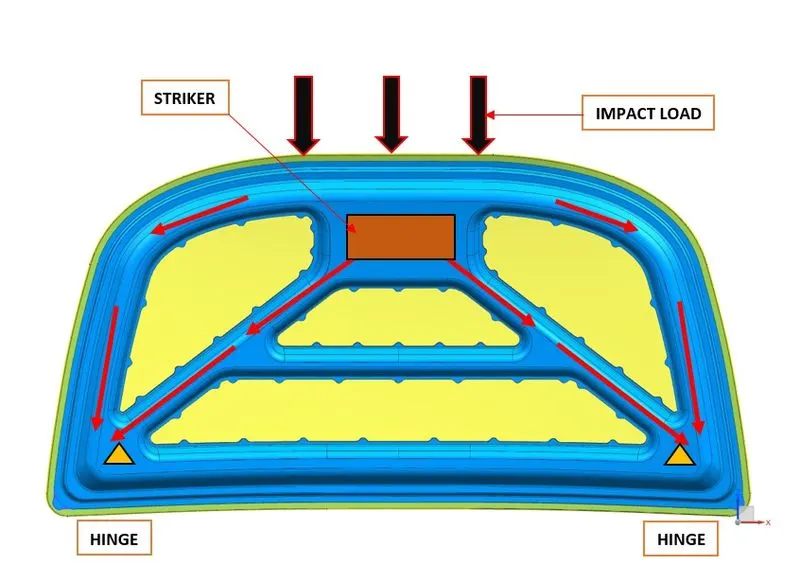
7. Hood Support: There are two kinds of hoods are used in the automotive industry, they are.
- Support Rod- Most car manufacturers are used this only because of simpler and cheaper in comparison to gas suspension. In this method we have to lift the hood by our own strength and fix the free end of the support rod to the provision which is given in the engine compartment or hood. It is suitable for lightness and relatively small hoods.
- Gas Stay- In this method, once we lightly lift the hood, then the gas stay can completely lift the hood completely. It may be made by the gas spring that is within the gas column. If the hood is heavier and longer, then that gas suspension is about a lot easier to lift.
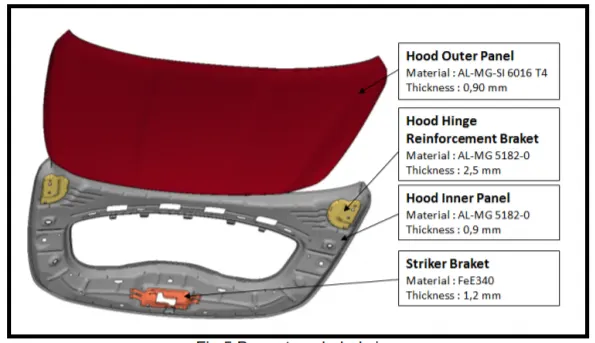
PROCEDURE :-
Hood outer panel:
Hood inner panel:
Reinforcement:
Latch Trajectory:
Emboss:
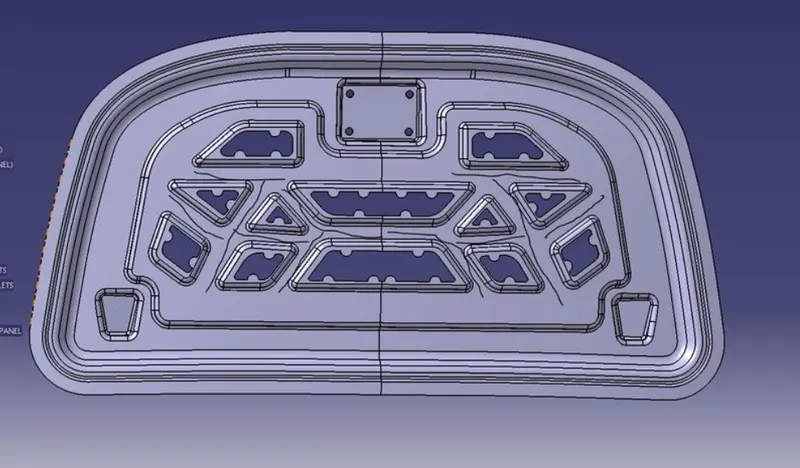
Mastic Data:
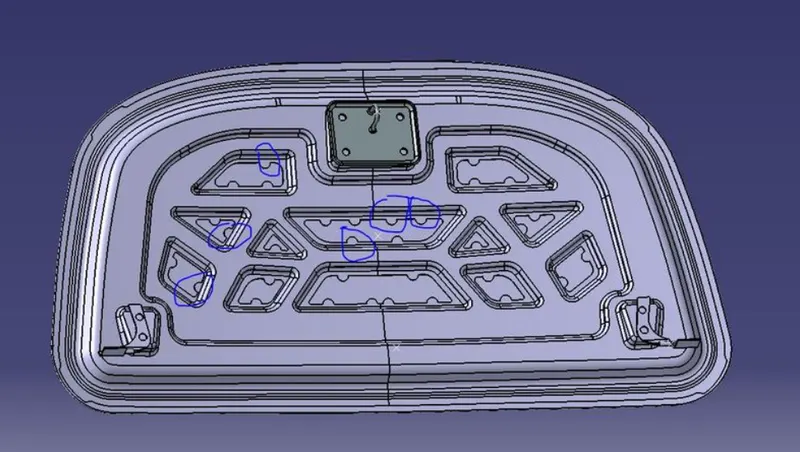
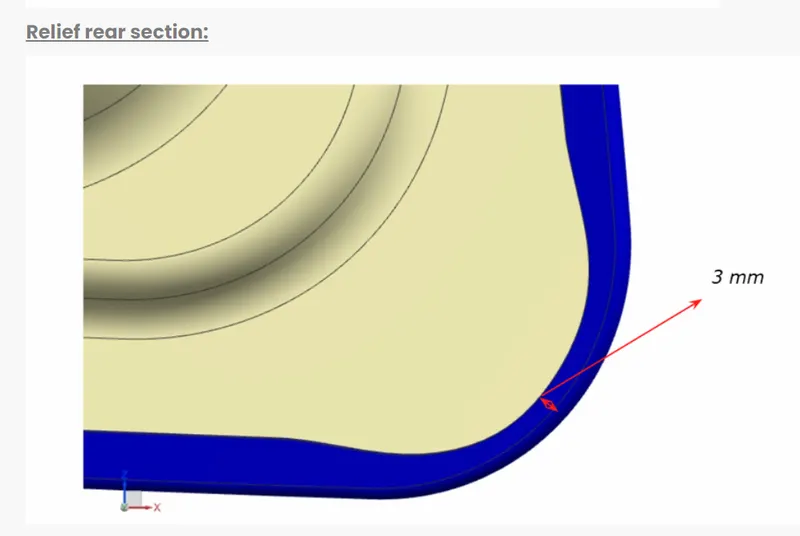
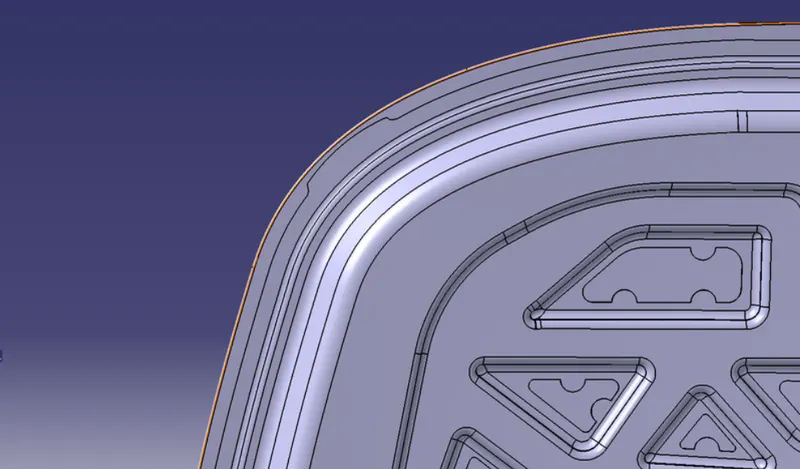
Hemming & Corner Cutout:
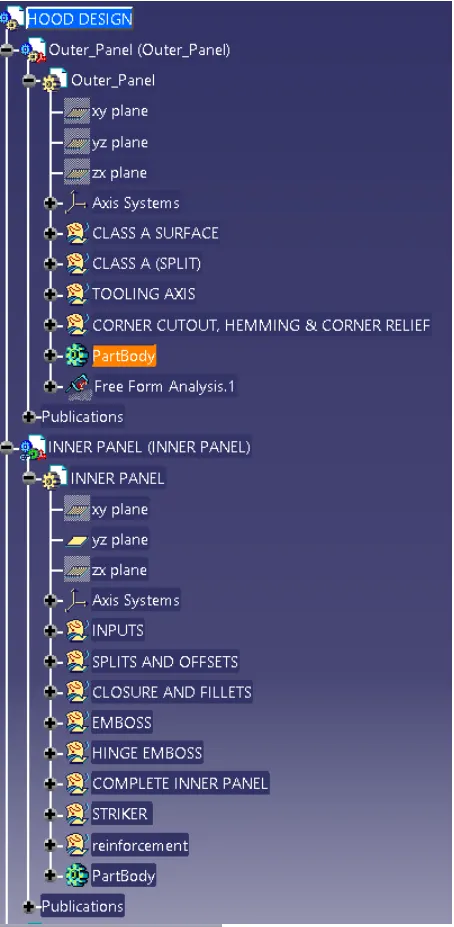
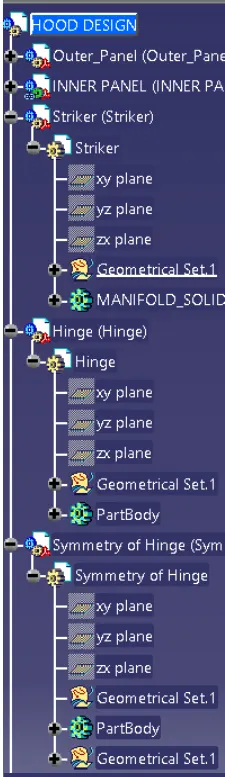
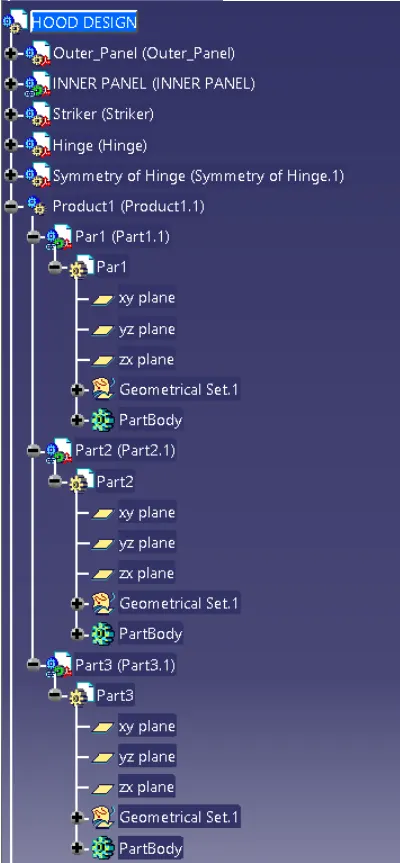
Tree Structures:
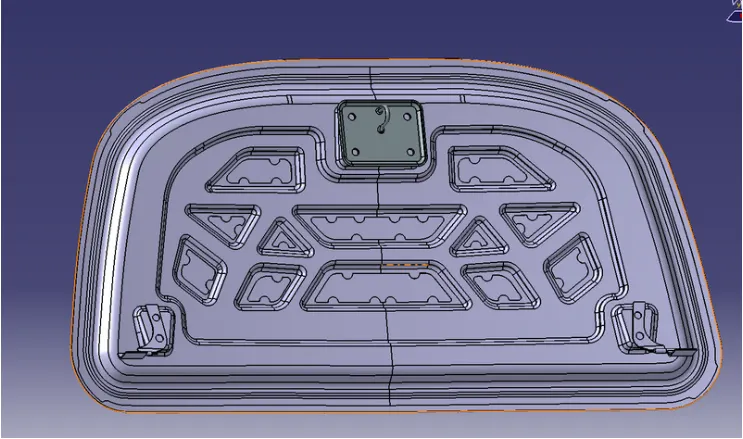
Final Design:
CONCLUSION :-
Finally, the cover design was complemented by a review of criteria, dimensions, procedures and standards. Through the process of this design, have learned about hood supports, plate operations like crimping, embossing, deep stamping, drilling, Pedestrain safety and its dimensions.