Hood design-Week 2
Hood Design
Aim: To make a detailed report about the Hood Design which includes a detailed explanation of the hood and its components, Latch Trajectory, Mastic Data, Emboss Definitions, Manufacturing process like Deep-Drawing and Hemming, and all the parameters followed in the design.
Please find the following details,
Introduction:
The hood of the engine cover is hinged to the body of the vehicle (front-engine automobile). It gives you access to the engine of the car and is crucial for frontal crash defense.
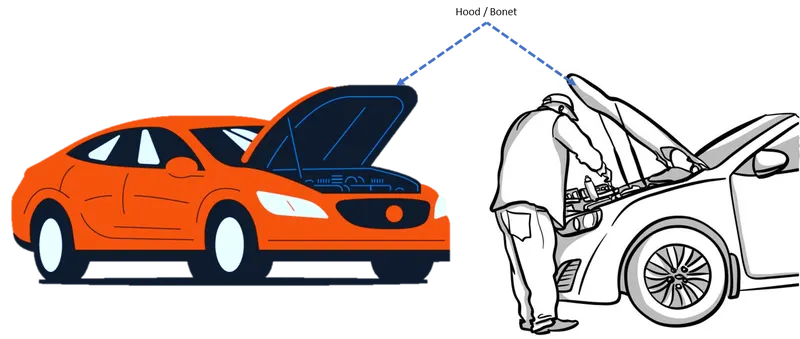
The principal element at the front of an automobile is the hood. It is used to adorn the vehicle and give it a posh appearance. To reduce the air effect, the Hood's design is made aerodynamic. Typically, a hood is utilized to provide easy access to elements like the radiator, engine, and several other parts. A front-engine vehicle's engine is covered by a hinged cover known as a car hood, sometimes known as a bonnet in certain other countries. Its function is to make the engine accessible for upkeep and repair. Usually, the hood is secured by a hidden clasp. Hood pins can be used to secure the car hood on vehicles with an aftermarket hood and race cars. An ornament for the hood, wiper jets, a power bulge, and/or a hood scoop can occasionally be found on hoods. Usually made of steel, car hoods can also occasionally be made of aluminum. Other materials, like as dry carbon, carbon fiber, or fiberglass, can be used to make aftermarket automobile hoods. One brand and model may not have the same hood design as another.
Design Considerations include the following
- Head clearance zone
- Pedestrian Safety
- Consideration of Noise Vibration Harshness (NVH)
- Vehicle Quality
- Occupant safety
- Styling
- Manufacturing
The hood's design considerations while creating or starting the design:
- The hood design needs to adhere to a master section that satisfies all structural and safety criteria.
- The hood should be constructed so that, in the event of a collision, the force of the impact will be directed away from the passenger compartment and toward the hinges.
- The latch and striker mechanism should be positioned at the ideal distance from the hinges to ensure that the hood opens and closes smoothly and without any delays.
- The frontal portion of the car should absorb the greatest amount of force in the event of a collision.
- The engine compartment should be accessible and easily maintainable thanks to the design.
- To minimize drag and improve aesthetics, it should be aerodynamic.
Head clearance zone
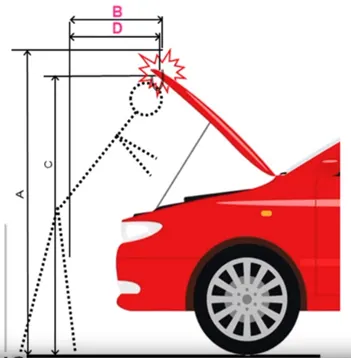
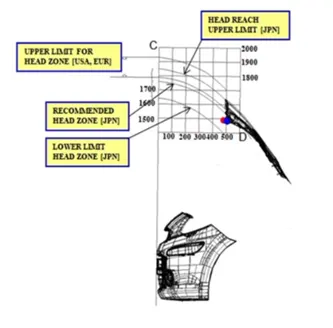

Passenger Safety
The hood is the first component of a car to be damaged in a frontal collision. To reduce the amount of force that is transferred to the cabin and assure passenger safety, the point must be built in such a way that it does not originate from the vehicle's body. Instead, it must be as energy-absorbing as feasible and be diverted toward the side panels of the automobile.
For Example, I took the Hyundai i10 but the same they check for all the cars in the market.

Pedestrian Safety
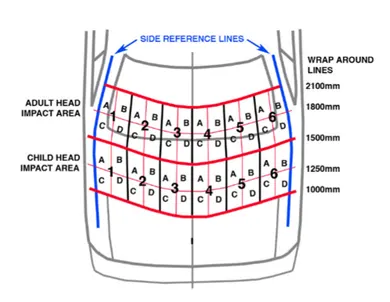
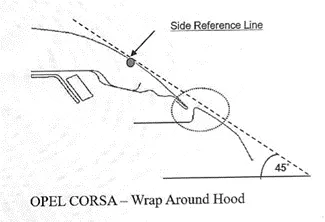
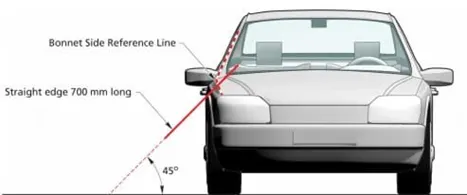
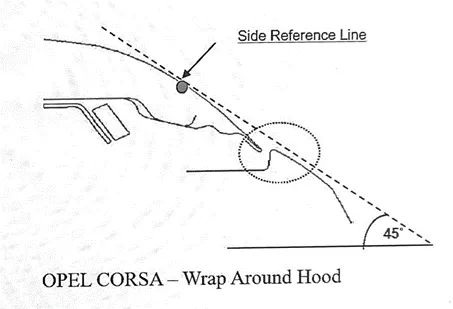
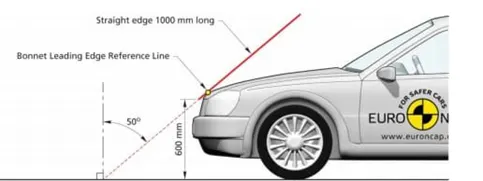
As per the NCAP Euro evaluation, pedestrian safety must be taken into account during the design process. Based on the side reference line, there are two sorts of hoods. The side reference line is a hypothetical line that is drawn at a 45-degree angle from the ground. The hood is inlaid if this line falls on the fender, and it is wrapped around the hood if it falls on the hood.
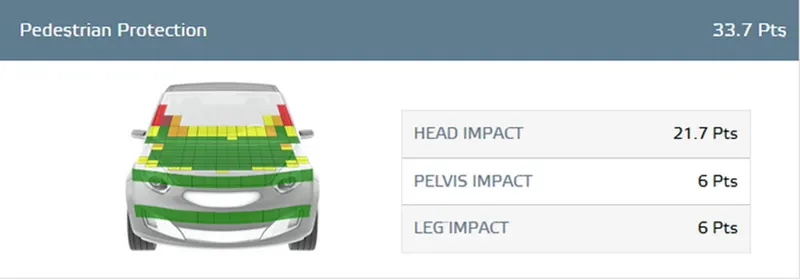
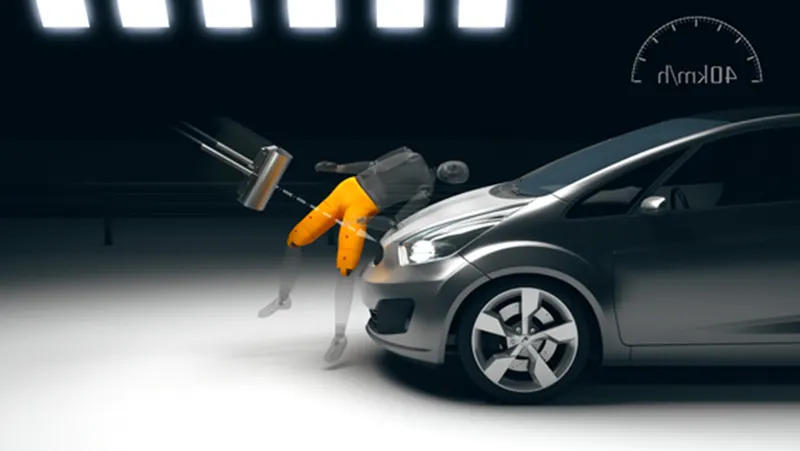
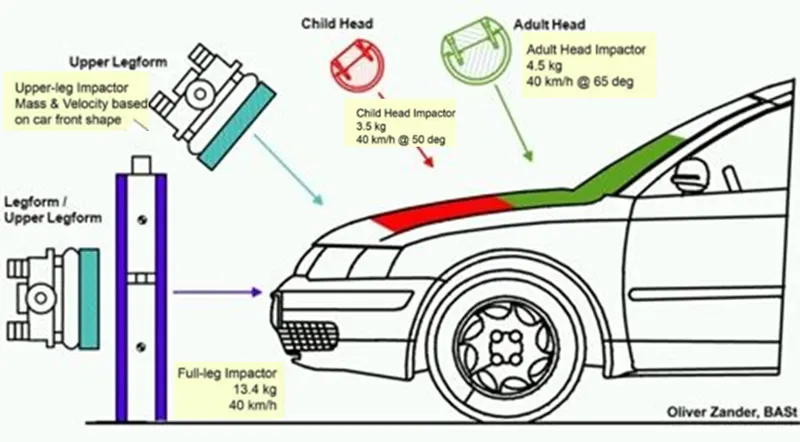
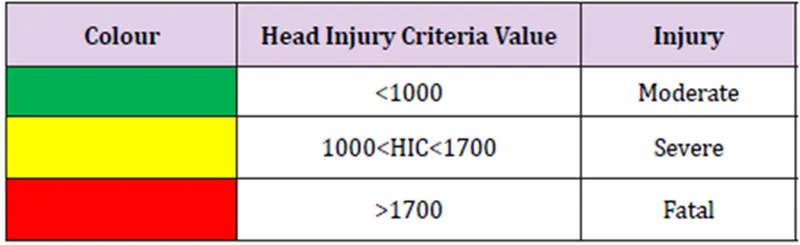
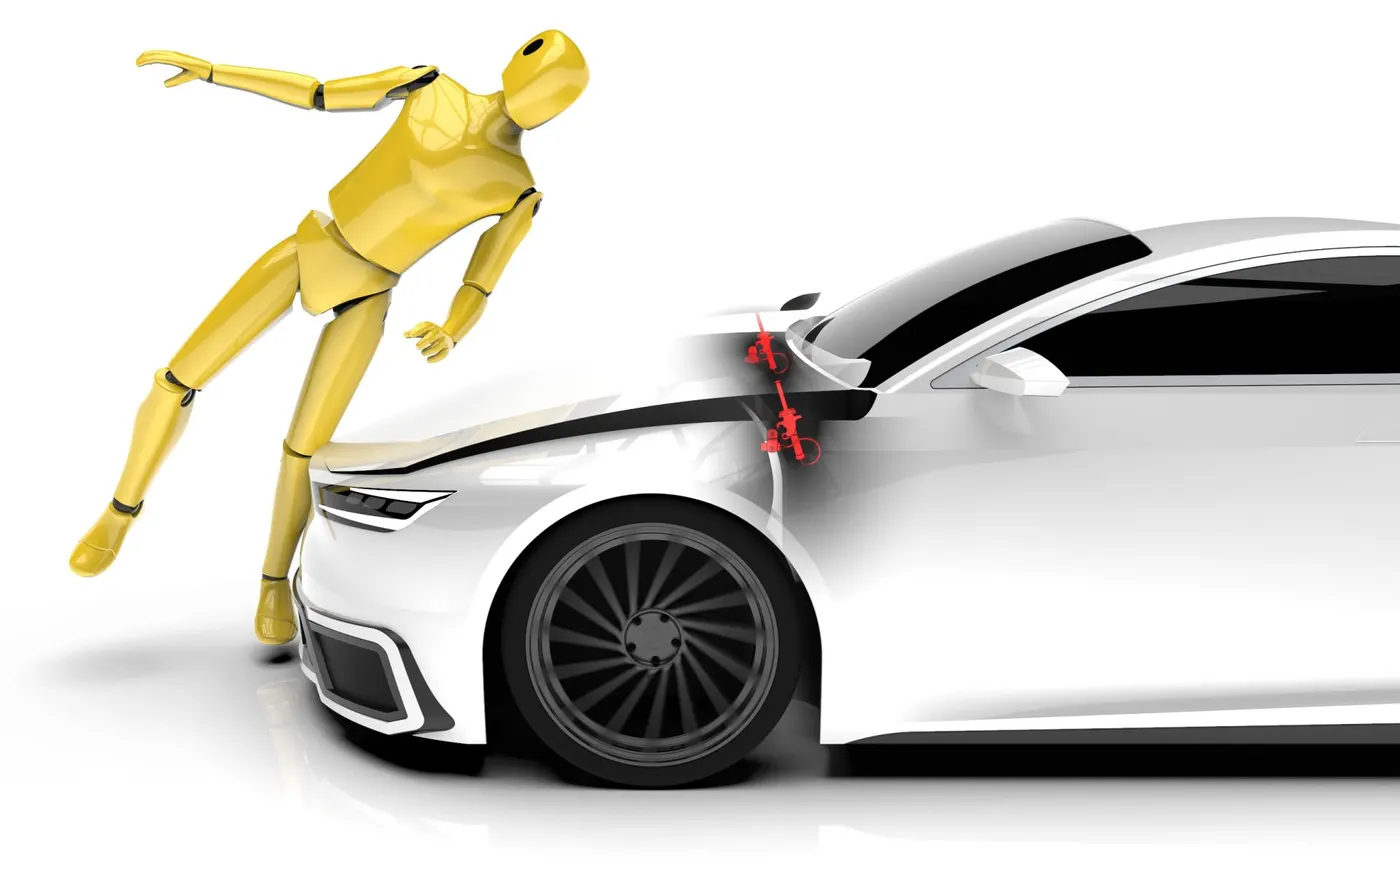
During this study, I found something interesting called the Pedestrian sensor and I attached the clip on how it works in real-time, currently, some high-end variant cars have this.
they called an "ACTIVE BONET" by accessing the sensor which I mentioned.

Wrap-Around Distance (WAD):
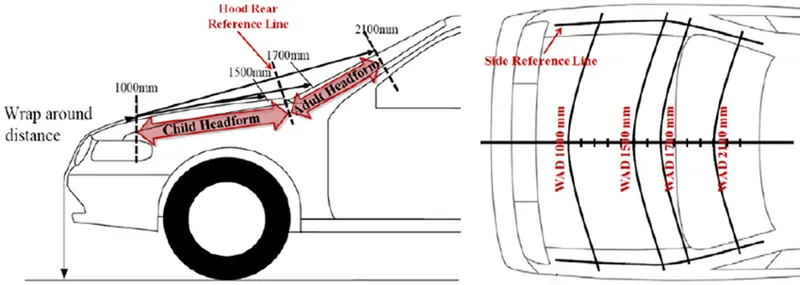
When an automobile strikes a pedestrian, the victim's entire body wraps around the car's front end, and the head strikes the bonnet or windscreen. Wrap Around Distance refers to the height from the ground at which the head strikes the car (WAD). The Wrap Around Distance, to be precise, is a measurement of the space between the ground and the head impact zone over the exterior of the car. From the ground, the wrap-around distance is measured longitudinally at the vehicle's center.
Consideration of Noise Vibration Harshness (NVH)
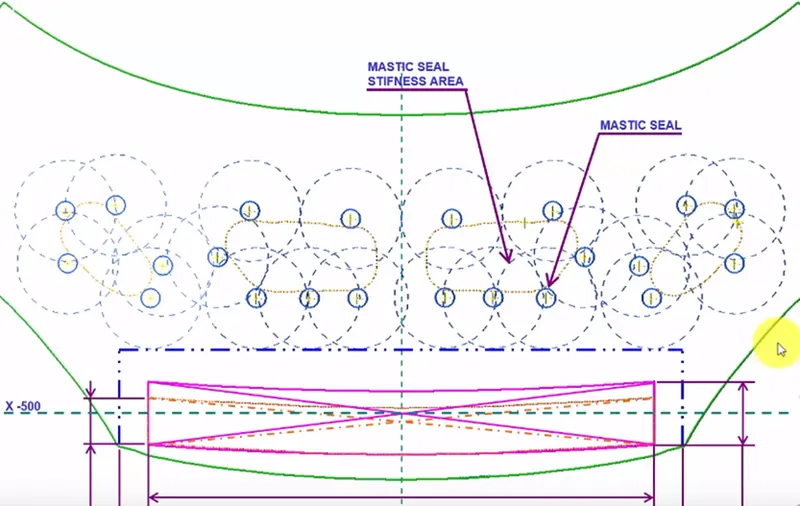
The design of cars must take into account NVH. The amount of vibration and noise the car makes should be kept to a minimum. In the hood, stiffener pads are offered to prevent vibrations. Mastic sealants lessen NVH as well. Between the inner and outer panels of the hood, stiffener pads and mastic are inserted.
The little flanges that are given for the mastic points are visible in the figure below.
Vehicle Quality:
The most critical aspect of vehicle quality is the material choice, followed by the production feasibility that produces the best results for benchmarking mechanical attributes. Typically, steel, aluminum alloy, or composite materials like fiberglass/carbon fiber are used to construct hood materials. The analysis of torsional stiffness, dent resistance, corrosion resistance, bending stiffness, noise attenuation, etc. is only a few of the variables taken into account.
Occupant safety:
The hood panel is designed in such a way that, during the crash, the hood section deforms completely so that the maximum impact of the crash is absorbed by the hood to get deform and divert collision forces away from the cabin. This helps to properly damp the force to avoid or reduce the risk of injuries and death.
The hood panel is built in such a way that, after a collision, the entire hood portion deforms, allowing the hood to take the majority of the crash's force and channel it away from the cabin. This aids in effectively dampening the force to prevent or lower the possibility of accidents and fatalities.
The hood is designed as a two-piece, with the inner panel and outside panel separated by mastic sealants, to achieve deformation. Therefore, the inner panel's hollow between the panel and the blanking serves as the section that is most likely to distort during a collision. Hinge plates that are reinforcements divert the crash's force to them.
Styling:
The styling crew creates the class's exterior. Considering the primary variable that frequently affects automobile sales in the market. Since it is the only part that is visible from the outside, the outside panel is the primary factor in this situation. It is important to consider aspects like surface quality, tight radii on hemmed panel edges, aesthetic design, etc. The outer panel is designed with aerodynamics in mind in addition to aesthetics.
Talking about the Hood types, There are two major types of hoods:
- Inlaid hood
- Wrap around hood
Inlaid hood
The tangential line that is drawn for 45 degrees to meet at the ground and the automobile body and contacts the terminal of the fender is known as the inlaid hood. The side reference line is the reference line that is drawn from the ground.
Wrap around hood
The war around the hood is a tangential line drawn for 45 degrees to meet at the ground and the car body, which hits the endpoint of the side reference line, which is the reference line from the ground.
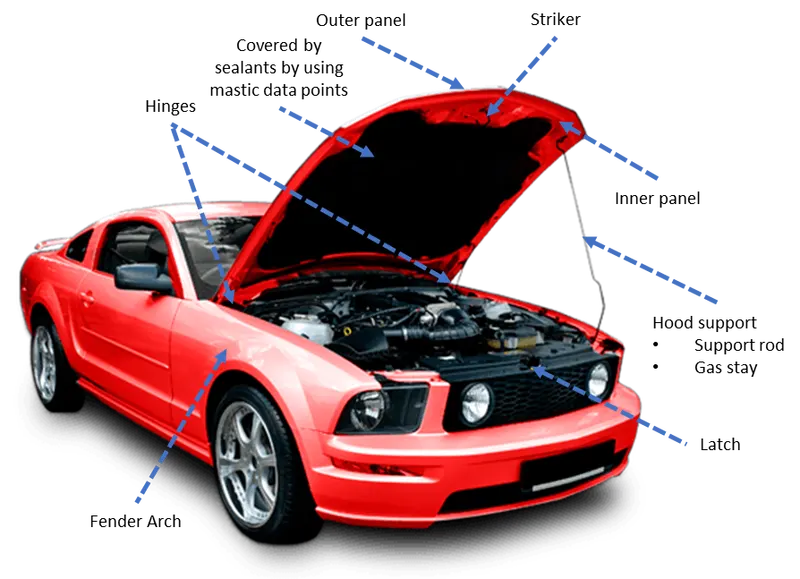
The following components make up the Car Hood:
- Outer Panel
- Inner Panel
- Striker and Hinge asm
- Reinforcement
- Hood Support
- Mastic's
Car Hood Components:
Outer Panel:
The outer panel is the most crucial component of the hood that gives the car a very pleasing aesthetic balance. To fulfill the aesthetic criteria, the outside panel must be correctly constructed. Therefore, those sheet metal procedures must strictly not be used to create the outer panel if the result is visible on the outer panel or if it lowers the aesthetic value. Because of this, hemming is employed to link the outer panel to the inner panel rather than welding.
The outer panel has been created as shown below utilizing the outer panel style surface and the supplied outer panel thickness (0.75 mm).,
Inner Panel:
When a collision happens, the inner panel, which is a key component in maintaining the hood's rigidity, is employed to deflect as much of the impact as it can to the hood's edges. It can be done by using a good inner panel design and the inner panel's embossing direction.
To ensure passenger and driver safety and set standards, numerous design modifications and research projects have been undertaken.
The necessary holes for moving the hood from one station to another and fixing the hood in a fixture are made in this inner panel. The embosses and mastic points are also present on the interior panel.
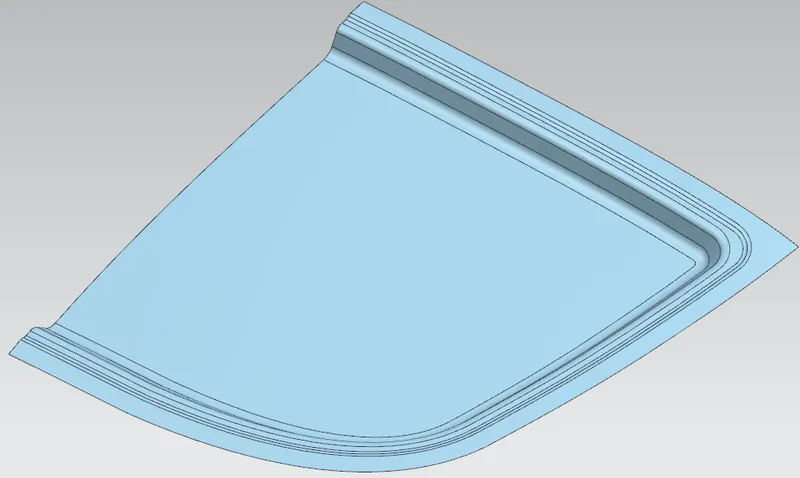
The Inner Panel has been constructed with the embosses and mastic points shown below by taking into account the Inner Panel thickness (0.75mm) and offsetting the outer panel style surface using the specified offset data.
Reinforcement:
The lower side of the inner panel is where the Striker and Hinges are joined. If it can be done directly, greater stress will be placed on that specific location of the inner panel, which could lead to the deformation of the panel there. so that the reinforcement enters and is positioned between the hinge, the hood, and the striker. It can lessen deformation while reinforcing the inner panel in that specific area.
Striker-Latch and Hinge Asm:
Striker-Latch :
When the hood does not need to be opened, the striker is the component that is used to secure the hood to the engine compartment using the latch that is attached to the engine compartment. When the hood is lowered, the striker, which is fastened to the bottom of the inner panel, engages the latch and locks it.
The driver is given a lever within the cabin to release the pressure on the lock. When it is finished, the hood will open one inch, and we will then be able to open it further.
Hinge Assembly:
It is utilized to secure the hood to the engine bay.
Hinge is essential for any component that has to open and close along an axis. It is put together using a single axis and has just two straightforward parts—a hood side hinge and an engine compartment side hinge.
At the outer ends of the hood and engine compartment, hinge assemblies are fastened.
Position of Striker and Hinge Assembly
There are specific actions that must be taken to attach the striker to the inner panel of the hood.
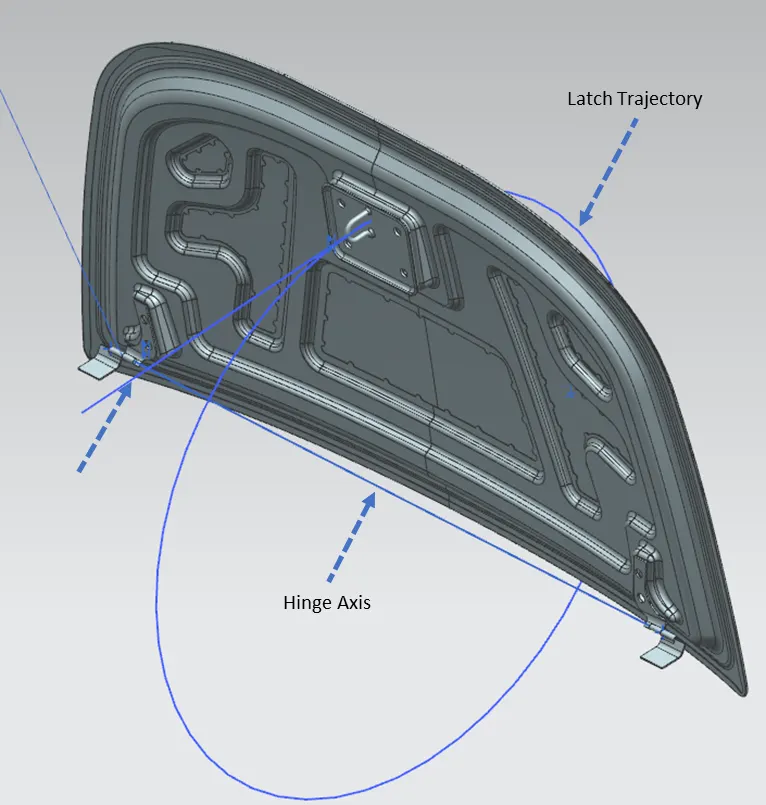
To accomplish this, the hinge is initially loosely linked to each outward end of the inner panel using the hinge reinforcement. The axis of the two hinges is then drawn as a line.
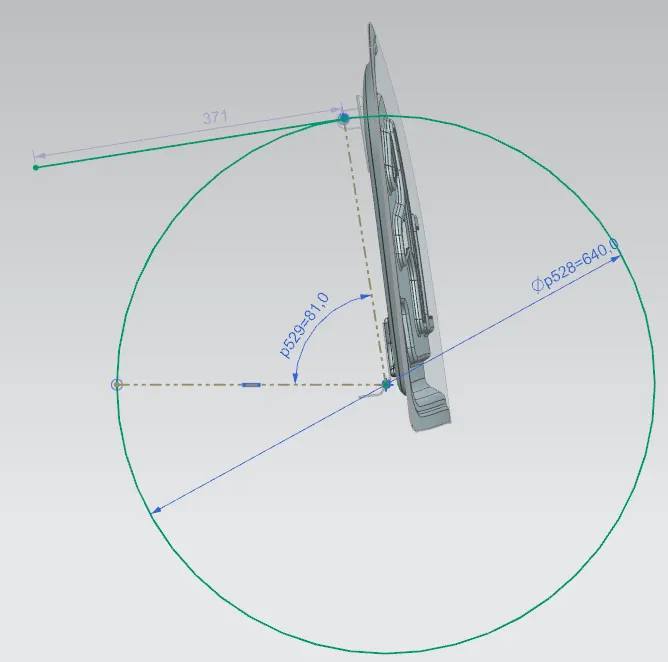
At the intersection of that line's midpoint and its tangent, a circle is formed. The ref line is then drawn at a specific angle inside the circle. After that, the circle's diameter and linge angle were adjusted based on the needed striker position. From the striker's striking point, a second line has also been drawn parallel to the hook of the strike.
Then, utilizing the assembly constraints, attach the striker reinforcement and both lines to the inner panel.
Hood support
while allowing access for maintenance and repairs Hood has two ways to fix.
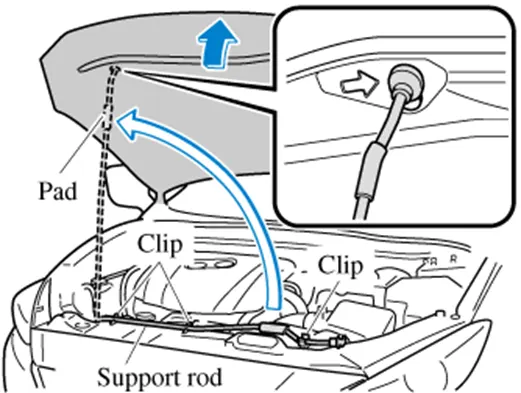
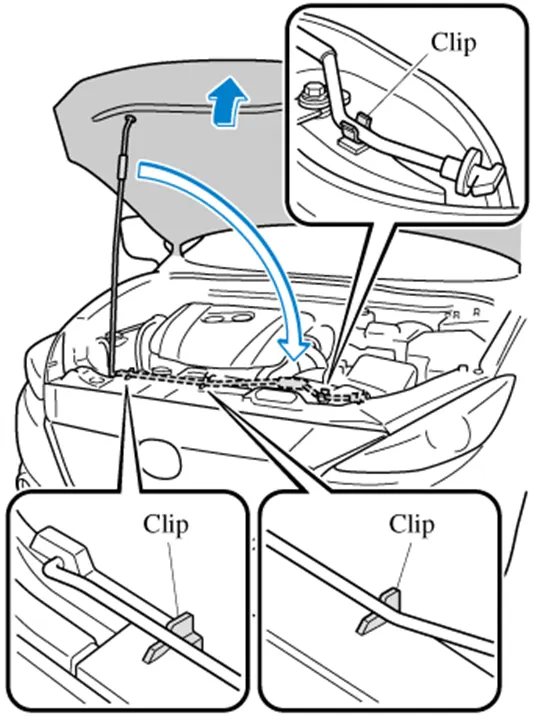
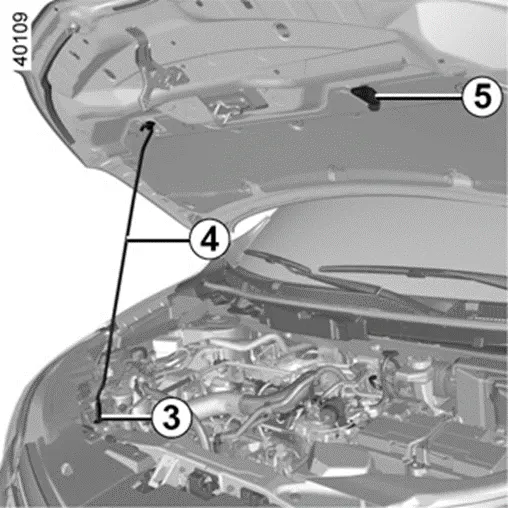
- Support Rod
- Gas Stay
Support Rod:
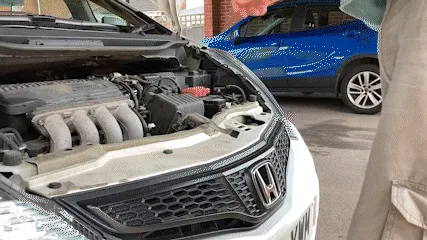
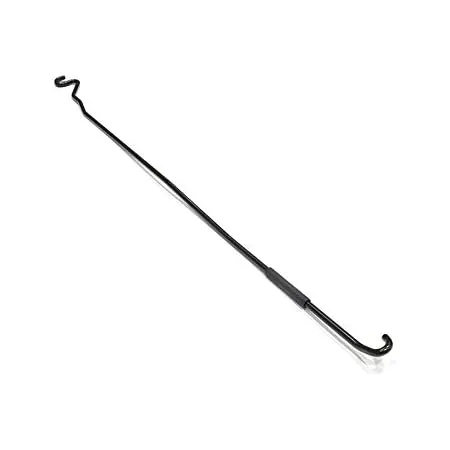
The support rod, which is often hinged at the engine as depicted above, is used to retain the hood at the hood opening angle. Since too much curvature can cause bending, the support rod is typically given a curvature to increase its strength. The curvature should be less than 35 mm. This is the method employed by the majority of automakers simply because it is easier and less expensive than using gas. To use this method, we must lift the hood using our strength and secure the support rod's free end to the opening provided in the engine compartment or hood. It is appropriate for hoods that are quite tiny and light in weight.
Gas Stay:
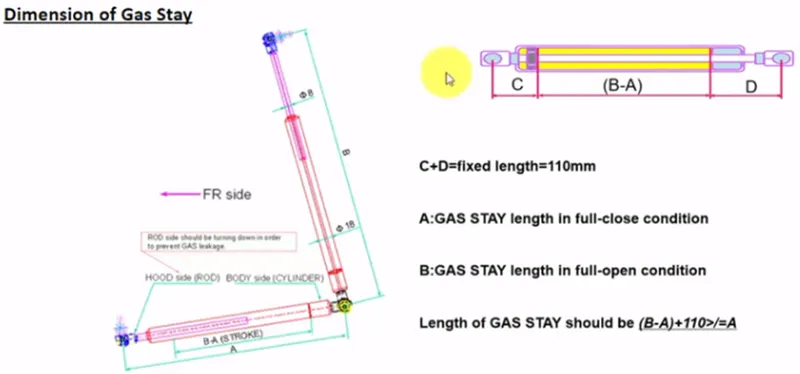
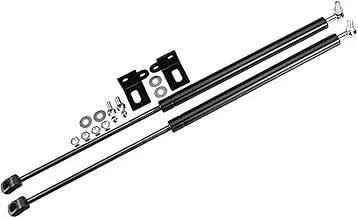
It employs pressurized gas to pneumatically store potential energy and withstand the external force applied perpendicular to the piston shaft's direction in an enclosed cylinder sealed by a sliding piston. With this technique, the gas stay can completely lift the hood once we lift it a small amount. The gas spring, which is located inside the gas stay, can accomplish this. This gas stay essentially makes the lifting procedure easier if the hood is heavy and long.

Mastics:
Mastics are a type of sealant that is applied between the outer and inner panels of the hood to join them together. When applied, it takes on the shape of a paste-like liquid substance with a high viscosity, and when it is placed in worm conditions, it transforms into a solid state that resembles rubber. For it to be a damping resistance and lessen noises overall.
Utilizing the following sheet metal operations, Hood has created:
- Deep drawing
- Embossing
- Hemming
- Piercing
Sheet Metal Operations:
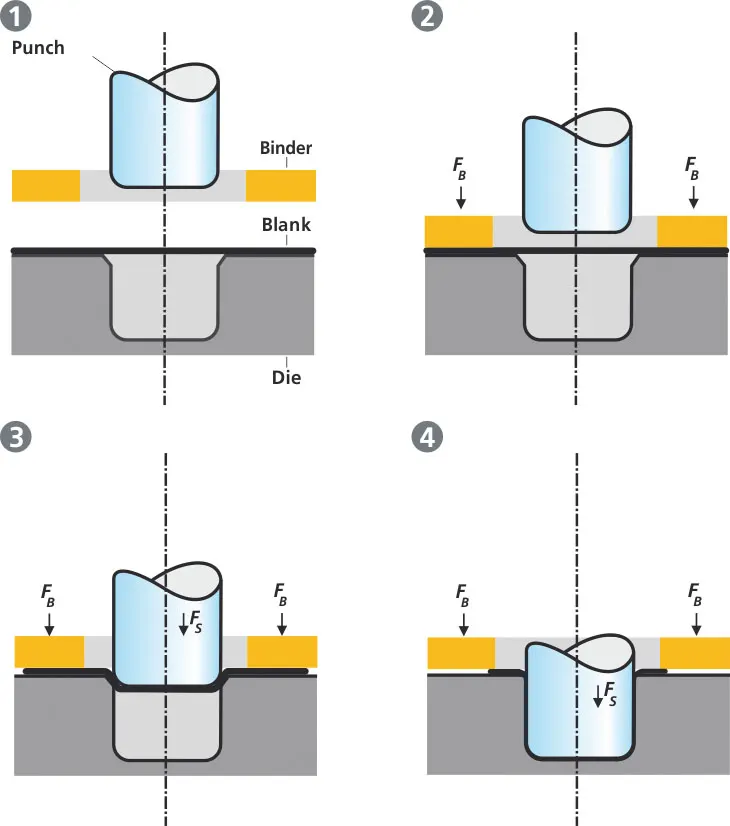
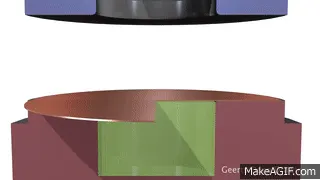
Deep Drawing:
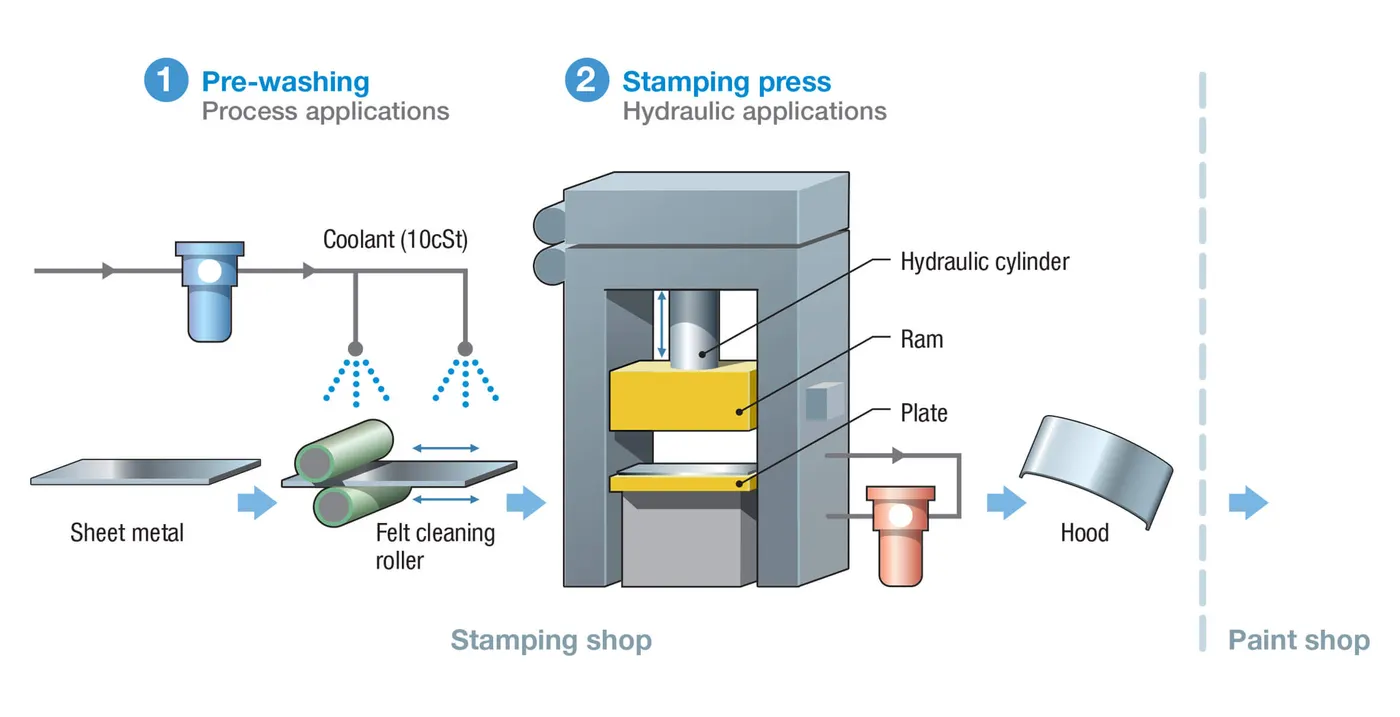
The method used to produce sheet metal is called deep drawing. The method is very similar to punching.
Deep drawing involves clamping the necessary sheet metal and keeping the die with the desired shape below the sheet metal. The punch then applies pressure to draw the sheet metal blank into the forming die.
Embossing:
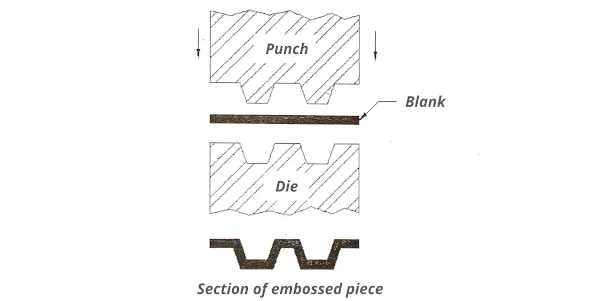
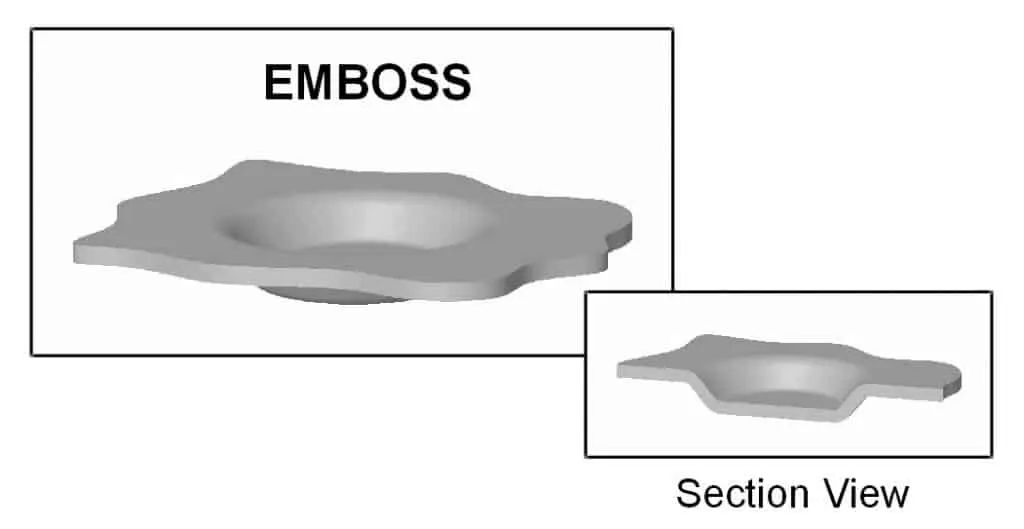
Embossing is a form of stamping. It is the technique of applying pressure on a flat piece of metal with a forming tool to produce a projection where it is needed.
The inner hood panel has more embosses in the hood design to increase the panel's tensile strength. The embosses are made, or you can say projected, on the inner panel sheet metal based on the design structure.
Hemming:
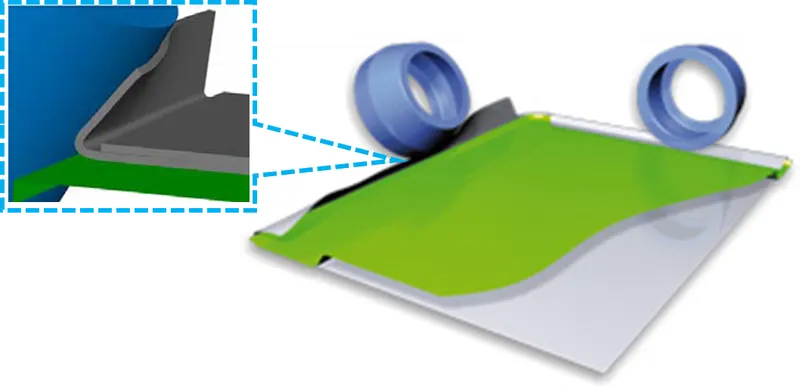
The pieces are fitted together using hemming. It can be done by folding the edges of one portion over the other section and fixing it inside of it. The roller is used to complete this task.
Hemming is used to create the hoods, doors, and boot lids of car parts.
There are two different hemming processes:
Traditional die hemming - In this technique, the sheet metal edge is folded by its whole length using a hemming die.
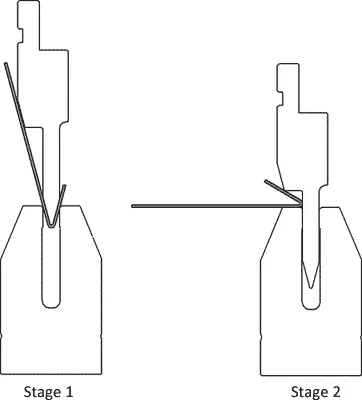
Roll Hemming - In this technique, rollers are used to complete the operation and two or more rollers simultaneously fold the sheet metal from various locations along the sheet metal edge to produce hemming that is relatively exact. The majority of automakers use the roll hemming technique because it is simpler than the more traditional die hemming.
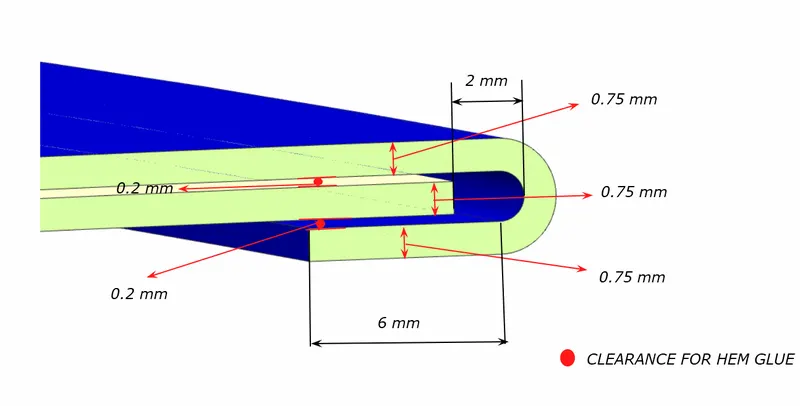
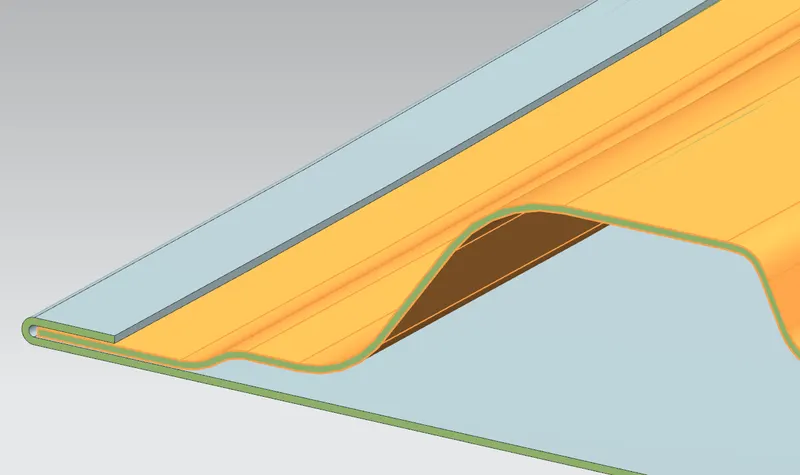
The edges of the outer panel are folded and rolled back to the underside of the inner panel during the hemming process in the Hood. The corner of the outside panel edge must be trimmed because, as the outer panel edge is folded and rolled back during the hemming process, there is a risk that the sheet metal would break.
Piercing:
By using the blanking punch and dies, undesirable material with certain forms is sheared off the sheet metal during the piercing operation.
Impact Force Distribution on Hood:
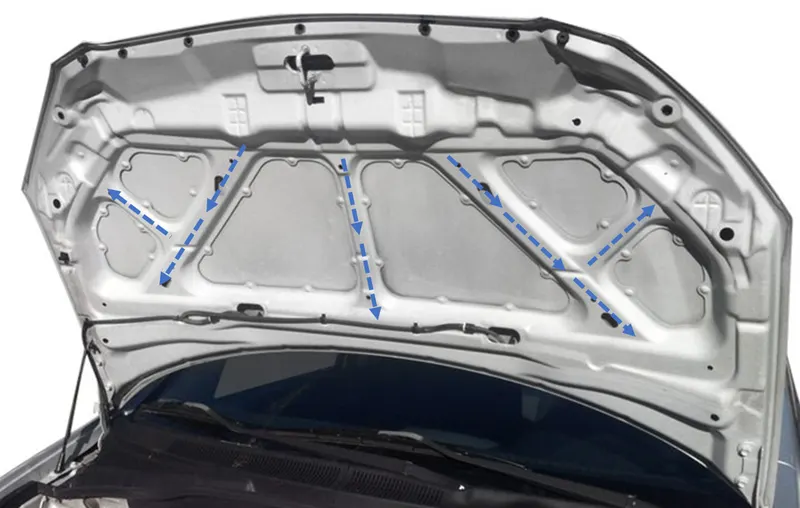
When a collision occurs, embosses in the inner panel have been designed to strengthen the inner panel by attempting to disperse the impact force outwards toward the hood. The impact distribution directions according to this hood design are shown in the illustration below.
Based on the above-mentioned theory or listed things that were kept in mind while I started my design with the available inputs, Please find the below-listed things.
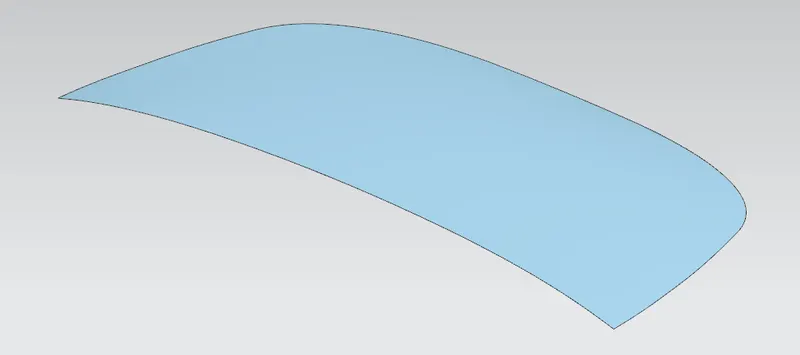
Major Input to create the design is called the master section & the dimension data provided for creating the components under the hood is called the Inner panel & outer panel which is highlighted here,
Master Section :
Dimensions data :
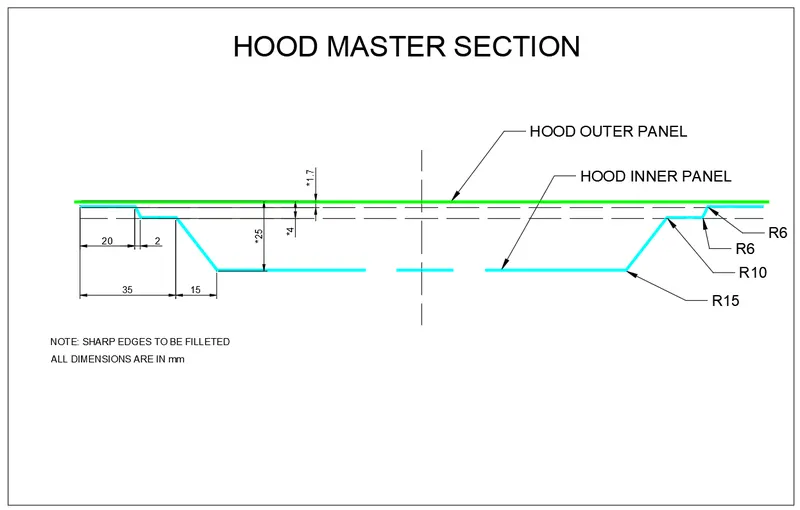
Hood Thickness Information :
- Outer Panel Thickness = 0.75mm
- Inner Panel Thickness = 0.75mm
- Reinforcement Thickness = 1.5mm
Design Procedure :
1. Inner panel design :
coming from the main portion (Master section)
To split the surface with a symmetry axis, and based on the above-mentioned or given dimensions to create the inner panel design, and the output is shown below:
After this start, creating the embossed features basically strengthens the part.
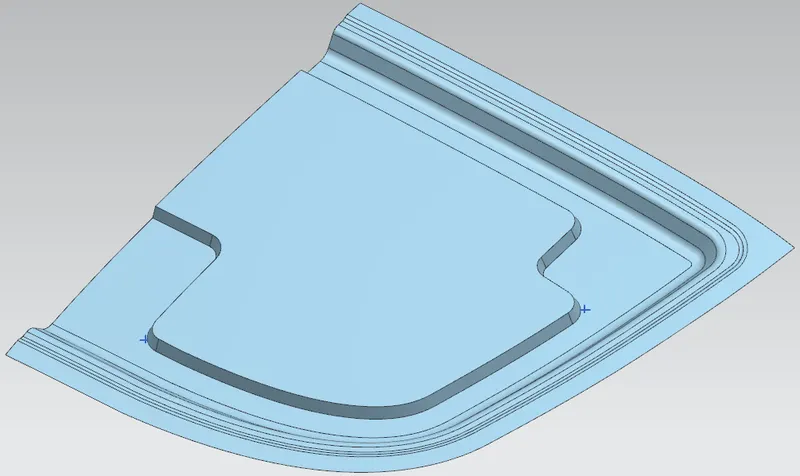
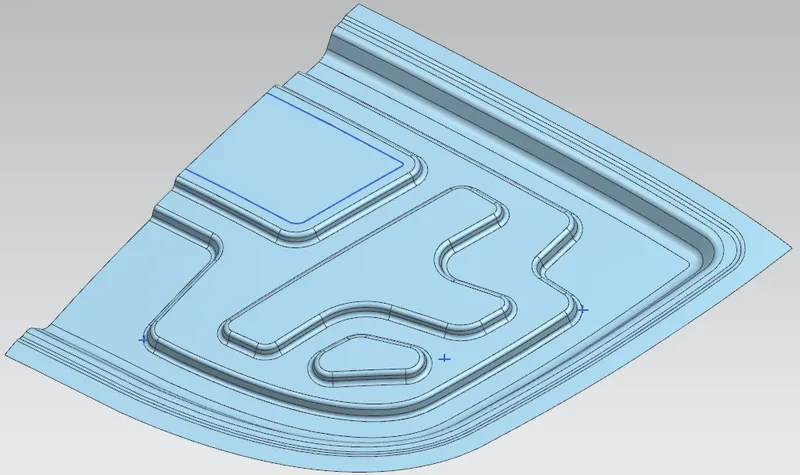
Now provide the cutouts and also create the mastic points/flanges in this inner panel.
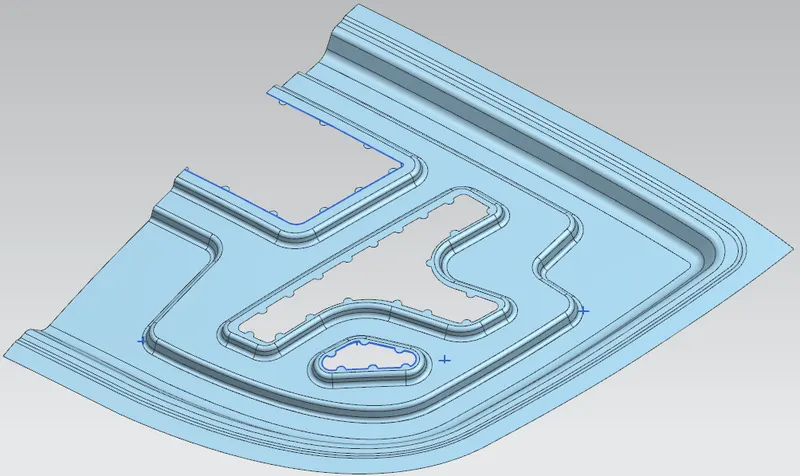
Now's the time to create the Hinge emboss for placing the hinge components, This hinge will play the role to open/close the hood by accessing the panel, and then doing the mirror geometry for getting the opposite side after that sew both sides for getting the better result while doing the thicken operation.
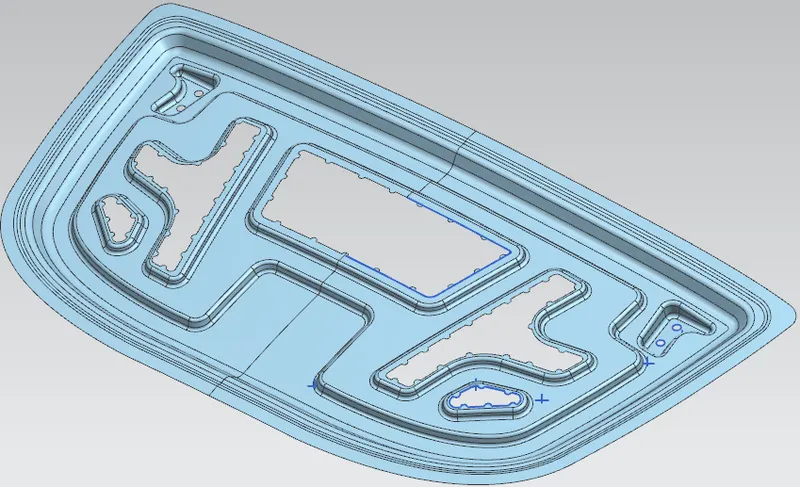
Make sure the following things,
- Emboss features - For better results during the collision
- Radius or blends in between areas.
- Mastic points
- embossing heights.
Force Distribution calculation:
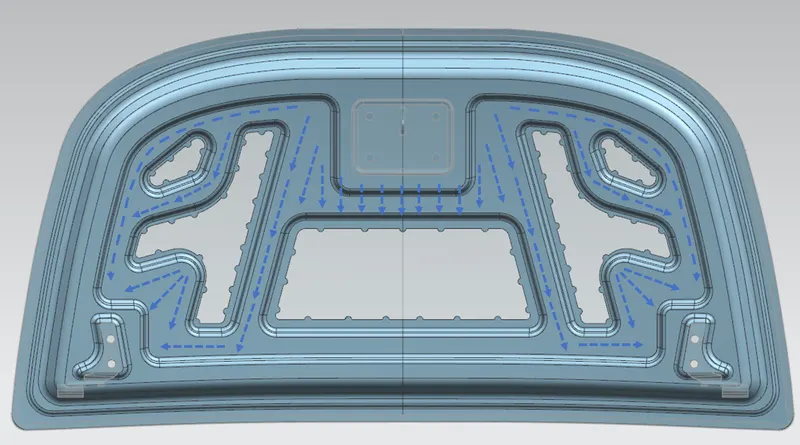
- Force Proportionality
A good designer should always prioritize safety considerations. For example, when designing a hood, one should keep in mind that all forces should be distributed toward the hood's hinge in the event of a frontal collision. This will lessen the impact of the crash and protect the passengers inside the car.
Mastic data's
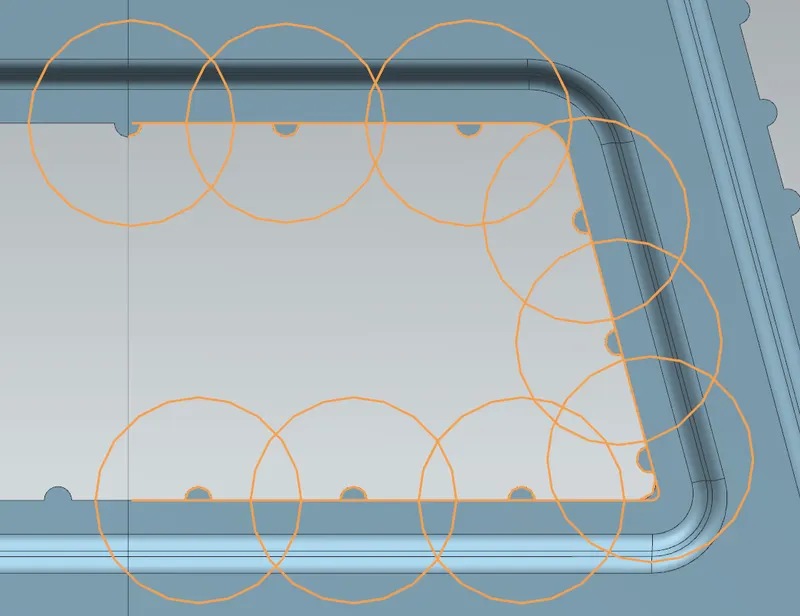
All the mastic points were created for the all emboss coming area, and the data I considered as 80mm pitch distance for each mastic point and the diameter of the mastic flange is 8mm.
The hood outer panel and hood inner panel are fixed or combined using a mastic sealant.
They may act as fire barriers in addition to providing thermal and acoustic insulation. They might also possess electrical characteristics. Sealants can also be used for straightforward filling or smoothing. They are frequently asked to handle many of these tasks at once.
A sealant serves three basic purposes: to fill gaps between two or more substrates; to create a barrier through its own physical characteristics and through adhesion to the substrate; and to maintain its sealing qualities throughout its expected lifetime, under normal service conditions, and in environmental factors. By using the suitable formulation, the sealant accomplishes these tasks and achieves particular application and performance attributes.
By absorbing shocks from both inner and outside panels, mastic sealant helps lower NVH.
Position of LATCH & STRIKER:
Once done all the things, create the emboss feature or set the reinforcements for Striker assembly before that to create the trajectory axis and latch mechanism to provide a better angle for closing or opening the hood i.e. to get the exact lock position.
DRAFT ANALYSIS:
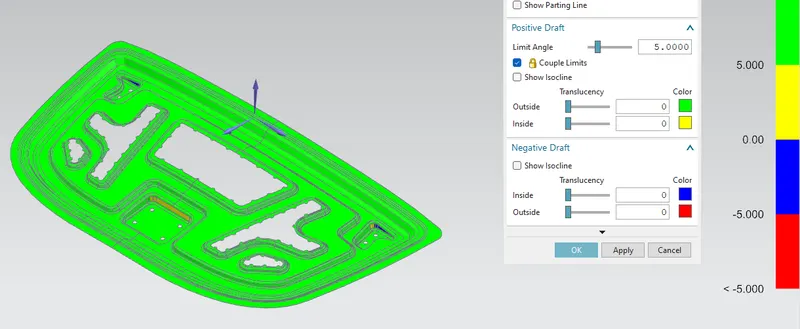
To detect any bad draught, the inner panel is subjected to a five-degree draught analysis. We are going through this procedure because we need to create and present manufacturers with a successful design.
We can observe that the inner panel has no negative draughts, hence the design is good and ready for manufacturing.
2. Outer panel Design:
This hood component serves as a covering or casing for all other hood components that are housed within it. This component's outer surface has a good surface finish and is covered with corrosion-resistant paint to protect the internal components from rust and give the automobile a nice appearance from the outside. This component, which gives our hood its shape, has been given various styles and shapes to improve the vehicle's appearance and performance and lessen the forces that moving air exerts on the vehicle.
- Hemming Process :
The car industry uses hemming to adhere inner and exterior closing panels together (hoods, doors, tailgates, etc.). It involves folding or bending the outer panel's flange over the inner panel. The accuracy of the process has a considerable impact on how the exterior of the automobile looks, making it a crucial component of the finished vehicle's quality.
Input : Output :
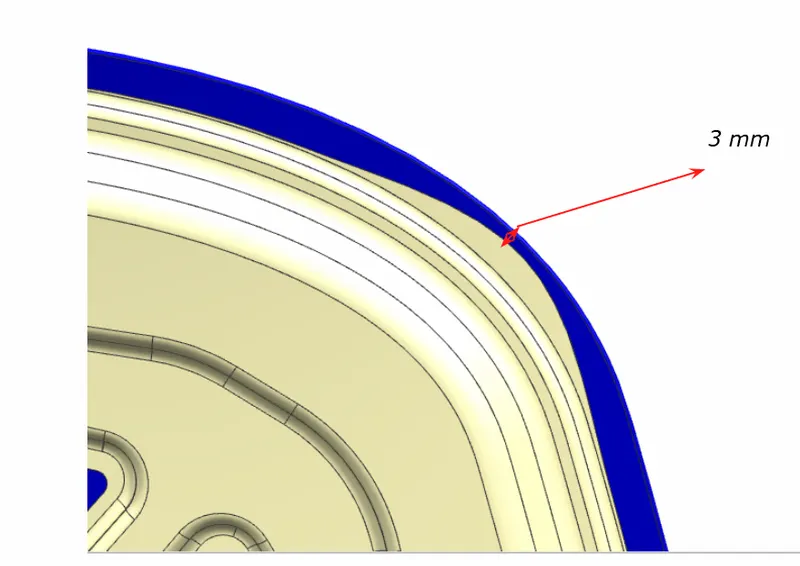
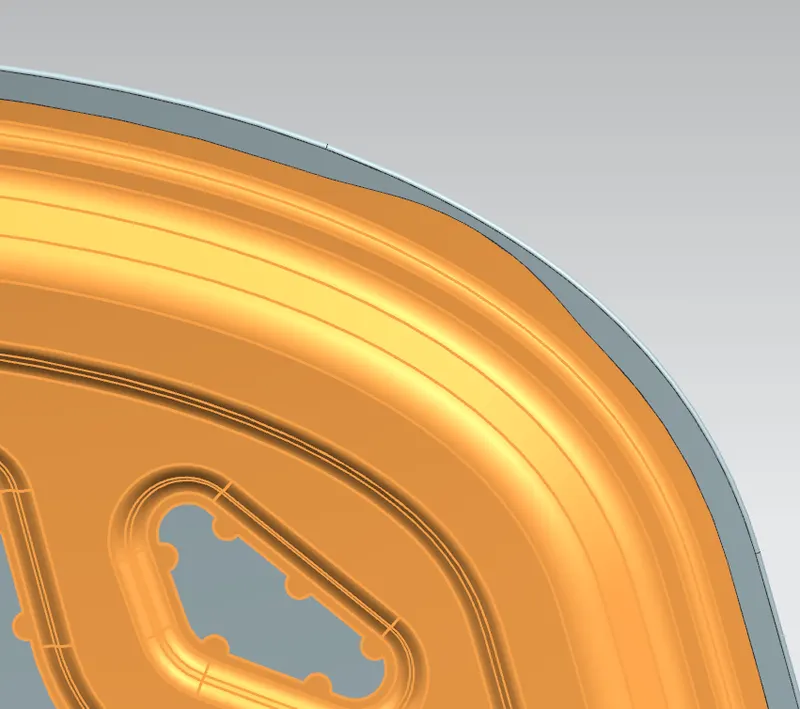
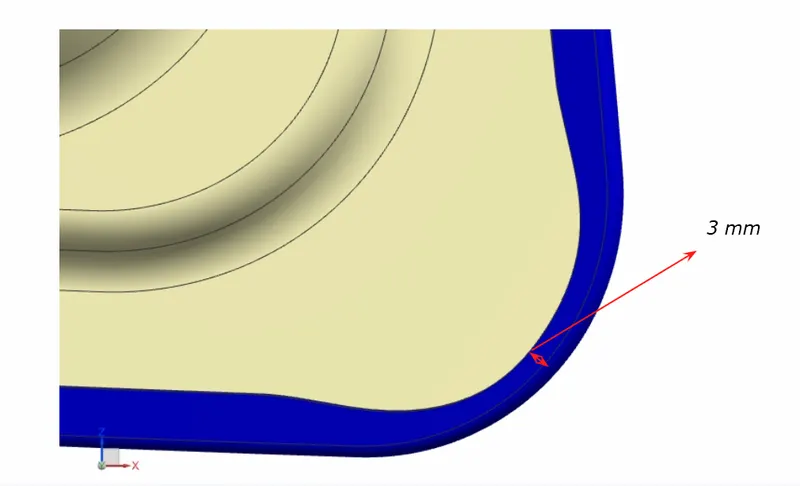
- Corner relief :
The car industry uses hemming to adhere inner and exterior closing panels together (hoods, doors, tailgates, etc.). It involves folding or bending the outer panel's flange over the inner panel. The accuracy of the process has a considerable impact on how the exterior of the automobile looks, making it a crucial component of the finished vehicle's quality.
Take it as 3mm from the input data.
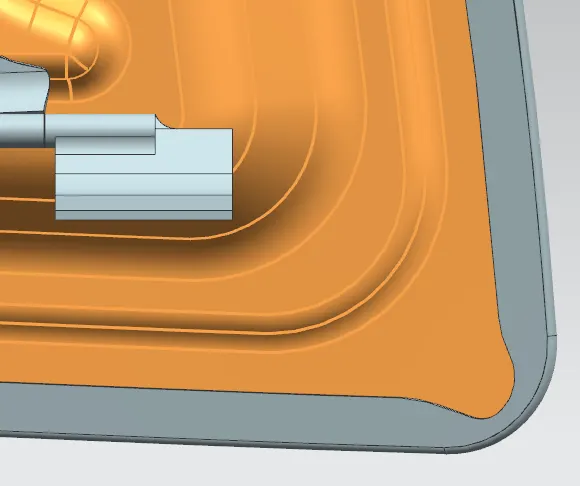
Front section:
Input : Output :
Front section:
Input : Output :
3. Assembly with all other components:
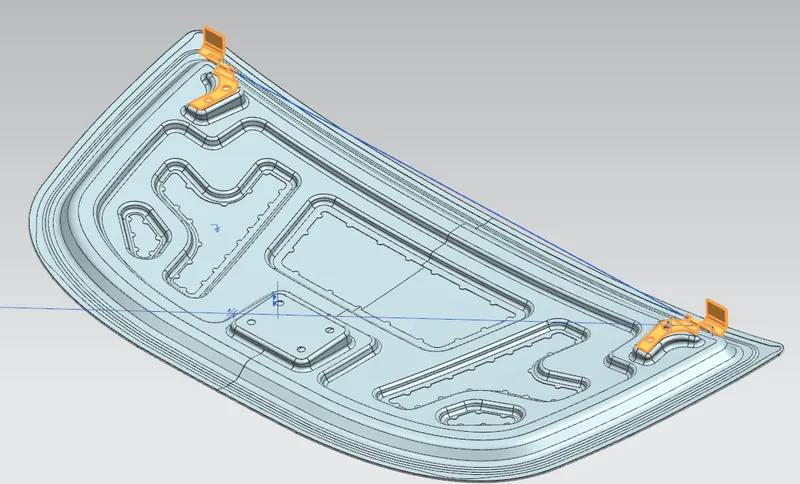
- Hinge Assembly :
Hinge
A hinge is a part that holds the car's hood to its fenders. To ensure that the hood opens and shuts correctly, the latch must be positioned perpendicular to the axis of the hinge.
- Latch & striker position :
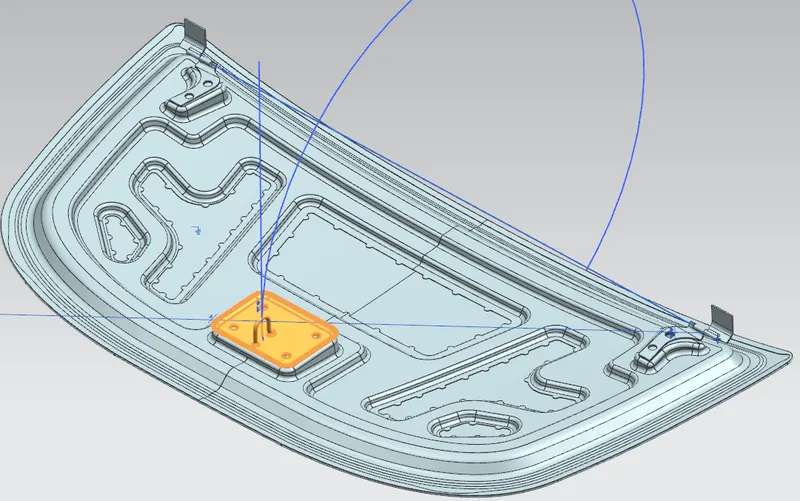
Latch
A hood latch is a pretty straightforward part. It functions essentially as the clasp that holds your hood closed. This latch makes sure that your hood is safely fastened to your car and won't suddenly pop open.
The secondary latch pivots when stress is applied to the cable from the hood release handle, and it pulls away from a retaining seat under the hood. The secondary latch should release the hood a few inches later by design before the safety latch takes control.
Tools or commands which I've used mostly for this project:
- Offset surface: This tool copies the chosen surface at a given distance and under given instructions.
- Emboss: The embossing device creates a punched surface with the contour of the closed-off area. A surface that contains the contour surface is used to create the punch. Draw a sketch. The punch can be forced from the base surface or the end cap.
- Trim sheet: The target surface is divided by the trim sheet gadget along the curve where the target surface and the gadget surface cross. Depending on the situation, the cover pieces on either side of the intersection may be discarded or kept.
- Through Curves: This device forms a surface between two different surface sections by curves, allowing the shape to alter in section.
- Law Extensions: Creates an extended surface subject to either an open chain or a closed contour on the selected target surface. The extension can be used to require a draught.
- Face blend: Produces a curved fillet or blend along two selected surfaces in a specified direction vector. You can alter the reach, width, and continuity of the blend curve.
- Extend sheet: Creates an extension of the selected sheet up to the specified distance.
- Offset in the face: This function creates an offset in the target face's front or edges up to a specified distance.
- Bridge curve: Create a roundabout section between two intersecting and non-intersecting curves by building a bridge curve. By adding distance, the roundabout's starting point and ending point changed.
- A projected curve: projects a curved profile onto the surface of the goal. Both a linear and curved surface are possible. A logical vector can change the direction.
- Sew: combines solid bodies by sewing faces together or sheet bodies by sewing common edges together. The surfaces can be closed off at any gap.
- Mirror Geometry: Reverse a geometry along a face by using mirror geometry.
- The curve on the surface: Directly on the face, the surface curve creates a surface spline feature.
- Thicken: Using thicken, a strong body is produced.
- Extracted body: This feature generates a body of selected geometry that can be modified by altering the parent feature and re-creating the extracted feature.
CONCLUSION:
- As a result, the hood is created with passenger and pedestrian safety in mind after the master portion is finished.
- The specified and necessary design guidelines for hood design and production were used to create this hood in Siemens NX CAD software.
REMARKS:
Encl. : CAD files with compressed condition