Hood design-Week 2
*)WHY A HOOD?
Hood is one of the most important component of a vehicle when it comes to safety and design. It is considered as the 6th door including the passenger 4 doors, back lid, fuel tank door. In design it makes the car look stylish. In aerodynamic terms, hood is the component which directs the air flowing over it to the wind screen. If it is not having a smooth surface, the region would provide obstacle to the free air flow or stop it which would make this hood feel heavy when the vehicle is driven at high speed. This would also make the air to spread over the region undesirably which would increase the drag coefficient of the vehicle. In terms of safety, it gives the necessary area over which it would minimize the force to reach the car occupants at the time of any accident. I have taken some e.g. of cars like 2019 Honda Civic, LeMan version Nissan GT-R etc.

The car aforementioned looks neat and continous in terms of styling when the hood is present. The strategy followed while designing a car body is to make it smooth and continous with minimum gaps in between. So this makes the outer panel of the hood- a styling part.Not much can be done on this styling part except for the design otherwise joining methods like spot welding,bolts and nut etc would make the surface look dirty which directly would affect the sales of that particular model. However, there are some design carried out on the hood as that is the main part to direct the air properly through and over the car.

The hood is having protrusions and vents in the hood of Civic. Hood perfectly covers the engine and saves the engine from teh harsh environmental conditions like snow, dust,water etc. But with that it also completes the front compartment or engine compartment and behaves like a hot chamber. The engine at the time of operation generates trimendous heat and usually has a very small region to dissipate out of the engine compartment increasing the temperature of this region. So, to solve this issue, such vents and channels are provided which are designed in such a way that they serve the purpose of channeling the air inside the engine compartment for tasks like cooling the engine compartment or supply air to the turbo-charger system or intake hose in case of naturally-aspirated engine. Some side grills and vents are given to allow the air from a special channel provided to distribute the weight of the car at high speed as any part that tries to stop the flow starts to make that region heavy in aerodynamic linguistics.
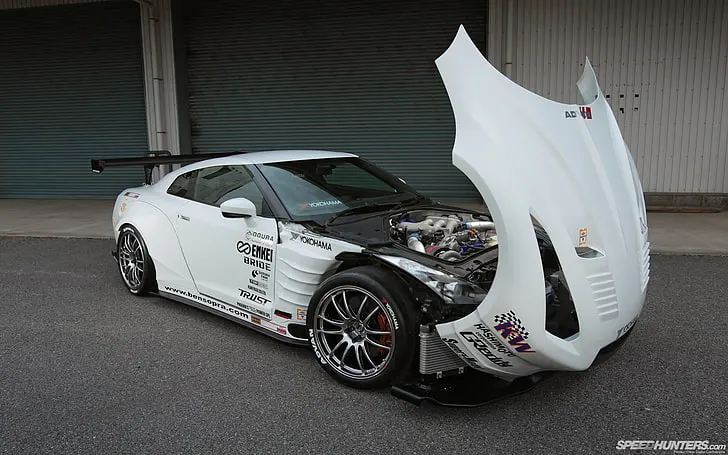
The 24 hour Le-mans Nissan GT-R is designed in such a way that the body should feel like a single unit so the creators adapt the techinque to integrate as many parts as possible and form a single unit. As it is visible that the front bumper,hood and side fenders all are manufactured as a single panel. This type of hood is only used in racing. This is done in order to replace the part in no time if any damage is seen while racing ,saving time. Also the hood opening is totaly opposite to the conventional street car. This is done to avoid the part from getting loose at the time of high speed driving as the drag offered by air can break the hinge if located in the front and open the whole unit while racing leading to accidents. The sole motive of such a design and assembly is to achieve the desired performance and make the car light due to the absence of all the joinging hinges and latches to connect different panels located in the front as seen in daily commuting cars.
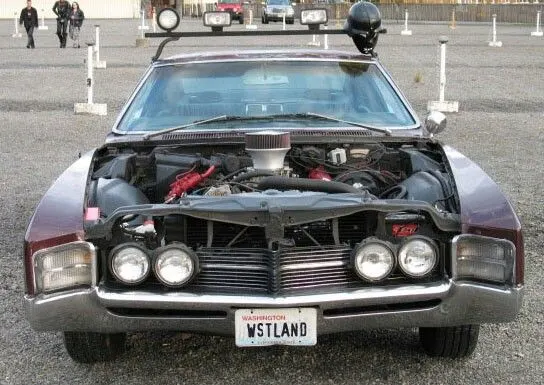
A car without a hood would look ugly and behave unstably while driving so hood becomes a very important part of the car body. If there is any leak in the engine compartment, there is good chance that it gets splash on the windscreen and obstruct safe driving conditions. The last point to support the importance of a hood is that it provides a strong base for mounting the windscreen washer.
*)HOOD
A hood contains a outer panel which makes the styling part. Inner panel which has all the shaped and cut-outs for safety. There are 2 hinges provided on the bottom of hood on either sides to assemble with the hinge assembly and finally on the car body. At the top centre is a striker.
1) Hood outer panel
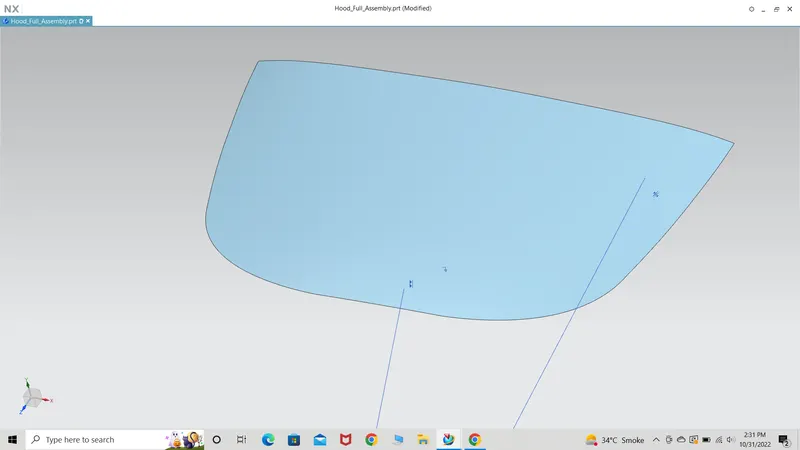
It is a styling part of the hood in a front engine car. It is made of light material keeping the aerodynamics of the car. It has some air flow lines on it to match with the other portion of the car and make the whole vehicle look neat. So basically, this portion is exposed to the air and is the part of hood which we see. When we open the hood, the inner side of the hood is visible.
2) Hood inner panel
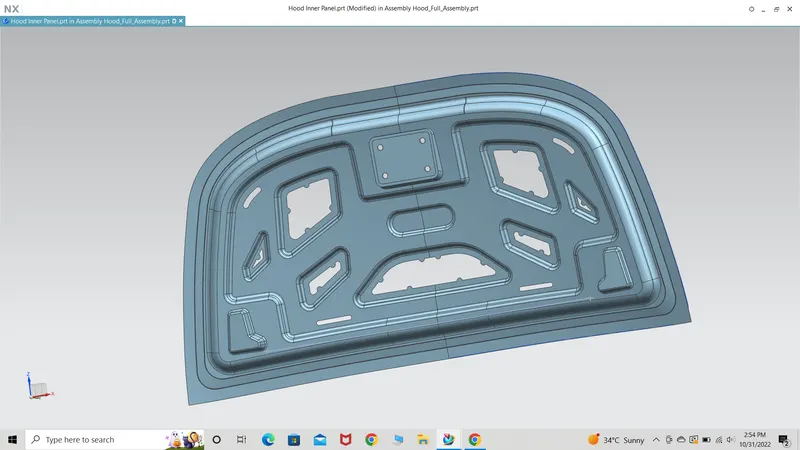
It forms the inner part of the hood assembly and provides strength and support to the outer panel. Several cut outs are given in this panel to
*) Reduce cost of production.
*) make the panel light.
*) Gives room for the outer panel to compress in case of accident with pedestrian involvement.
There are some surfaces provided to the inner panel to strengthen this portion even after the cut offs. Mastic glue points are also given on this panel. Several holes for hinge and striker assembly is drilled on this panel itself.
3) Hinge assembly
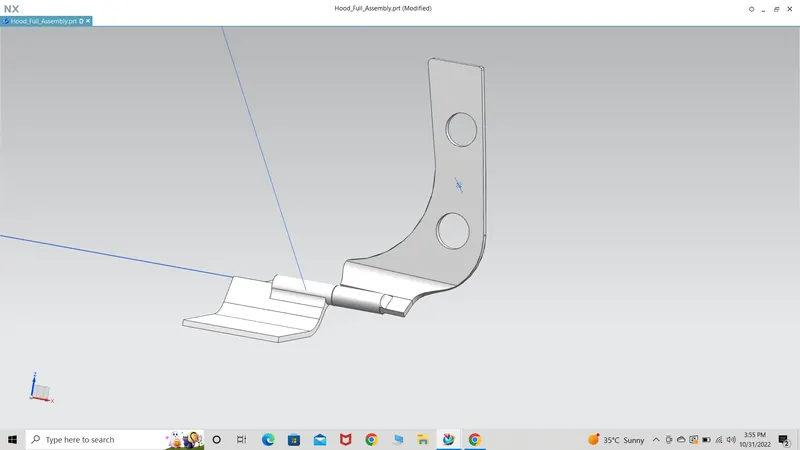
Hinge provides the hood a fixed axis of rotation. One part of the hinge is fixed to the car engine compartment and the other to the inner panel. The two parts are connected in such a way that independent movement of both the parts is possible thus making the hood to move accordingly.
4) Stiker and latch
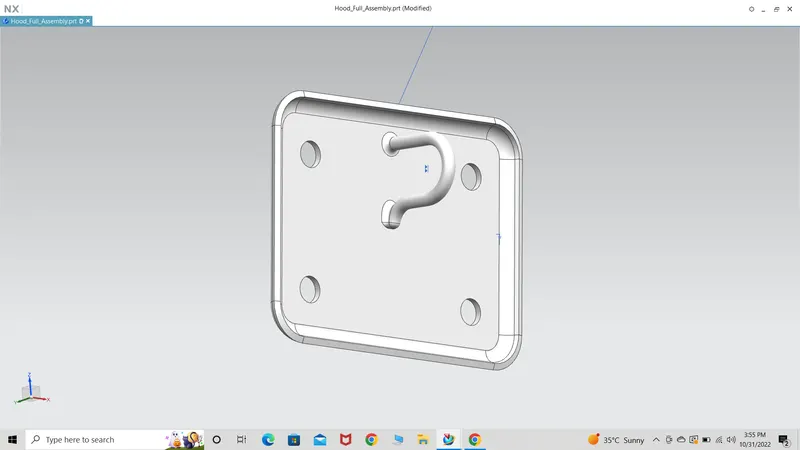
Striker is fixed to the inner hood panel and has a hood that gets locked to the latch that is located on the engine compartment. This is given to tightly lock the hood assembly to the car body and avoid getting open accidentally when the car is moving.
5) Support rod and grommet
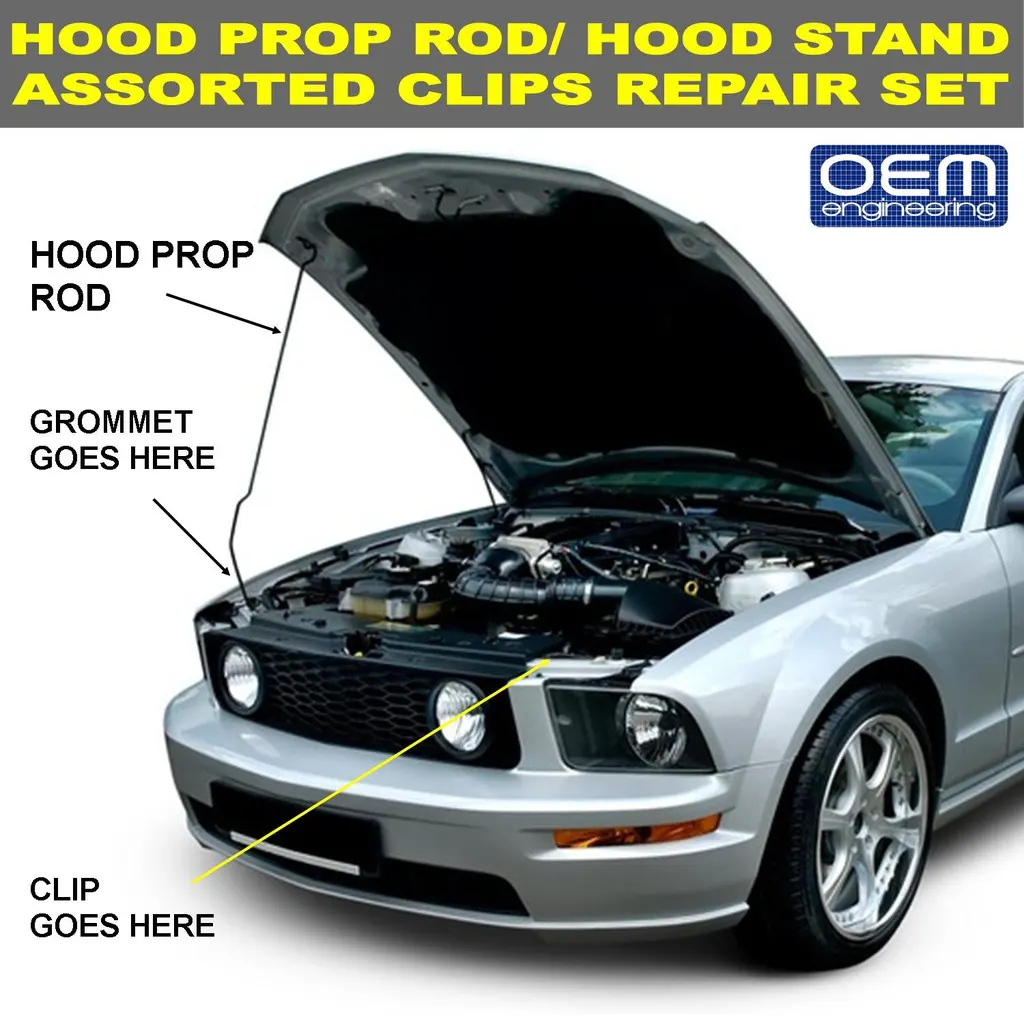
An additional component needed in this region is the support rod which is used to keep the hood in open position in order to work inside the compartment. It is provied on the left of the car so that it doesn't come in the way of the mechanic removing the battery.
Grommet is a small part located inside the engine compartment that holds the support rod in rest position when the hood is closed.
6) Reinforcements
Reinforcement simply means to strengthen a specific thing. In hood, the areas given for hinge and striker are such that the embossing done to create one makes the region a bit weak. A metal plate of similar shape is fixed on the other face of the hood and improves the strength of these regions.
Designing aspects
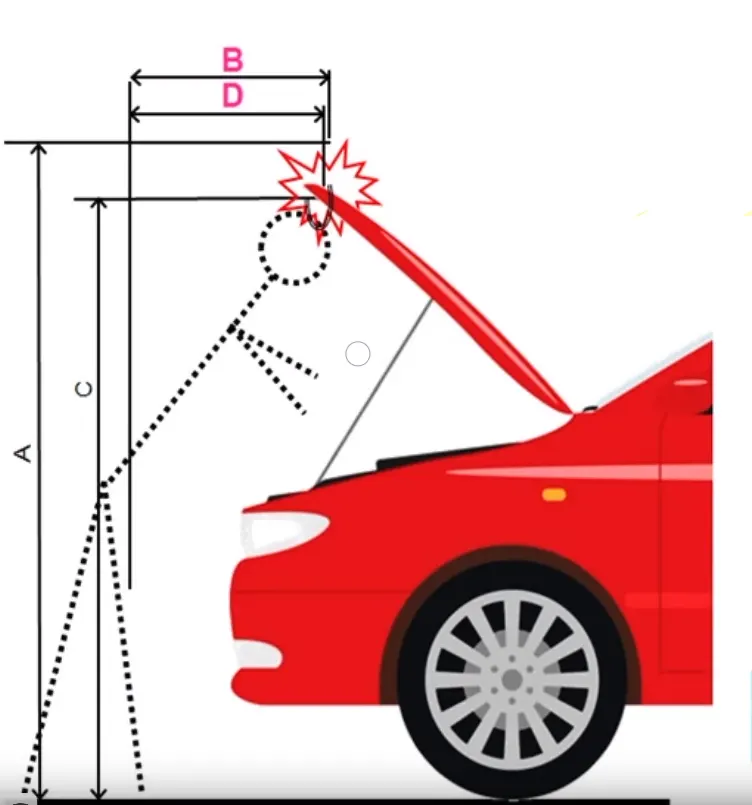
*) While designing a hood, it should always be kept in mind the max angle of opening. A country with an average human height of 6ft, if gets exposed to a car with hood opening angle less then it may injure the operator getting ready to work on the engine. This is the region the angle of opening should be large enough for the safety of the operator.
*) Hood is locked with the help of 2 locks 1) Primary 2) Secondary.Primary lock is the one which is opened when the driver operates the latch below the dashboard. While designing, it should be kept in mind that the hood raises itself to 10-15mm when the primary lock is opened. Secondary lock comes into the picture when the hood is raised already to 15mm by opening the primary lock but the hood is still left to open to it's maximum angle. This is when, hands are used to access the secondary lock i.e. latch below the hood and opened. Further, human strength is used to hold and raise the hood to the max angle and support rod is fixed to the hood.
*) It should always be kept in mind the type of car for which the hood getting designed. If the hood is getting designed for a racing car or SUV then it is obvious that the hood is going to be long and in SUV case heavy. If support rod is provided in such a car then the operator would find it very difficult to use the insufficient strength against the heavy hood to hold it with one hand and then attempt to fix the support rod. In case of racing cars, hand won't reach the hold to fix the support rod. For such a case, gas stay is used.
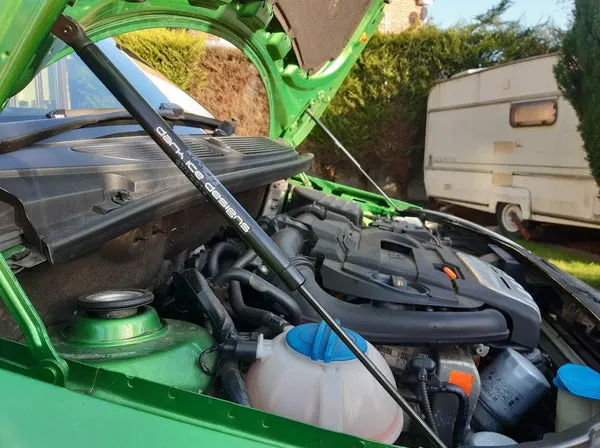
Gas stay is kind of pneumatic piston operated mechanised unit used to support the hood. Both the ends are fixed permanently to the hood and inner region of side fender. The operator has to just push the hood upwards and the hood automatically raises itself to the max angle. No need to hold it as pistons replace the hands in this case. The gas stay is fixed on both the ends with the help of ball studs. A support rod is about 200g while gas stay is around 1kg.
Designing a Hood in NX 12
1) Outer panel was already given to me and taking it as a reference, the inner panel is designed. By the use of offset command the inner flange is designed. Embossing command is used to create the surface on the offset surface. For the dimensions of the sections, master section is available for reference. Trim command is used to remove the unwanted surface.
2) The inner panel is given cut outs in such a way that the force when coming from the front should draw away from the passenger.
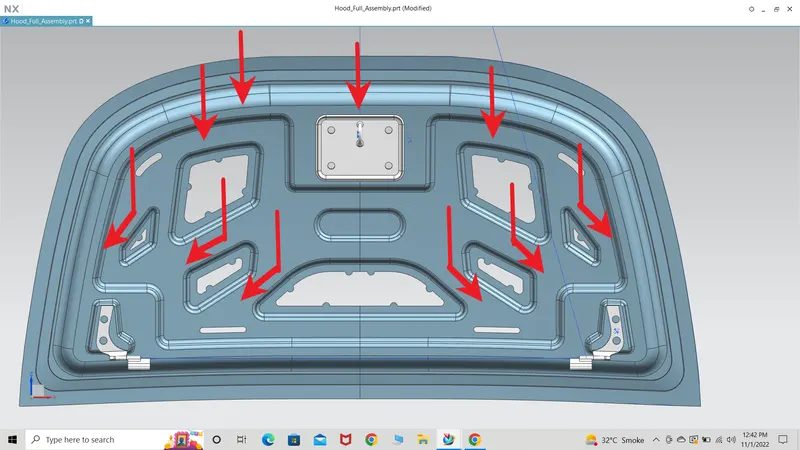
The cut-outs are designed in such a manner that the force transferred from the other body should divert the straight path taken by the 1st law of Newton which states that the force or body would remain in the state of motion or rest and in the same direction unless an external force is applied to change the course of it. The shape of cut-outs behave like an external force which changes the direction of the incoming collision force. This cut-outs also save a lot of material make the cost of production a bit less and also makes the hood light in weight.
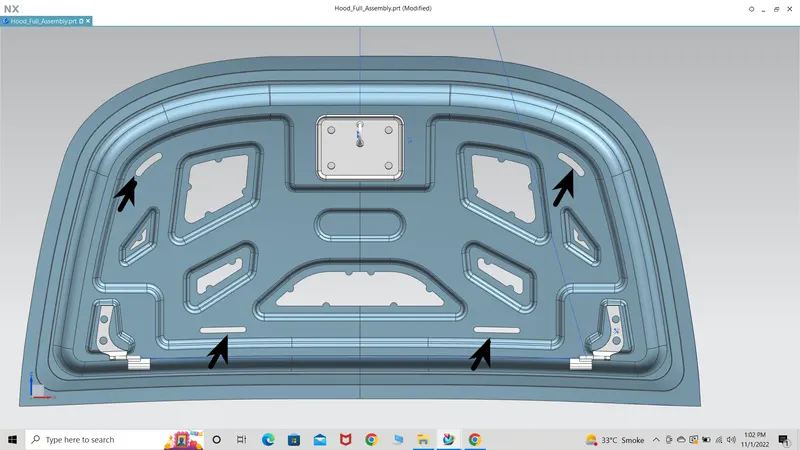
*) Additional cuts are given for heat dissipation. Engine compartment becomes very hot when operating for long hours so these cut-outs would remove some amount of heat out of the compartment.
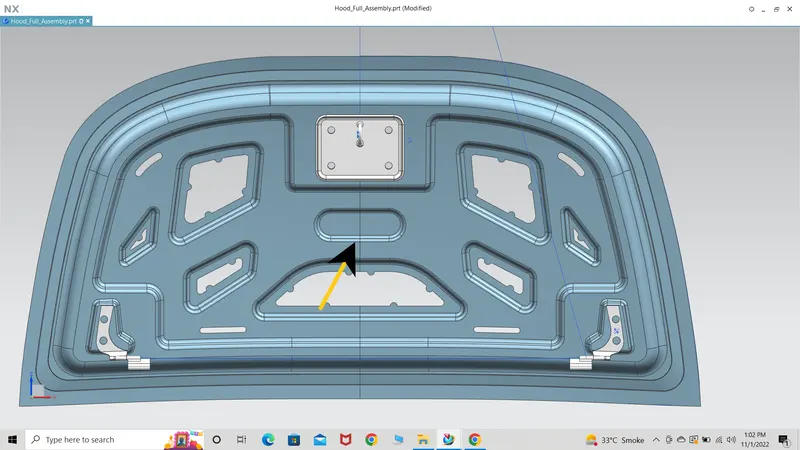
*) The labelled region is the given keeping in mind that when the car hits something, the hood would bend from this region towards upward direction. It is very important that the design adaption has a reason behind it and not just for aesthetics.
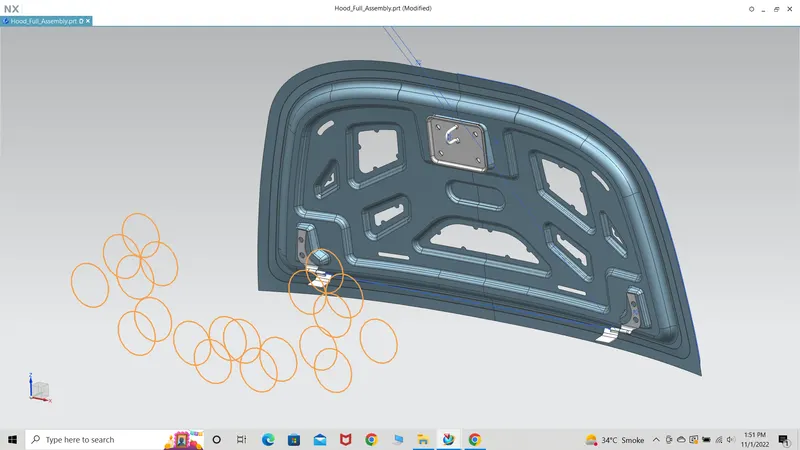
*) For joining the 2 panels i.e inner and outer, regular spot welding is not adapted as it would leave marks on the outer panel and spoil the overall look of the car so strong mastic glue is used for the purpose. The inner cut-outs are left with mastic points behind which the glue would be applied. The measurement of the point is 10mm and the radius of area over which it would spread is taken as 80mm. With the help of sketch tool, the circles are made and later the sketch is projected on the body.
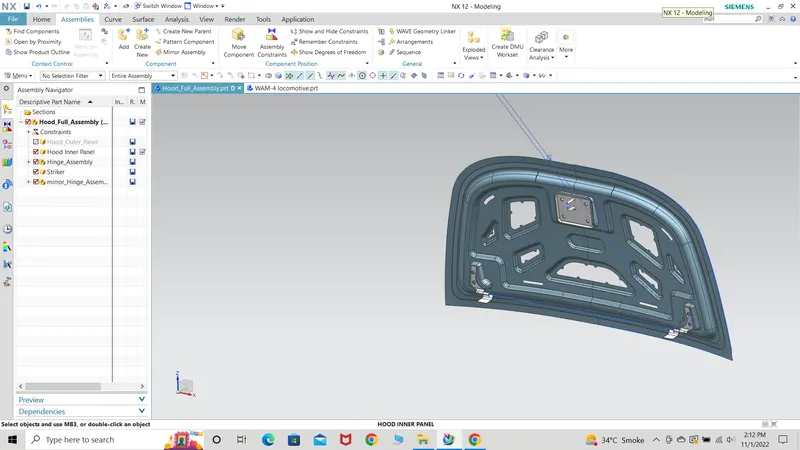
*) The embossing for the hinge is made by moving the hinge close to the body using move component tool. A datum plane parallel to the hinge is created and then a sketch for the hinge embossing is created. The hinge is assembled on the embossing by using constraints tool. The distance between each cut-outs and outer flange should be min 6mm. The embossing surface should have 6-8mm. Face blending should have min 5mm of curve.
*) An axis is made from both the hinge centre. This would be the axis of trajectory circle or hood movement. A circle is made in such a way that the point of striker hook would coincide with the tangent line of the circle. Striker embossing is created by using wave geometry linker and the striker is assembled by using constraints.
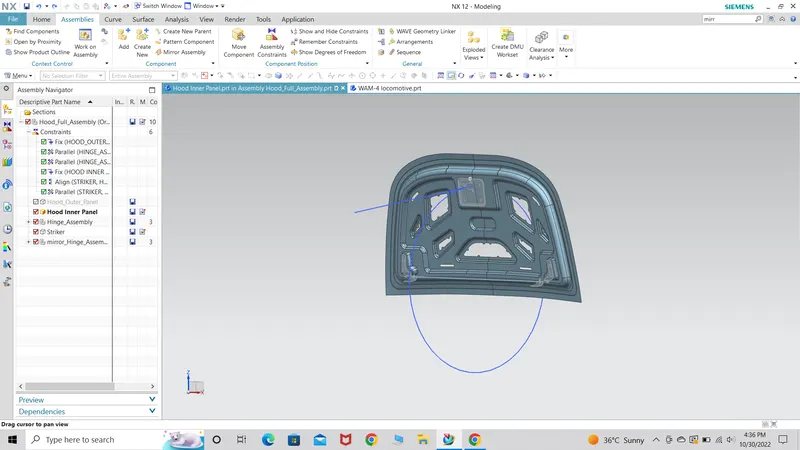
The final inner panel looks like in the s.s. shown below.
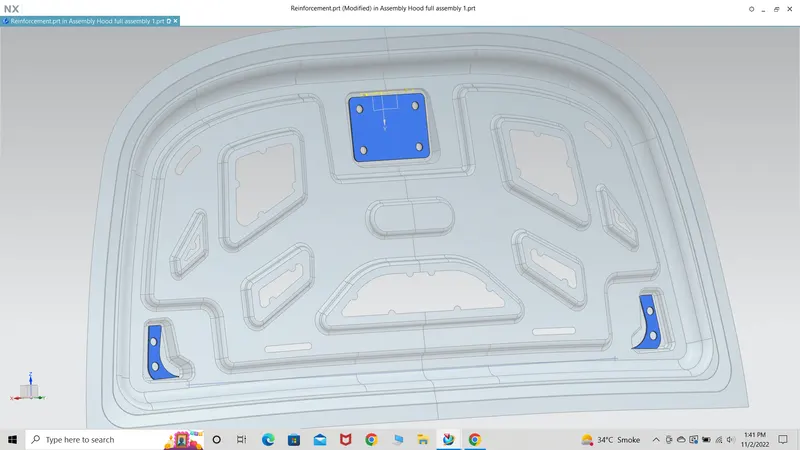
*) Reinforcement is made as a seperate component by using create part and then selecting hinge assembly and striker. Then by the use of thicken and giving some offset to the starting face a part of 1.5mm was created. While created, it was kept in mind that the reinforcement should be placed opposite to the embossing face only then it would act like a strengthening part. it should not be assembled like a visor in a nut bolt fitting.
3) The outer panel is designed using the master section which is later used for hemming operation. The dimensions for hemming process are all given in the technical information.
Outer Panel Thickness – 0.75mm
Inner Panel Thickness – 0.75mm
Reinforcement Thickness – 1.5mm
Hemming is done using face blend with 3 face option.
Corner reliefs are given as while executing the hemming at the corners, the outer panel that is hemmed would not give a smooth and perfect curved surface. So a small amount of outer panel at the same region is removed which is called as corner reliefs. In this model, there are front and rear corner reliefs.
4) After completing all the components, the inner and outer panels have to thicken to 0.75mm. The inner panel has to be thicken keeping the vector direction upwards on the other hand outer panel has to be thicken keeping the vector direction in downward direction.
- Trim Body – It is used to trim one or more bodies using a face or plane. You can also specify the bodies to retain and the bodies to discard.
- Offset Surface – It allows you to offset one or more existing surfaces.
- Offset in Face – This command will allow you to offset particular edges or curves on selected faces.
- Trim Sheet – It is used to trim off a portion of a sheet body using curves, faces, edges or planes.
- Through Curves – It will allow you to create a body Through multiple sections, where it’s shape changes to pass through each section.
- Law Extension – This command extends a curve or edge to create a sheet body at desired angle length by changing the rules under angle law and length law.
- Trim and Extend – It helps you to trim and extend intersecting surfaces and make corner at their intersection.
- Face Blend – It creates fillets between faces.
- Edge Blend – It creates fillets on edges.
- Extend Sheet – It will allow you to extend an existing surface to required distance.
- Emboss – Emboss command creates an embossing by modifying a body with faces created by projecting a curve/section along a direction. You can modify the emboss using options like endcap location and draft angle.
- Projected Curve – It is used to project an existing curve/curves on a selected plane or surface by selecting a direction for projection.
- Mirror Geometry – As name suggests, it allows you to mirror geometries about selected plane or surface.
- Sew – It combines sheet bodies together by sewing their common edges. There shouldn’t be any gaps larger than specified tolerance.
- Thicken – It is used to convert a surface to solid body by providing thickness.
- Extrude – It helps you to create a feature from a sketch. You are also able to create thin feature using a sketch or curve under this command.
- Wave Geometry Linker – With this you can create, associative or linked copies of any entity of a part into other parts. It may be a surface, edge, curve, body, sketch etc. The changes made to the original entity will be reflected in the copy of that entity.
The sheet metal operation in automotive manufacturing industries
1) Hemming
Hemming is a forming operation in which the edges of a panel is folded over another panel in order to achieve a tight fitting. Hemming is used to connect two panels together and gives a nice and smooth edge surface which would look incomplete and with sharp edges resulting in hand injury during access to the panels in case the panel in not hemmed togther. Hemming is done usually in 3 steps. First hem is called pre-hemming and the surface is rolled to some angle. The next pre-hemming operation again folds the surface to some more angle and finally the last step known as hemming folds the part to the final 0 degree angle. This is actually done in order to avoid breakage of the part at the time of folding.
2) Piercing and blanking
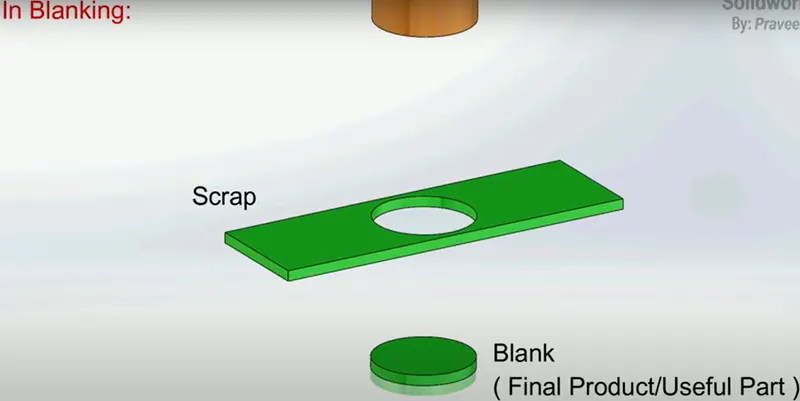
Blanking and piercing are sheering process in which a punch and die are used to produce parts from coil or metal sheet. Blanking produces the outside features of the components. If there is a sheet and we want a surface with a circular cross section of a dimension so in this case, a metal sheet is taken and by blanking a sheer force is applied on this sheet of the same dimension as required and a hole is blanked off. The surface that is blanked off is the final desired product.
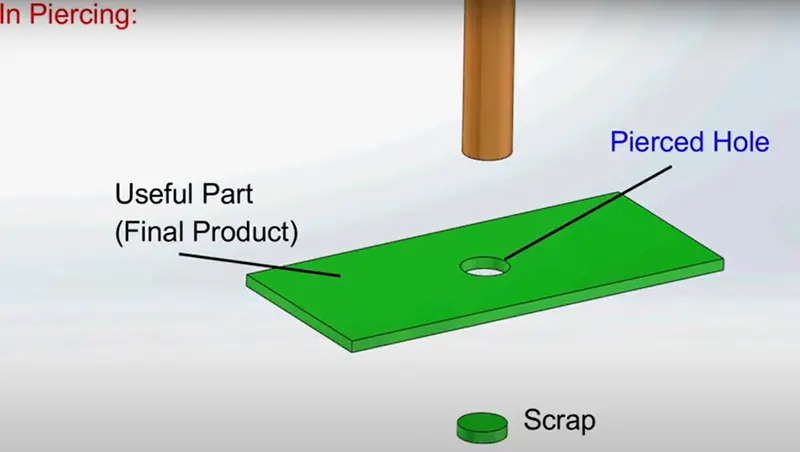
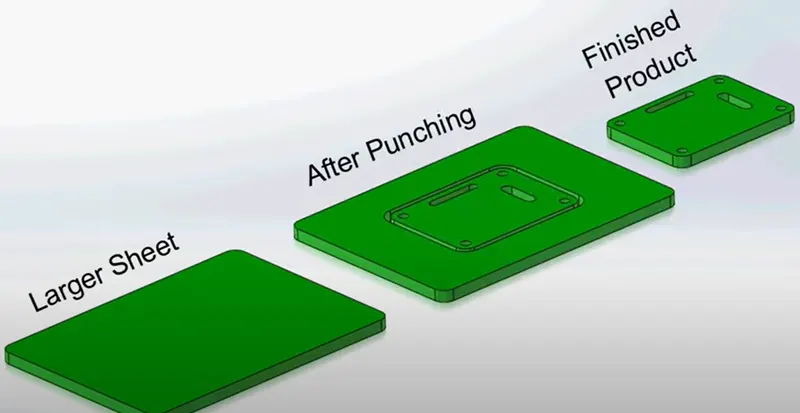
Piercing on other hand uses the same technique but to make internal holes and shapes in a given sheet metal. Here, the surface left after piercing the desired hole or shape is the final product. Sometimes piercing and punching terms are used depending on the task done on the sheet metal panel.
3) Deep drawing
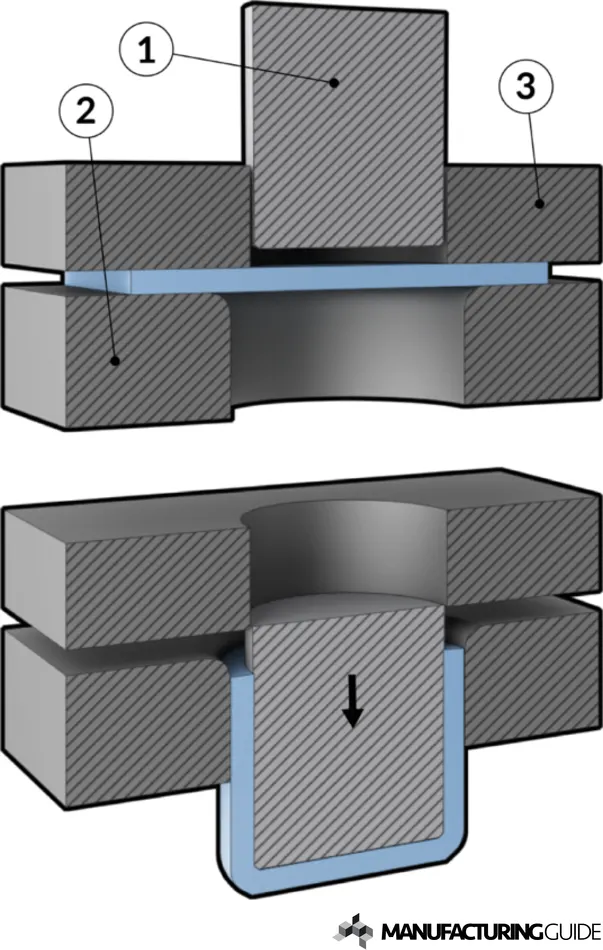
it is a sheet metal forming process in which a radial blank is drawn into the forming die by mechanical punching. It is thus a shape transformation process with material retention. The process is considered deep when the blank depth exceeds the diameter of the drawn part.
4) Embossing
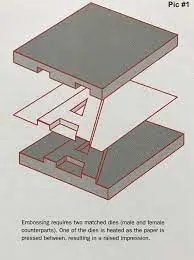
Embossing is a stamped process in which a raised or sunken design in formed in the sheet metal. The process is done by means of a male and a female roller dies or by passing the sheet metal between the rolls of the desired pattern.
5) Mastic points
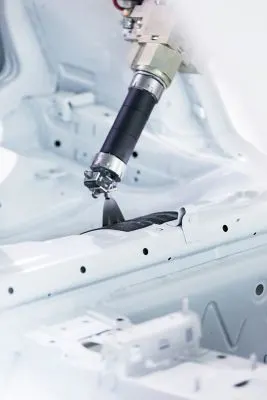
Mastic points are the points where the inner and the outer panel of the hood in this case are joined together by using a strong glue called mastic sealant. Mastic glue is an elastic material which acts like a rubber and helps the hood outer panel to deform in case of any accident. The glue is applied in between both the panels. It is soft initially when it is applied but after hot furnance, it solidifies and gives strength to the panels together. One spot of mastic glue has an impact over a region of 80mm.
Conclusion
The report is complete containing manufacturing processs,hood details and the model with the compressed file attached below.