Drafting of various geometries using Chamfer, Fillet tool in AutoCad
AIM: To draw the different given geometry is using chamfer,fillet tool in AutoCad.
1.
procedure:
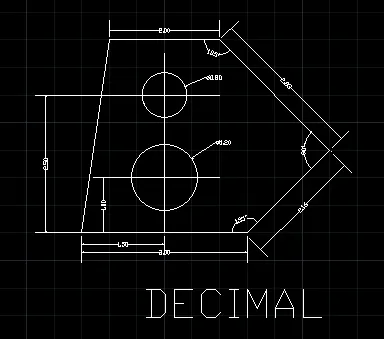
step1: Type units in the command line. A unit dialogue box will appear.In the units dialogue box set the units to decimal.
step2: Go to Dimstyle and adjust the text height and arrow height accordingly. Set as current and close the dialogue box.
step3: Now specify at any point in Autocad drawing sheet.
step4: Draw a horizontal line of 3 units placing the cursor in the positive x-axis direction.
step5: press shift @the distance 2.12 then press shift and < then type the angle 45degree to get the inclined line of 2.12 units.
step6: Following the same procedure draw the inclined line of length 2.83 units.
step7: Place the cursor in the negative x-axis direction and draw a line of 2 units.
step8: Join the line to the starting point and press escape.
step9: From a distance of 1.5 unitsTo the right of the starting point and at a height of one unit from the bottom of the starting point draw a circle of diameter 1.2 units
step10: Again from the bottom of the baseline draw a circle of 0.8 units diameter at an height of 2.5 units using the centre diameter tool.
step11: Give the necessary dimensions.
result:
2.
procedure:
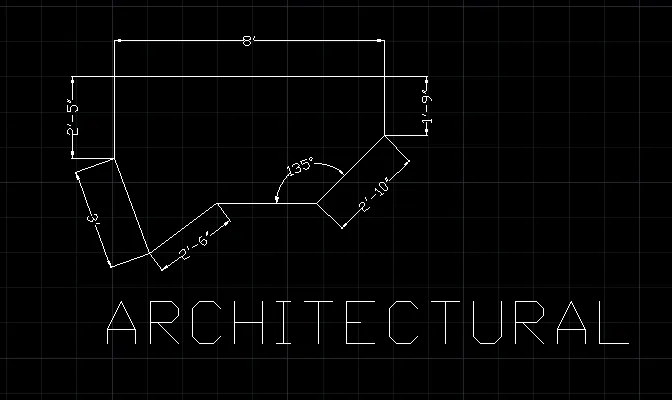
step1: Type units in the command line. A unit dialogue box will appear.In the units dialogue box set the units to architectural in inches.
step2: Go to Dimstyle and adjust the text height and arrow height accordingly. Set as current and close the dialogue box.
step3: Now specify at any point in Autocad drawing sheet.
step4: draw a horizontal line placing the cursor in the positive x axis direction of 8 feet.
step5:Placing the cursor in a downward direction continue to draw the line of 1 feet 9 inch.
step6:press shift @the distance 2'-10" then press shift and < then type the angle 135
degree to get the inclined line of 2 feet 10 inches.
step7: Placing the cursor in the negative x-axis directionAnd given the angle of 135 degrees
step8: Now switch off the orthomodeAnd place the cursor in inclined direction giving the length 2 feet 6 inches.
step9: Press escape.Start to draw the line in Vertically downward direction from the starting point of length 2 feet 5 inches.
step10:Continue to draw the line by placing the cursor in an incline downward direction to enclose the geometry giving the length of 3 feet.
step11: Press escape and give the necessary dimensions.
3.
procedure:
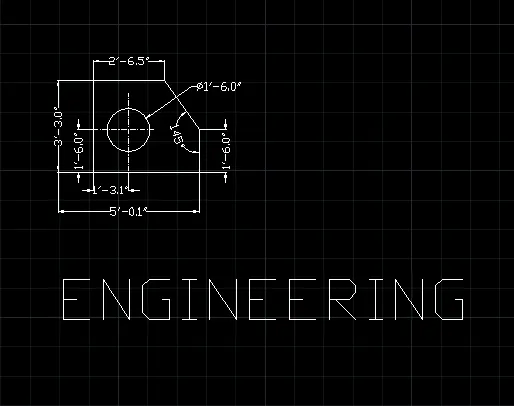
step1: Type units in the command line. A unit dialogue box will appear.In the units dialogue box set the units to engineering units in inches.
step2: Go to Dimstyle and adjust the text height and arrow height accordingly. Set as current and close the dialogue box.
step3: Now specify at any point in Autocad drawing sheet.
step4: draw a horizontal line placing the cursor in the negative x axis direction of 2 feet 6.5 inches.
step5: Placing the cursor in the downward direction draw a line of height 3 feet 3 inches.
step6: Again placing the cursor in the positive x-axis direction draw a line of 5 feet 0.1 inches.
step7: Placing the cursor in upward direction through a line of height 1 feet 6 inches. Now close the line that is join the the first point and press escape.
step8: From the baseline at and height of 1 feet 6 inch and distance of 1 feet 3 inch draw a a circle of diameter 1 inch 6 feet by selecting the centre diameter tool.
result:
4.
procedure:
step1: Type units in the command line. A unit dialogue box will appear.In the units dialogue box set the units to decimal.
step2: Go to Dimstyle and adjust the text height and arrow height accordingly. Set as current and close the dialogue box.
step3: Now specify at any point in Autocad drawing sheet.
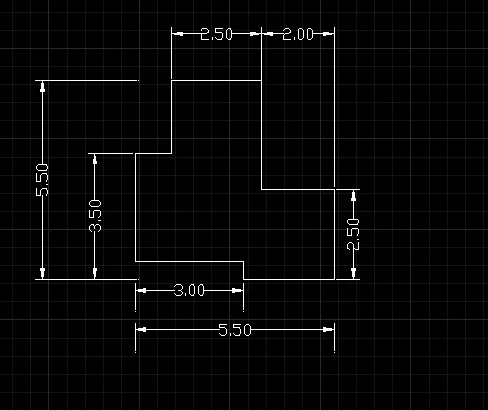
step4: The horizontal line of 3 units placing the cursor on the positive x-axis direction.
step5: Now place it in the downward direction and draw a line of 0.5 units.
step6: Placing the cursor on the positive x-axis direction draw a line of 2.5 units.
step7: Take the cursor in upward direction and draw a line of 2.5 units.
step8: Placing the person the negative x-axis direction draw a line of 2 units. press esc.
step9: From the first point draw a line extending to a height of 3.5 units in positive y axis direction.
step10: Placing the cursors in the positive x-axis direction draw line of 1 unit and extend the line above placing the cursor above of length 2 units.now enclose the geometry.
step11: give the necessary dimensions.
results:
5.
procedure:
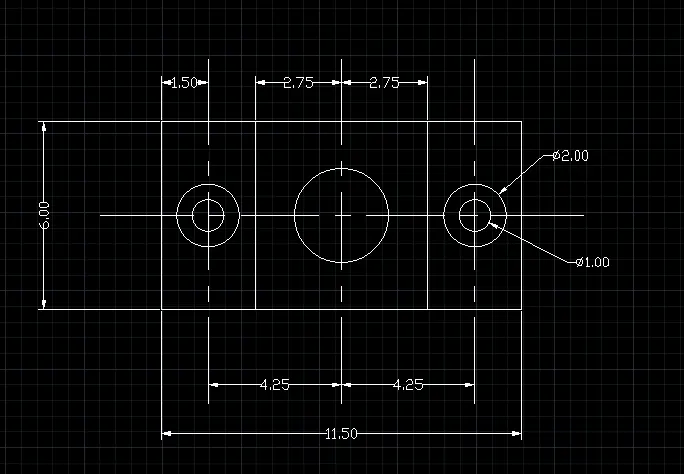
step1: Select rectangle command and draw rectangle of 11.5, 6 units
step2: Draw Centre line in the midpoint of a rectangle
step3: Now from the centre point draw a circle of diameter 3 units
step4: Draw vertical line of height 6 units inside the rectangle aligned with the centerline.
step5: Offset this line at a distance of 2.75 units in both the sides.Now Delete that line.
step6: Now outside the centre line to a distance of 4.25 each on both the sides.
step7: At the intersection of both the centre lines draw two circles one off diameter 1 unit and another of diameter 2 units concentric to the another respectively on each sides.
step8: Give the necessary dimensions.
result:
6.
procedure:
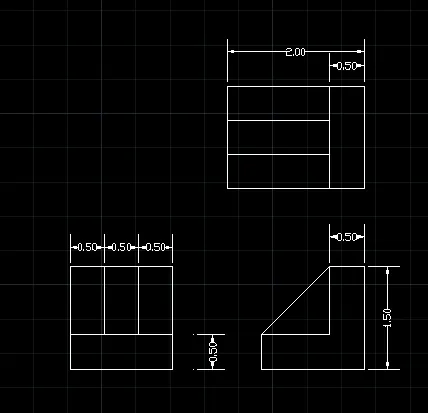
step1: Draw a square of 1.5 by 1.5 unit.
step2: Now from a height of 0.5 from the base draw a horizontal line and trim the outer parts.
step3: Draw a height of one unit touching the previously drawn horizontal line.
step4: Now offset this one unit line twice at a distance of 0.5
step5: Keeping polar tracker on, track the base to a certain horizontal distance and draw a line of 2 units.
step6: Now placing the cursor in the positive y axis direction draw a line of 1.5 units.
step7: Continue to draw the line keeping the cursor in negative x-axis direction of length 0.5 units.
step8: Continue to draw the line keeping the cursor in the negative y axis direction and draw a line under the the tracker tracks The distance from a distance about 0.5 units from the base.
step9: Continue to draw the line keeping the cursor in the negative x-axis direction under the track addresses the point perpendicular above the first point. Now close the geometry. Press esc.
step10: To draw the slanting line start the line command from the point about 0.5 unit from the base and connect it to complete the geometry.
step11: Keeping polar tracker on, track the base to a certain vertical distance and draw a line of 1.5units.
steps12: Keeping the cursor in the negative x-axis direction draw a line of 2 units in close the geometry drawing the rectangle
step13: From the starting point again draw a line of 1.5 units and offset the line to a distance of 0.5 in a left side.Now delete the previously drawn line.
step14: Draw horizontal line touching the base of 1.5 units and outside the same line twice at a distance of 0.5 upwards.
step15: Now the 3 geometry is are ready. Give the necessary dimensions.
result:
7.
procedure:
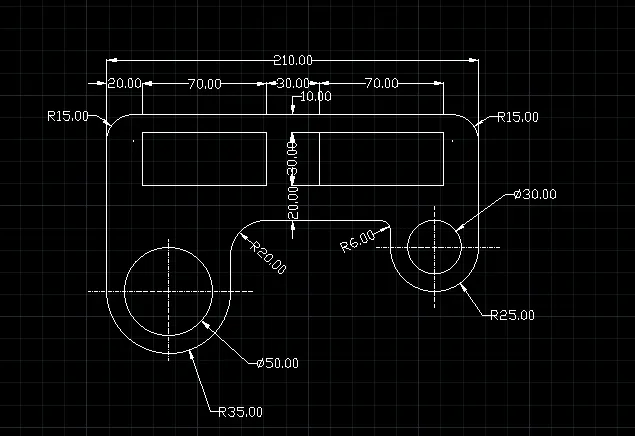
step1: Select the line command and specify anywhere.
step2: Keeping the cursor in the horizontal directionDraw a line of 210 units
step3: placing the cursor in the downward direction at a negative y axis direction draw a line of 75 units. Press esc.
step4: Now from the first point that is a starting point place the cursor in the downward direction that is the negative y axis direction and draw a line of length 100 units.
step5: Use the fillet option and click on the radius option in the command box
step6: Now specify the radius as 15 units and Select the left corner vertex.Again using the same fillet option select the right corner vertex.
step7: From a distance of 20 units from the right of the starting point draw a rectangle below the width of 10 units of measurement 70,30 units.
step8: Copy the rectangle and paste the rectangle at a distance of30 units to the right of the rectangle.Press escape.
step9: Draw Centre line at the and height of 100 units and 75 units.
step10: From the central line draw a circle of diameter 50 units
step11: now draw the circle of radius 35 units concentric to the inner circle
step12: Trim the remaining part
step13: Do the same to the next two circles
step14: Write the line command and enclose the geometry
step15: select the fillet option and give the radius of 20 units and fillet the bottom left corner vertex
step16: Changing the radius 26 units now fill at the bottom right corner vertex. Press escape
step17: Give the necessary dimensions
result:
8.
procedure:
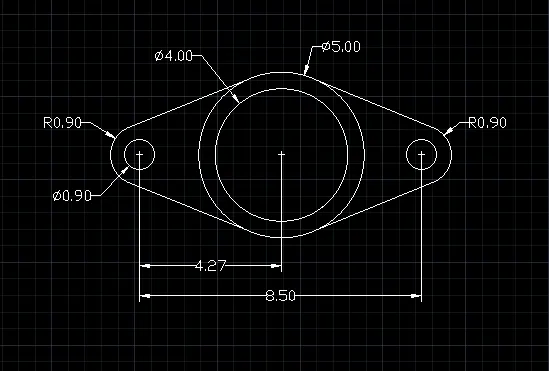
step1: specify at any point and draw a circle of diameter 4 units.
step2: From the same Centre draw another circle of diameter 5 units concentric to that circle.Press escape
atep3: From the centre draw a vertical line and set it to a distance of 4.27 units on both the sides
step4: From the points draw circles of diameter 0.9 in units each.
step5: Press escape, now take the the centre radius form and draw a circle of 0.9 units radius concentric to the circle
step6: In object snapping keep the tangent snap on and speech of the ortho mode
step7: Now draw a line tangent to the bigger circle and the smaller circles
step8: Press escape and use the trim option and trim the inner portion of the circle of radius 0.9 units
step9: Give the necessary dimensions.
result:
9.
procedure:
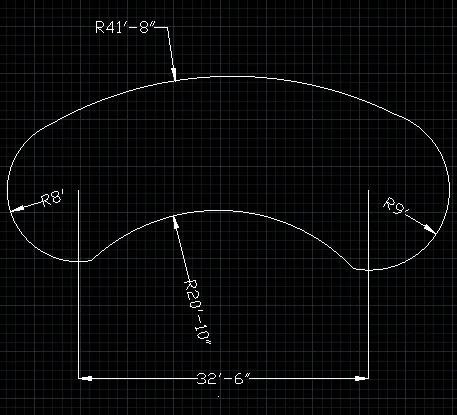
step1: Type unit in the command box and set the units to architectural
step2: Now go to the dimension style and the primary units tab change the units to architectural set into inches. Press escape
step3: Now specify any point and draw a a circle of radius 8 feet.
step4:Press escape and click on the line command
step5: Now specify the line from the centre and draw a line of 32 feet 6 inches placing the cursor on the positive x-axis direction.
step6: Press escape
step7: From the endpoint of the line draw a circle of radius 9 feet.
step8: Now delete the line joining the two circles
step9: Select the dropdown box for the arc tool and select the start and radius form.
step10: Now draw an Arc below the two circles joining the arcs of the two circles giving the radius as 20 feet 10 inches
step11: Press escape and another arc touching the the circumference of upper side of the two circles of radius of Arc as 41 feet 8 inches
step12: Now press escape and select the trim tool.
step13: Trim the inner circumference of the circles and press escape
step14: Give the necessary dimensions.
result:
10.
procedure:
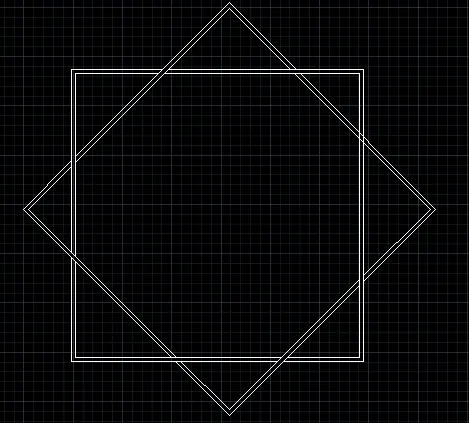
step1: specify any point and draw a a square of any dimension
step2: Press escape and select the offset tool and offset the the square to any random distance say 10 units
step3: Press escape and draw another square of same dimension and offset the square
step4: Now rotate the square using the rotation tool from the ribbon and place the square using the move option in between the previously drawn squares such that their edges intercepts
step5: Now press escape and select the trim tool
step6: Zoom the diagram and trim according to the given geometry.
result:
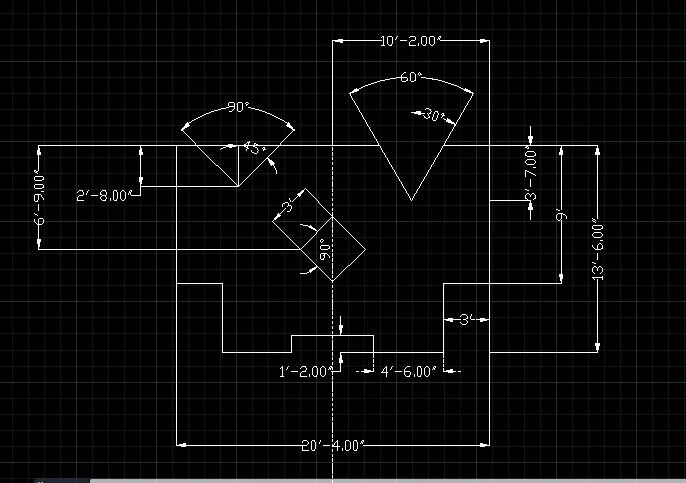
11.
procedure:
step1: Select the line command and specify a point anywhere and draw a line placing the person the positive x-axis direction of length 10 feet 2 inches
step2: Now place the cursor in the downward direction and give the length of 9 feet
step3: continue and place the cursor in the backward direction at is in the negative x-axis direction and give a length of 3 feet
step4: Draw a line placing the cursor in the downward direction a height 4 feet 6 inches
step5: place the cursor in a negative x axis direction and continued to draw a line of length 4 feet 6 inchesThen take a height of 1 feet 2 inch
step6: Keep in the polar tracker on place the cursor in the negative x-axis direction and give the length up to the line where the line intersects with the tracking line. Now press escape
step7: Select the entire geometry drawn and use the mirror option from the ribbon and draw a mirror image of the drawing
step8: From the right corner point at a distance at horizontal distance of 3 feet and a vertical distance of 3 feet 7 inch specify the point and draw a slant line tracing the 3 feet line
step9: Select the half portion and mirror image it
step10: Trim the middle horizontal line
step11: Go to dimensions and give the dimension showing angle 60 degree and 30 degree
step12: Similarly draw for the next 90 degree subtended triangle
step13: Press escape and now draw a square of 3 feet
step14: Use the move option and move theThe square in theInner portion from a height of 6 feet 9 inch from above horizontal line
step15: rotate and move the square in the middle such that the distance from the upper horizontal line to the diagonal is 6 feet 9 inch
step16: Give the necessary dimensions.
result: