Creation of geometries by Coordinate system methods using AutoCad
P1:
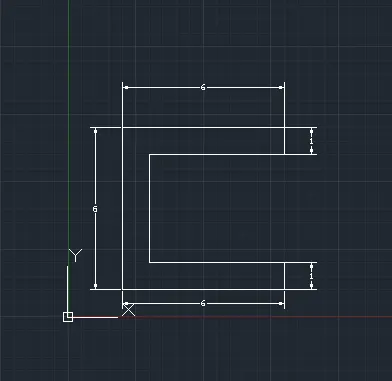
Absolute co-ordinate system:
Select the line tool from the Ribbon tab the command prompt shows specify the first point.
In the command prompt Enter the first point as 2,1
Now the command will ask to enter the next point
Specify the next point as (2,7)
Specify the next point as (8,7)
Specify the next point as (8,6)
Specify the next point as (3,6)
Specify the next point as (3,2)
Specify the next point as (8,2)
Specify the next point as (8,1)
Specify the next point as (2,1) or else click on the 'close' from command
Relative rectangular co-ordinate:
Select the line tool from the Ribbon tab the command prompt shows specify the first point.
In the command prompt Enter the first point as 2,1
Now the command will ask to enter the next point
Specify the next point as (@0,6)
Specify the next point as (@6,0)
Specify the next point as (@0,-1)
Specify the next point as (@-5,0)
Specify the next point as (@0,-4)
Specify the next point as (@5,0)
Specify the next point as (@0,-1)
click close or press escape
Polar coordinaate method:
Select the line tool from the Ribbon tab the command prompt shows specify the first point.
In the command prompt Enter the first point as 2,1
Now the command will ask to enter the next point
Specify the next point as (@6<90)
Specify the next point as (@6<0)
Specify the next point as (@1<270)
Specify the next point as (@5<180)
Specify the next point as (@4<270)
Specify the next point as (@5<0)
Specify the next point as (@1<270)
Specify the next point as (@6<180)
press escape.
Direct distant method:
Select the line tool from the Ribbon tab the command prompt shows specify the first point.
In the command prompt Enter the first point as 2,1
Now the command will ask to enter the next point
Specify the next point as 6
enter the length as 6
enter the lengh as 1 keeping the cursor in downward direction
enter the lengh as 5 keeping the cursor in negative X direction
enter the lengh as 4 keeping the cursor in downward direction
enter the lengh as 5 keeping the cursor in positive X direction
enter the lengh as 1 keeping the cursor in downward direction
enter the lengh as 6 keeping the cursor in negative X direction
P2:
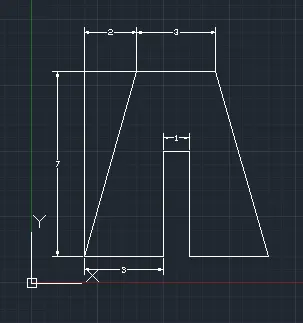
Absolute co-ordinate system:
Select the line tool from the Ribbon tab the command prompt shows specify the first point.
In the command prompt Enter the first point as 2,1
Now the command will ask to enter the next point
Specify the next point as (3,1)
Specify the next point as (3,5)
Specify the next point as (4,5)
Specify the next point as (4,1)
Specify the next point as (7,1)
Specify the next point as (5,7)
Specify the next point as (2,7)
Specify the next point as (2,1)
press esc
Relative rectangular co-ordinate:
Select the line tool from the Ribbon tab the command prompt shows specify the first point.
In the command prompt Enter the first point as 2,1
Now the command will ask to enter the next point
Specify the next point as (@3,0)
Specify the next point as (@0,4)
Specify the next point as (@1,0)
Specify the next point as (@0,-4)
Specify the next point as (@3,0)
Specify the next point as (@5,7)
Specify the next point as (@-3,0)
Specify the next point as (@2,1)
press esc
Polar coordinaate method:
Select the line tool from the Ribbon tab the command prompt shows specify the first point.
In the command prompt Enter the first point as 2,1
Now the command will ask to enter the next point
Specify the next point as (@3<0)
Specify the next point as (@4<90)
Specify the next point as (@1<0)
Specify the next point as (@4<270)
Specify the next point as (@3<0)
press esc
Specify the next point as (2,7)
Specify the next point as (@3<0)
join the lines
press esc
Direct distant method:
Select the line tool from the Ribbon tab the command prompt shows specify the first point.
In the command prompt Enter the first point as 2,1
Now the command will ask to enter the next point
Specify the next point as 3 keeping the cursor in positive X direction
Specify the next point as 4 keeping the cursor in positive Y direction
Specify the next point as 1 keeping the cursor in positive X direction
Specify the next point as 4 keeping the cursor in negative Y direction
Specify the next point as 3 keeping the cursor in positive X direction
press esc
Specify the next point as (2,7)
Specify the next point as 3 keeping the cursor in positive X direction
join the remaining points
P4:
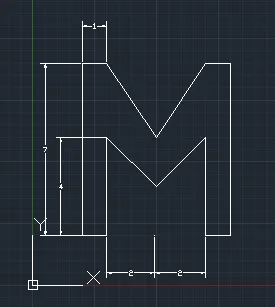
Select the line tool from the Ribbon tab the command prompt shows specify the first point.
In the command prompt Enter the first point as 2,1
Now the command will ask to enter the next point
Specify the next point as 1 keeping the cursor in positive X direction
Specify the next point as 4 keeping the cursor in positive Y direction
draw the slant line at a distance of 2
now again,specify the next point as 4 now keeping the cursor in negative Y direction
Specify the next point as 1 keeping the cursor in positive X direction
Specify the next point as 7 keeping the cursor in positive Y direction
Specify the next point as 1 keeping the cursor in negative X direction
draw the slant line at a distance of 2
pecify the next point as 1 keeping the cursor in negative X direction
Specify the next point as 7 keeping the cursor in negative Y direction
P5:
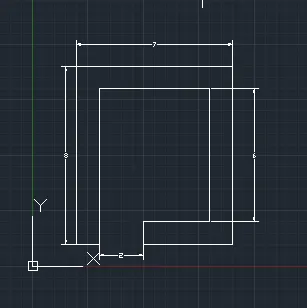
Select the line tool from the Ribbon tab the command prompt shows specify the first point.
In the command prompt Enter the first point as 2,1
Now the command will ask to enter the next point
Specify the next point as 1 keeping the cursor in positive X direction
Specify the next point as 7 keeping the cursor in positive Y direction
Specify the next point as 5 keeping the cursor in positive X direction
Specify the next point as 6 keeping the cursor in negative Y direction
Specify the next point as 3 keeping the cursor in negative X direction
Specify the next point as 1 keeping the cursor in negative Y direction
Specify the next point as 4 keeping the cursor in positive X direction
Specify the next point as 8 keeping the cursor in positive Y direction
Specify the next point as 7 keeping the cursor in negative X direction
Specify the next point as 8 keeping the cursor in negative Y direction
press esc
P-7:
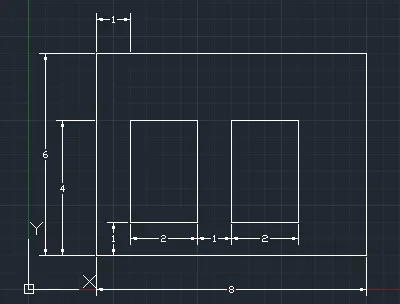
Select the line tool from the Ribbon tab the command prompt shows specify the first point.
In the command prompt Enter the first point as 2,1
Now the command will ask to enter the next point
Specify the next point as 8 keeping the cursor in positive X direction
Specify the next point as 6 keeping the cursor in positive Y direction
Specify the next point as 8 keeping the cursor in negative X direction
Specify the next point as 6 keeping the cursor in negative Y direction
press esc
Specify the next point as 3,1
Specify the next point as 2 keeping the cursor in positive X direction
Specify the next point as 3 keeping the cursor in positive Y direction
Specify the next point as 2 keeping the cursor in negative X direction
Specify the next point as 3 keeping the cursor in negative Y direction
press esc
Specify the next point as 6,1
Specify the next point as 2 keeping the cursor in positive X direction
Specify the next point as 3 keeping the cursor in positive Y direction
Specify the next point as 2 keeping the cursor in negative X direction
Specify the next point as 3 keeping the cursor in negative Y direction
press esc
P-8:
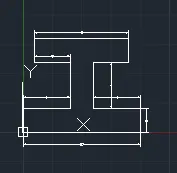
Select the line tool from the Ribbon tab the command prompt shows specify the first point.
In the command prompt Enter the first point as 0,0
Now the command will ask to enter the next point
Specify the next point as 10 keeping the cursor in positive X direction
Specify the next point as 2 keeping the cursor in positive y direction
Specify the next point as 4 keeping the cursor in negative X direction
Specify the next point as 4 keeping the cursor in positive Y direction
Specify the next point as 3 keeping the cursor in negative X direction
Specify the next point as 2 keeping the cursor in positive y direction
Specify the next point as 8 keeping the cursor in negative X direction
Specify the next point as 2 keeping the cursor in negative y direction
Specify the next point as 3 keeping the cursor in positive X direction
Specify the next point as 4 keeping the cursor in negative Y direction
Specify the next point as 4 keeping the cursor in negative X direction
Specify the next point as 2 keeping the cursor in negative y direction
press esc
P-9:
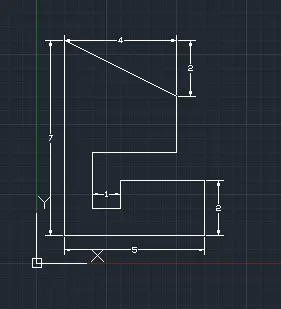
Select the line tool from the Ribbon tab the command prompt shows specify the first point.
In the command prompt Enter the first point as 0,0
Now the command will ask to enter the next point
Specify the next point as 5 keeping the cursor in positive X direction
Specify the next point as 2 keeping the cursor in positive Y direction
Specify the next point as 3 keeping the cursor in negative X direction
Specify the next point as 1 keeping the cursor in ngative Y direction
Specify the next point as 2 keeping the cursor in positive Y direction
Specify the next point as 3 keeping the cursor in negative X direction
Specify the next point as 2 keeping the cursor in positive Y direction
draw a slant line at an height of 2
Specify the next point as 7 keeping the cursor in negative Y direction
press esc
P-10:
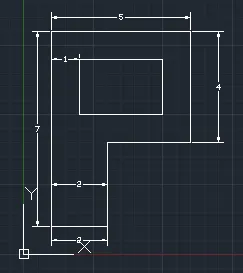
Select the line tool from the Ribbon tab the command prompt shows specify the first point.
In the command prompt Enter the first point as 1,1
Now the command will ask to enter the next point
Specify the next point as 2 keeping the cursor in positive X direction
Specify the next point as 3 keeping the cursor in positive Y direction
Specify the next point as 3 keeping the cursor in positive X direction
Specify the next point as 4 keeping the cursor in positive Y direction
Specify the next point as 5 keeping the cursor in negative X direction
Specify the next point as 7 keeping the cursor in negative Y direction
press esc
In the command prompt Enter the point as 2,5
Specify the next point as 3 keeping the cursor in positive X direction
Specify the next point as 2 keeping the cursor in positive Y direction
Specify the next point as 3 keeping the cursor in negative X direction
Specify the next point as 2 keeping the cursor in positive Y direction
press esc
PROFILE- WOOD:
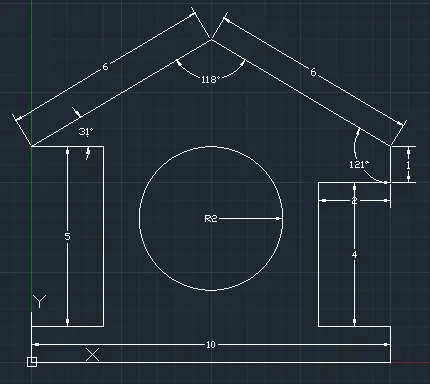
Select the line tool from the Ribbon tab the command prompt shows specify the first point.
In the command prompt Enter the first point as 0,0
Now the command will ask to enter the next point
Specify the next point as 10 keeping the cursor in positive X direction
Specify the next point as 2 keeping the cursor in positive Y direction
Specify the next point as 2 keeping the cursor in negative X direction
Specify the next point as 4 keeping the cursor in positive Y direction
Specify the next point 2 keeping the cursor in positive X direction
Specify the next point as 1 keeping the cursor in positive Y direction
Specify the next point as (@5.831<120.964)
Specify the next point as (@5.831<118.072)
Specify the next point as 2 keeping the cursor in positive X direction
Specify the next point as 5 keeping the cursor in negative Y direction
Specify the next point 2 keeping the cursor in negative X direction
Specify the next point as 1 keeping the cursor in negative Y direction
select the center radius circle at 5,4 of radius 2
press esc
QUEEN POST TRUSS:
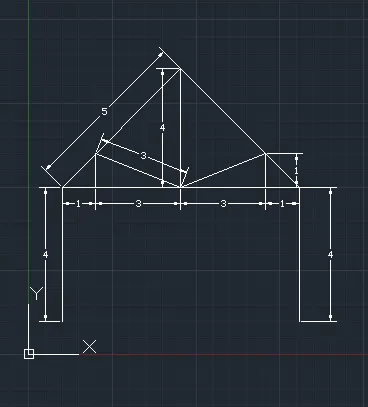
Select the line tool from the Ribbon tab the command prompt shows specify the first point.
In the command prompt Enter the first point as 1,1
Now the command will ask to enter the next point
Specify the next point as 4 keeping the cursor in positive Y direction
Specify the next point 1 keeping the cursor in positive X direction
Specify the next point 3 keeping the cursor in positive X direction
Specify the next point 3 keeping the cursor in positive X direction
Specify the next point 1 keeping the cursor in positive X direction
Specify the next point as 4 keeping the cursor in negative Y direction
Specify the next point as (@5<45)
Specify the next point as (@5<90)
from 2,4 specify point 1 keeping the cursor in positive Y direction
join the slant line at 2,4
press esc
MONO PITCH:
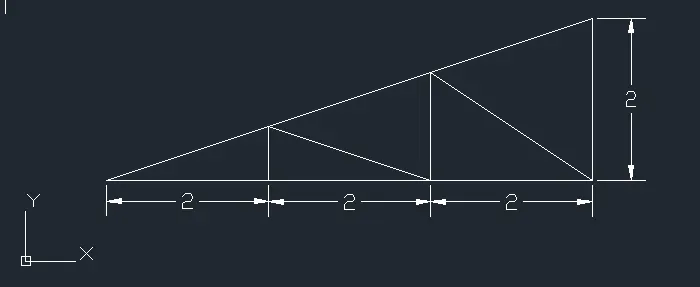
Select the line tool from the Ribbon tab the command prompt shows specify the first point.
In the command prompt Enter the first point as 1,1
Now the command will ask to enter the next point
Specify the next point as 6 keeping the cursor in positive X direction
Specify the next point as 2 keeping the cursor in positive Y direction
join 1,1
press esc
Specify the next point as 2,1
Specify the next point as 0.667 keeping the cursor in positive Y direction
Specify the next point as 4,1
Specify the next point as 1.33 keeping the cursor in positive Y direction
join the slanting lines
press esc .