Creation of Column Schedule and Drawing Template using AutoCad
Aim: -
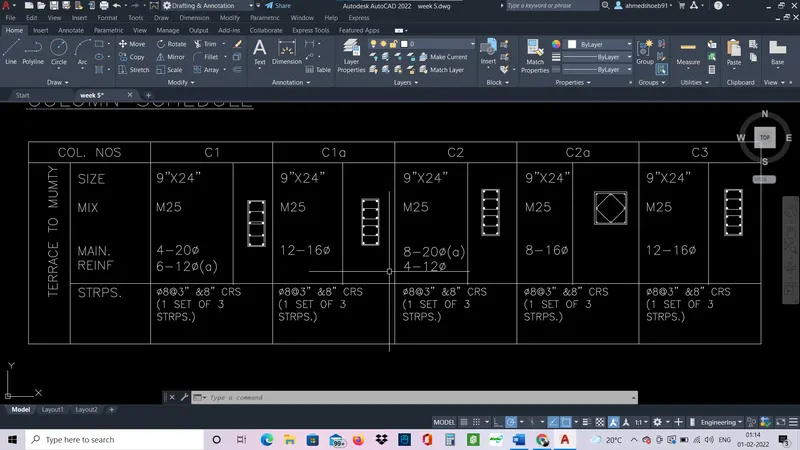
To create a column schedule as shown in figure in AutoCAD.
Procedure: -
Creating Table
- Line command is selected and 60’x20’ table is drawn.
- Offset command is used to divide the table in required schedule.
- Offsets are done to give enough space for text and column diagrams.
- Trim the unnecessary lines.
Entering the text
- Use command Mtext and draw the box, give the text height as 8”. Write ‘COLUMN SCHEDULE’ above the table.
- Again use the Mtext command and write ‘Col. Nos.’, C1, C2 etc, in first row.
- Use Dt or single text for ‘terrace to mumty’. Give a height of 8” and on angle write 90. This will make the text vertical.
- Use Mtext command for everything else.
- For ease of use copy one mtext command and then edit it rather than making new everytime.
- Enter the texts as given, for symbols there is a an option on top right “symbols” where you can select diameter, degrees etc.
Creating column
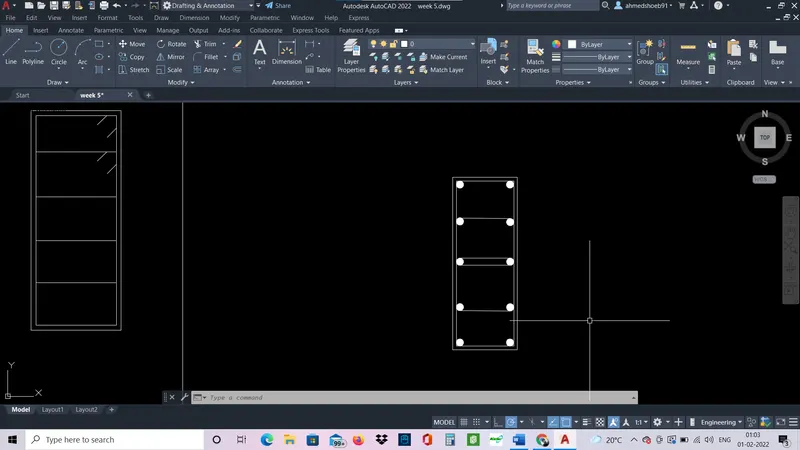
- Command rectang is used is draw a rectangle of 9”x24”. Give an offset of 0.5.
- Select circle command and choose tan tan radius and draw a circle in corner for 0.5”.
- Copy the circles in required corners.
- Choose donut command, select inside point as 0 and outer point as 1”. And fill the circles.
- Use lines command to draw reinforcements.
Result: -
AIM: -
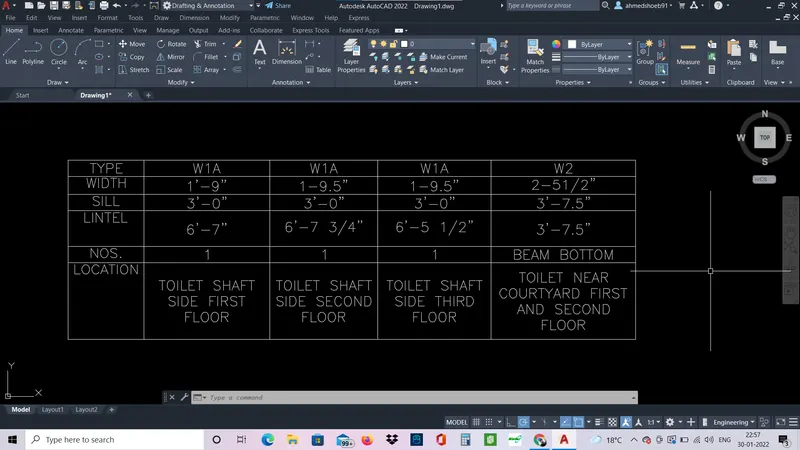
To create a window schedule in AutoCAD.
Procedure: -
- Select table command and draw an table for 5 columns and 6 rows.
- Select window selection.
- Draw the table. And fill the cells as given in the figure.
- Cells grip can be manipulated for width and height by clicking on it.
Result: -
Aim: -
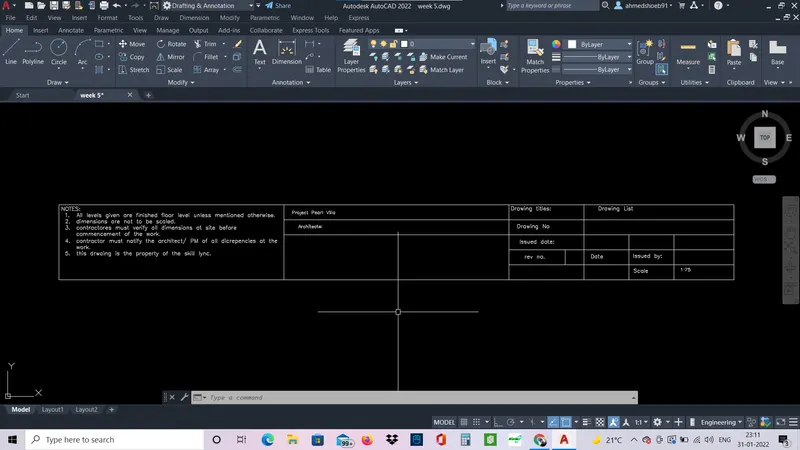
To create a drawing template as shown in figure in AutoCAD.
Procedure: -
- To create this template line and offset command is used.
- Draw a vertical line of 180’ and vertical line of 20’. Use offset command and divide the 180’ line in 60’ thrice.
- Draw the necessary line and trim the excess lines to resemble the given template.
- For “NOTES” text use command Mtext. Select a height od 10” and write the given text.
- Use Mtext command and write the given texts.
Result: -
Aim: -
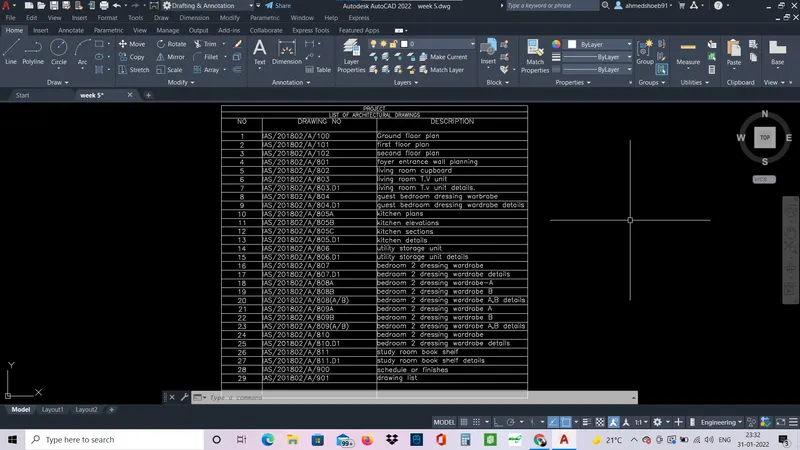
To create the list of drawing schedule as shown in figure in AutoCAD.
Procedure: -
- Select the table command.
- Select 1st and 2nd as title and 3rd as data.
- Divide the table in 3 columns and 29 rows.
- For no. write 1 and then hover on that cell in the corner and continue it down till 29.
- For drawing no. “IAS/201802/A/” and copy it till end edit it to add numbers.
- Fill the descriptions.
Result: -
Aim: -
To create a beam detail in AutoCAD.
Procedure: -
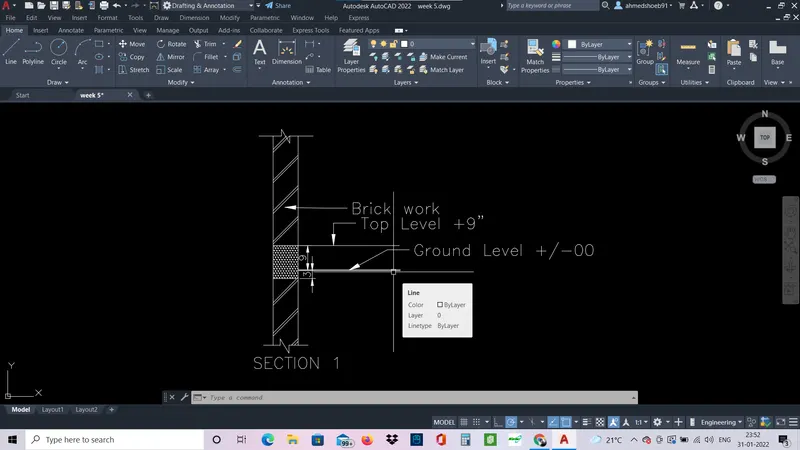
- Create a wall section of 9” width and height of 5’
- Give a line in middle and give an offset of 3” and 9” for beam section.
- Extend the top of 9” line and 3” line.
- Trim the inside 3” line.
- Select hatch command and give different hatch for brick wall and beam section.
- Select the label command and give labels for “Top level” and “ground level”
- Give dimensions.
- Select Mtext and and height of 4” and write “SECTION 1”.
Result: -