Creating a Wardrobe detailed drawing, Floor Plan, Kitchen Layout and Column Detail using AutoCad
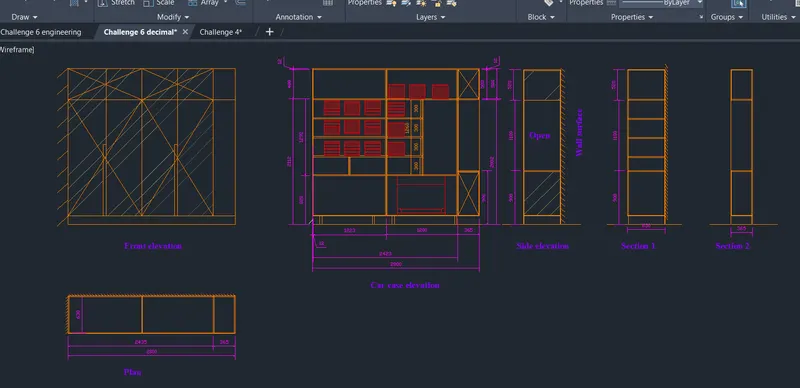
1.Aim: To create the elevation of a building in the Auto cad using engineering system.
- In a particular building elevation is one important module.The elevation gives the out look architectural appearence of the building it is made in various designs to give the pleasant look.
- The elevation is also defined as the side view of the building from all sides of the building.
- The elevtaion may decide the final outlookview of the building.
- The elevatiion is formed by the projection of lines of edges of the plan in the vertical direction, By using the reference of the plan we can prepare the elevation of the building very efficiently.
Procedure :
- Click on new File and create the new template for potting the drawing.
- Now enter units (un) command and select the decimal system in the units and also set the precision of the units and insertion scale to mm and click on ok.
- The Elevation is prepared by the projection of the lines from the plan in the vertical direction.The projection of lines can be drawn by using construction lines command entering 'XL' in the command bar which may be the very useful for the preparation of the elevation.
- From the reference of the plan the outer edge of the building lines are projected which specifies the length of the building.
- Now again enter the 'XL'command in the command bar and the height of the building is plotted by using the lines which are projected from the sectional view of the building. These projection lines are projected horizontally which meets the lines projected from the plan of the building.
- After forming the outer perimeter of th buildingNow the front portion slab and beam projections are plotted.
- After the slab and beam projections the doors,windows,stair case is plotted according to the height level of the bulding from the reference of the plinth beam.Firstly we need to plot the plan or elevation of the building and locate the positions of the columns at the specified points.
- Now using the hatching command 'H' enter in the command bar the walls,doors,windows, beam and column projections are hatched.
- Hatching specifies the mode of material to be used for making the architectural view of the building or car case.
- Now dimlinear command the dimensions of the elevation are plotted,it will be useful if we create the new dimension style.
- Create a new text style by entering 'ST'command in the comand bar.
- Now using text or mtext command the elevation details are written to specify the different items of the model.
- Now using the layers command assign layers to the various units of the elevation model as we required.
- The final result of the elevation of the bulding or carcase is obtained as shown inthe below.
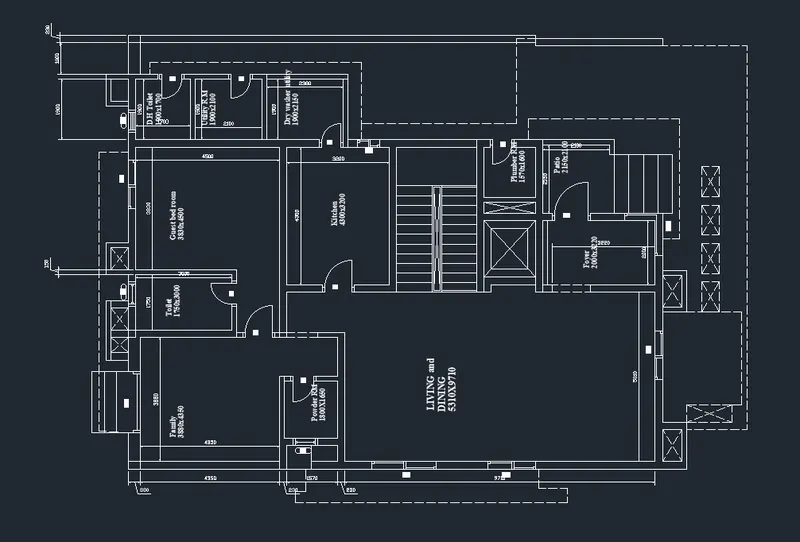
2. Aim: To create the floor plan lay out of a residence in the Auto cad using Engineering system.
- The floor plan is nothing but the lyout of the walls of the various rooms of the bbuilding or any other structure.
- The floor plan shows about the details of the size of the rooms,doors,windows,ventilators and furniture of the building.
- In this the thickness of the main and partiotion walls can be easily identified.
- The floor plan is very useful during the super structure construction.
Procedure :
- Click on new File and create the new template for potting the drawing
- Now enter units (un) command and select the decimal system in the units and also set the precision of the units and insertion scale to mm and click on ok.
- The sizes of the rooms can beplotted by using the rectangle or poly line or line command in the command bar,It will be more use ful to select the rectangle or poly line command to plot the size of the with accuracy.
- After plotting a particular room, the walls are created by using the offset command 'o' inthe command bar. The walls created with an offset distance of 230mm for the main walls and 150mm for the partition walls.
- The rooms are created one after the other as there will be a wall between the two rooms.
- Now after creating the walls using the trim command 'tr'in the command bar the walls are trimmed to insert the doors for access into the rooms.
- The dooors are inserted by using the block command.The doors are plotted separately in the model space and there are created as blocks and then they inserted at required room entrances.
- In the same way the windows and ventilators are also created as blocks and they are inserted in the place where they are required.
- Every room should be provided atleast with an windowand every toilet is to be provided with a ventilator
- The sunshade or chujja projections are to be mentioned with the dotted imaginary line over the windows and ventilators of the building.
- The staircase is plotted with the plan of the treads of the steps.The terad of the stair is 300 mm and the rise of the stair is 150mm.
- The Details of the rooms are plotted with the text command. The text command will be single line text or multiline text.
- The text style is created or modified by using the 'ST' command. In the st command the text font,size,lineweight etc are modified and set as current to use the style in the lay out.
- The dimensions of the layout is plotted using the dim linear command. For the clear understanding the dimension style is also created in the dimension(D) command. In this command the linetype, arrow type, size,text of the dimension,jog factor etc are modified and set as current style.
- Now using the layers command assign layers to the different components of the building.
- New layers are created and specified colours are assigned to each layer and each individual components of the building.
- These layers help to lock or freeze the components of the building while plotting.
- The final layout of the residence is obtained as shown inthe below.
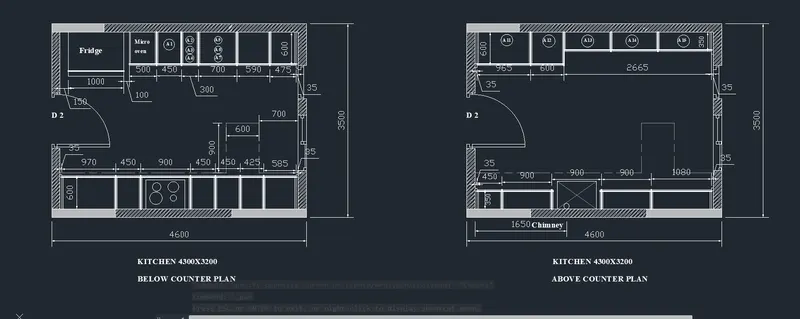
3. Aim: To create the kitchen lay out of a residence in the Auto cad using Engineering system.
- The kitchen lay out is showing the utilities in the kitchen with appropraite placement and sizes of the utilities .
- The kitchen lay out displays the position of refrigirator,gas stove,wash basin and other with the use of the carpet area in the kitchen.
- The kitchen layout is helpful for the easy understanding and useful the laying of the water,gas,electrical layout according to the utilities of the room.
Procedure :
- Click on new File and create the new template for potting the drawing
- Now enter units (un) command and select the decimal system in the units and also set the precision of the units and insertion scale to mm and click on ok.
- The sizes of the kitchen can beplotted by using the rectangle or poly line or line command in the command bar,It will be more use ful to select the rectangle or poly line command to plot the size of the with accuracy.
- The kitchen room is plotted with the size of 4300x3200mm
- After plotting a kitchen room, the walls are created by using the offset command 'o' inthe command bar. The walls created with an offset distance of 150mm for the walls.
- Now after creating the walls using the trim command 'tr'in the command bar the walls are trimmed to insert the doors for access into the rooms.
- The dooors are inserted by using the block command.The doors are plotted separately in the model space and there are created as blocks and then they inserted at required room entrances.
- In the same way the windows and exhaust fan are also created as blocks and they are inserted in the place where they are required.
- The position of refrigirator,microoven,wash basin are ploted and separated by the offset command using the proper offset distance.
- To get the differece between the utilities of the room the line weight of the utilities are increased to evaulate the diffence.
- The Details of the kitchen are plotted with the text command. The text command will be single line text or multiline text.
- The text style is created or modified by using the 'ST' command. In the st command the text font,size,lineweight etc are modified and set as current to use the style in the lay out.
- The dimensions of the kitchnen is plotted using the dim linear command. For the clear understanding the dimension style is also created in the dimension(D) command. In this command the linetype, arrow type, size,text of the dimension,jog factor etc are modified and set as current style.
- Now using the layers command assign layers to the different components of the building if we wish to show the difference btween the utilities of the kitchen.
- New layers are created and specified colours are assigned to each layer and each individual components of the building.
- These layers help to lock or freeze the components of the kitchen.
- The final kitchen layout of the residence is obtained as shown inthe below.
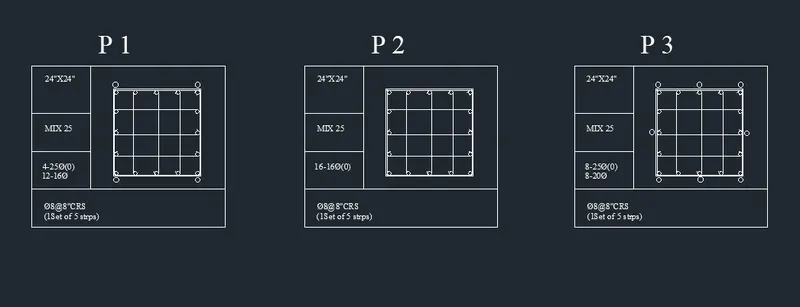
4. Aim: To create the column details of the building the Auto cad using engineering system.
- In a particular building various number of coumns and beams are provided with various sizes and shapes. In the design we need to specify the deatails like size and reinforcement details. so we need to prepare the details for the columns and beams separately.
- By using this schedule we can get know the details of the reinforcement details and as well as the size and shape of the each unit separately.
Procedure :
- Click on new File and create the new template for potting the drawing.
- Now enter units (un) command and select the engineering system in the units and also set the precision of the units and insertion scale to inches and click on ok.
- Firstly we need to plot the plan or elevation of the building and locate the positions of the columns at the specified points.
- The column details can be prepared by the using the table,text and block command.
- The table can be crated from the annotation in the ribbon bar the table can be created by clicking the new option and the properties of the table can be modified as we required according to the schedule.
- The table mainly consists of Title,header and data.The table consists of the size of column and size of the row, text of the data. The boundaries of the table can be modified as we required and we need to mention the required column and rows and we can get the table in the model space.
- The title cell is used to mention the title of the column or beam unit or doors etc.
- The addition of rows and columns can be modified according to the situtaion in the model space.
- Now using the Mtext or by clicking in the required cell we can mention the title,Size and mix proportion of the concrete.
- The schedule also gives the details of the main rein forcement, stirrups or hellical reinforcement along with the sizes.
- The model type of column or beam can be mentioned using the Block command.
- Now using the layers command assign layers to the table as we required.
- The final result of the schedule of columns is obtained as shown inthe below.
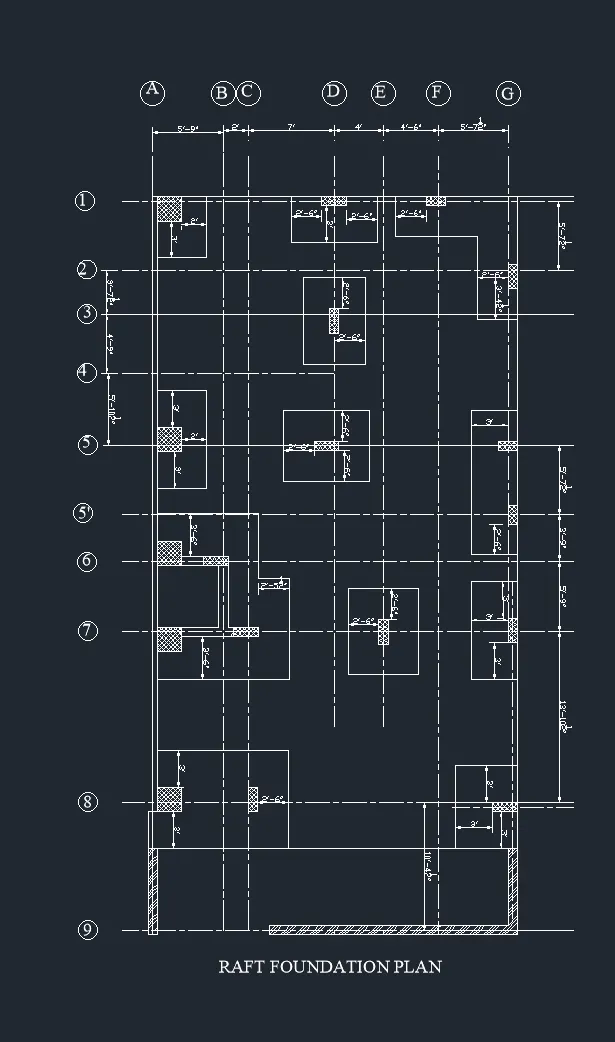
5. Aim: To create the raft foundation lay out of a residence in the Auto cad using Engineering system.
- The raft foundation lay out is nothing but the lyout of the columns and layout of the footings of building or any other structure.
- The raft foundation displays the orientation ofthe columns and the spacing between the columns of the building.
- The raft foundation is used for the marking of the position of the columns which will be used up to the plinth level of the building.
- The raft foundation plan is very useful during the sub structure construction.
Procedure :
- Click on new File and create the new template for potting the drawing
- Now enter units (un) command and select the engineering system in the units and also set the precision of the units and insertion scale to inches and click on ok.
- The building is to be arranged with columns to transfer the load coming from the super structure to the soil, for the smooth processs the columns are arranged in such a way that the load is transformed with out any deflection of the structure.
- The columns are arranged and oriented according to the load transformation.
- Firstly one of the column of 24"x24" is the extreme edge column is placed by using the rectangle or polyline command.
- By using the offset command the other columns cetre lines are plotted by using the various offset distances.
- The columns may be either 9"x24" or 9"x18" and they are plotted withthe appropraite diatance and the orientation is decided according tothe design of the building.
- The centre lines of the column are plotted to know the action of load of the building.
- The centre lines are also used to plot the the raft under the columns of the buildings.
- The raft under the coluumns are plotted with the offset command and using the trim command the excess lines are trimmed to avoide the confusion while marking the columns in the site.
- Byusing hatch command 'h' in the command bar,The columns are hatched to get to know the formation material of the column and to identify easily inthe layout.
- The Details of the column are plotted with the text command. The text command will be single line text or multiline text.
- The text style is created or modified by using the 'ST' command. In the st command the text font,size,lineweight etc are modified and set as current to use the style in the lay out.
- The dimensions of the layout is plotted using the dim linear command. For the clear understanding the dimension style is also created in the dimension(D) command. In this command the linetype, arrow type, size,text of the dimension,jog factor etc are modified and set as current style.
- Now using the layers command assign layers to the different components of the building.
- New layers are created and specified colours are assigned to each layer and each individual components of the building.
- These layers help to lock or freeze the components of the building while plotting.
- The final layout of the raft foundationof a residence is obtained as shown inthe below.