Creating a Residence Layout, Seating plan, Toilet and Utility room plan using AutoCad
Aim:To draw the given diagrams in AutoCAD using various Commands of the AutoCAD and the various Functions present in AutoCAD.
Process:We draw the given diagrams in AutoCAD using the various Commands and Functions present in AutoCAD.
The various Commands we use in the process of drawing are:
- LINE
- CIRCLE
- TRIM
- OFFSET
And,we even give the Dimensions of the diagrams along with the Texts.
FIGURE 1
Aim:
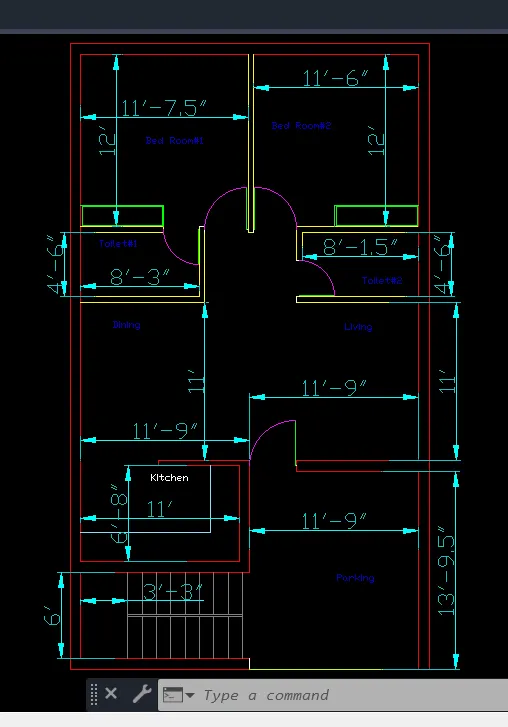
To draw the given Plan in AutoCAD by using various Commands.
Process:
We draw the given plan in AutoCAD by using various Commands.
The various Commands we use in the AutoCAD to draw the plan are:
- LINE
- CIRCLE
- TRIM
- OFFSET
- XLINE
The process of drawing goes on as:
- Initially,we use the XLINE Command to draw the Horizontal and the Vertical Line which could thereafter act as any one of the corners of the Building.Actually,this is a recommended step to start as a basic one,as for this there is no requirement of the specific length and this line appears all over the screen whatever be the zooming.
- After getting a corner due to the intersecting of these 2 lines,we trim the extra parts to form a proper corner.
- Now,we start from drawing the Bed Room 1 where we offset the lines at the proper distances basing upon the given dimensions to form the room and then we trim for the door and after forming the internal wall between the bed rooms,we start drawing the Bed Room 2 where the same like trimming is done for the formation of doors.
- And we even draw the cupboards.
- Now we form the internal walls which act as the walls for the bath room where we offset the lines as per the thickness of the internal walls and we even trim the lines to form the door gaps.
- Now,we draw the Living and Dining with the same process and then we go for the Kitchen.
- And finally,we draw the steps and form the Parking.
- We draw the doors using the LINE Command basing upon the given dimensions of the doors and and we even mention the pattern of the door opening.
- After the drawing,we form the different layer with the different colours such as like External Walls,Internal Walls,Stairs,Furniture,Entrance,Door Openings and for the Text and the Dimensions.
- We even mention the dimensions,using the Linear Dimension Option.
- Therafter,we apply the text.
- Here,we even use the Polar Mode and Dynamic Mode where ever required.
Result:
Hence,the given plan is formed in the AutoCAD.
FIGURE 2
Aim:
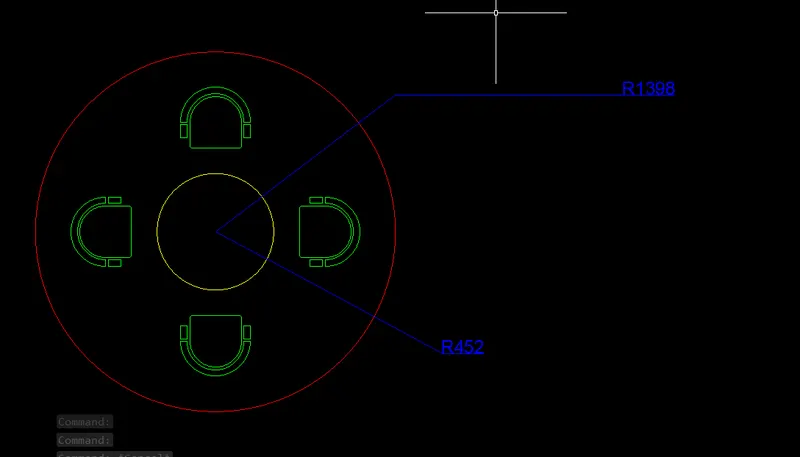
To draw the given Outdoor Sitting in AutoCAD by using various Commands.
Process:
We draw the given Outdoor Sitting in AutoCAD by using various Commands.
The various Commands we use in the AutoCAD to draw the plan are:
- LINE
- CIRCLE
- TRIM
- OFFSET
The process of drawing goes on as:
- Initially,we start the drawing the Circles using the CIRCLE Command.
- Where,next we have to draw the Chairs.
- For us to form the Chairs,we initially draw a rectangle where form a semicircle over it to form as a chair where and we offset these circles to form the handles of the chairs.
- We even have to draw the small rectangles as a part of the handles of the chairs.
- Where we trim these parts where ever necessary and we even fillet the rectangle bottom to form the rounded corners.
- Now,the same process is carried out to draw the remaining 3 chairs.
- Finally,the dimensions have to be provided.
- And the different layers are to bed added such as Base,Table,Chairs and the Dimensions.
Result:
Hence,the given Outdoor Sitting is formed in the AutoCAD.
FIGURE 3
Aim:
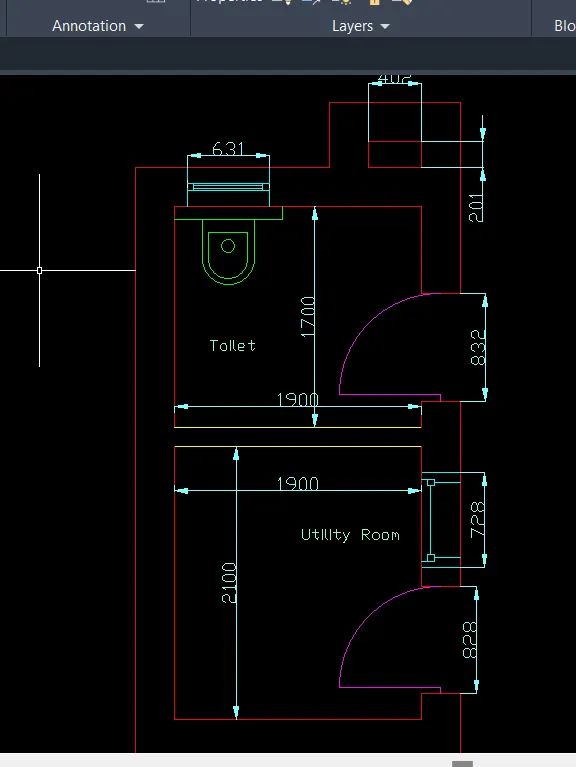
To draw the given in AutoCAD by using various Commands.
Process:
We draw the given Utility and Toilet Room Plan in AutoCAD by using various Commands.
The various Commands we use in the AutoCAD to draw the plan are:
- LINE
- CIRCLE
- TRIM
- OFFSET
- XLINE
The process of drawing goes on as:
- Initially,we use the XLINE Command to draw the Horizontal and the Vertical Line which could thereafter act as any one of the corners of the Building.Actually,this is a recommended step to start as a basic one,as for this there is no requirement of the specific length and this line appears all over the screen whatever be the zooming.
- After getting a corner due to the intersecting of these 2 lines,we trim the extra parts to form a proper corner.
- Now,we start from drawing the Toilet where we offset the lines at the proper distances basing upon the given dimensions to form the room and then we trim for the door and after forming the internal wall between the Toilet and the Utility Room,we start drawing the Utility Room where the same like trimming is done for the formation of doors.
- And we even draw the Ventilators.
- We draw the doors using the LINE Command basing upon the given dimensions of the doors and and we even mention the pattern of the door opening.
- After the drawing,we form the different layer with the different colours such as like External Walls,Internal Walls,Furniture,Ventilater and for the Text and the Dimensions.
- We even mention the dimensions,using the Linear Dimension Option.
- Therafter,we apply the text.
- Here,we even use the Polar Mode and Dynamic Mode where ever required.
- We draw the water closet just by forming the rectangles and circles,where we use TRIM and OFFSET Commands
Result:
Hence,the given Outdoor Sitting is formed in the AutoCAD.