Creating a Residence Layout, Seating plan, Toilet and Utility room plan using AutoCad
Q-1:-
Residence Plan:-
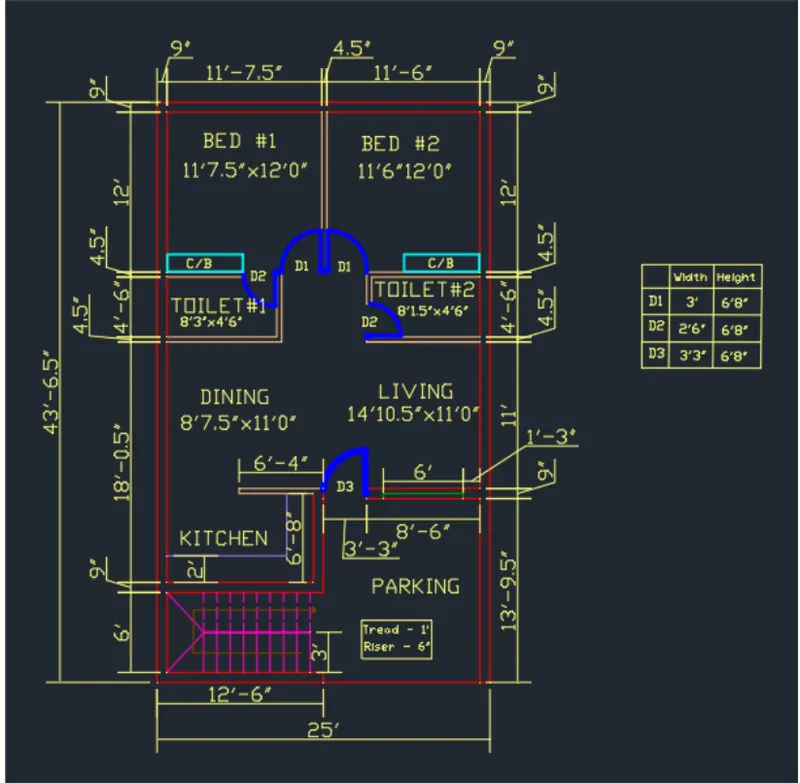
Sketch the layout of a residence as shown in the Figure 1. Consider all dimensions as reference to sketch the unit plan. Also the text in the layout are only for reference. Assume the missing dimensions. Also, refer the schedule for size of the doors.
A) AIM:-
Draw given drawings by using Autocad
PROCEDURE:-
step 1 :
- Go to START MENU, select AutoCAD 2023
- In the Command line type in: STARTUP [ENTER]
- Enter new value of startup: 1
- Go to Application Menu and select New
- In the 'Create New Drawing' dialog box, we do the Advanced Setup and select the Engineering unit of measurement and select precision as 0'-0.0"
- Set the limits by entering LIMITS in the Command tab. The lower-left corner is specified as 0'0.0",0'0.0", and the upper-right corner is specified as 100',100'
- Enter UNITS command in the command tab.
- In the Drawing Units dialog box, select Engineering in Type: 0-0.0" in Precision; and Inches in Insertion scale
- Click on 'OK'.
STEP 2
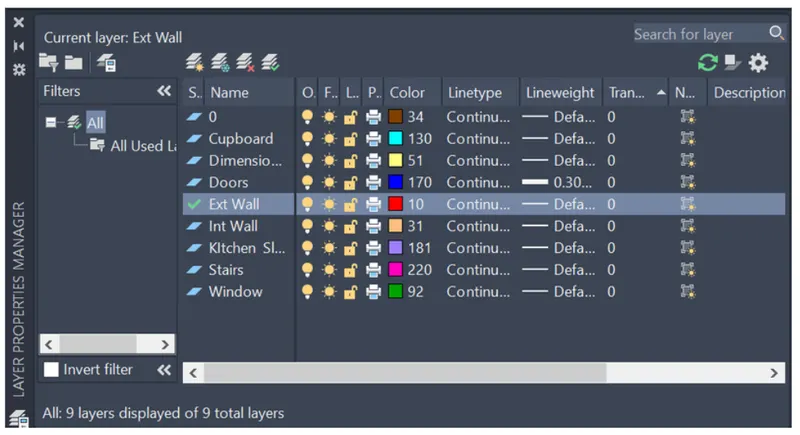
- Click on Layer Properties in the Layer panel on the Ribbon.
- Click on 'Now Layer to create the following layers - Doors, External Wall, Internal Wall, Window, Stairs, Kitchen Slab, Cupboard, Dimension and Text.
- Specify different colors for the different layers and then close the Layer Properties Manager dialog box.
Step:-3
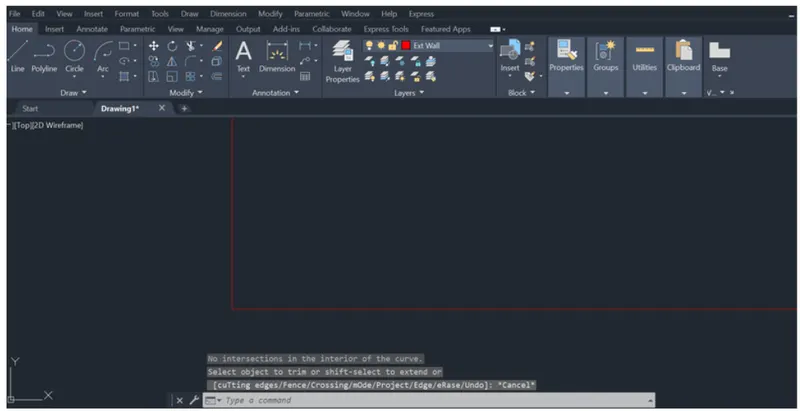
- To begin drawing, select the Ext Wall layer as the default layer in the Layer panel.
- Select the Construction Line tool by entering 'XLINE' command in the command tab.
- Draw two lines, one vertical and the other horizontal, both intersecting at a point.
- Press Esc to cancel the XLINE.
- Select the Trim tool by entering 'TR' command in the command tab.
- Press ENTER.
- Select Edge option; and click on No Extend.
- Select the extruted lines.
- Press 'Esc' to cancel the TRIM command.
STEP 4
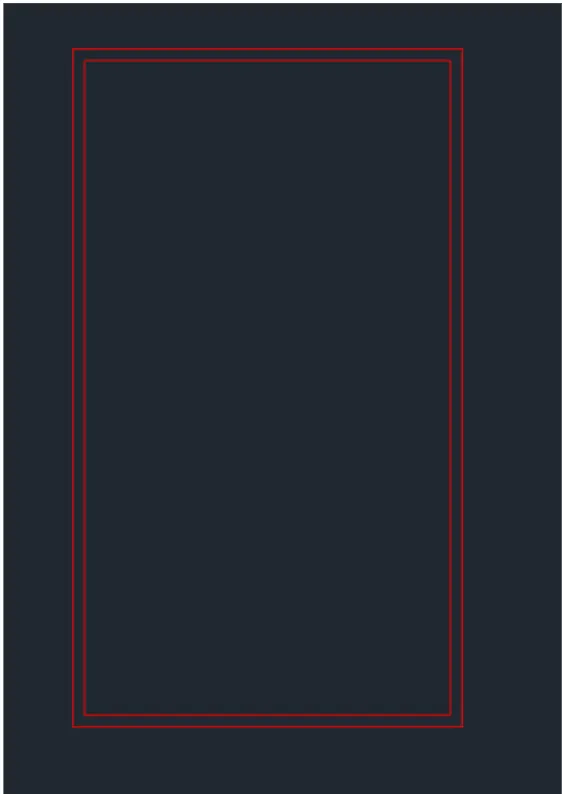
- Select the Offset tool by entering OFFSET command in the command tab
- As thickness of external wall is 9", enter 9.0" as offset distance in the command line
- Select both the vertical and horizontal lines of the above drawing
- Specify the next point on the desired side to offset.
- The vertical outer line is offsetted to a distance of 25", which is then offsetted to a distance of 9" as is the thickness of the wall.
- The horizontal outer line is offsetted to a distance of 436.5", which is then offsetted to a distance of 9" as is the thickness of the wall.
- Press Esc' to cancel the OFFSET command
- The unwanted lines are trimmed off using the TRIM command
STEP 5
- Next Offset command is repeated to create all other external walls according to the dimensions given in the
- plan.
- The bottom inner horizontal line is offsetted to a distance of 6, and the line formed is again offseted to a distace of 9" as is the thickness of the external wall
- The bottom outer horizontal line is offsetted to a distance of 13'9.5", and the line formed is again offseted to a distace of 9" as is the thickness of the external wall.
- The left ourter vertical line is offsetted to a distance of 12'6", and the line formed is again offseted to a distace of
- 9 as is the thickness of the external wall
- Then the lines are Trimmed, Erased, Extended and/or Joined to edit the drawing as per requirement.
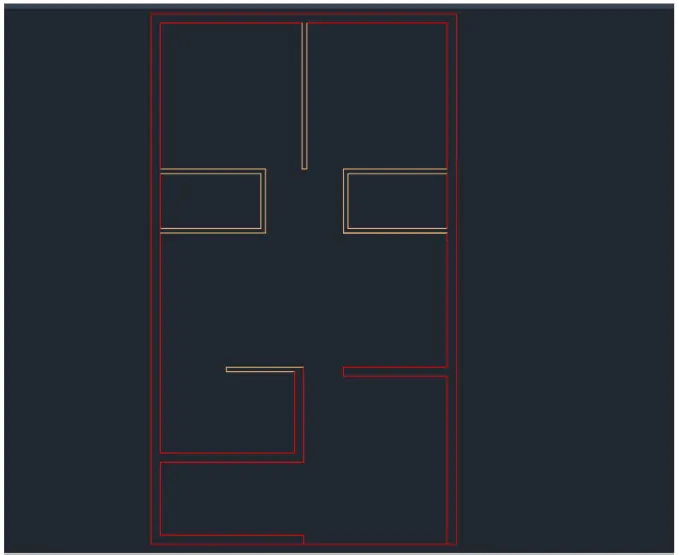
- Once all the external wall have been created, next the internal wall are drawn
- Select the Int Wall layer as the default layer in the Layer panel.
- Select the Offset tool by entering OFFSET command in the command tab.
- Specify the offset distance, Select the line to offset and click on the direction we need the line in
- while offsetting the thickness of the internal walls is specified to be 4.5".
- Press Esc to cancel the OFFSET command.
- The new lines drawn are selected and assigned to the Int Wall layer.
- Then the lines are Trimmed Erased Extended and/or Joined to edit the drawing as per requirement
STEP 6
- For staircase drawing, select the Stairs layer as the default layer in the Layer panel
- Select the Line tool by entering LINE command in the command tab.
- Draw a line of length 6' at a distance of 2'9" from the bottom left inner corner of the plan.
- Press Esc to cancel the LINE command.
- Select the Offset tool by entering 'OFFSET command in the command tab.
- Specify an offset distance of 1, then click on the desired side.
- Next keep selcting and offsetting the lines for 8 more times to form the stairs.
- Press Esc to cancel the OFFSET command.
- Select the Line tool by entering LINE command in the command tab.
- Draw a line through the mid-point of the 6 long lines created previously to divide the stairs.
- Press Esc to cancel the LINE command.
- Again select the Line tool by entering LINE' command in the command tab.
- Draw a line showing the direction of the stairs.
- Press Esc to cancel the LINE command.
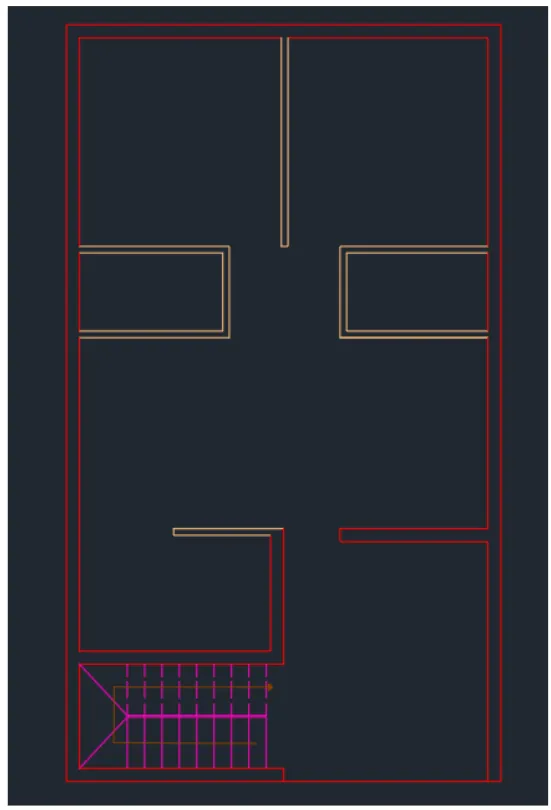
STEP 7
- To draw doors, select the Doors layer as the default layer in the Layer panel
- Select the Line tool by entering LINE command in the command tab.
- Draw doors at the specified positions.
- Door D3 is created at the entrance with a width of 3'3"
- Press Esc to cancel the LINE command
- Selet the Arc tool from the ribbon, choose the Start, End, Direction option, then draw an orc to represent the swing of the door by specifying the start, end and direction of the arc as suitable.
- Select the Line tool by entering LINE command in the command tab
- Door D1 is created at the entry of each bedroom with a width of 3.
- Press Esc to cancel the LINE command
- Seet the Are tool from the ribbon, choose the Start, End, Direction option, then draw an arc to represent the swing of the door by specifying the start, ond and direction of the arc as suitable
- Select the line tool by entering LINE command in the command tab.
- Door D2 is created at the entry of each bedroom with width 2'6"
- Press Esc to cancel the LINE command.
- Selet the Arc tool from the ribbon, choose the Start, End, Direction option, then draw an arc to represent the swing of the door by specifying the start end and direction of the arc as suitable.
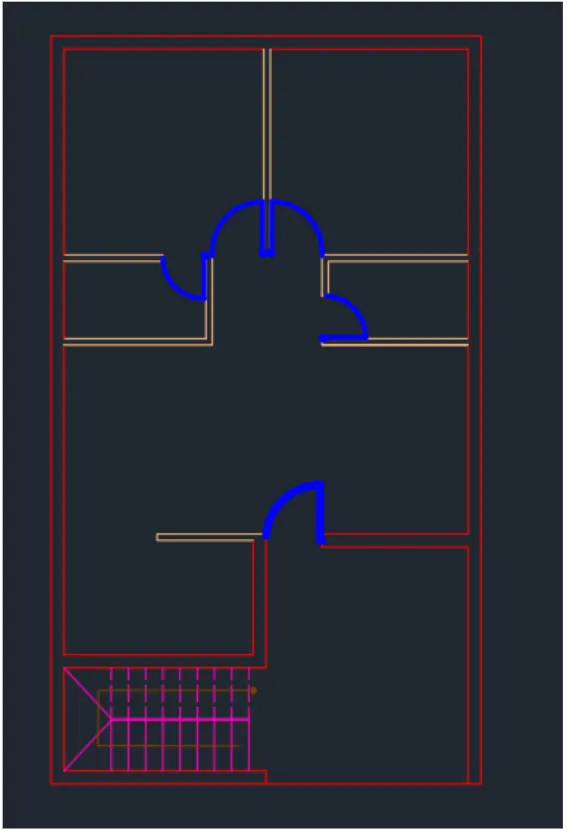
STEP 8
- To draw the kitchen slab, select the Kitchen slab layer as the default layer in the Layer panel.
- Select the Offset tool by entering Offset command in the command tab.
- Specify the Offset distance as 2
- Select the vertical and horizontal inner lines of the kitchen wall.
- Specify the point on side to offset
- Press Esc to cancel the Offset command.
- Select the Trim tool by entering TR command in the command tab
- Press ENTER
- Select Edge option, and click on No Extend
- Select the unwanted lines
- Press 'Esc' to cancel the TRIM command
- Next, to draw the window, select the Window layer as the default layer in the Layer panel
- Select the Line tool by entering LINE command in the command tab
- Draw a line of 9' at the inner edge of the bottom living room wall.
- Press Esc to cancel the LINE command
- Select the Offset tool by entering 'Offset' command in the command tab.
- Specify the Offset distance as 1'3".
- Select the vertical line of 9" lenght.
- Specify the point on side to offset.
- Again offset the new line to a distance of 6'.
- Select the vertical line of 9" lenght.
- Specify the point on side to offset.
- Press Esc to cancel the Offset command.
- Erase the first line created.
- Select the Line tool by entering 'LINE' command in the command tab.
- Draw a line joining the midpoint of the last two lines to form the window.
- Press Esc to cancel the LINE command.
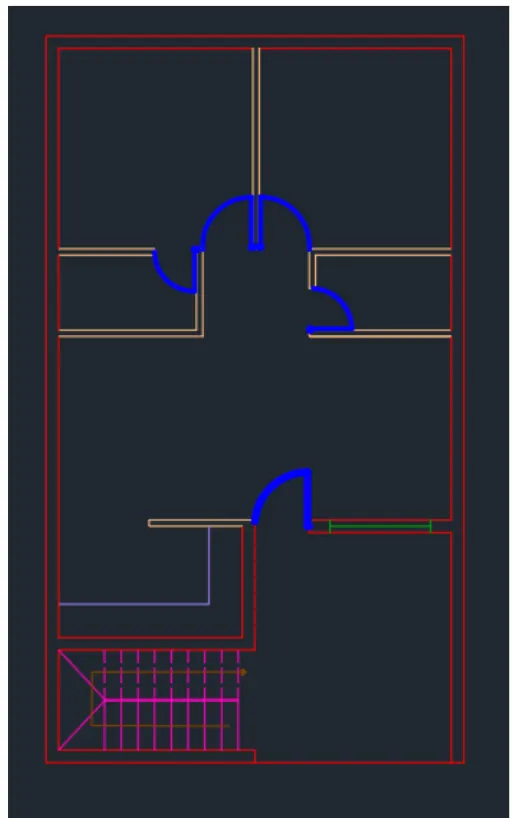
STEP 9
- To draw the Cupboards, select the Cupboard layer as the default layer in the Layer panel.
- Select the Rectangle tool by entering 'REC command in the command tab
- Specify the first corner as the bottom left corner of Bedroom I, drag the cursor and specify the second point at a distance equal to the length of the common wall between Toilet 1 and Bedroom 1.
- Select the Offset tool by entering 'OFFSET command in the command tab
- Specify an offset distance of 1".
- Select the rectangle created earlier, and then click on the inside of the previous rectangle
- Press Esc to cancel the OFFSET command.
- Select the Copy tool by entering COPY' command in the command tab
- Select the rectangles created earlier, press ENTER.
- Specify the base point as the bottom right corner of the rectangle created previously.
- Specif the second base point as the bottom right corner of Bedroom 2.
- Press Esc to cancel the Copy command.
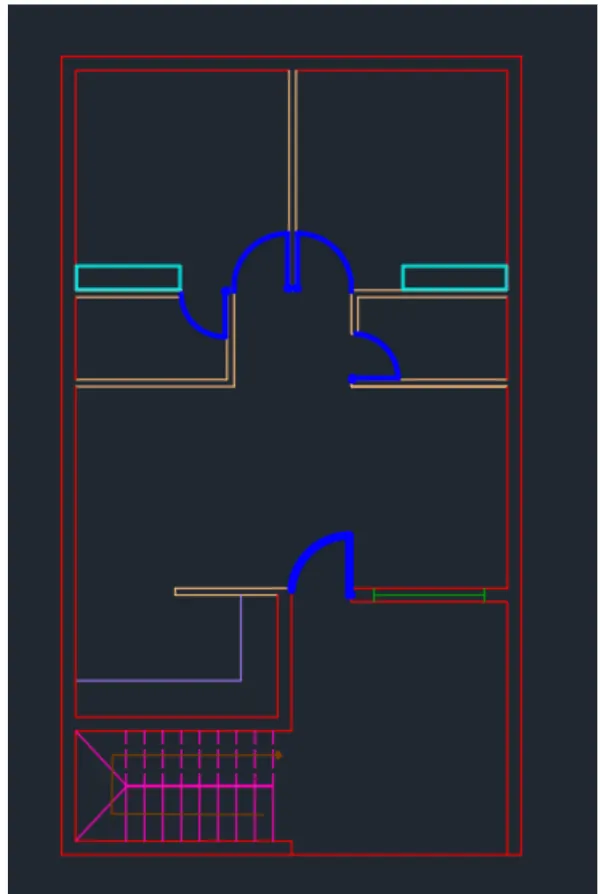
STEP 10
- Select the Dimension and Text layer as the default layer in the Layer panel
- Enter DST command in the command tab to open the Dimension Style Manager dialog box.
- Click on the Modify tab.
- Under the lines option change the colour of the dimension and extension lines.
- Under the Symbols and Arrows option change the Arrow size to 1.
- Under the Text option change the Text height to l'.
- Click OK. Then click on Set Current and Close the dialog box.
- Select the Dimension tool by entering DIM in the command line.
- Select the first point and second point of the object to be measured, then drag the dimension line to the desired location. Repeat for all the objects to be measured.
- Enter TEXT command in the command line.
- Specify the start point of text as required.
- Specify height of text as 1
- Specify angle of rotation of text as 0.
- Copy the text box to wherever necessary, and then enter the desired data into it.
- Click enter and press Esc.
- Save the draving.
Result:-
Q-2:-
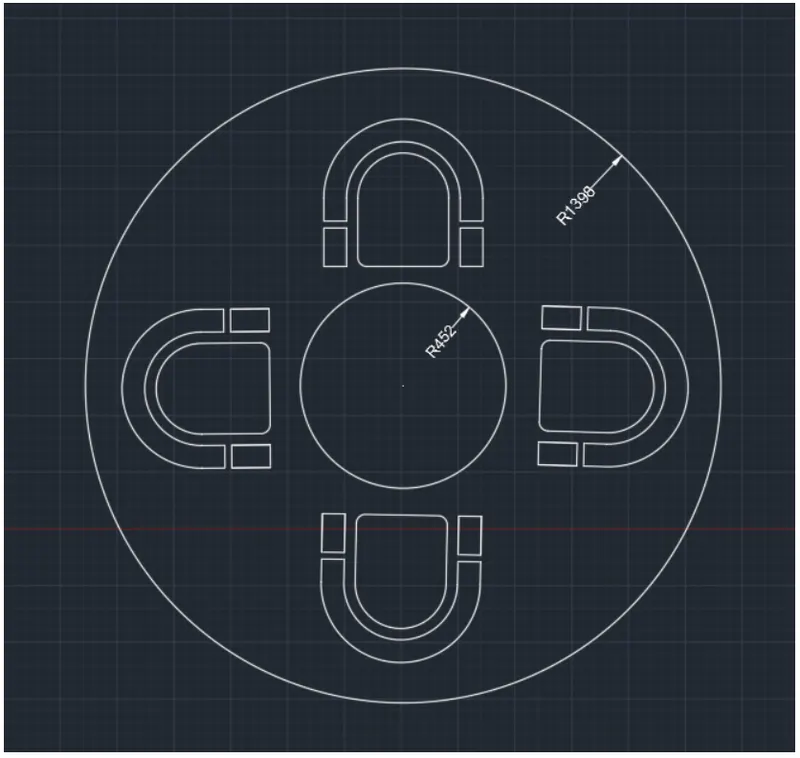
Sketch the seating plan for an outdoor canopy, Assume the dimensions for the seating. Also, consider the dimensions in mm.
A) AIM:-
Draw given drawings by using Autocad
PROCEDURE:-
- Arrange the limits,units as per the given dimensions.
- To draw this drawing we mostley use circle command.
- After circle drawn we need to download the door cad blocks we require.and arrange the as per the drawing.
- After the completion of drawing we need to use dimension bar to indicates the distances.
Result:-
Q-3:-
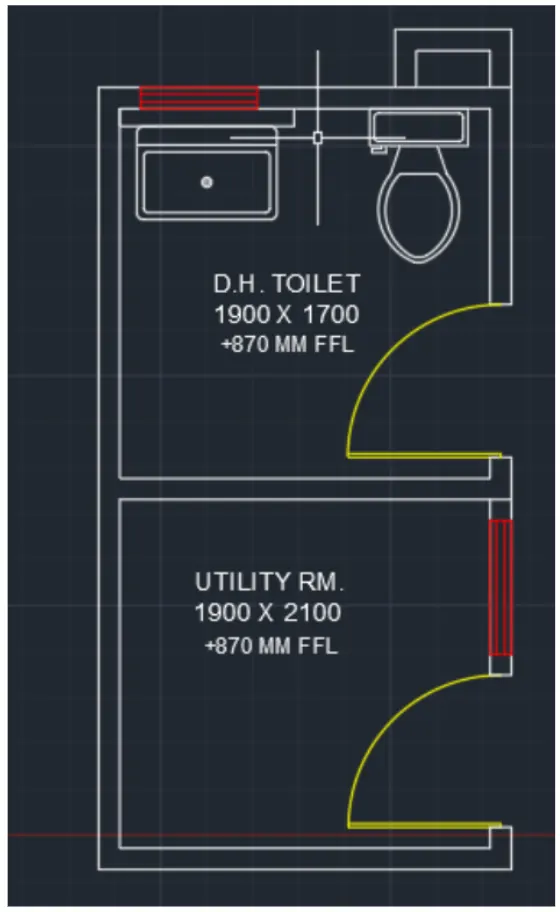
Sketch the part plan for the tollers and utilities room. Consider the outer wall thickness as 300mm and inner wall thickness as 150mm. Also, assume the missing dimension, Texts, dimensions, and hatches are only for references. Also, symbols for toilets and w/c are also for references.
A) AIM:-
Draw given drawings by using Autocad
PROCEDURE:-
- Arrange the limits,units as per the given dimensions.
- To draw this drawing we mostley use line,offset,mtext,trim,Hatch command.
- while drawing we schould be clear about dimensions given in the drawing.
- here we need to download require materail and place as per drawing and use text button to indicate the place.
- After the completion of drawing we need to use dimension bar to indicates the distances.
Result:-
Note:- All diamention are in mm