Creating a Residence Layout, Seating plan, Toilet and Utility room plan using AutoCad
1. RESIDENCE PLAN
AIM
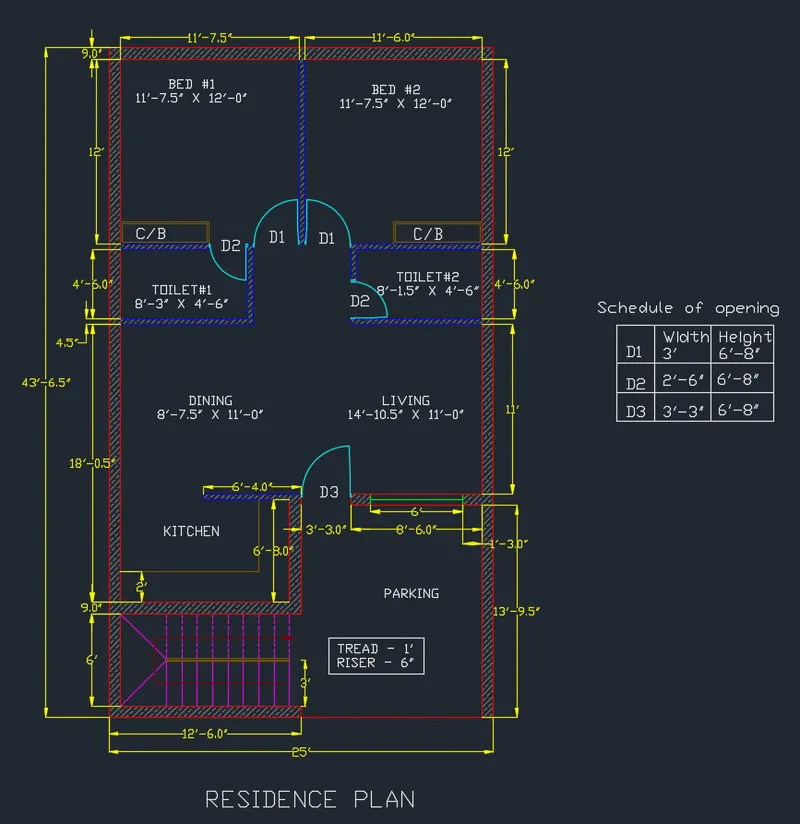
Sketch the layout of a residence, consider all dimensions as reference to sketch the unit plan. Also, the text in the layout is only for reference. Assume the missing dimensions. Also, refer the schedule for size of the doors
INTRODUCTION
The Residence plan can be drawn with help of some important command like line, rectangle, offset, fillet etc., the plan is executed according to the given figure
PROCEDURE
- Open the AutoCAD software and dick on new for a new drawing sheet
- Enter units in command box
- Select Engineering in type 0’-0.0” in precision and inches in units to scale inserted content Press OK
- Ensure the dynamic input is off
- Choose line command by pressing 'L' enter and to give the dimensions to the command, the line was drawn.
- Take the offset command to give size of exterior wall and interior wall
- Indicate the direction of the line by line keeping ortho mode is ON
- Type OS in the command bar for object snap
- Go to polar tracking settings in the dialogue box
- Give the line, rectangle, offset and fillet command measurement as per given in drawing as question
- After completion of drawing exit from command and starting giving dimensions
- To give dimensions and angles enter 'DIM'(Dimension) and select the line to locate the dimension in object
- To set the properties of dimension enter 'DIMS' (Dimension style) and specify the sizes as per requirements
- To save the file, go to the AutoCAD application and choose the save as option
- Now select the snapping tool to take screenshot
RESULT
2. OUTDOOR SEATING WITH CANOPY
AIM
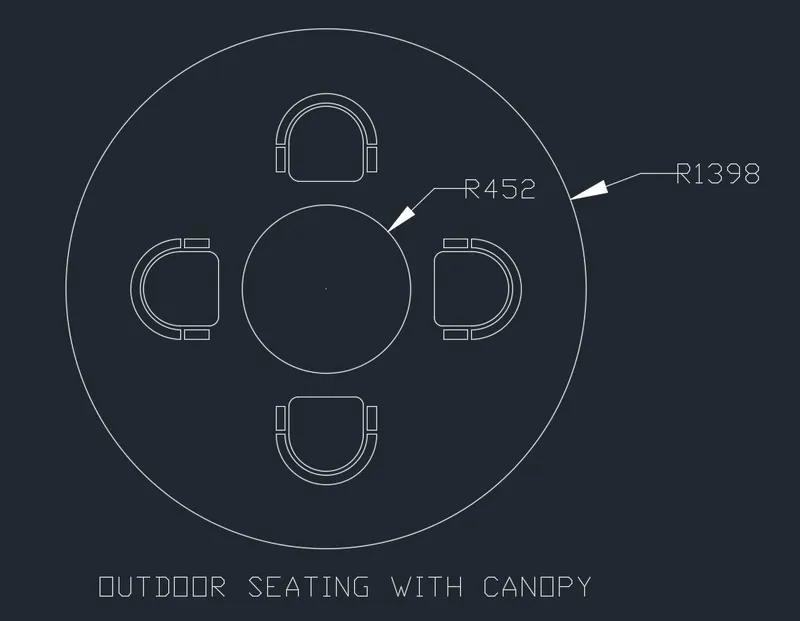
Sketch the seating plan for an outdoor canopy. Assume the dimensions for the seating Also, consider the dimensions in mm
INTRODUCTION
The outdoor seating with canopy can be drawn with help of some important command like circle, rectangle, line, rotate, mirror, fillet, offset etc., the outdoor seating with canopy is executed according to the given figure
PROCEDURE
- Open the AutoCAD software and dick on new for a new drawing sheet
- Enter units in command box
- Select Decimal in type 0 in precision and millimetre in units to scale inserted content Press OK
- Ensure the dynamic input is off
- Choose circle command by pressing 'C' enter and to give the radius to the command, the circle was drawn.
- Repeat the circle command to draw another one
- Indicate the direction of the line by line keeping ortho mode is ON
- Type OS in the command bar for object snap
- Go to polar tracking settings in the dialogue box
- Give the circle, line, rectangle, offset and fillet command measurement as per given in drawing as question
- After completion of drawing exit from command and starting giving dimensions
- To give dimensions and angles enter 'DIM'(Dimension) and select the line to locate the dimension in object
- To set the properties of dimension enter 'DIMS' (Dimension style) and specify the sizes as per requirements
- To save the file, go to the AutoCAD application and choose the save as option
- Now select the snapping tool to take screenshot
RESULT
3. TOILETS AND UTILITIES ROOM PLAN
AIM
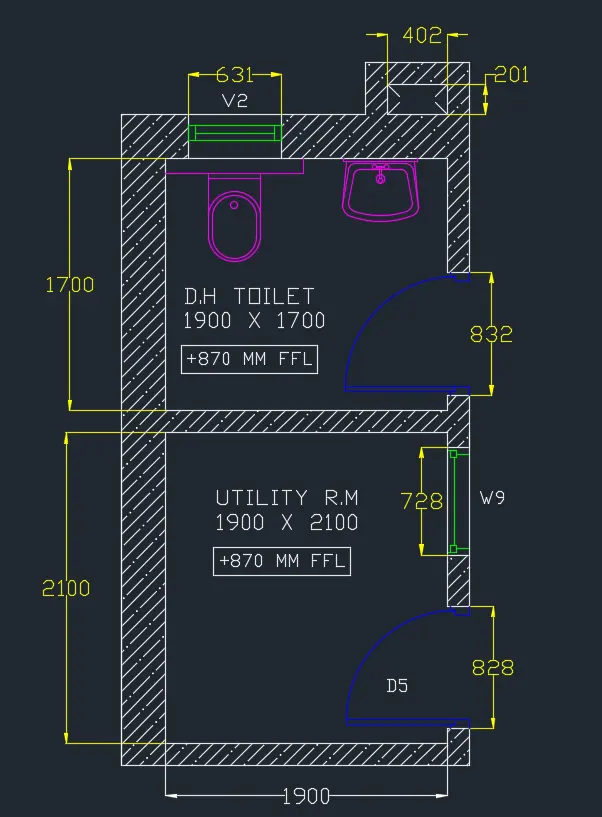
Sketch the plan for the toilets and utilities room. Consider the outer wall thickness as 300mm and inner wall thickness as 150mm. Also, assume the missing dimension, Texts, dimensions, and hatches are only for references. Also, symbols for toilets and w/c are also for references.
INTRODUCTION
The toilets and utilities room plan can be drawn with help of some important command like line, rectangle, offset, fillet etc., the plan is executed according to the given figure
PROCEDURE
- Open the AutoCAD software and dick on new for a new drawing sheet
- Enter units in command box
- Select Decimal in type 0.0 in precision and millimetres in units to scale inserted content Press OK
- Ensure the dynamic input is off
- Choose line command by pressing 'L' enter and to give the dimensions to the command, the line was drawn.
- Take the offset command to give size of exterior wall and interior wall
- Indicate the direction of the line by line keeping ortho mode is ON
- Type OS in the command bar for object snap
- Go to polar tracking settings in the dialogue box
- Give the line, rectangle, offset and fillet command measurement as per given in drawing as question
- After completion of drawing exit from command and starting giving dimensions
- To give dimensions and angles enter 'DIM'(Dimension) and select the line to locate the dimension in object
- To set the properties of dimension enter 'DIMS' (Dimension style) and specify the sizes as per requirements
- To save the file, go to the AutoCAD application and choose the save as option
- Now select the snapping tool to take screenshot
RESULT