Creating a Layout, Section and Elevation with dimensions using AutoCad
a AIM to create a house plan as shown
procedure 1 open autocad
2 open a new sheet form the home rebbon
3 select units
4 select the limits from 0,0
5 create a rec of the required dimention
6 now give it a offset OF 300 MM to make the thickness of the outside wall
7 now from the upper wall of the rec give a offset of 3100 to make the bedroom wall innner wall thickness is 150mm
8 now from the left side of the rec give a offset at 2550 ,1250,1250,3000 to make the walls of 2 toilet and bedrooom
9 give a offset of 150mm to each line to make innner wall thicness
10 now from the left side of ex wall give a offset of 3225,3250,44475 to mke the bedrooom livingroom and dra
11 now use the trim option from the rebbon andmake doors to the bedrooms and toilets
12 now to createsteps give a offset of 2600 from the dra wall and make a exrernal wall of 300mm
13 now ue the erase command to erase the externall wall from the rec and make a separeation
14 now from the small externall wall which we have created leave a distance of 1200 and start making steps by using the offset command
15 let us give the spacing between each step 150mm make some steps ex 8
16 now leave a distance of 1200 and draw a single line
17 from that line leave a distance of 1000 and draw a innerwall 3050 height which will create a bedroom with the externall wall
18 now from the wall ofthe steps give a offset of 2550 ,1225to make dra/kit nd toilet use the trim command to remove the unwanted lines
19 now to create the windows where required take line command and turn n the snap
20 draw a window bitween the exwall of the drawing
21 now use the copy command to copy the window and now plaace it where ever a window is required in the drawing
22 now create a square of small dimention and place it where ever the hatching is reqired
23 now use the command hatch and select the hatch pattern
24 click on the all the square where the hatching is required
25 now go to the home rebbon and use mtext to write the text
26 select multilineext and give the height of the text and write where ever is reqired
27 use the leader optionto write the dimentions when required
28 to increase the leader headsize click on the leader and go to propertys and increae the headsize to 500
29 result 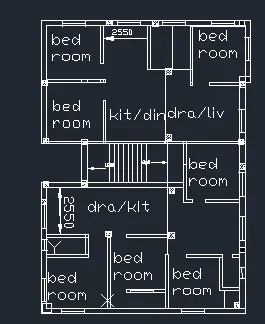
b AIM : to draw the sections as shown
1 draw a line of 11000 in y direction
2 draw a line of 11000 in x direction
3 now give a offset of 200 to the x line
4 now give a line in y direction at a distance of 2450
5 now from that line give a offset of 2850,2850,2850 to male the slabs
6 for each slab give a offset of 125 to make it thick
7 from the left leave a distance od 1400 to make a piller
8 extend the two piller lines to the top slab
9 by using the extend command
10 to extend the lines to the top slab
11 from the left piller leave a ditance of 1400 and make steps t=250
r =143.75
12 at 1st landing give a distance of 1200
13 now give the direction of the steps to the right side till the door
14 continue making the steps till the top floor
15 to make the realing give the linetype command and select dotted or small dash line
16 and give a heght to the railing and connect the points
17 at the top make a rec by selecting rec from the rebbon
18 select mtext to write a text in rec
19 use the leader to give the dimention
20 too increae the leader head size by cliching on leader and give size 500
21 now draw a square at the bottom floor
22 use copy command to make the sqares at every floor
23 use the line option to make the door at every floor
24 by using the line command create the windows where it is needed
25 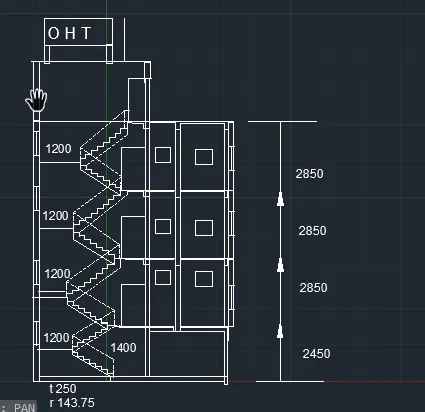
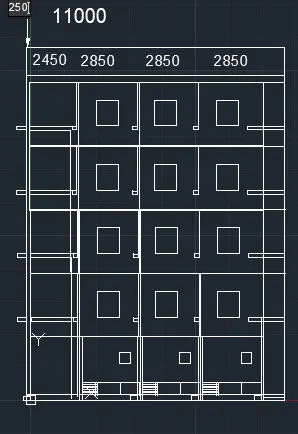
c aim to draw the section
1 draw a line of 11000 mm in x and y direction
2 now give a offset of 250 to the x line to make it thick
3 now give a height of 600 from the bottom line and make3 rec
4 in the left rec givea offset of 20 and make 4 small rec
6 now use the copy option and make this window in the reming two sections
7 now give a height of 2850 and make a slab of 150 mm thickness
8 draw a rec at the center of the section
9 draw a square at the bottom part of the section
10 now use the copy command in the command box
11 select the 2nd floor of the building
13 now press enter
14 now place it on topof each other 3 times to complete the diagram
15 now use the mtext command to use write the text
16 result