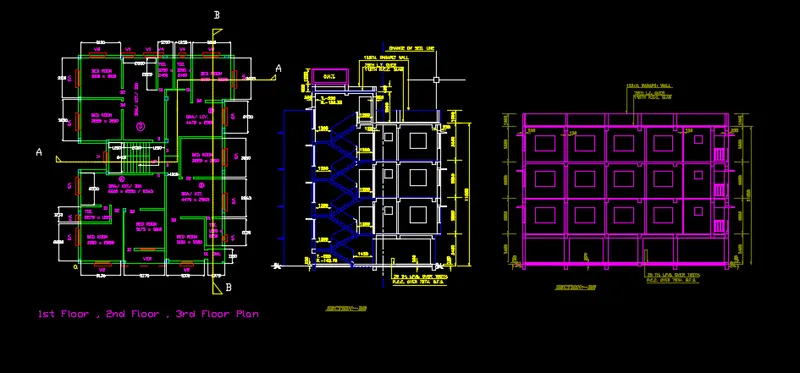
Creating a Layout, Section and Elevation with dimensions using AutoCad
Aim - To create the Plan and Sections as shown in the Figures by using proper dimension techniques and
dimension styles to document the project.
Introduction - i) In a given fig . 1st floor 2nd floor and 3rd floor plan is given with dimensions .
ii) Section A- A is cut through the staircase and toilet .
iii) Section B-B is cut vertically of the right side of the plan.
iv) Following are the commands are used -
a) Construction line -XL
b) Line
c) Rectangle
d) Offset
e Trim
f) Fillet
g) Dimcontinue and DText
h) Hatch
Assume Door Sizes -
| SR No | Door No | Door Size |
| 1 | D | 1100 x 2000 mm |
| 2 | D1 | 750 x 2100 mm |
| 3 | D2 | 900 x 2100 |
Assume Window Sizes and Ventilators
| SR No | Door No | Door Size |
| 1 | W1 | 800 x 1500mm |
| 2 | W2 | 1100 x 1500 mm |
| 3 | W3 | 1300 x 1500 mm |
| 4 | W4 | 700x 500 mm |
Procedure -
i) Open a new drawing (Cntrl + N) with metric units
ii) Select units to Decimal and Precision (0.0) with Milimeters .
iii) Lim-max and limits are also set .
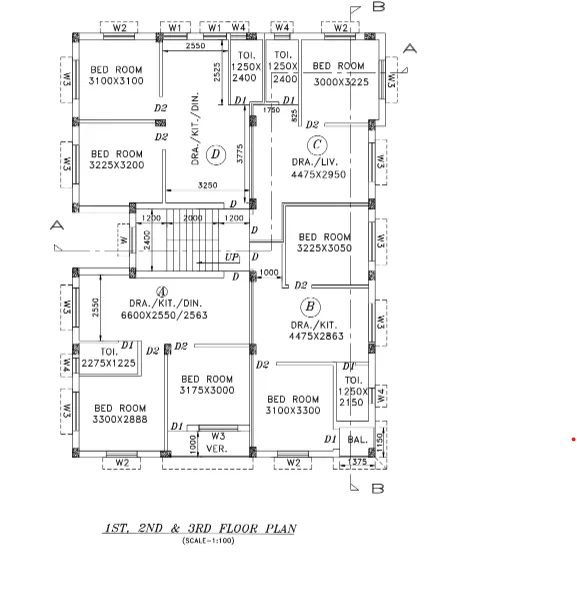
Step by Step Procedure -
A) 1st floor , 2nd floor , 3rd floor
Step 1)
i) Command XL - give horizontal and vertical construction line .
ii) Assume external wall thickness as 230mm and internal wall thickness as 125 mm
iii) Command Offset and give offset of 230 mm horizontally as well as vertically .
iv) Specify base point name as a .
v) Give offset of 3300 in + x direction
vi) Repeat comand give offset of 125mm , 3175mm , 125mm , 3100 mm ,125mm , 1250mm , 230mm
respectively in +x direction . ( For 3 Bedroom with different sizes and toilet .)
vii) Now , give offset from base point A at a distance 2888mm in +y direction
viii) Repeat the command at a distance 1225mm , 125mm , 2550mm , 230mm , 2440mm , 230mm ,
3200mm , 125mm, 3100mm in +y direction ( Bedroom , toilet , DRA/KIT/DIN , Bedroom , Bedroom )
ix) Now take the vertical projection of offsets which are specified in point (vi) and will get the
other room dimensions .
x) Draw the column in a given location as shown in fig .
xi) Command LA and and enter Layer 1 - continuous line - change colour to green .
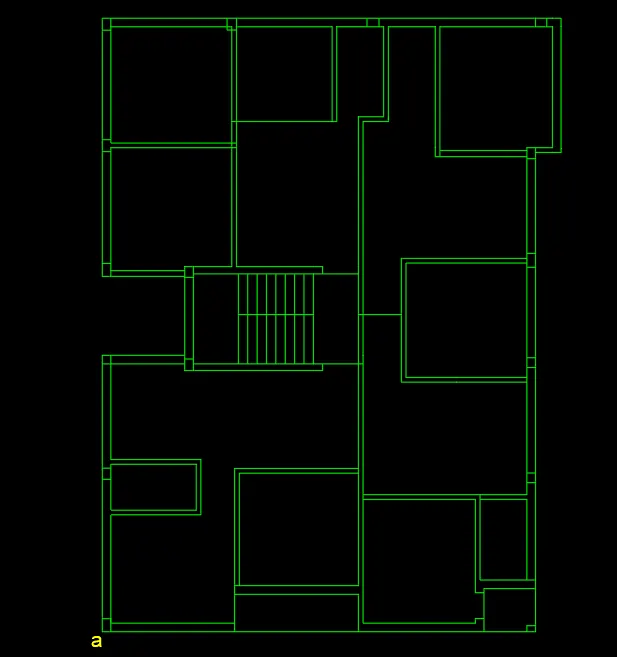
Step 2)
i) As per the Assume sizes give the opening for doors .
ii) Similarly for windows also . and draw the chajja by taking offset of 100mm on both side
and shows it by dotted line .
iii) Give the hatching to the Column as shown in plan .
iv) Commad Hatch - Solid fill .
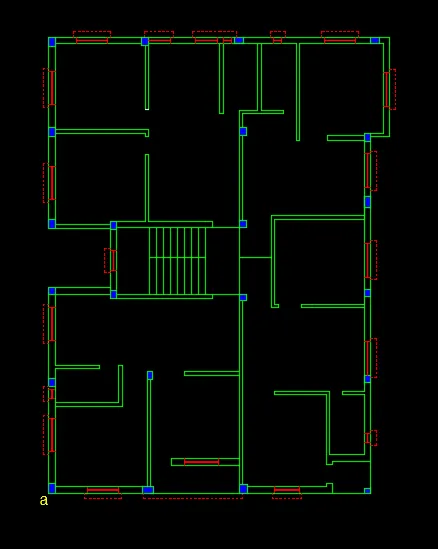
Step 3)
i) After creating the external geometry , openings of doors , windows and shown it by different layers .
ii) Now give Annotatins and Dimensions to the plan .
For Dimensions -
iii) Give command D - Select Standard font - Modify - Select the primary unit - Decimals .
iv) Select Fit - and set scale 20 .
v) Select color to the dimensions directly from text without creating layers .
For Annotations -
i) Give command Dtext
ii) Justify - Center
iii) Style - Arial
iv) Specify point of text
v) Select the text angle - 0
vi) Selelct text height - 100 mm
vii) and give the annotations .
For Stairs -
i) Command Qleader .
ii) Select Annotations - Mtext
iii) max no of points - 3
iv) Select size of arrow- 50 mm .
v) Draw a section line A-A and B- B through stairs and toilet and other rooms as shown in fig .
vi) To show Section line select line type as Center line and change the color to yellow.
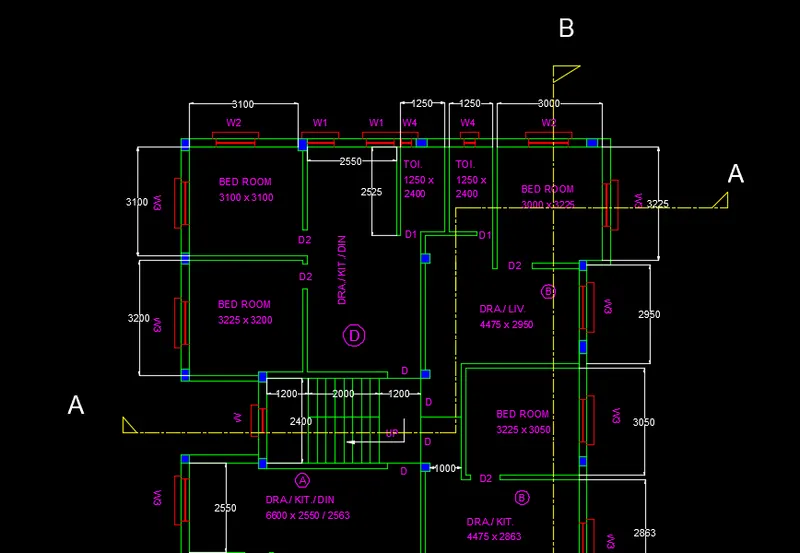
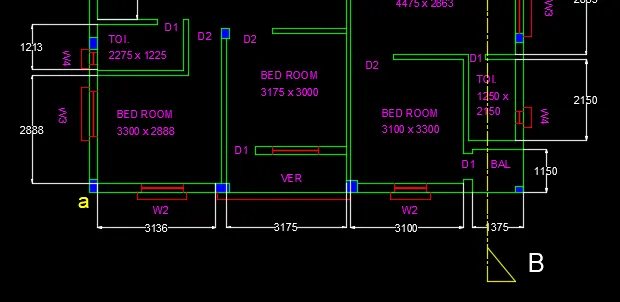
therefore ,
1st floor , 2nd floor , 3rd floor plan is drawn
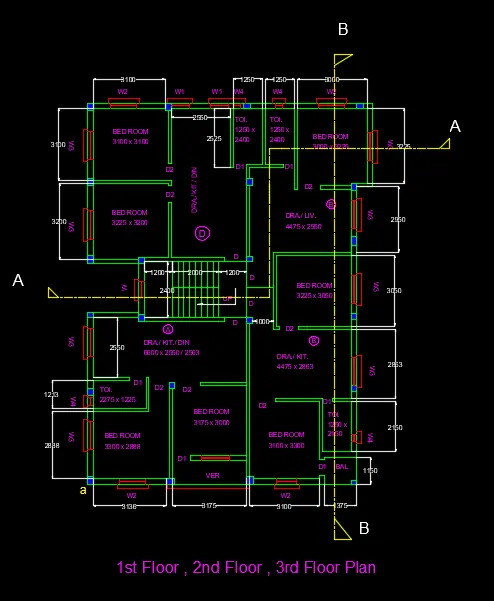
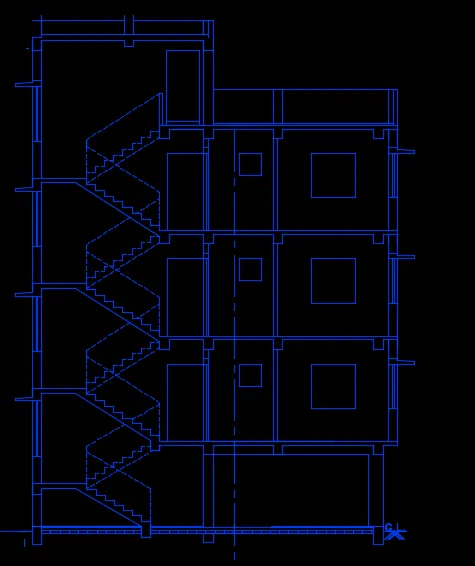
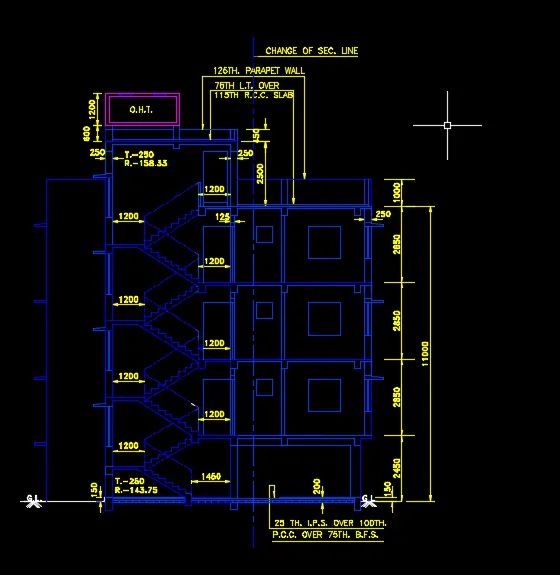
B) For Section AA -
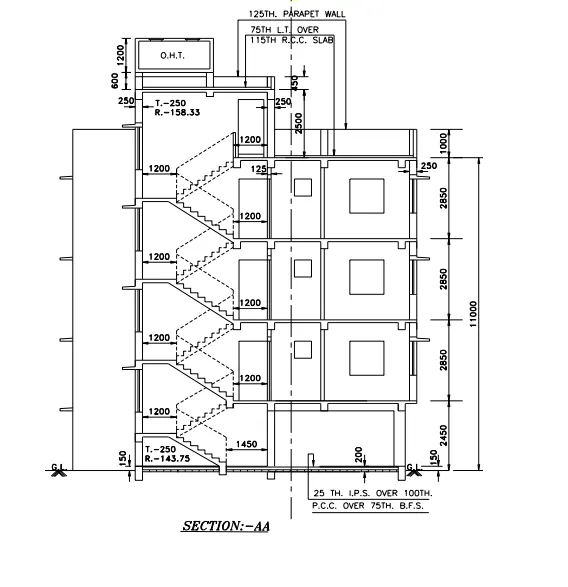
Step 1)
i) Take the vertical projection from 1st floor , 2nd floor , 3rd floor plan
ii) Give command XL - V
iii) With the help of construction lines mrk the position of columns .
iv) Give the offset of 150mm from bottom in +y dirrction .
v) Again give the offset of 200 mm from bottom in +y direction
vi) Give the offset of 2450mm from bottom to mark slab level of 1st floor .
vii) Similarly give offset of 2850 from 1st floor slab to 2nd floor slab level .
viii) Similarly give offset of 2850 from 2nd floor slab level to 3rf floor level .
ix) Similarly give offset of 2850 mm from 3rd floor level .
x) give offset of 1000 mm to the bottom of OH tank.
Step 2)
For Drawing Cross section of staricase - at Ground floor
i) Take the offset of 1200 mm for landing .
ii) Take the Riser = 143.75 mm
iii) Take the Tread = 250 mm
iv) Take the waist slab at an angle 30
v) and draw the section as shown in fig .
For Drawing Cross section of staricase - at 1st floor
i) Take the offset of 1200 mm for landing .
ii) Take the Riser = 143.75 mm
iii) Take the Tread = 250 mm
iv) Take the waist slab at an angle 30
v) and draw the section as shown in fig .
vi) Draw the Handrail by taking offset from GF at a distance of 1000 mm and join it .
vii) Select layer as Dotted line and apply on Handrail .
viii) Copy the hand rail to 1st floor 2nd floor and 3rd floor .
Note - Similarly draw the cross section of stairs at 2nd and 3rd floor .
For Doors and Windows .
i) Draw the doors as per the size which we have assumed above .( Alread mentioned in Introduction)
ii) Command Rec
iii) Draw the rectangle and draw the door at 1st floor .
iv) Command copy and copy it by taking base point on 2nd and 3rd floor .
Similarly ,
i) For windows also draw a rectangle of assume size .
ii) Take the center point and and place it on 1st floor
iii) Copy the same on 2nd and 3rd floor as shown in fig.
iv) Draw the lintel beam -
a) Command LN tool .
b) Specify point (@400 , 0)
c) Specify next point (@0 , 50)
d) Specify next point (@400 , 20)
e) Similarly follow the same procedure for drawing other lintel beams .
f) Geometry is shown by Blue colour .
a) Select the plan and right click and click on properties and change the colour to blue .
Step 3) Over head tank .
i) Draw the over head tank above the roof .
ii) Take the offset of 600mm from top .
iii) Give the command Rec to draw over head tank
iv) Enter the length = 2500 mm
v) Enter width = 1200 mm
vi) Take the offset of rectangle at a distance 25 mm.
Step 4) Annotations and Dimensions -
i) Give command Dtext
ii) Justify - Center
iii) Style - Arial
iv) Specify point of text
v) Select the text angle - 0
vi) Selelct text height - 500 mm
vii) and give the annotations .
For Dimensions -
iii) Give command D -
iv) Select Standard font -
v) Modify - Select the primary unit - Decimals .
iv) Select Fit - and set scale 200 .
v) Select color to the dimensions directly from text without creating layers .
i) Command Qleader .
ii) Select Annotations - Mtext
iii) max no of points - 3
iv) Select size of arrow- 100 mm
v) Give the text as shown in fig .
C) Section B-B
Step 1)
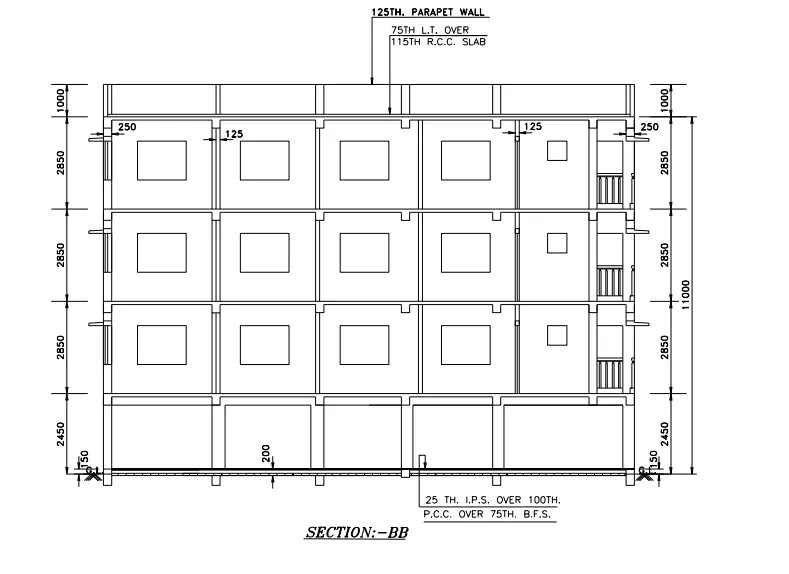
i) For Section B-B rotate the section A-A in 90 degree .
ii) After rotating the section A -A trim the staircase section .
iii) Now Command XL and take the vertical projection in -ve y direction .
iv) Specify the base line as B of a distance of 16388 mm .
v) Take a offset of 150mm from base line /GL
vi) Again offset of 2450 mm from GL to ground floor slab
vii) Again offset of 2850 from ground floor slab to 1st floor slab
viii) Again offset of 2850 mm from 1st floor to 2nd floor
ix) Again offset of 2850 mm from 2nd floor to 3rd floor
x) And take the offset of 1000 mm from 3rd floor to top .
xi) After rotating the Section AA we alread had a projection of internal walls and external walls
i.e (125mm and 250mm ) .
xii) Extend the projection till the base line .
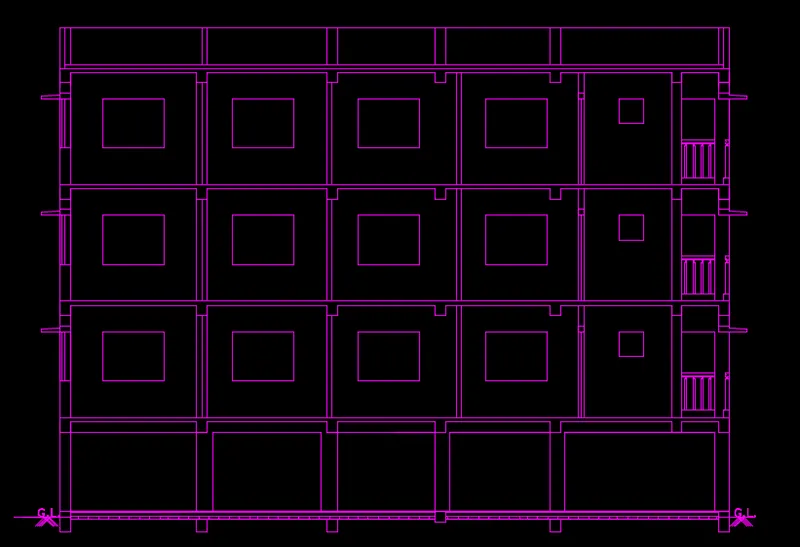
xiii) Draw the window at the 1st floor ( As W3 ) Sizes are already mentioned .
xiv) Command Array and Select Rectangular array to draw the same window at 2nd floor and 3rd floor .
( Only W3 window visible after cutting section BB and for toilet W4)
xvi) Give no of columns as 4
xvii) No of rows as 3
xviii) Spacing between columns are 1600mm
xix) Spacing between rows are 1600 mm
xx) Press Enter and will get same sizes of windows .
xxi) Draw the W4 for toilet in 5th column .
xiii) And Draw Balcony as shown in fig in last column .
Change the colour directly by selecting the object , right click - properties and change colour .
Step 2) Annotations and Dimensions -
i) Give command Dtext
ii) Justify - Center
iii) Style - Arial
iv) Specify point of text
v) Select the text angle - 0
vi) Selelct text height - 500 mm
vii) and give the annotations .
For Dimensions -
iii) Give command D -
iv) Select Standard font -
v) Modify - Select the primary unit - Decimals .
iv) Select Fit - and set scale 200 .
v) Select color to the dimensions directly from text without creating layers .
i) Command Qleader .
ii) Select Annotations - Mtext
iii) max no of points - 3
iv) Select size of arrow- 100 mm
v) Give the text as shown in fig .
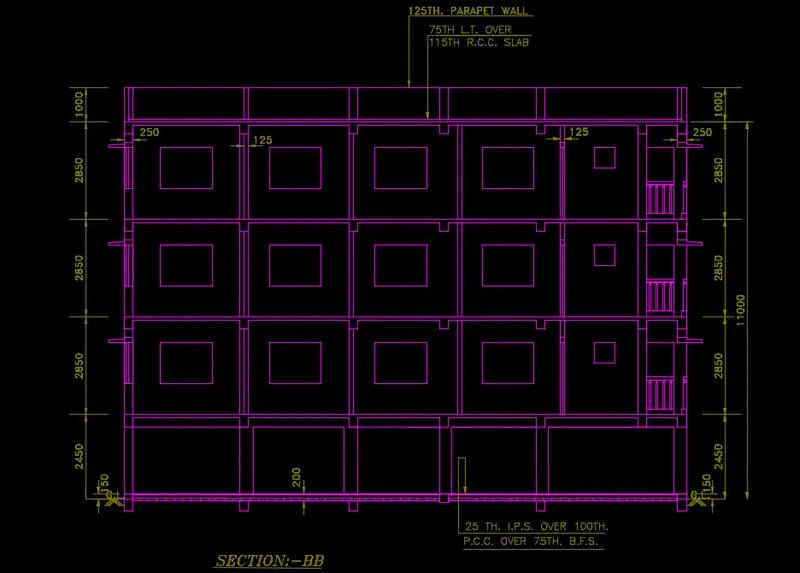
Results - The Plan and Sections as shown in drawn by using proper dimension techniques and
dimension styles to document the project.