Assignment 5-RADIOSS Interfaces & Study of Effect of Notches Challenge
1.MESHING BUMPER ASSEMBLY
Objective:
The main objective here is to create a mesh for Bumper assembly with mesh size = 6mm
Question file
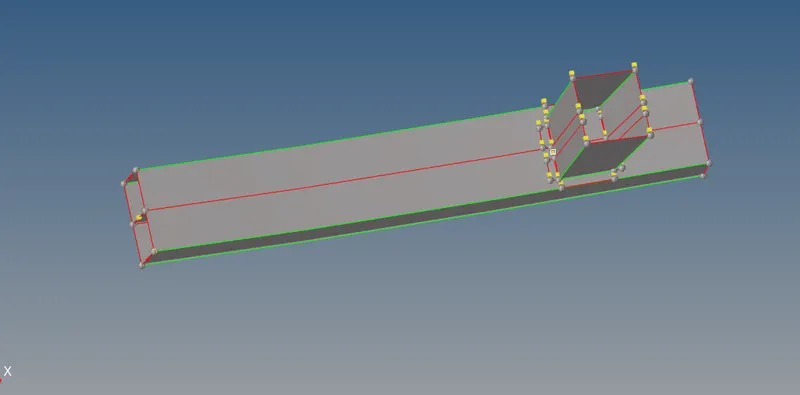
Procedure:
- First download the .hm file from the given attachement in the website
- Open the direct .hm file in Hypermesh software
- Now start Geometric cleanup activities
- Delete the extra and irregular surfaces by going to Delete - Surface -Select surace - delete entity
- Than go to Geom -Surface edit - Extend - Select lines to extend over - than select surface to extend & Select surface to target - Try to attach all the lines to surfaces properly.
After cleanup & before meshing
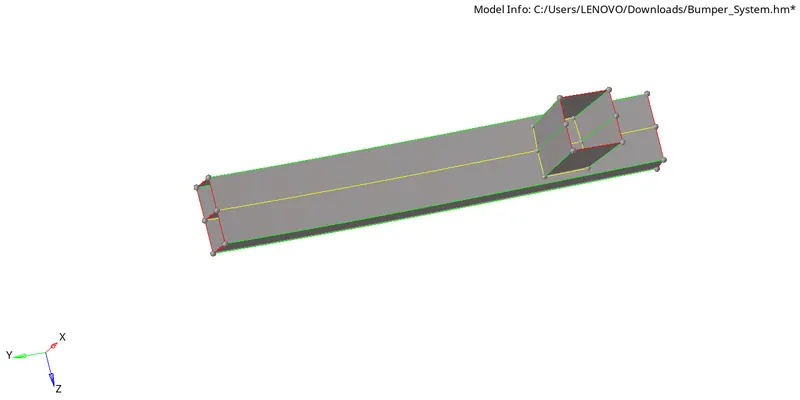
- If any surfaces or Lines not getting attached - Delete that surface and create new surface by-
- Geom - Surfaces - By using Ruled option try to create perfect surfaces - by selecting Line list.
- After all the cleanup start meshing by going to -
- 2D - Automesh - Select the surfaces individually - start meshing on the surfaces - With mesh size = 6mm
- Mask the outer surfaces - than the inner surfaces will be visible to mesh - Complete meshing all the surfaces
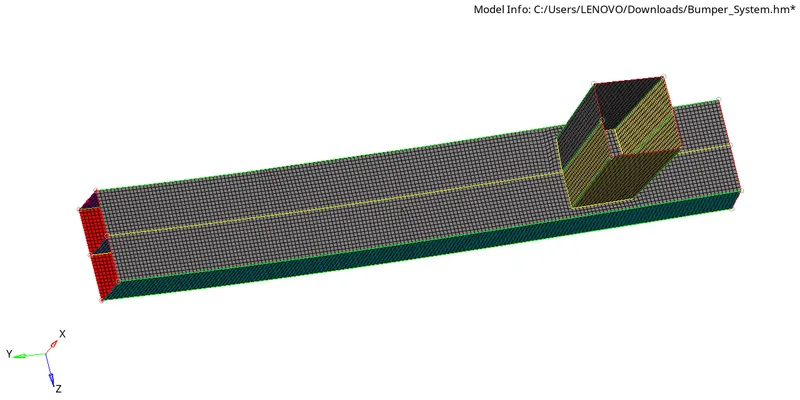
After Meshing
- Than use the Quality index and if any Trias are present remove those by Drag trias.
- Check all the sides and try to make good mesh.
Result:
By performing all the following operations in step by step manner we will get Bumper assembly properly meshed according to given criteria.
2. CRASH TUBE MODEL
CASE 1: RUN THE CRASH TUBE MODEL AS IT IS
Objective:
The main objective here is to run the Crash tube model as it is without modifying anything and plot the graphs for the given model.
Procedure:
- First import the solver deck model which is .rad file format by goin to
- File - Import - Solver deck - Select the file from the storage location - Select the .000 rad file - Import
- After Importing Go to View - Browsers - Hypermesh - Solver
- After opening solver browser - go to output blocks - Right click - Create - TH node card
- Than in that card - Select entity id's - selct the all elements or faces on the screen and - Hit on proceed
- After that Go to Analysis - Radioss - Select the location to save the simulation files - In below box mention '-nt 4' than hit on Radioss.
- Than simulation starts running
- After the simulation stops by using Hypergraph start plotting all the energy graphs and Rigidwall forces graph and try to analyse what is going on.
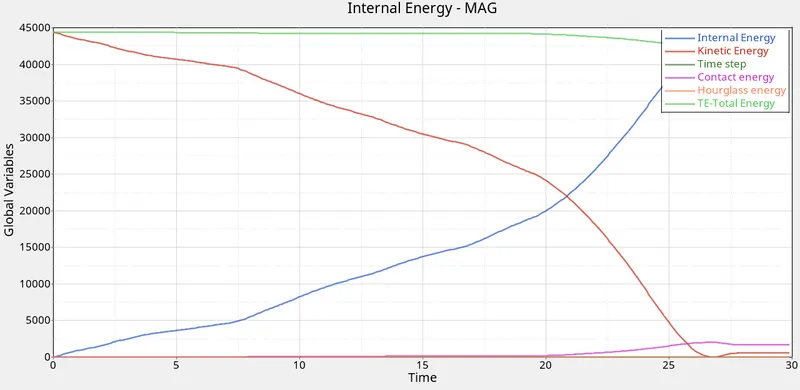
- From this energy graph we can observe that as initially the kinetic energy is very high due to starting stage of compression because of high velocity this will also be high
- Gradually Velocity and KE starts decreasing when it comes to flat crossection the curve in graph also gets down
- But IE will be minimum in starting and reaches peak coming to the end
- Contact energy and hourglass energy are minimum
- Total energy 'TE' is almost high in the graph throughout the process
- Due to Notches there is a decrease of force
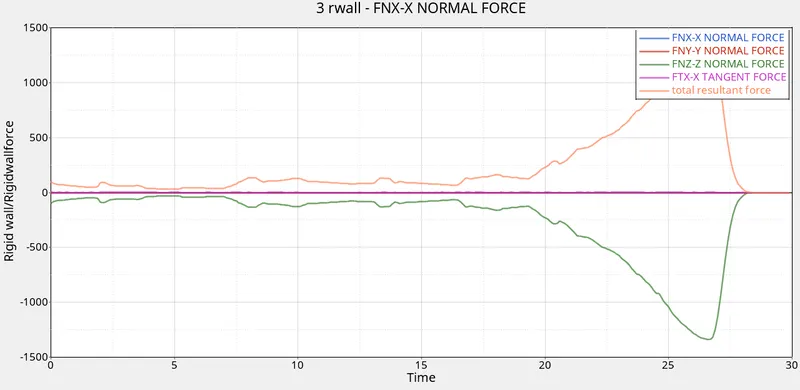
- The curve of total resultant force slowly goes higher but in starting it has very minimum deviation but progressively it increases.
- Normal force is very less and in negative side.
- The above graph consists of 3 Rwall forces.
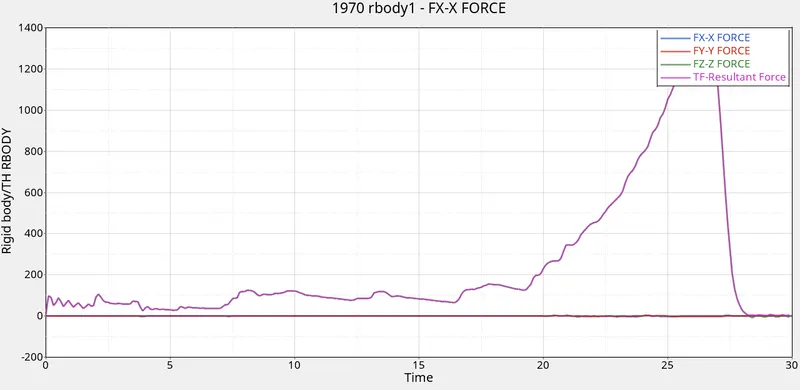
- This graph consists of Th rbody forces where Resultant force is increasing but all other forces are near the origin line only.
Conclusion:
Here running the Crash tube model without modifying anything and also creating the graphs for the given model is successfully completed.
CASE 2:CHANGE THE INACTI VALUE AND RUN
Objective:
The main objective here is to run the Crash tube model by changing the Inacti value and to plot the graphs for the given model.
Procedure:
- First import the solver deck model which is .rad file format by goin to
- File - Import - Solver deck - Select the file from the storage location - Select the .000 rad file - Import
- After Importing Go to View - Browsers - Hypermesh - Solver
- After opening solver browser - go to output blocks - Right click - Create - TH node card
- Than in that card - Select entity id's - selct the all elements or faces on the screen and - Hit on proceed
- After that Go to Analysis - Radioss - Select the location to save the simulation files - In below box mention '-nt 4' than hit on Radioss.
- Than simulation starts running
- After the simulation stops by using Hypergraph start plotting all the energy graphs and Rigidwall forces graph and try to analyse what is going on.
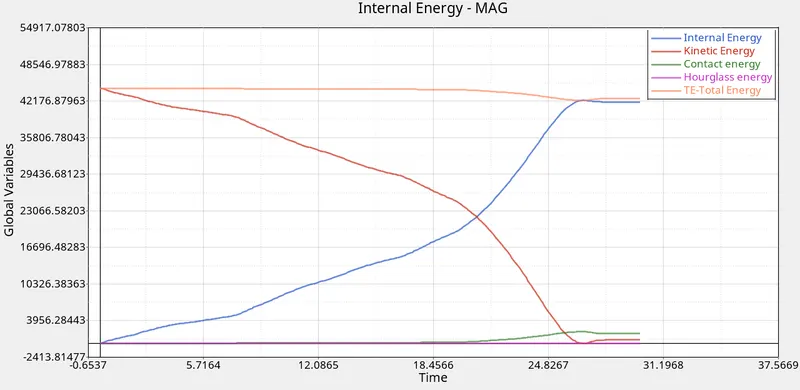
- From here we can observe that KE is drastically decreasing and IE is increasing till the end and coming to TE is almost high & also constantly going from starting to end.
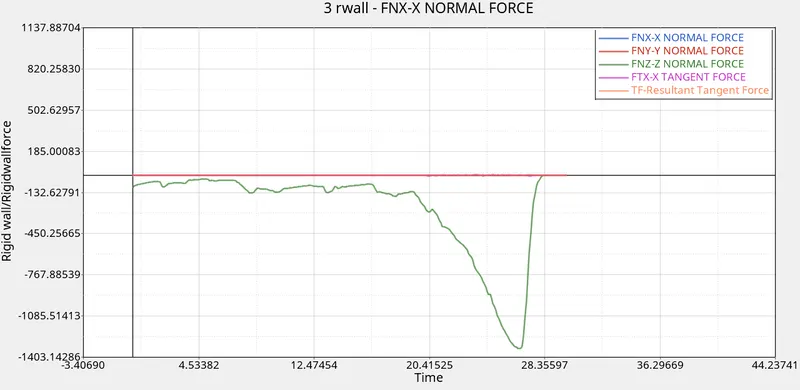
- Now coming to Rwall forces in FNZ-Z normal force is decreasing below the Origin line & Fyy is attached to origin line.
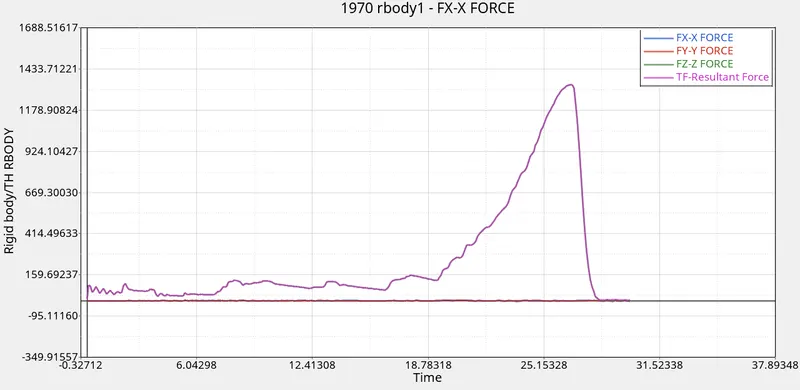
- From here we can get to know that TF-Total resultant force is progressively increasing and all other forces are near to origin line only.
Conclusion:
By following all the procedure we will be be getting Inacti value changed and than the Rwall,TH Rbody graphs & also energy graphs will be getting.
CASE 3: RUN THE CRASH TUBE MODEL BY TYPE 11 CONTACT
Objective:
The main objective here is to run the Crash tube model by changing the Type to 11 and plot the graphs for the given model.
Procedure:
- First import the solver deck model which is .rad file format by goin to
- File - Import - Solver deck - Select the file from the storage location - Select the .000 rad file - Import
- After Importing Go to View - Browsers - Hypermesh - Solver
- After opening solver browser - go to output blocks - Right click - Create - TH node card
- Than in that card - Select entity id's - selct the all elements or faces on the screen and - Hit on proceed
- After that Go to Analysis - Radioss - Select the location to save the simulation files - In below box mention '-nt 4' than hit on Radioss.
- Than simulation starts running
- After the simulation stops by using Hypergraph start plotting all the energy graphs and Rigidwall forces graph and try to analyse what is going on.
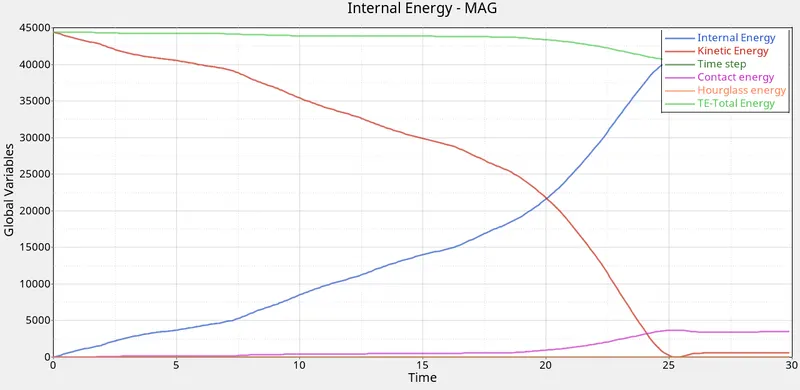
- From the given graph we can observe that initially KE is high and slowly it will decrease and TE is high & constant till end.
- Contact energy is nearby to origin.
- Hourglass energy is near to origin only.
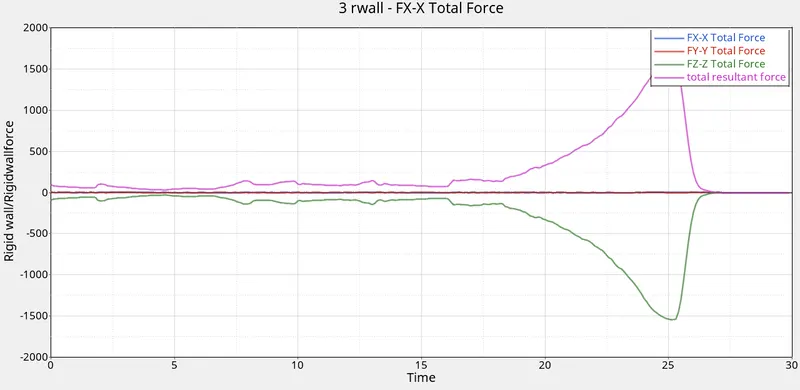
- Total resultant force is progressively increasing
- Fzz total force is below origin line.
- Fyy is attached to origin line only
Conclusion:
By changing the Type to 11 and plot the graphs for the given model
CASE 4: REMOVE BOTH NOTCHES AND REMOVE BOUNDARY CONDITION ON RIGID BODY NODE THAN RUN
Objective:
The main objective here is to run the Crash tube model by changing the Type to 11 and plot the graphs for the given model.
Procedure:
- First import the solver deck model which is .rad file format by going to
- File - Import - Solver deck - Select the file from the storage location - Select the .000 rad file - Import
- After Importing Go to View - Browsers - Hypermesh - Solver
- After opening solver browser - go to output blocks - Right click - Create - TH node card
- Than in that card - Select entity id's - selct the all elements or faces on the screen and - Hit on proceed
- After that Go to Analysis - Radioss - Select the location to save the simulation files - In below box mention '-nt 4' than hit on Radioss.
- Than simulation starts running
- After the simulation stops by using Hypergraph start plotting all the energy graphs and Rigidwall forces graph and try to analyse what is going on.