Assignment 1-2D Meshing Challenge
Aim:- Clean up the geometry of the following models and extract the mid surface and perform 2D meshing.
Objective:-
* Import the model and Clean the geometry, check free edges, overlap surfaces, extra surface , gap in surface and fix this types of error and refine the geometry.
* Extract the proper mid surface and do topology cleanup on it.
* Ignore holes which is below 5mm diameter.
* Create 2D mesh with target length 5mm, min 3.5mm max 7mm.
* Assign proper thickness, by creating a generic property.
Procedure:-
For Model -1
1. Importing:
* Import the given Part 1 model in Hm format.
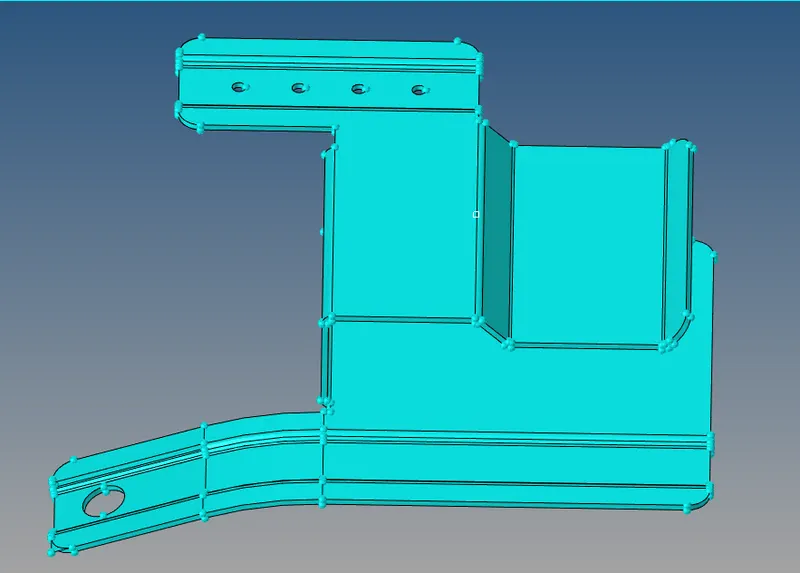
2. Perform Geometry Clean up:
* First of all we have to put the geometry in Topology mode so that we can find duplicate surfaces , missing surfaces and free edges.
* After the Topology mode we have to use Visualization Panel and wire frame tool for see the free edges and duplicate surfaces. In this panel we hide the green line and blue line so that we can easily observe the free edges and duplicate surfaces as red and yellow colour lines respectively
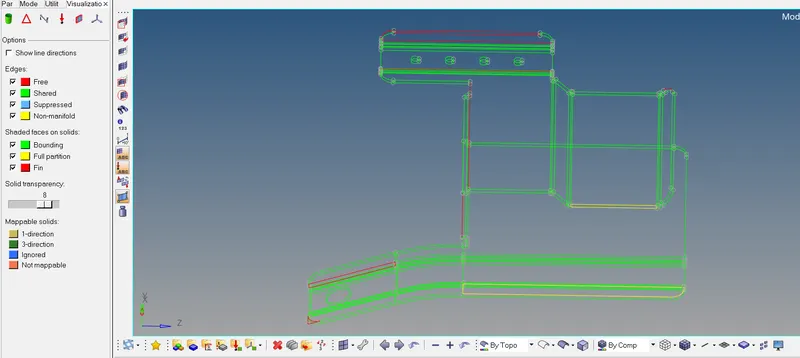
* In above image we can see that red, green, yellow lines in which red line indicate that there is free edges or crack and gap in geometry. green lines indicate that there is shared surfaces which is not a error and yellow lines indicate that there is overlap ( non manifold ) surface in present which is consider as error.
* We use quick edit panel tools such as delete surface , filler surface , toggle edge , replace point etc for solve our problem.
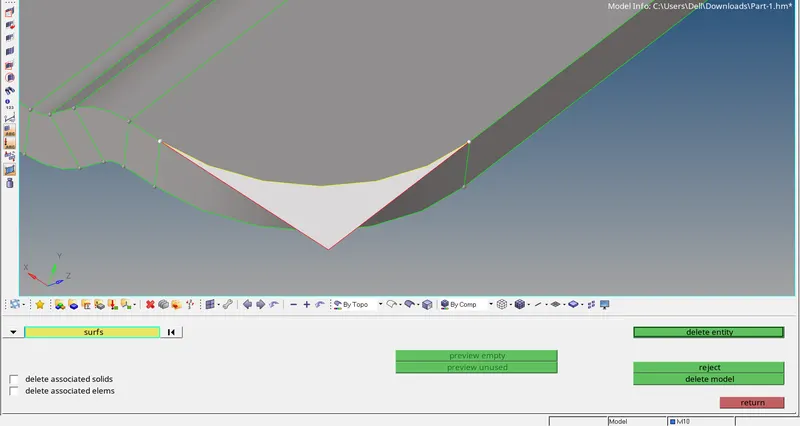
* In above image we can see that there is extra surface.
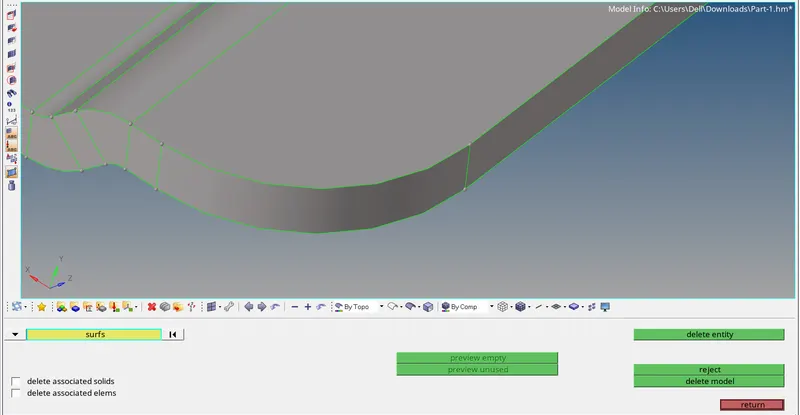
* This extra surface is deleted by delete tool.
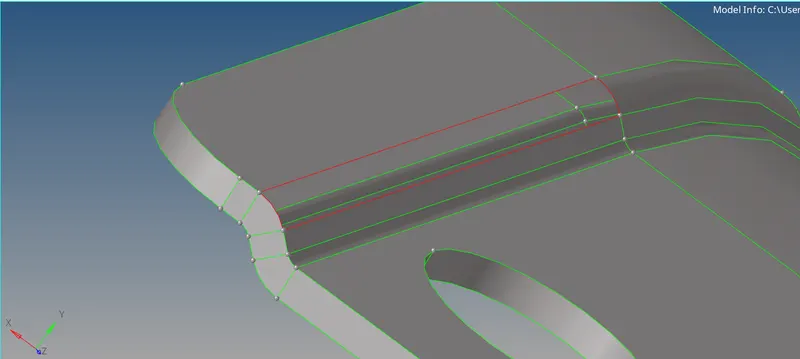
* In above image we can see that there is gap in surface.
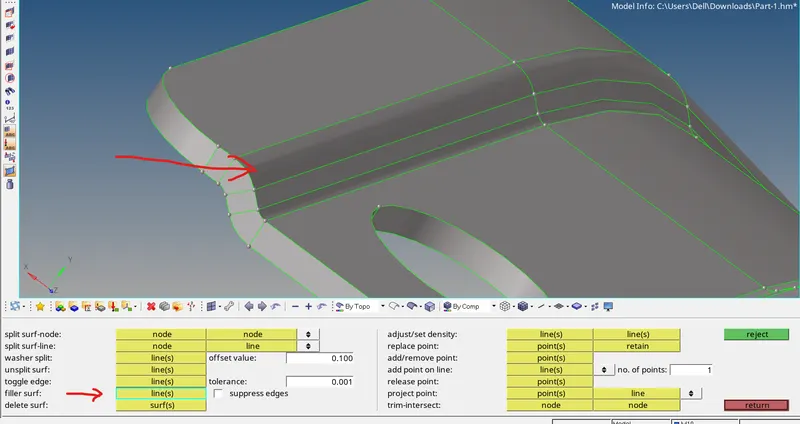
* This gap in surface error is solve by filler surf tool which is present in quick edit panel.
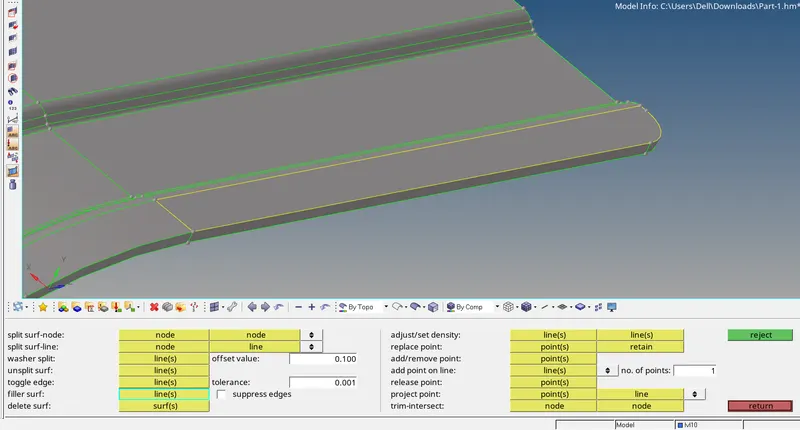
* In above fig there is overlap surface bounded by yellow lines.
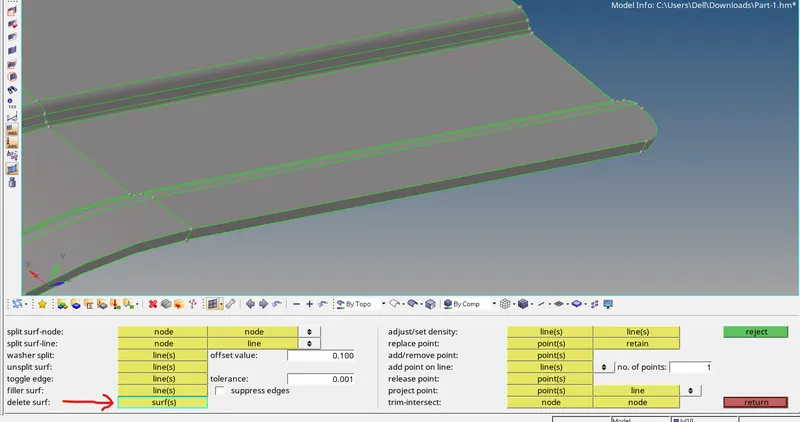
* In above image we can see that the overlap surface error is solve by delete surface tool.
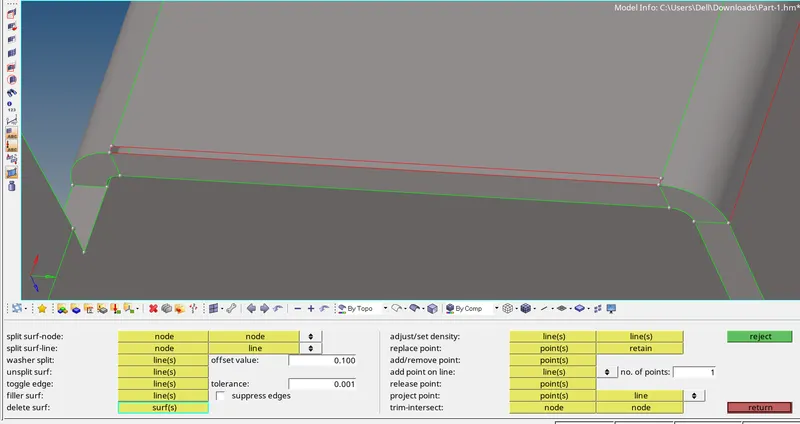
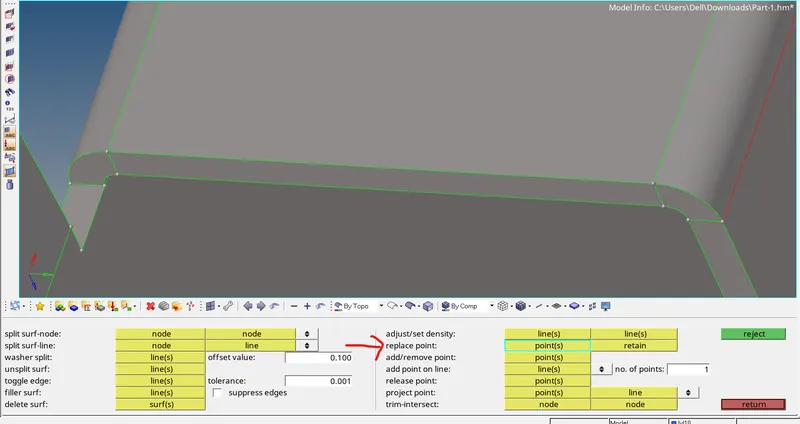
* In above image we can see that there is small gap in surface. This error is solve by replacing the point as shown in below image.
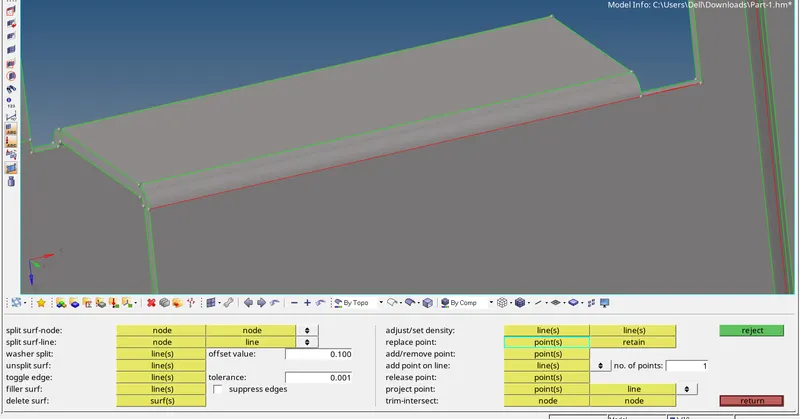
* In image we can see that there is free edge in surfae which can be solve by toggle the red edge by toggle edge tool , present in quick edit paned.
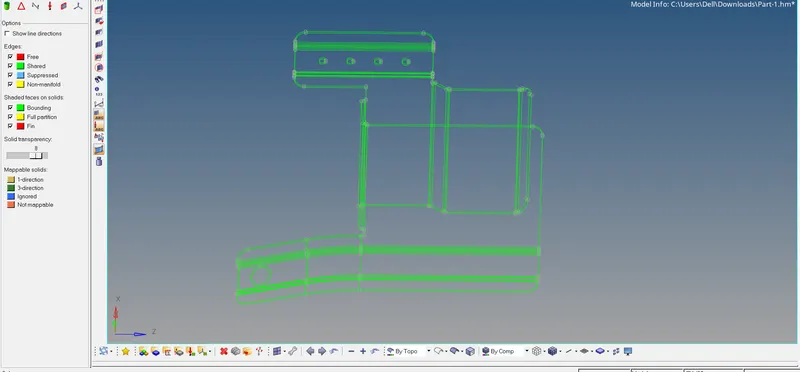
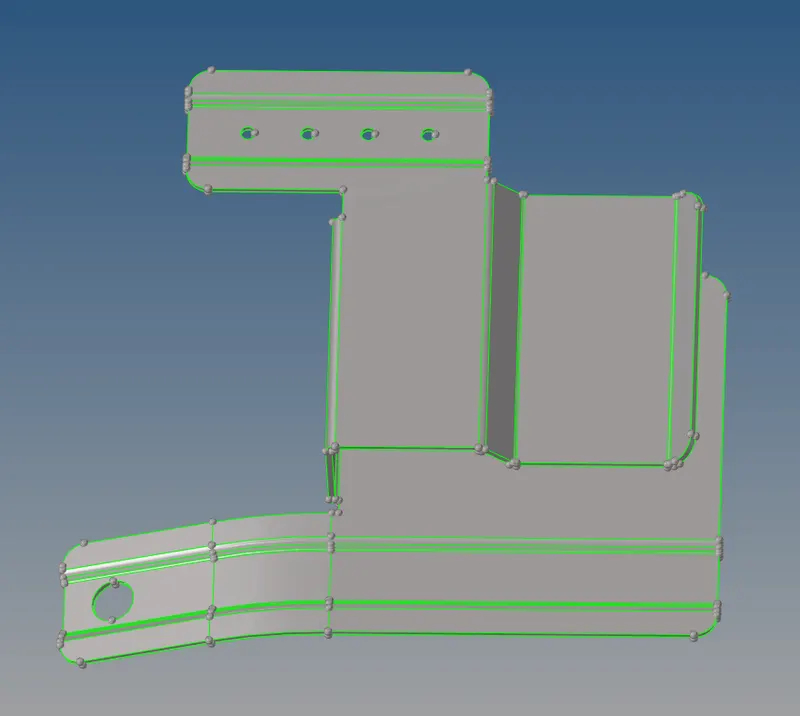
* So in this manner we clean the given geometry as shown in above figure.
3. Extract Mid Surface:
* After doing geometry cleaning we have to do extraction of midsurface operation.
* For extrationg of midsurface we use midsurface - auto extraction tool. ( 2D - midsurface - auto extractinon )
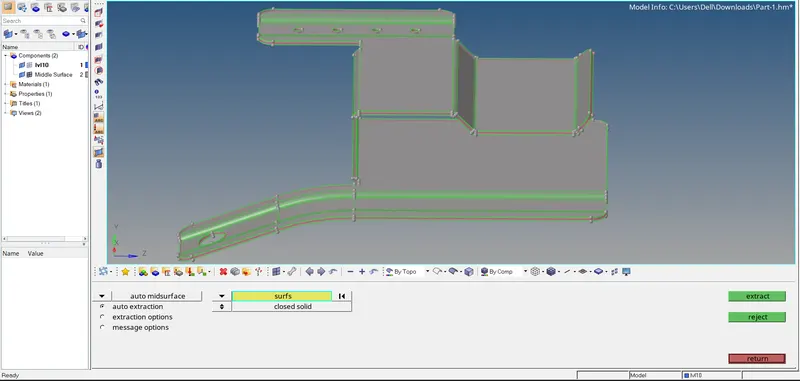
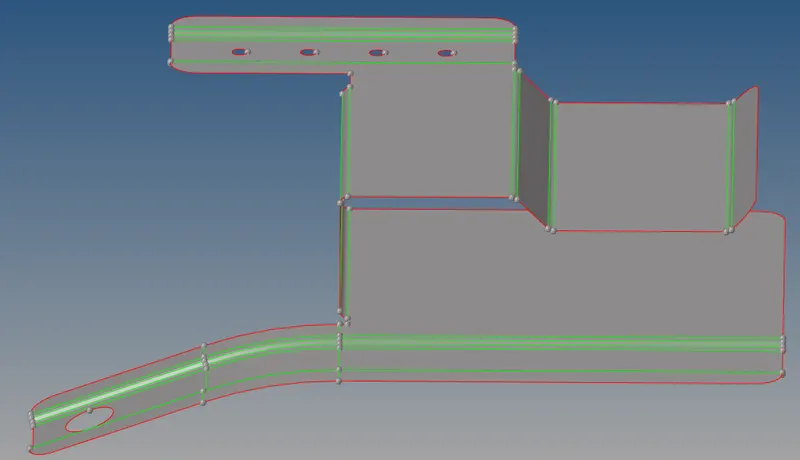
* In above image we can see that mid surface is extracted accurately.
4. Mid Surface Cleanup :
* For mid surface clean up first we remove holes which is less than 5mm diameter as per given instructions.
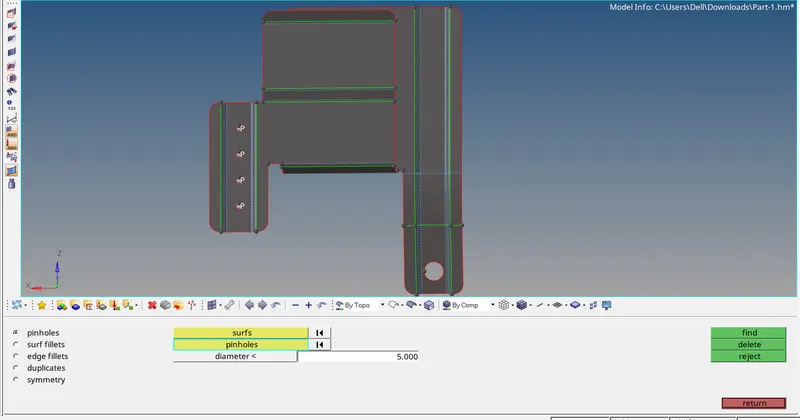
* In above image we find the holes which in less than 5mm diameter by using defeature tools. ( geom - defeature - pinholes )
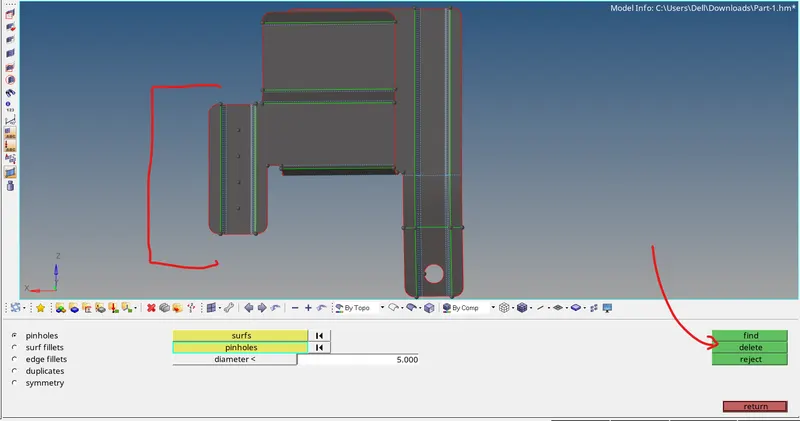
* In above image we can see that holes are removed.
* After this we measure the gap between the edges and if we find gap less than minimum element length ( which is 3.5mm ) we toggle that edge so in this way we clean the mid surface. ( geom - distamce - two points ) ( geom - quick edit - toggle edge )
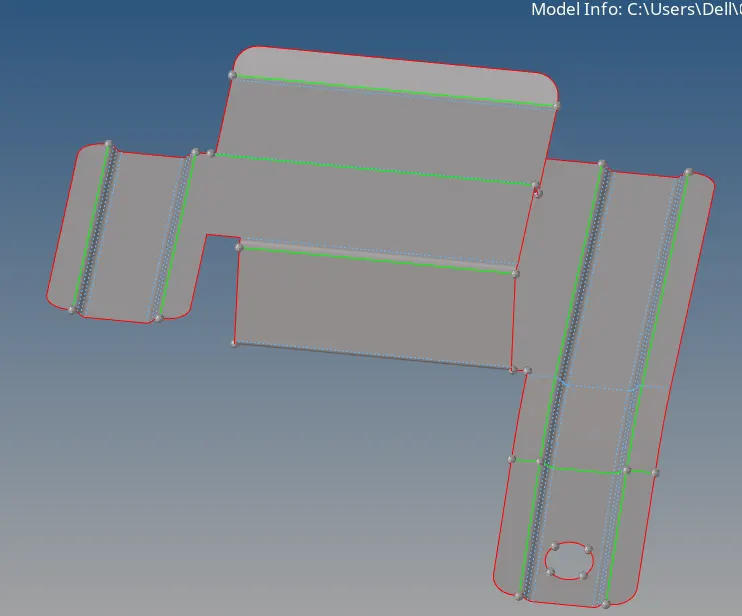
fig - cleaned mid surface
5. Set Mesh Parameters:
* Mesh parameters is given and this value is filled in criteria file.
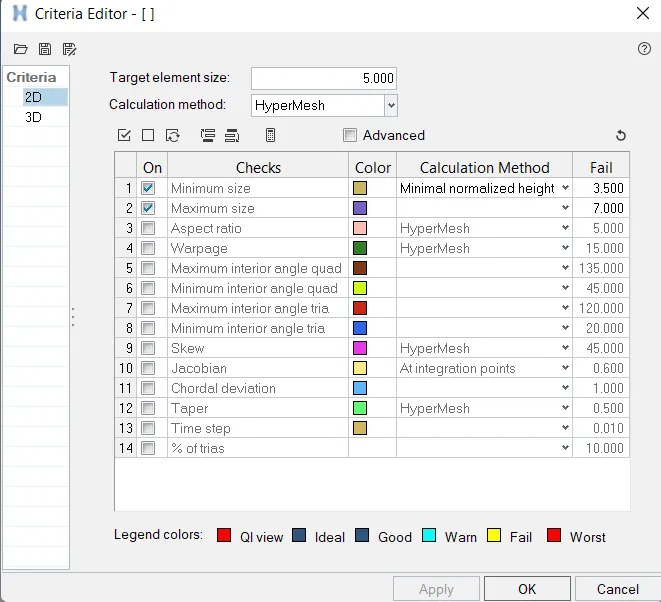
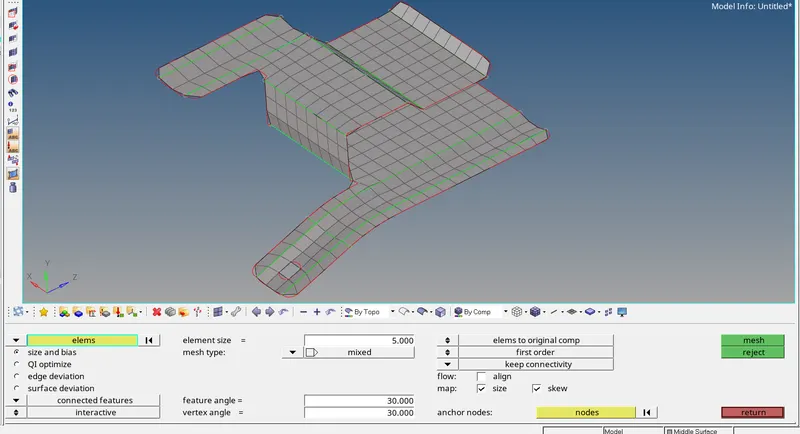
6. 2D Meshing:
* After mid surface clean up and mesh parameter setup we ready for meshing and for meshing we use automesh tool.( 2D - automesh)
* Set element length and select method size and bias.
* Then select surface and mesh.
7. Clear the quality of mesh and mesh flow:
* After meshing we clean the mesh using various tools. primarily we use quality index tools such as element optimization , drag tria , place nodes is also very helpful tool and swap edge tool.
* For removing tria element we use rebuild mesh tool and if this not work we go through element mesh option.
* when we generate proper mesh by using above tools we smooth the element using smooth tool so we can get smooth mesh flow. (2D - smooth)
* In this way we clear the quality of elements.
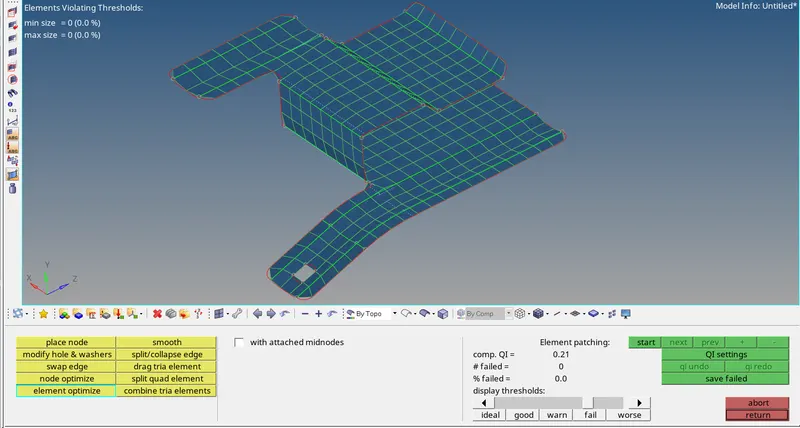
* In above image we clear the quality of model.
* After meshig done in entire surface we check for the free edges and connectivity for this we go to tool and then edges and select the displayed surface and clilck on find edges and if we fing free edges in between elements we have to clear this issue with remesh option or rebuild tool or we use preview equivalence tool.( tool - edges)
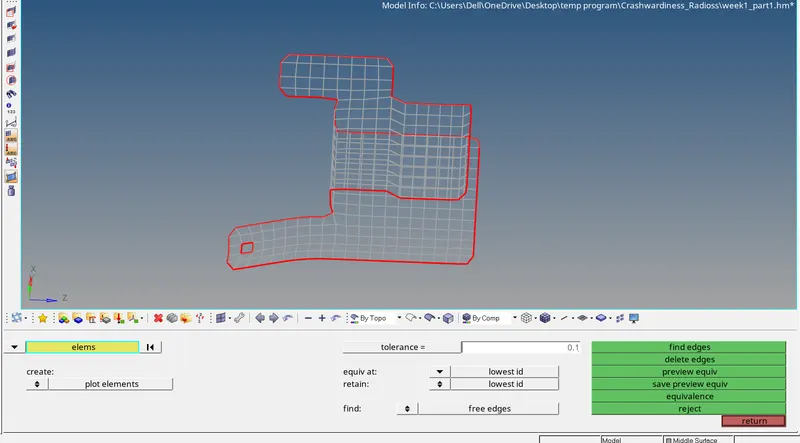
* In above image we can see that there is no free edge present in model.
8. Assign Property and Thickness:
* first we measure the thickness of parent geometry. ( geom - distamce - two points )
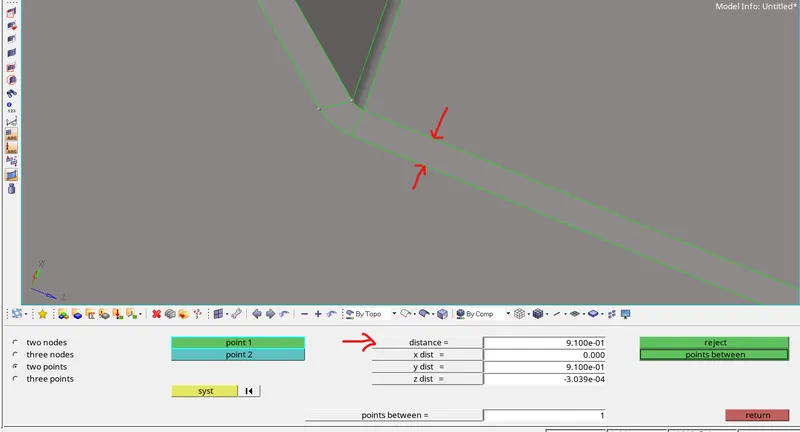
* For creating property , do right click on model browser and clcik on create - property.
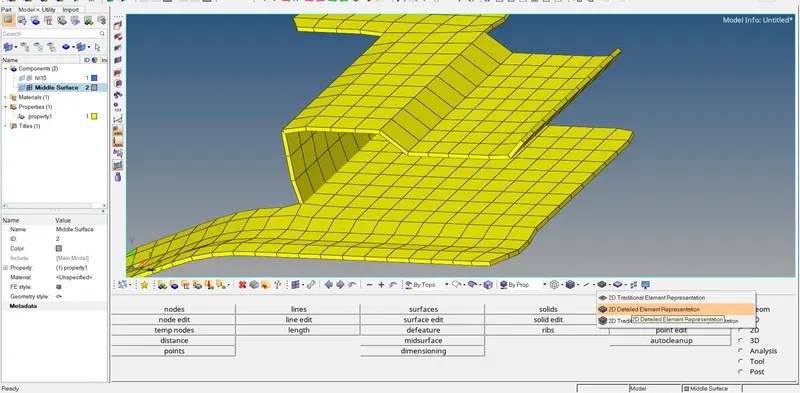
* In property we fill the thickness value and by right click on midsurfae component we assign the property. we enable 2D element detailed representation so that we can see that the thickness as show in below image.
For Model -2
1. Importing:
* Import the given Part 1 model in Hm format.
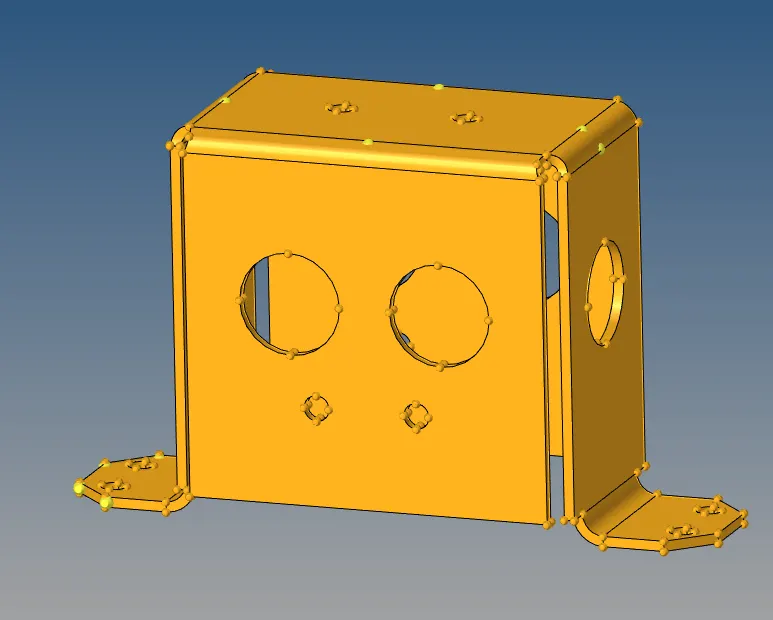
2. Perform Geometry Clean up:
* First of all we have to put the geometry in Topology mode so that we can find duplicate surfaces , missing surfaces and free edges.
* After the Topology mode we have to use Visualization Panel and wire frame tool for see the free edges and duplicate surfaces. In this panel we hide the green line and blue line so that we can easily observe the free edges and duplicate surfaces as red and yellow colour lines respectively
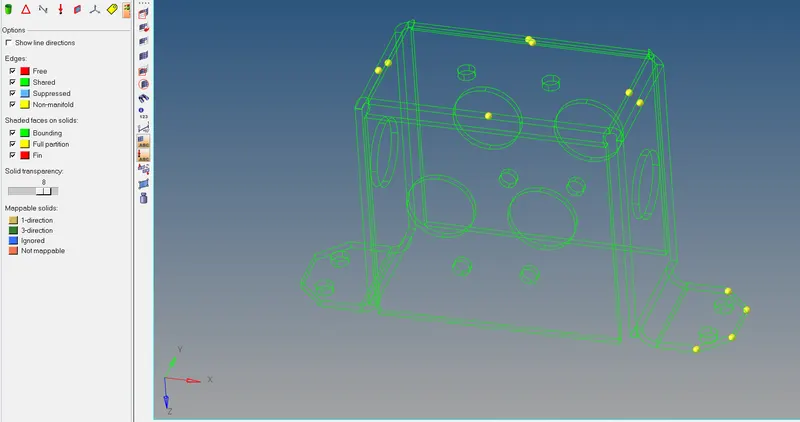
* As we can see that geometry is clear.
3. Extract Mid Surface:
* After doing geometry cleaning we have to do extraction of midsurface operation.
* For extrationg of midsurface we use midsurface - auto extraction tool. ( 2D - midsurface - auto extractinon )
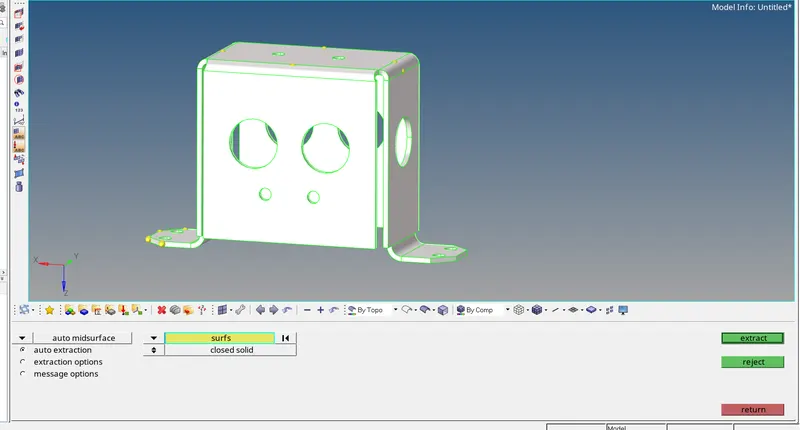
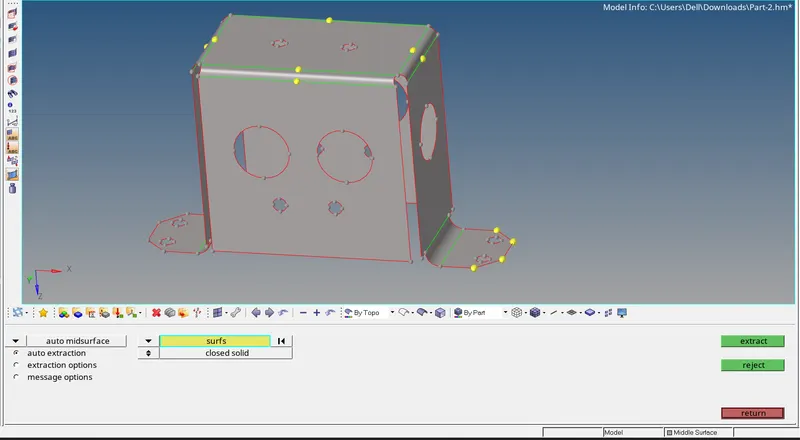
* In above image we can see that mid surface is extracted accurately.
4. Mid Surface Cleanup :
* For mid surface clean up first we remove holes which is less than 5mm diameter as per given instructions.
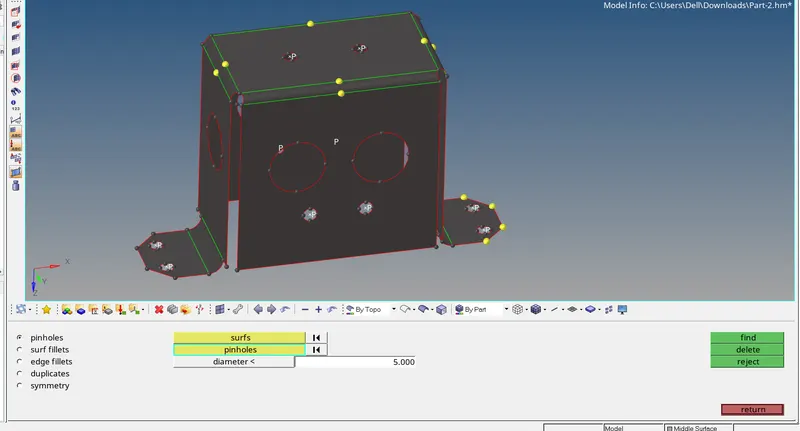
* In above image we find the holes which in less than 5mm diameter by using defeature tools. ( geom - defeature - pinholes ). Then we remove hole by click on delete button.
5. Set Mesh Parameters:
* Mesh parameters is given and this value is filled in criteria file.
6. 2D Meshing:
* After mid surface clean up and mesh parameter setup we ready for meshing and for meshing we use automesh tool.( 2D - automesh)
* Set element length and select method size and bias.
* Then select surface and mesh.
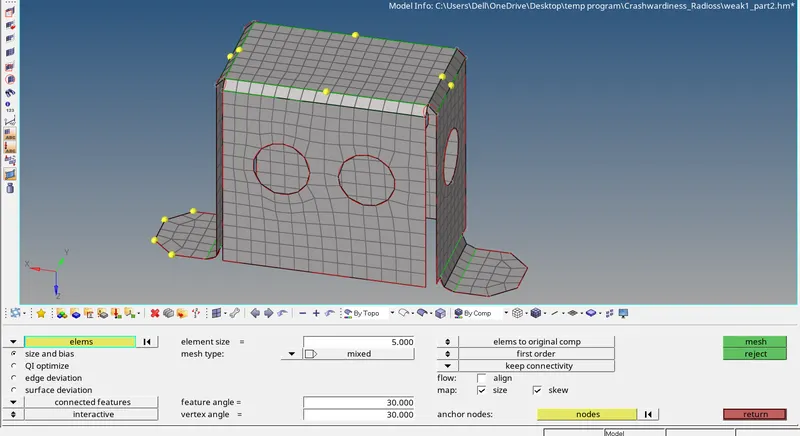
fig - meshed model
7. Clear the quality of mesh and mesh flow:
* After meshing we clean the mesh using various tools. primarily we use quality index tools such as element optimization , drag tria , place nodes is also very helpful tool and swap edge tool.
* For removing tria element we use rebuild mesh tool and if this not work we go through element mesh option.
* when we generate proper mesh by using above tools we smooth the element using smooth tool so we can get smooth mesh flow. (2D - smooth)
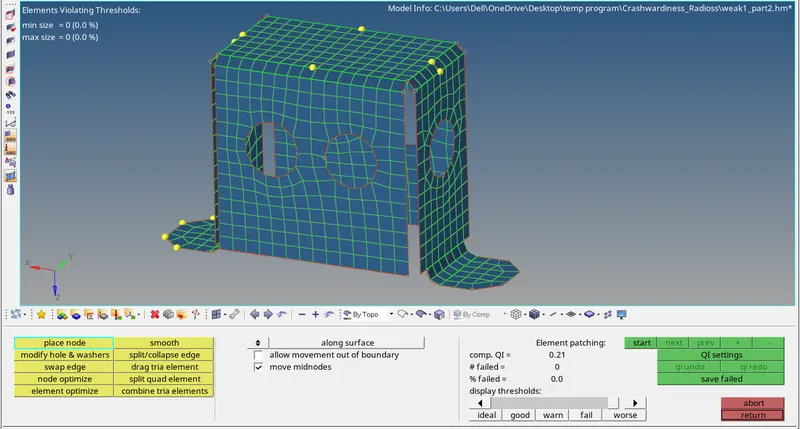
* In this way we clear the quality of elements.
* After meshig done in entire surface we check for the free edges and connectivity for this we go to tool and then edges and select the displayed surface and clilck on find edges and if we fing free edges in between elements we have to clear this issue with remesh option or rebuild tool or we use preview equivalence tool.( tool - edges)
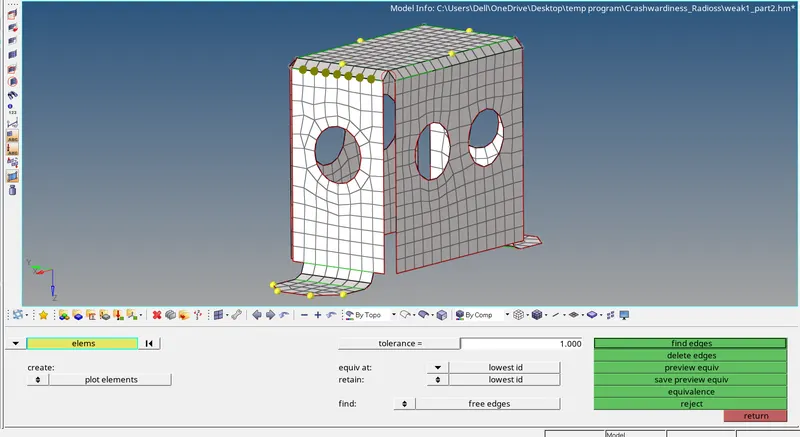
* In above image we can see that we found equivalence and clear this issue by connecting nodes of elements.
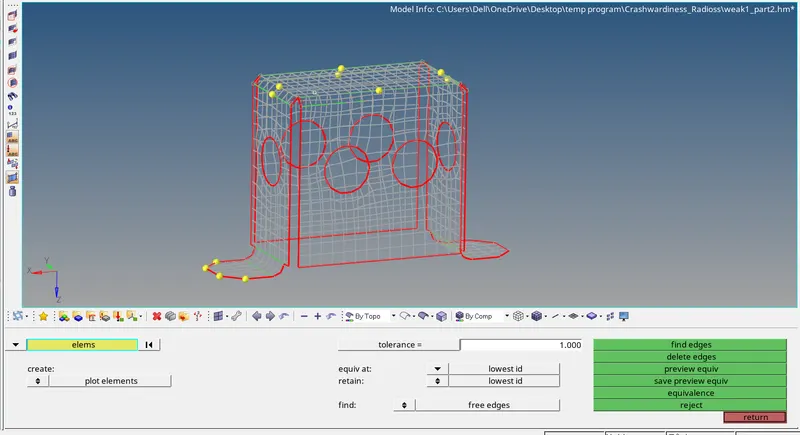
* In above image we can see that there is no free edge present in model.
8. Assign Property and Thickness:
* first we measure the thickness of parent geometry. ( geom - distamce - two points )
* For creating property , do right click on model browser and clcik on create - property.
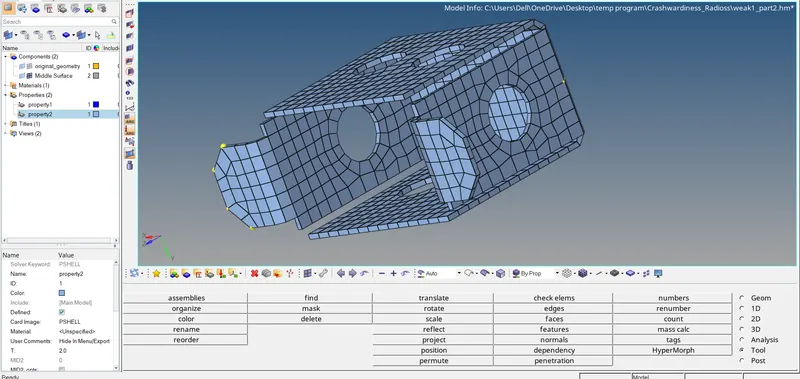
* In property we fill the thickness value and by right click on midsurfae component we assign the property. we enable 2D element detailed representation so that we can see that the thickness as show in below image.
For Model -3
1. Importing:
* Import the given Part 1 model in Hm format.
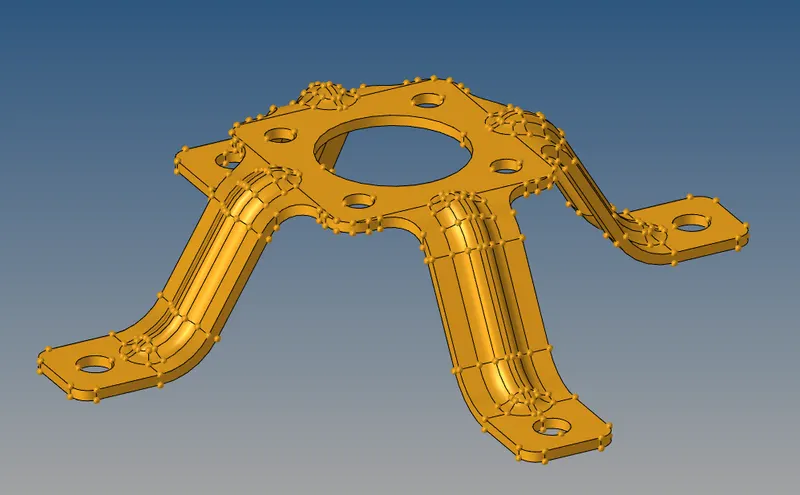
2. Perform Geometry Clean up:
* First of all we have to put the geometry in Topology mode so that we can find duplicate surfaces , missing surfaces and free edges.
* After the Topology mode we have to use Visualization Panel and wire frame tool for see the free edges and duplicate surfaces. In this panel we hide the green line and blue line so that we can easily observe the free edges and duplicate surfaces as red and yellow colour lines respectively
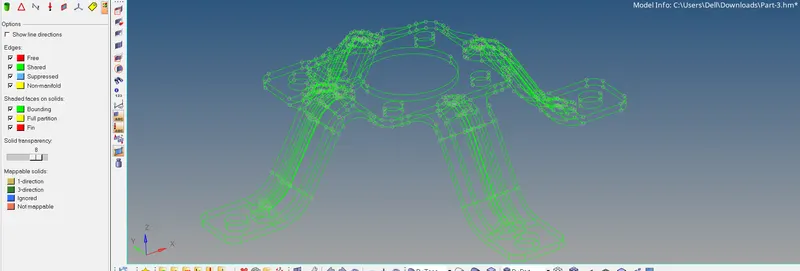
* As we can see that geometry is clear.
3. Extract Mid Surface:
* After doing geometry cleaning we have to do extraction of midsurface operation.
* For extrationg of midsurface we use midsurface - auto extraction tool. ( 2D - midsurface - auto extractinon )
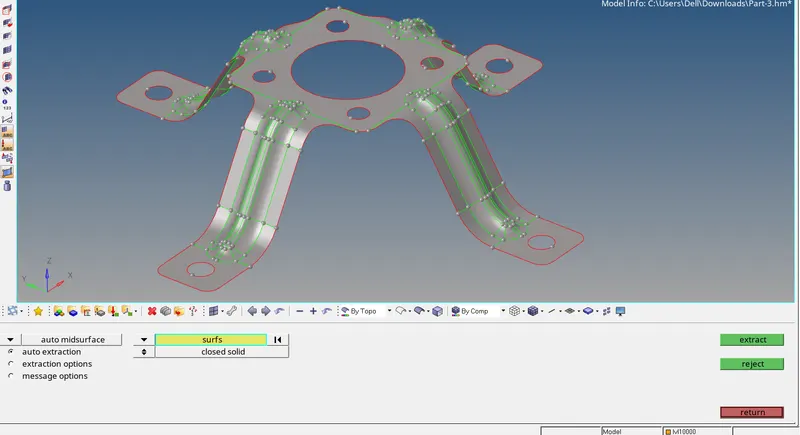
* In above image we can see that mid surface is extracted accurately.
4. Mid Surface Cleanup :
* For mid surface clean up first we remove holes which is less than 5mm diameter as per given instructions.
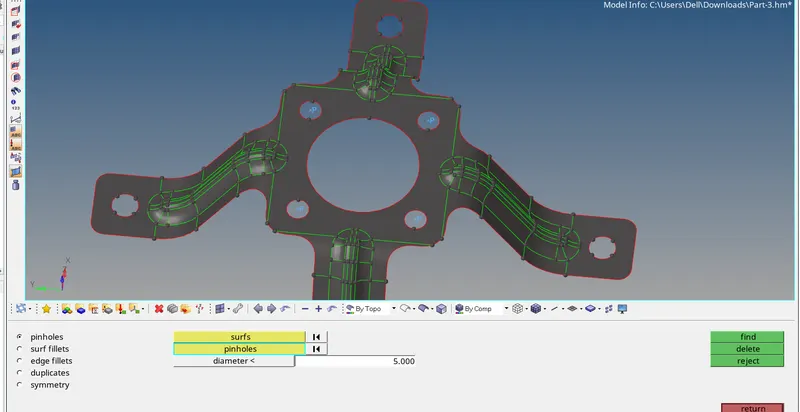
* In above image we find the holes which in less than 5mm diameter by using defeature tools. ( geom - defeature - pinholes ). Then we remove hole by click on delete button.
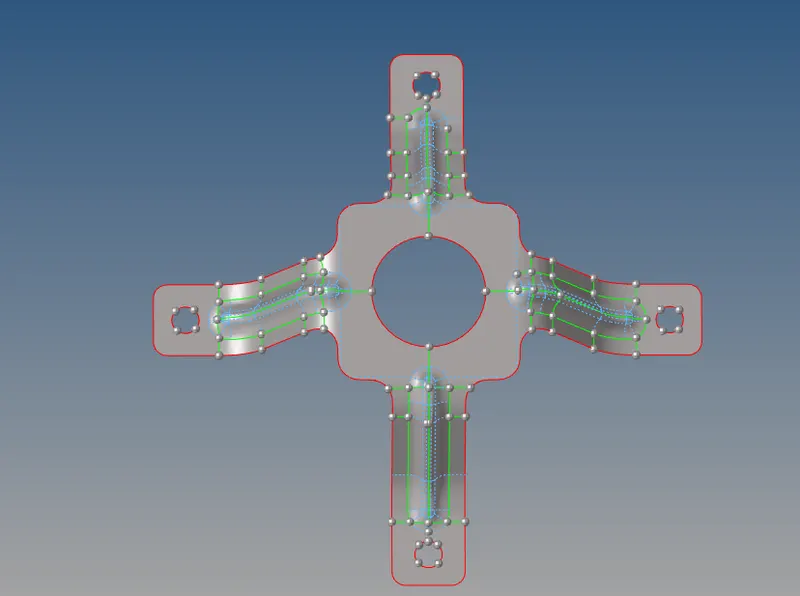
fig- mid surface cleanup is done.
5. Set Mesh Parameters:
* Mesh parameters is given and this value is filled in criteria file.
6. 2D Meshing:
* After mid surface clean up and mesh parameter setup we ready for meshing and for meshing we use automesh tool.( 2D - automesh)
* Set element length and select method size and bias.
* Then select surface and mesh.
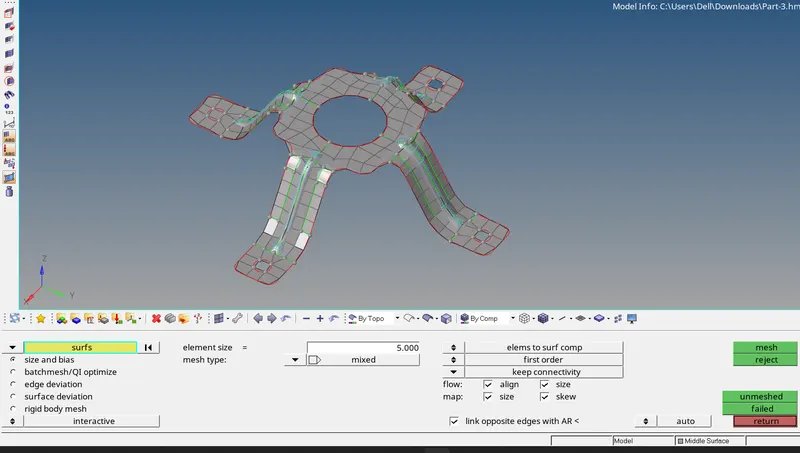
fig - meshed model
7. Clear the quality of mesh and mesh flow:
* After meshing we clean the mesh using various tools. primarily we use quality index tools such as element optimization , drag tria , place nodes is also very helpful tool and swap edge tool.
* For removing tria element we use rebuild mesh tool and if this not work we go through element mesh option.
* when we generate proper mesh by using above tools we smooth the element using smooth tool so we can get smooth mesh flow. (2D - smooth)
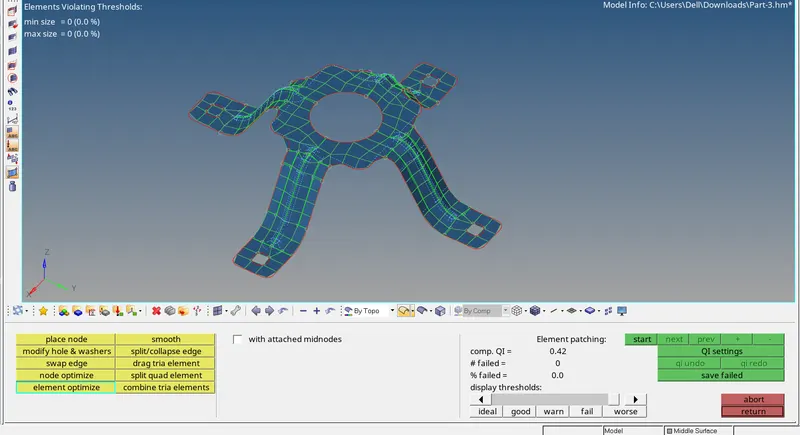
* In this way we clear the quality of elements.
* After meshig done in entire surface we check for the free edges and connectivity for this we go to tool and then edges and select the displayed surface and clilck on find edges and if we fing free edges in between elements we have to clear this issue with remesh option or rebuild tool or we use preview equivalence tool.( tool - edges)
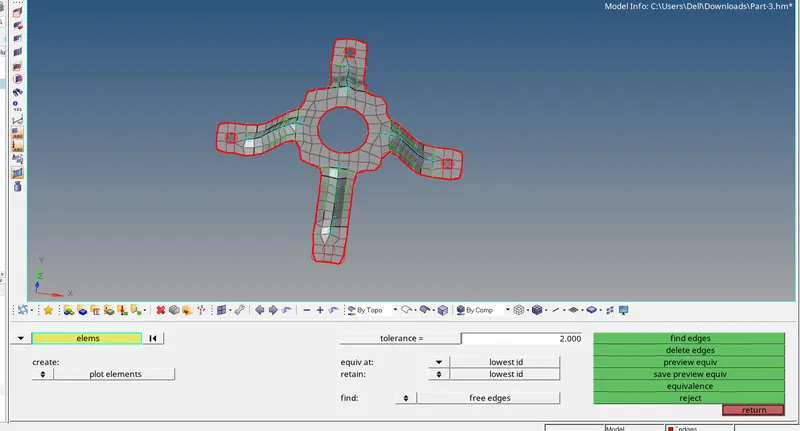
* In above image we can see that there is no free edge present in model.
8. Assign Property and Thickness:
* first we measure the thickness of parent geometry. ( geom - distamce - two points )
* For creating property , do right click on model browser and clcik on create - property.
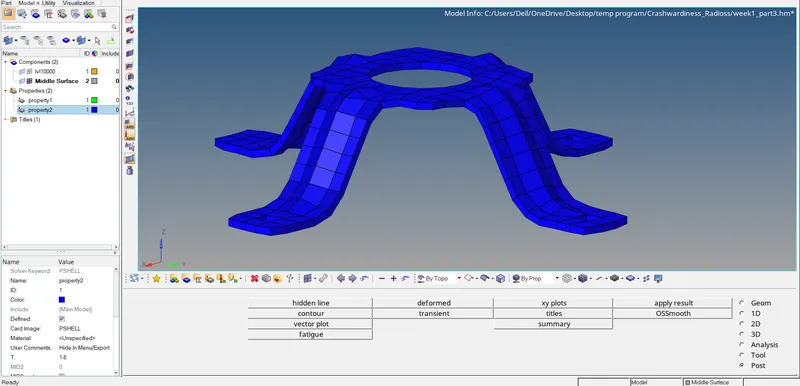
* In property we fill the thickness value and by right click on midsurfae component we assign the property. we enable 2D element detailed representation so that we can see that the thickness as show in below image.
Result:-
* All three given models are meshed followed by midsurface extraction and geometry cleanup.
* All meshed model are pass the given quality criteria and have good mesh flow.
* The appropriate thickness is assign to the mid surface of all three models through property assinging.
* The free edge checkup is done for all models.
Conclusion:-
2D meshing is done for all three given models followed by midsurface extraction and geometry cleanup as per given instructions using hypermesh.