American Chopper
Objective :-
- The objective of this project is used to create a model of different parts of the Chopper using Solidworks.
- To assemble the different parts modeled for the chopper.
- To create a Photorealistic model of the chopper and Render the model using Solidworks Photoview 360 or Solidworks visualize.
Theory:-
A chopper is a type of custom motorcycle. The chopper is perhaps the most extreme of all custom styles, often using radically modified steering angles and lengthened forks for a stretched-out appearance. Some of the characteristic features of choppers are long front ends with extended forks often coupled with an increased rake angle, hardtail frames (frames without rear suspension), very tall "ape hanger" or very short "drag" handlebars, lengthened or stretched frames, and larger than stock front wheels.
The first choppers were built in America and tended to be based on Harley-Davidson motorcycles.
Rather than being primarily performance oriented modifications, choppers are more about achieving a certain look.
So the purpose of this project is to create an aesthetic model of a chopper using Solidworks and Solidworks Visualize.
Part Modeling :
- Part Modeling you can create a part from a conceptual sketch through solid feature-based modeling, as well as build and modify parts through direct and intuitive graphical manipulation.
Parts to be modeled for chopper :
- The following parts of the chopper are modeled in Solidworks and assembled together.
- Transmission Belt
- Kick stand
- Front Fender
- Rear Fender
- Oil Tank
- Chain
- Pedal
- Front Wheel
- Rear Wheel
- Front Fork
- Chassis
- Engine
- Gas Tank
- Transmission Belt :
- The Transmission Belt in the chopper is used to transmit the power from the Engine to the Gearbox.
Features used to create Transmission Belt
- Sketch
- Offset
- Extrude
- Fillet
- Appearances
Sketch
Sketch is the two dimensional representation of the model with respect to the plane/view from the outside of the model.In solidworks there are different sketch options available to create a sketch. These are known as Entities in solidworks. The following are the entities available in Solidworks LIne, Arc, Spline, Circles, Rectangle.
Offset
Offset one or more sketch entities, selected model edges, or model faces by a specified distance. For example, you can offset sketch entities such as splines or arcs, sets of model edges, loops, and so on. You can offset finite lines, arcs, and splines.
Extrude
Extrude is a type of feature available in solidworks to convert a 2D sketch into the 3D model.
Fillet
Fillet/Round creates a rounded internal or external face on the part. You can fillet all edges of a face, selected sets of faces, selected edges, or edge loops.
Procedures followed to create a model of Transmission Belt
- Initially a Solidworks software is opened. Then, the new part is clicked to create a new model.
- Before creating the sketch the default plane names are changed as given below,
- Front Plane - Front Plane Transmission Belt
- Top Plane - Top Plane Transmission Belt
- Right Plane - Right Plane Transmission Belt
- Then, the front plane is selected to sketch.
- The 2D sketch is created in the front plane and dimensions,relations are given to the sketch to fully define a sketch.While sketching the offset command is used to duplicate the sketch to some distance.
- After this process the sketch is closed. Then, the extrude command is used to convert a 2D sketch into 3D model.
- Then, the fillet is given to the belt as per the requirements. The model of the transmission belt is created.
- The model is saved with the name of Transmission Belt.
- KickStand :
- The Kick Stand is also known as Side Stand. It is used to support the chopper.
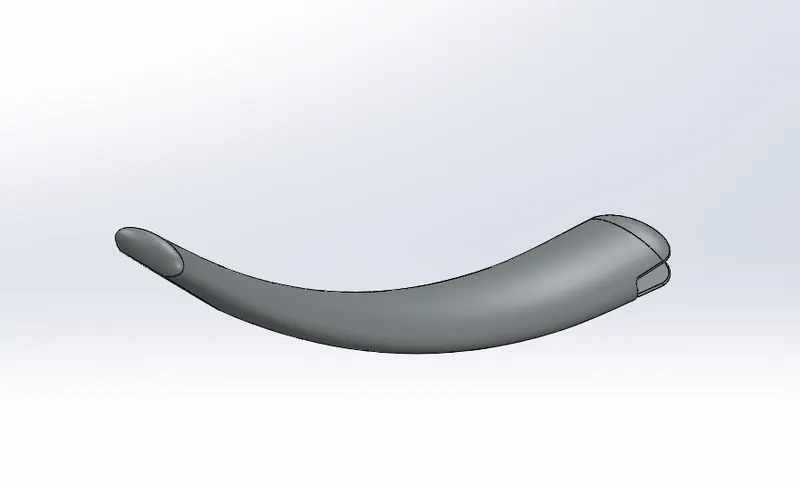
Features used to create KickStand
- Sketch
- Loft
- Dome
- Extrude Boss
- Extrude cut
- Fillet
- Split
- Appearances
Loft
The loft feature in SOLIDWORKS allows you generate complex geometry in a single feature. It does this by interpolating surfaces between various cross-sections of a model. These cross-sections can be sketches, faces, or edges. In the loft interface, these cross-sections are considered “Loft Profiles”.
Dome
Faces to Dome. Select one or more planar or non-planar faces. You can apply domes to faces whose centroid lies outside the face. This allows you to apply domes to irregularly shaped contours.
Extrude cut
Extrude cut is another cool feature which helps to remove materials from the 3D model. It is just the opposite to extrude boss/base feature, because it cuts a sketch profile while extruding. You can cut in both directions and mainly used for creating holes, channels, slots etc.
Split
The SOLIDWORKS Split Line tool is used to project an entity (sketch, solid, surface, face, plane, or surface spline) onto other surfaces or curved/planar faces. You are also able to split faces on multiple bodies with one command.
3. Front Fender
Fender(mudguard) is a body that frames the wheel well (the fender underside). Its primary purpose is to prevent sand, mud, rocks, liquids, and other road spray from being thrown into the air by the rotating tyre.
Features used to create Front Fender
- Sketch
- Offset Entities
- Trim entities
- Revolve
- Dynamic mirror
- Split
- Appearances
Trim entities
Select the trim type based on the entities you want to trim or extend. All trim types are available with 2D sketches and 2D sketches on 3D planes. You can use any of the following trim options: Power trim.
Revolve
To create a revolve feature: Create a sketch that contains one or more profiles and a centerline, line, or edge to use as the axis around which the feature revolves. Click one of the following revolve tools
Dynamic mirror
Dynamic mirror is the important tool in Solidworks. As you sketch the entities, they are mirrored about the pre-selected sketch entity.
4. Rear Fender
Fender(mudguard) is a body that frames the wheel well (the fender underside). Its primary purpose is to prevent sand, mud, rocks, liquids, and other road spray from being thrown into the air by the rotating tyre.
Features used to create Rear Fender
- Sketch
- Offset Entities
- Trim entities
- Revolve
- Appearances
Appearances
An appearance defines the visual properties of a model, including color and texture. Appearances do not affect physical properties, which are defined by materials. Every material is assigned a default appearance that emulates the look of the material.
5. Oil Tank
Stores the oil for lubrication and cooling purposes.
Features used to create Oil Tank
- Sketch
- Boss Extrude
- Combine
- Fillet
- Shell
- Appearances
Combine
Combine is the type of feature available in Solidworks to manually combine the two bodies.
Shell
The Shell Definition PropertyManager is used to define the thickness of thin and thick shell elements.
6. Chain
Chain drive is used for transmission of mechanical power, in this case the power from the engine to the wheels of a vehicle.
Chain drive design was a lengthy process as it required repetition of various commands. But the Curve Driven Pattern and Mirror commands in Solidworks came handy in this case.
Features used to create Chain
- Sketch
- Trim
- Fillet
- Blocks
- Extrude
- Patterns
- Appearances
Blocks
You can make, save, edit, and insert blocks for drawing items and sketch entities that you use often, such as standard notes, title blocks, label positions, and so on. You can attach blocks to geometry or to drawing views, and you can insert them into sheet formats.
Patterns
The Curve Driven Pattern tool allows you to create patterns along a planar or 3D curve. You can base your pattern on an open curve, or on a closed curve, such as a circle. In the chain part Curve Driven Pattern is used.
7. Pedal
Used for placing the foot, applying brakes and shifting the gear in a motorcycle.
Features used to create Pedal
- Sketch
- Extrude
- Fillet
- Linear pattern
- Dome
- Chamfer
- Appearances
Chamber
A cut on the edge or cornerof something that makes it slope slightly rather than being perfectly square.
Linear pattern
Linear pattern is also more like a circular pattern. The features/bodies are patterned linearly. Pattern is a kind tool like Array available in AutoCAD.
8. Front Wheel
The front wheel consists of the unique spider web shaped rims, tyre, brake rotor and caliper.
Features used to create Front Wheel
- Sketch
- Revolve
- Trim
- Fillet Entities
- Boss/Base Extrude
- Revolve Cut
- Linear pattern
- Chamfer
- Fillet Features
- Cut Extrude
- Circular Pattern
- Appearances
Circular Pattern
Circular pattern is used to create a pattern of the sporks and the patterns(Grooves) available in the tyre. Also, it is used to create holes in the discs of the front wheel. The parent bodies/ features are used to create a different number of instances required to create the pattern circularly.
9. Rear Wheel
The wider but stockier rear wheel consists of the unique spider web shaped rims, tyre, brake rotor, caliper and sprocket. A circular object that revolves on an axle and is fixed below a vehicle or other object to enable it to move easily over the ground.The disc and sprocket are attached with a rear wheel. The chain is connected between the Engine and the Rear Wheel. Chain is a positive drive. Compared to the belt it will be more efficient and losses in the chain will be less comparatively.
Features used to create Rear Wheel
- Sketch
- Revolve
- Trim
- Fillet Entities
- Boss/Base Extrude
- Planes
- Revolve Cut
- Linear pattern
- Chamfer
- Fillet Features
- Cut Extrude
- Circular Pattern
- Appearances
10. Front Fork
The fork connects the front wheel and axle to its frame, typically via a yoke, also known as a triple clamp, which consists of an upper yoke joined to a lower yoke via a steering stem, a shaft that runs through the steering head, creating the steering axis. Most motorcycles today use telescopic forks for the front suspension. The forks can be most easily understood as simply large hydraulic shock absorbers with internal coil springs. They allow the front wheel to react to imperfections in the road while isolating the rest of the motorcycle from that motion.
Features used to create Front Fork
- Sketch
- Extrude
- Trim
- Revolve
- Split
- Plane
- Convert entities
- Move/copy Body
- Dome
- Mirror
- Combine
- Curve (Project Curve)
- Sweep
- Appearance
Move/copy Body
Move/ Copy body is used to move/copy the body from one place to other places in the fork.
Mirror
By using mirror faces with a mid-plane selected only the chosen faces within the revolve will be mirrored. Mirroring bodies can be used whether in a single or multi body part and allows you to select solid geometry instead of the features and faces in a body. In the fork part the one part of the fork is created and the other part is mirrored. Then the parts are manually combined.
Project Curve
Project curve is the kind of 3D curve which is projected on the basis of the two different 2D sketches.
Sweep
With the Sweep feature we can create a shape by moving a 2D sketch Profile along a 2D or 3D sketch Path.
11. Chassis
Chassis/frame is the motorcycle's core structure. It supports the engine, provides a location for the steering and supports the rear end and the rider along with any passenger or luggage. The fuel tank is attached to the frame.
Features used to create Chassis
- Sketch
- Offset
- Convert entities
- Project Curve
- Trim
- Plane
- Sweep
- Split
- Revolve
- Cut Extrude
- Fillet
- Combine
- Appearance
12. Engine
An engine powers a motorcycle. Here, a V-twin engine, also called a V2 engine is used. It is a two- cylinder piston engine where the cylinders share a common crankshaft and are arranged in a 'V' configuration. The Vee configuration generally reduces the overall engine length, height and weight compared with an equivalent inline configuration.
Engine is the prime mover for the Bike. The engine converts a Chemical energy into the Heat energy and then the heat energy is converted into mechanical work. The mechanical work in the engine is rotational motion. This rotation is converted to the wheel with the use of the chain and sprocket through the gearbox and clutch.
Features used to create Engine
- Sketch
- Convert entities
- Trim
- Revolve
- Boss extrude
- Cut extrude
- Offset
- Dome
- Fillet
- Project curve
- Composite curve
- Sweep
- Mirror
- Circular Pattern
- Split
Gas Tank:-
Unlike other parts where Solid Modelling was used, gas tank was majorly designed using Surface modelling, given its curvy geometry. Gas tanks are used to store the gas. To give the gas to the engine whenever it’s required.
Features used to create Gas Tank
- Sketch
- Trim
- Project cuve
- Convert entities
- Sweep Surface
- Loft Surface
- Fill surface
- Surface trim
- Surface knit
- Sweep cut
- Fillet
- Appearances
Loft Surface
Loft Surfaces are surfaces generated by multiple 3D Curves or existing edges creating a smooth tangency between the selected curves.
Sweep Surfaces
Sweep Surfaces are surfaces that are generated from a section curve positioned along a path.
Filled Surface
The Filled Surface feature constructs a surface patch with any number of sides, within a boundary defined by existing model edges, sketches, or curves, including composite curves.
Surface trim
Primarily used to cut away material from a surface, and provides two modes: Standard and Mutual.
Surface knit
Surface knit is used to knit the two free edges/open edges of the surfaces together. Also it reduces the gap between the two edges of the surface.
2. Assembly of Chopper:-
Assembled the parts of the chopper using relations, Standard Mates(Coincident, Parallel, Tangent, Perpendicular, etc) , Advanced Mates (Symmetric, Width, Angle, etc) and Mirroring.
Plane orientation/alignment was taken care of while performing the mating.
Some parts like kickstand and front fork needed a limiting angle which was set while applying mates. Some parts had to be edited to avoid any bad geometry from showing up in the assembly.
Side view of the Assembly
Front view of the Assembly
Rear view of the Assembly
Isometric view of the Assembly render
3.Rendering
Rendering the model was done using Photoview 360 in Solidworks and Solidworks Visualize.
Decals were applied in the case of Oil Tank, Gas Tank and Rear Fender during the final model rendering stage.
1. Photoview 360 (Solidworks add-in)
Rendering using Photoview 360 involved setting the Scene, Environment, Camera, Perspective and Lights by adjusting various parameters. Extra mates were added to give a realistic view of the scene.
Colour adjustments were done if required.
Render using Photoview 360 with decals
2. Solidworks Visualize
The assembly was imported to Solidworks Visualize and various adjustments in colour were done in case of multiple renderings. The Environment, Backplate and Camera positions were chosen and tweaked accordingly to give the image a photorealistic finish.
Three renderings were done using different views and scenes.
Render using Solidworks Visualize with decals
Conclusion
Thus, the exterior parts of an American Chopper were designed, modelled and assembled using Solidworks 2018 and photorealistically rendered using Solidworks Visualize 2018.