Designing a Bush Holder in CATIA V5: Complete Step-by-Step Guide
Learn how to design a Bush Holder in CATIA V5 with this step-by-step tutorial. Perfect for beginners, this CATIA V5 tutorial covers Boolean operations, drafting, and advanced part design techniques. Explore more with the Skill-Lync CATIA course!

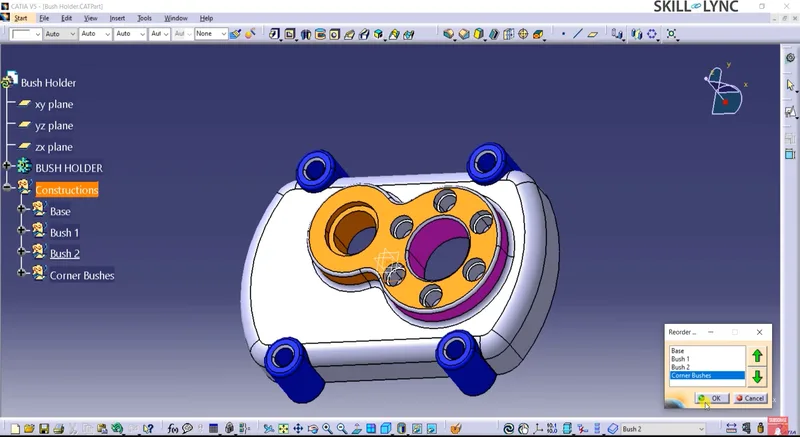
Welcome back to our CATIA V5 Design Series! Today, we’re combining two crucial videos into one comprehensive guide that covers everything you need to know about designing a Bush Holder in CATIA V5. This tutorial not only walks you through creating Bush 1 and Bush 2 but also delves into Boolean operations, drafting, and the design of Corner Bushes.
By the end of this blog, you’ll be equipped with the knowledge to design complex components in CATIA V5, set up drafting views, and apply advanced modeling techniques. Let's dive right in!
Step 1: Decoding the blueprint
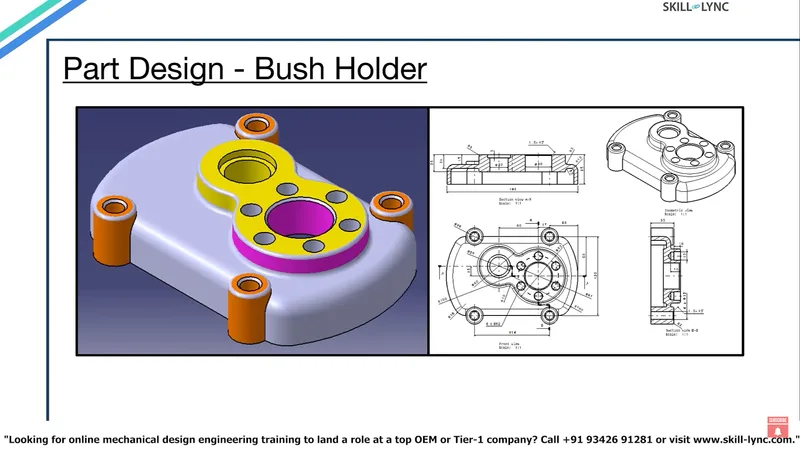
Before we get into CATIA, let’s look at the blueprint. This drawing will guide the design process for the Bush Holder, which consists of the following key views:
- A top view of the model.
- Section views showing the bushes.
- An isometric view for a 3D perspective.
Our model will have four major components:
- The base of the bush holder.
- Bush 1, located on the left of the top face.
- Bush 2, on the right side of the top face.
- Corner bushes, positioned symmetrically at the corners.
Step 2: Setting up the workspace in CATIA V5
Let’s jump into CATIA V5 and start creating the Bush Holder:
- Create a new part and name it Bush Holder.
- Save the file, and organize your workspace. Naming conventions are important here—use clear names for each sketch and body to keep your design structured.
Step 3: Designing the base
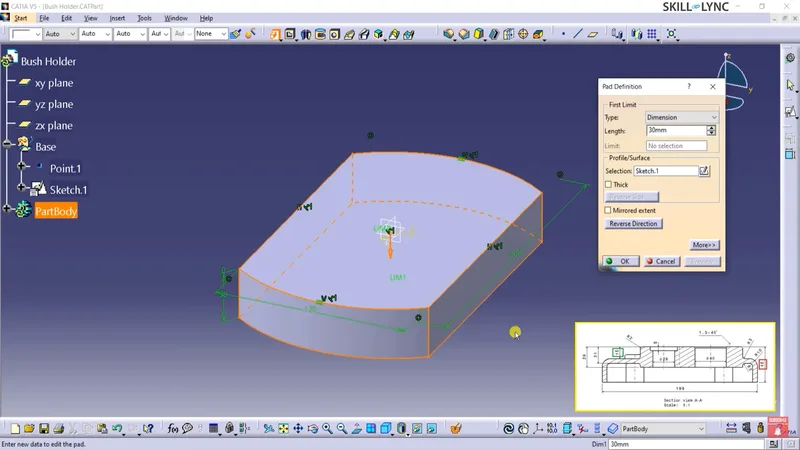
We’ll begin by designing the base of the Bush Holder. The base is essentially a rectangle with rounded edges.
- Open Sketcher and start a sketch on the XY plane.
- Use the Centered Rectangle Command to draw a rectangle measuring 200 mm by 120 mm.
- Use the Arc Command to add arcs at both ends, each with a radius of 100 mm. Ensure the arcs are tangent to the rectangle.
- Trim unnecessary edges, and use construction lines where appropriate to avoid affecting future constraints.
Switch to the Part Design Workbench:
- Use the Pad Command to extrude the sketch by 30 mm.
- Apply Edge Fillets of 18 mm for the corners and a 10 mm fillet to the top face.
- Use the Shell Command to hollow out the base. Set a thickness of 6 mm, and remove the bottom face.
Step 4: Designing Bush 1 and Bush 2
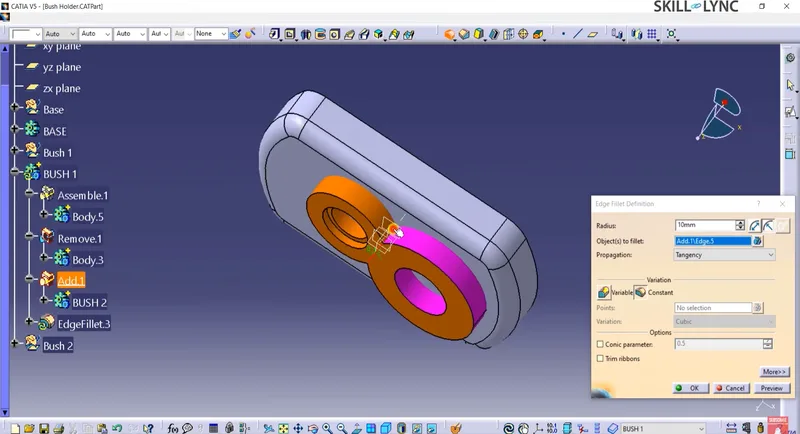
Now let’s create Bush 1 and Bush 2. These will be created as separate bodies and combined later using Boolean operations.
Bush 1: Insert a new and name it
- Insert a new Geometrical Set and name it Bush 1.
- Sketch two concentric circles on the top face of the base:
- Outer diameter: 60 mm
- Inner diameter: 28 mm
- Use the Pad Command to extrude Bush 1. Set the first limit to 15 mm above the base and the second limit to 11 mm below it.
Refining Bush 1:
- Copy the existing sketch and create a new one. Delete the outer circle and change the inner one to a diameter of 35 mm.
- Pad the new sketch by 5 mm.
- To refine the design, use the Remove Boolean Operation to create a step cut.
Bush 2:
- Create another Geometrical Set and body named Bush 2.
- Copy Sketch 2 from Bush 1 and paste it into Bush 2’s geometrical set.
- Modify the center distance for Bush 2 to 60 mm from the right end of the base.
- Draw two concentric circles with outer and inner diameters of 82 mm and 40 mm, respectively.
- Pad the sketch by 26 mm.
Use the Add Boolean Operation to combine Bush 1 and Bush 2 into the base. Apply distinct colors to each bush for visual clarity.
Step 5: Designing the corner bushes
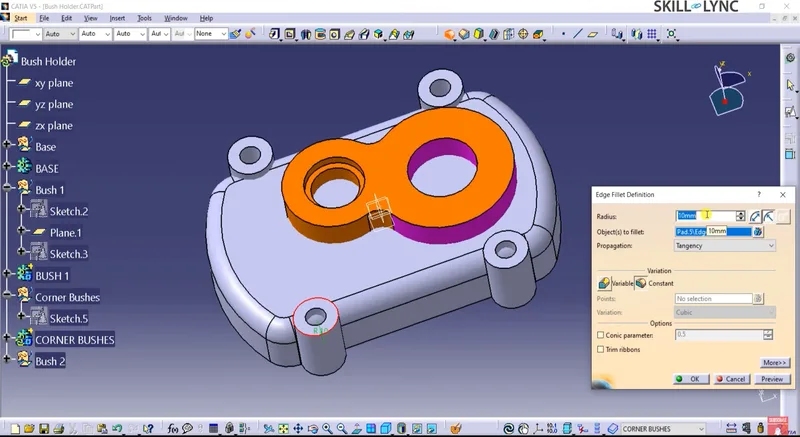
Corner bushes are the final components to model. Each bush has an outer diameter of 26 mm and a height of 35 mm.
- Create a new Geometrical Set and name it Corner Bushes.
- Copy Sketch 2 from Bush 1 and edit the axis distance to 43 mm from the right end of the base.
- Sketch two circles with outer and inner diameters of 26 mm and 12 mm.
Use the Mirror Command to duplicate these circles, and then Pad the sketch to a height of 35 mm. Smooth the corners by applying 2 mm radius fillets.
Step 6: Finalizing the design with Boolean Operations
With all components in place, let’s clean up the design using Boolean Operations.
- Use Union Trim to merge Bush 1, Bush 2, and the Corner Bushes with the base.
- Apply chamfers of 1.5 mm at a 45-degree angle on Bush 2 and the Corner Bushes.
- Add holes to Bush 2 with a 12 mm diameter and a depth of 15 mm. Use the Circular Pattern Command to repeat the holes across six instances.
Finally, organize your specification tree by grouping all geometrical sets into one.
Step 7: Drafting the model
Now that the 3D model is complete, let’s generate the technical drawings.
- Switch to the Drafting Workbench and insert the top view, front view, and isometric view of the Bush Holder.
- Use the Dimensioning Tools to add the necessary measurements.
Drafting ensures your design is properly documented for manufacturing.
Conclusion
In this comprehensive guide, we covered:
- Designing the Bush Holder and its components (Bush 1, Bush 2, and Corner Bushes).
- Using Boolean Operations for complex part design.
- Preparing technical drawings using CATIA’s Drafting Workbench.
This concludes the Bush Holder design tutorial. We hope this step-by-step guide enhances your CATIA skills and prepares you for more advanced part designs. Stay tuned for future tutorials in our CATIA V5 Design Series!
This blog is part of our ongoing CATIA Design Series. If you missed the previous posts, check them out here
Would you like to have a more interactive experience going through the CATIA user interface?
Skill-Lync has released a FREE comprehensive course covering CATIA in detail! Check it out here.
Right from the user interface's fundamentals, menus and options, this course covers most aspects of the tool from a practical perspective. It even includes a certificate to add to your resume after completion!
Check out our hands-on course today and add CATIA to your list of skills!
Let’s get #IndustryReady together, one skill at a time!


