Optimizing Plot Scales and Macros in AutoCAD
Optimize your AutoCAD workflow with our guide on plot scales and macros in AutoCAD for engineers. Learn to fine-tune print layouts, scale settings, and streamline repetitive tasks through macros for enhanced productivity in AutoCAD 2D and AutoCAD 3D projects.

Welcome back to the AutoCAD Essentials for Mechanical Engineers series! In this segment, we'll explore two critical components: adjusting plot scales for optimized print output and creating macros to automate repetitive tasks. These tools are powerful, enabling precision in your AutoCAD drawings and freeing up time to focus on design, rather than redundant commands. Let’s dive into plotting, scaling, and creating efficient workflows through AutoCAD macros.
Understanding Plot Scales: Fitting Drawings to the Page
In AutoCAD for engineers, setting an accurate plot scale is essential. Plot scales determine how your drawing appears on a chosen paper size, whether fitted to the paper or set to a custom scale. To illustrate, let’s look at applying a scale of 1:8. If this doesn’t align with the current area, AutoCAD will issue a warning that “The annotation scale is not equal to the plot scale.” When adjusting the scale, preview your drawing to ensure it fits as intended.
Customizing plot scales helps AutoCAD for beginners and professionals alike by optimizing how much of your design appears on paper. You can choose to fit the drawing to the page or apply a scale that best suits your project requirements. This process is invaluable in AutoCAD 2D drawing for beginners as well as in advanced AutoCAD mechanical drawings.
Additional Plotting Options
AutoCAD offers other useful plot settings, such as:
- Plot in Background: Allows the plot process to run in the background.
- Transparency: Useful if you need to print with transparent object settings.
- Watermark: Adds a watermark to the plot if needed.
- Plot Upside Down: An option for rotating the entire plot, useful in certain layouts.
By familiarizing yourself with these settings, you can create a tailored printing setup, ensuring your AutoCAD mechanical engineering drawings meet all professional standards.
Introducing Macros: Streamlining Workflows in AutoCAD
AutoCAD macros can be transformative. Think of a macro as a shortcut for a series of commands. It automates repetitive tasks, saving you time and minimizing the chance for errors. AutoCAD’s macro functionality, similar to Microsoft’s Visual Basic for Applications (VBA) scripts in Excel, can be applied to automate everything from creating layers to assigning line types. This feature is especially valuable in AutoCAD mechanical engineering courses, where students can learn to implement repetitive commands seamlessly.
Recording Macros with the Action Recorder
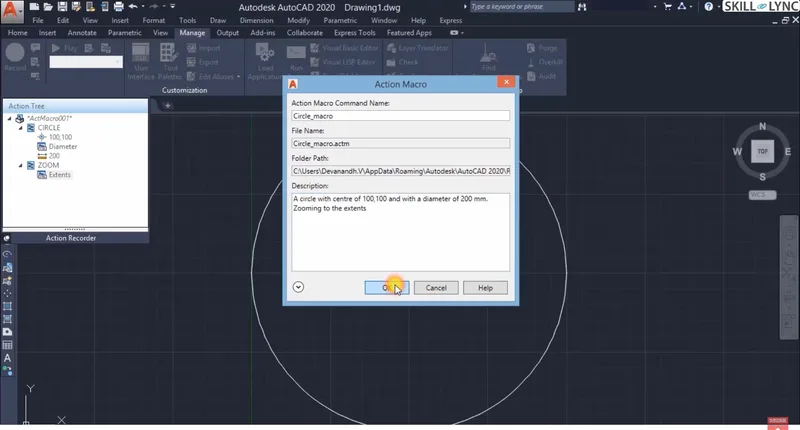
The Action Recorder in AutoCAD simplifies the process of creating macros by recording each action as you perform it. Let’s walk through an example of using the Action Recorder to create a macro that draws a circle:
- Start Recording: In the Manage tab, select Action Recorder and click the round record button.
- Set Commands: For our macro, enter the Circle command and set the center point to (100, 100) with a diameter of 200 units.
- Zoom Extents: After creating the circle, use the Zoom Extents command to center the circle within the view.
- Stop Recording: Click the stop button, and the Action Recorder will prompt you to name your macro (e.g., “Circle Macro”) and save it.
Once saved, your macro can be played back at any time with a single click. This is beneficial for tasks that are frequently repeated, such as setting up specific dimensions or adjusting layers in CAD software. You can access saved macros in the Action Recorder dropdown menu.
Adding User Prompts in Macros
A unique feature of AutoCAD macros is the ability to include user prompts, which are especially useful in 3D CAD and CAD programs for mechanical engineers who need flexibility in design tasks. For example, when creating a macro for drawing circles, you could include a prompt that allows the user to enter a custom center point or diameter each time the macro runs. This adds versatility and ensures your macro can be applied across different projects without modification.
Here’s how to add a prompt:
- Insert User Prompt: Within the Action Recorder, select the command you want to prompt for, such as “Center Point,” and set it to require user input.
- Play Back the Macro: When you run the macro, AutoCAD will pause for the user to input the center point, creating a dynamic workflow.
Modifying Macros for Customization
Once a macro is created, it can be edited and customized:
- Edit Parameters: Right-click the macro in the Action Recorder and choose Edit to adjust parameters, such as coordinates or line types.
- Incorporate User Messages: Adding user messages in the macro ensures that users receive prompts during playback, making it clear what the macro is executing.
This customization is beneficial for students and professionals enrolled in AutoCAD training and certification programs, as it allows them to tailor macros for specific tasks in mechanical AutoCAD projects.
Best Practices for Using Macros in AutoCAD
The key to leveraging macros effectively is knowing when and how to use them. Here are a few best practices:
- Identify Repetitive Tasks: Look for tasks you perform repeatedly, such as applying specific layers or line styles.
- Keep Macros Simple: Overloading macros with too many commands can make them cumbersome. Focus on automating specific tasks for maximum efficiency.
- Use Dynamic Inputs: Including user prompts where necessary keeps your macros flexible and versatile, especially in AutoCAD online environments.
By mastering macros, AutoCAD for mechanical engineers becomes even more powerful, enhancing efficiency and allowing more focus on high-level design rather than repetitive tasks.
Wrapping Up: Efficient Plotting and Macro Use in AutoCAD
Plotting and macros are two crucial elements for engineers using design software for mechanical engineers. Proper plotting scales allow you to print precise, clear images suited to any project’s needs, whether for CAD tutorials or professional presentations. Macros, on the other hand, streamline your process, allowing you to create efficient, custom workflows that save time and ensure accuracy.
AutoCAD Essentials for Mechanical Engineers aims to provide a deep understanding of these tools, giving you the skills to elevate your CAD design work and make the most of your training. As you grow more comfortable with macros, you’ll find that automation and efficient plotting can drastically improve productivity and output quality, aligning with the best practices in top design software for the industry.
Happy plotting and automating!
This blog is part of our ongoing AutoCAD Design Series. If you missed the previous posts, check them out here.
Would you like to have a more interactive experience going through the AutoCAD essentials?
Skill-Lync has released a FREE comprehensive course covering AutoCAD Essentials for Mechanical Engineers in detail! Check it out here.
If you’re looking to go deeper into AutoCAD Essentials check out Skill-Lync’s AutoCAD certification course.
Check out our hands-on course today and add AutoCAD to your list of skills!
Let’s get #IndustryReady together, one skill at a time!


