Using External References in AutoCAD
Learn to use external references (Xrefs) in AutoCAD to streamline complex assemblies and improve collaboration. This guide is ideal for engineers looking to enhance AutoCAD 2D and 3D workflows by mastering efficient, dynamic file management with Xrefs.

Welcome back to AutoCAD Essentials for Mechanical Engineers blog series! In this blog, we’ll dive into how to effectively use external references (Xrefs) in AutoCAD for managing complex assembly drawings. This is an essential skill for anyone looking to build large assemblies while maintaining flexibility and collaboration.
What is an External Reference (Xref)?
External references, or Xrefs, allow you to insert one AutoCAD drawing into another, maintaining a live link between the two. Unlike static blocks, Xrefs are dynamic—meaning any updates made to the referenced file automatically reflect in the main drawing. This functionality is invaluable for complex assemblies in mechanical AutoCAD projects where multiple team members work on different components simultaneously.
Example: Building a Pump Assembly with Xrefs
Let’s look at a practical example: a pump housing assembly. This assembly includes various components such as a hexagonal socket head cap, a bottom plate, a pump cover, a drive shaft, a wheel casing, and a pump wheel. To organize and manage these elements efficiently, you can use Xrefs to bring in each part as a separate drawing.
Steps to Use Xrefs in AutoCAD
1. Inserting an Xref:
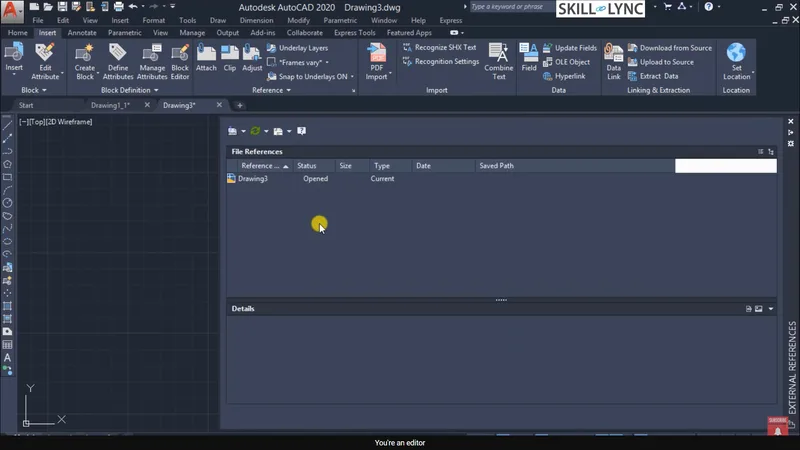
- Go to the Insert tab, then select External Reference. Alternatively, navigate to Reference in the Insert panel.
- In the External Reference Manager, choose Attach Drawing and select the component drawing, such as the pump cover.
2. Choosing Between Attachment and Overlay:
- Overlay: Ideal for temporary views or when you want to reference a drawing without it being part of the final output.
- Attachment: Useful when you want the referenced drawing to become a permanent part of your current assembly.
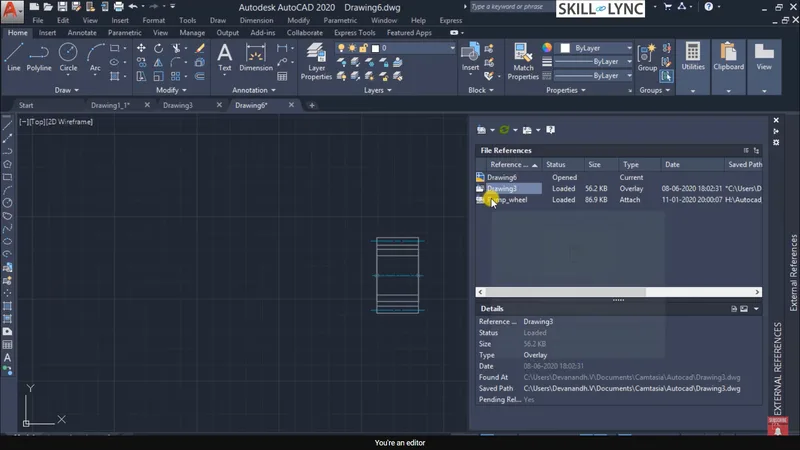
For instance, using an overlay for the pump cover provides a temporary reference, whereas attaching the pump wheel makes it an integral part of the main assembly.
3. Positioning the Xref:
When attaching or overlaying, AutoCAD prompts you to choose insertion point, scale, and rotation. These options allow you to place the component precisely where it belongs within the assembly.
Understanding Attachment vs. Overlay
- Attachment: When saved and reopened, attachments remain integral to the drawing and are suitable for final assemblies where every part is essential.
- Overlay: Functions more like a tracing layer that allows you to view another file without embedding it in the main drawing. This is beneficial for referencing the boundaries of parts without altering the main drawing.
Working with Nested References
Nesting occurs when a referenced drawing contains its own Xrefs. For example, if the pump wheel references the pump cover, then the pump cover becomes a nested reference. Be cautious with nesting to avoid circular references, where drawings loop back to themselves, creating potential errors.
Practical Applications of Xrefs
- Collaborative Work: Each designer can work on different components of an assembly. Xrefs allow them to view and integrate other designers’ work without needing a finalized drawing.
- Automatic Updates: Xrefs ensure that your assembly always shows the latest version of each component. Every time you open the main assembly, AutoCAD refreshes the Xrefs to display the most recent updates.
- Optimized Memory Usage: Xrefs keep your main drawing lightweight, as the referenced files are stored externally. You can also unload Xrefs temporarily to improve performance.
Modifying Xref Types and Paths
- Switch Between Attachment and Overlay: If you need to change a reference from attachment to overlay, right-click on the Xref in the manager and select the appropriate type.
- Reload or Unload Xrefs: Unloading an Xref removes it from display without detaching it from the drawing, preserving its link for future use. Reloading restores the reference, incorporating any changes made to the source file.
- Detaching an Xref: This removes the Xref entirely, deleting all associated layers and information from the drawing. Detaching is a permanent action and should be used when you no longer need the reference.
Additional Xref Options in AutoCAD
AutoCAD’s External Reference Manager offers flexibility for various file types. You can attach not only DWG files but also images, PDFs, point clouds, and coordination models. This versatility is particularly useful in multi-disciplinary projects, allowing you to reference different file types without converting them into AutoCAD drawings.
Best Practices for Using Xrefs
- Use Overlays for Temporary References: When you only need a visual aid or reference points, overlays are ideal. This keeps your main drawing uncluttered and speeds up load times.
- Organize Your Xrefs: Maintain a clear folder structure for all reference files. Use relative paths to ensure that file links remain intact even if the folder is moved.
- Avoid Circular References: To prevent errors, avoid creating situations where a drawing references itself through a chain of nested references.
- Keep Your Layers Consistent: Xrefs carry their layer names, so maintaining a standardized naming convention ensures clarity and reduces conflicts when assembling files from different sources.
Wrapping Up: Leveraging Xrefs in AutoCAD
Using external references effectively can transform your AutoCAD mechanical engineering workflow, especially for large-scale assemblies. Xrefs bring flexibility, reduce redundancy, and foster collaboration—essential qualities for any engineer working in CAD software.
Whether you’re taking an AutoCAD mechanical crash course or working in an advanced AutoCAD mechanical engineering course, mastering Xrefs will enhance your skills and streamline your design process. Integrate these practices into your work to improve efficiency and maintain accuracy across projects. Happy designing!
This blog is part of our ongoing AutoCAD Design Series. If you missed the previous posts, check them out here.
Would you like to have a more interactive experience going through the AutoCAD essentials?
Skill-Lync has released a FREE comprehensive course covering AutoCAD Essentials for Mechanical Engineers in detail! Check it out here.
If you’re looking to go deeper into AutoCAD Essentials check out Skill-Lync’s AutoCAD certification course.
Check out our hands-on course today and add AutoCAD to your list of skills!
Let’s get #IndustryReady together, one skill at a time!


