Week 9 - Attachment Feature Creation - Challenge 2
COIN HOLDER WITH SCREW BOSSES & DOGHOUSE DESIGN
Objective:
The main objective is to create Screw Bosses & Dog House on Automotive Plastic Component - Coin Holder using industry principles and Design Rules. Concepts such as Rib Root Thickness, Draft Angles, Draft Analysis, Determining the Tooling Axis, Class A, Class B and Class C surfaces. The Component is Designed to manufacture maintaining a wall thickness of 2.5 mm using Surface Design and Solid Design techniques in Catia V5 application.
Introduction:
Screw Boss Design:
- Screw Bosses are Class B side engineering features which find use in many part designs as point for attachment and assembly.
- Most common variety consists of cylindrical projections with holes designed to receive screws, threaded inserts or other types of fastening hardware.
Guidelines for Screw Boss Design:
- To reduce stress concentration and potential breakage the bosses must have blended radii rather than sharp edges at the base.
- Larger radius reduces stress concentration but also increases chance for sink or void.
- Specifying smaller screws or inserts often prevents overly thick bosses.
- Normally, the boss hole should extend the base wall level even if the full depth of is not needed for assembly.
- Shallow holes can lead to thick sections at wall resulting in sink marks or voids.
- Deep holes can lead to thin walls which are difficult to fill during molding.
- Because of draft requirement the tall bossed (>5 x outer diameter of Boss) can create filling problem at their top or thick section at the base.
- Proper Boss design is necessary to avoid plastic defects which involves the following critical sections and design rules that needs to be considered:
- Draft angle
- Thickness at base (w)
- Height/Diameter Ratio (H/D)
- Optional Radii for fillets (r)
- Boss Gussets or Ribs for support
- Root Diameter
- Planning ahead for the Type of Ejection
- The Below image shows the critical sections.
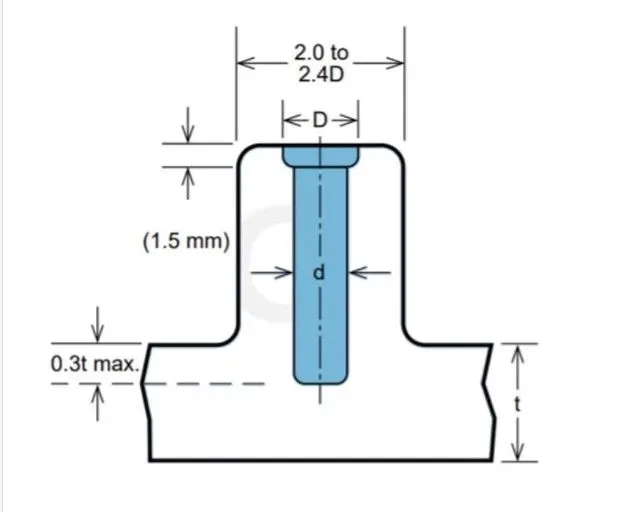
- Design Rules considering above critical sections are as follows:
- Thickness (w) = 0.6 x t
- Should be measured at base.
- Should be measured at the tangent of the fillet.
- Larger base area could lead to higher heat retention.
- Retained heat could lead to Higher Shrinkage.
- Optional Radii (r) = 0.25 mm Max.
- Must not violate ± 40% thickness requirement for the base thickness.
- Draft = 5⁰ on both inner and outer walls.
- Different rule used for sleeve ejection that needs to be planned.
- H/D ratio should be 3:1 or 2:1
- Boss Gussets should meet Rib Design Rules
- Planning for Ejection:
- If height of Boss <25 mm then draft is not required when sleeve ejection is used.
- If height of Boss >25 mm then draft should be done only on outside wall for sleeve ejection.
- If Sleeve Ejection is not used then draft of 0.5⁰ is required on all walls.
- If Boss wall thickness must exceed the recommended ratio, consider adding recess around the base of the boss to reduce the severity of sink.
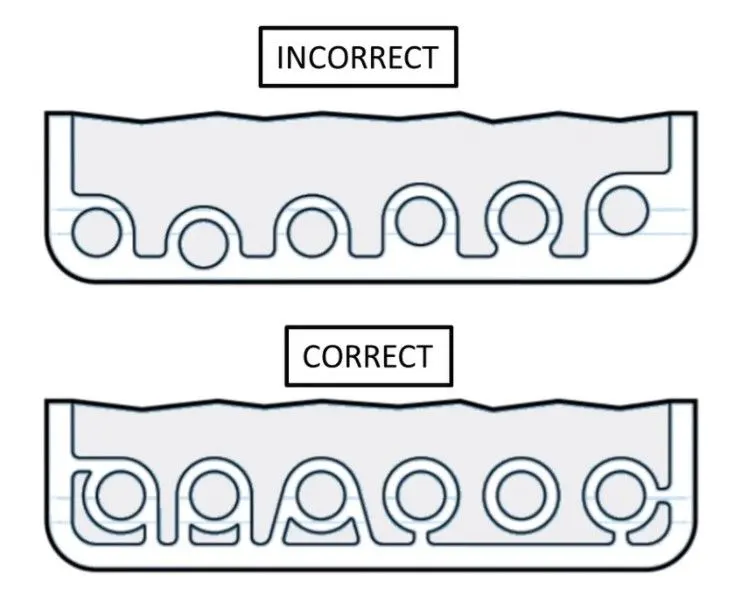
- Avoid bosses that merge into the side walls because they can form thick sections that lead to sink marks. Instead position the bosses away from the side walls, and if needed connect it with ribs as shown in below image.
Dog House Design:
- Dog House is a B Surface engineering feature used to avoid sink marks primarily.
- Its secondary use is to place an offset B side feature such as boss or locators on it.
- The cross section for dog house near the B surface is less and then increases rapidly.
- It can be extended to have another feature on it.
- Also, if Bosses are perpendicular to the B surface Dog Houses are used to place it.
Guidelines and Design Rules for Dog House:
- Proper Dog House design is necessary to avoid plastic defects which involves the following critical sections and design rules that needs to be considered:
- Draft angle
- Dog House Wall Section
- Part Surface
- Bottom of Dog House
- Wall Thickness
- Height and Width
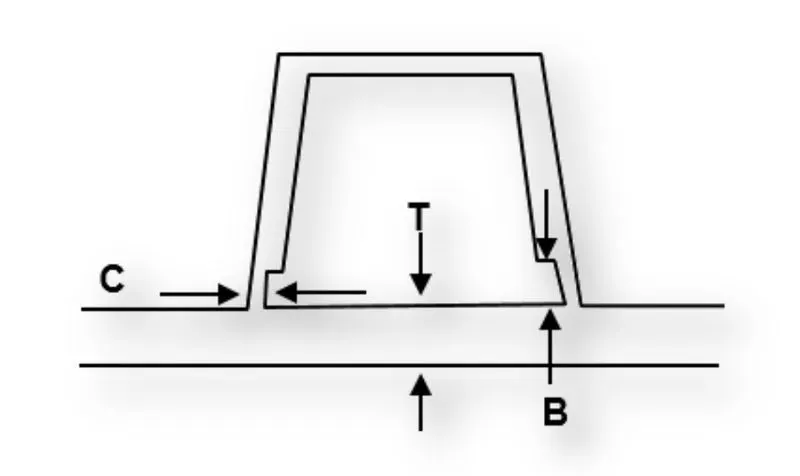
- B = 3 to 6 mm, C <= 0.4 x T
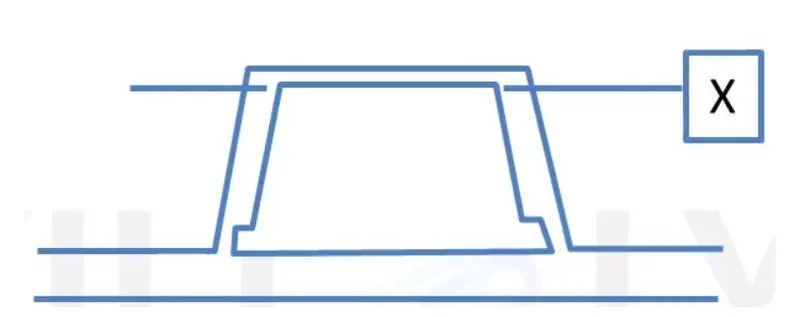
- Dog House width (X) = 12 mm Minimum
- Height (H) = 6 mm Minimum
- X/H = 3:1 or 2:1
- Draft of 5⁰ minimum to draw direction, if slide is considered then this can change to 3⁰
Draft Angle:
- Draft is an angular tapering given at the design stage to every Plastic component that has to be manufactured.
- It is given in the direction of the Mold Movement.
- The draft allows the parts to release easily from the mold without creating friction between the surface of component and the core and cavity plates.
- When a Plastic component cools down inside the mold, the natural tendency of it is to shrink and attach to the core or cavity half.
- The movement of mold opening causes friction on the walls of the component as well as the core/cavity blocks.
- This reduces the life of the mold as well as the component itself.
- The component may also have rough surface finish as well as weak structure due to this method.
- This problem can be solved by giving draft to the component.
- Most applications require minimum draft angles of around 0.5⁰ to 1⁰, however 3⁰ draft angles are widely accepted for cost saving purpose.
- 7⁰ Draft angles are given to textured surfaces like Instrument Panels.
- Minimum possible draft angles are given to screw bosses, ribs and stiffeners due to their critical nature.
- Walls having 0⁰ or negative draft are difficult to manufacture thus, are required to redesign from the Class A stage.
Tooling Axis:
- Tooling Axis is the direction in which the mold opens and closes.
- Part Drafts are given along this axis.
Draft Analysis:
- Draft Analysis is a tool in Catia which identifies the zones which deviates from the specified values of angles along a defined draft direction using colour codes.
- It highlights the region of draft using colours.
- Draft Analysis is the first step performed after receiving the Class A of the component.
- Draft analysis should be passed in order to make the plastic component manufacturable.
- Acceptable draft angles are used as range for draft analysis.
Class A Surface:
- In automotive design, a class A surface is any of a set freeform surfaces of high efficiency and quality. It is the visible aesthetic surface of any automotive component.
- Class A surface refers to those surfaces which are visible and abide to the physical meaning, in a product.
- This classification is primarily used in the automotive and increasingly in consumer goods industry.
- It is a requirement where aesthetics has a significant contribution.
- For this reason, the exterior of automobiles is deemed Class A.
Class B Surface:
- Class B surfaces are engineering surfaces which are invisible to the eyes or often on the back side of the Class A surfaces.
- It is mainly the thickness of the component or Class A.
- These surfaces need to be designed as per the Class A surface i.e., the continuity, thickness of the component, functionality etc should be maintained.
- These surfaces include the main engineering features such as Screw bosses, Ribs, Stiffeners and fixations.
- B surfaces also do not contain any aesthetic styling content and textures since it is not visible to eyes.
Class C Surface:
- Class C surfaces are connectors between Class A and Class B surfaces.
- This surface connects both A and B surfaces along or angled to the Tooling Axis.
- It contains the draft as per the design.
- It is basically the thickened surface between both A and B surface.
Design Methodology:
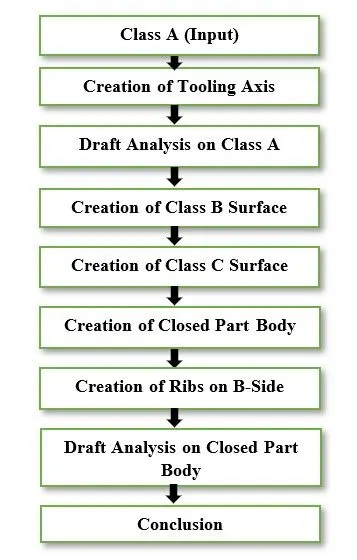
The design methodology of Coin Holder with Screw Bosses & Dog House Design is explained through flow charts.
Description:
Class A (Input):
- After receiving the Class-A for the Coin Holder check the connectivity of the surfaces on it.
- Use Join operation, boundary operation and disassemble.
- The check is over if any discontinuities do not arise.
- Delete the operations after check.
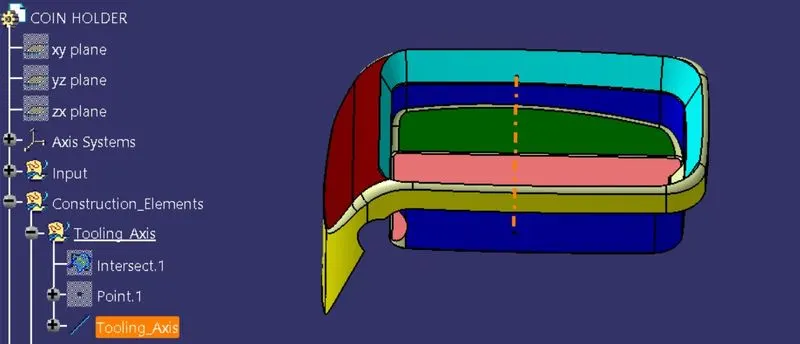
Creation of Tooling Axis:
- Identify faces which can potentially create problems while manufacturing.
- Surfaces at angles along a desired Tooling Axis.
- Extract a plain surface and create a point on its center for Axis system creation.
- In this case Y axis can be possible Tooling Axis Direction.
- The highlighted coloured faces can be problem in terms of draft analysis.
- Intersect the YZ Plane with the Class A.
- Since Most of the Faces from the Intersect are either parallel or at 90⁰ or having comfortable draft angles, the Tooling Axis will be created in direction normal to the Base Surface along the origin of the axis system.
- Publish the Tooling Axis as the Class A for easy access using Toolsà Publications as per the below image.
Draft Analysis on Class A:
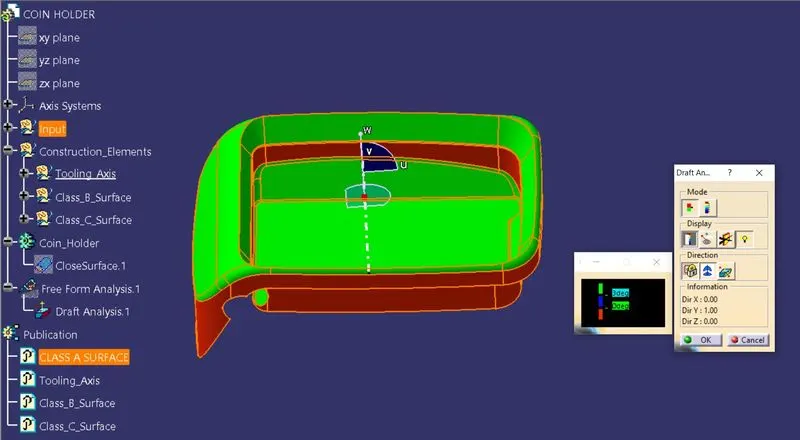
- Change View Mode Customization to Material mode.
- Go to Insert – Analysis – Feature Draft Analysis and move the compass to the Tooling Axis. Change the range to 3⁰. Apply the settings as shown below image.
- As shown the target area has 27⁰ draft angle on a face.
- The input Class A also has walls having negative angle to the tooling axis and some having 0⁰ too.
- This can be an issue while manufacturing the component as it would be very difficult to draw from the molds.
- So, this design needs to be reconsidered at the Class A Styling stage where improvising on the draft angles is required.
- Minimum Positive drafts can be considered while styling after which can be considered to be thickened and manufactured.
Creation of Class B Surface:
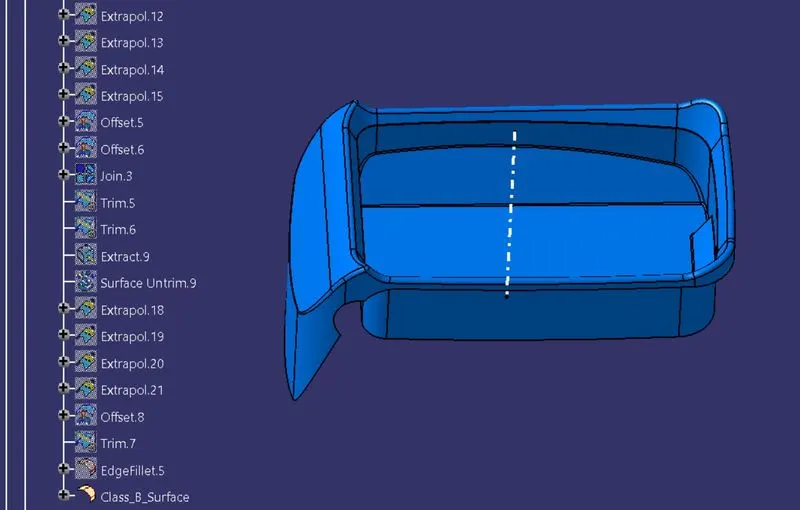
- Extract the relevant surfaces from the Class-A surface which excludes the Fillets and holes.
- Here the selected faces consist of Side walls, Base, Top walls, Initial trims, Outer Flange.
- Extract of these surfaces as shown in below image.
- Use Untrim Command to untrim the extracted surfaces and create a natural extend.
- Extrapolate the untrimmed surfaces so that each of them intersects clearly and pass way forward than the Class A will help in its trimming in further operations.
- Offset the extrapolated surfaces to the value of required Thickness of the part.
- In this case of Coin Holder, the thickness value is 2.5 mm.
- The offset faces are the part of B-Surface.
- Then, trim the extra surfaces to obtain similar extended surfaces as in class A.
- The surface obtained after trim is shown in below image.
- Apply fillets while maintaining the part thickness between the Class A and Class B surfaces.
- The value of Fillet is given by the equation (B surface fillet = A surface fillet + Thickness of the part).
- The sign + or – must be decided so as to maintain the part thickness which in this case is 2.5 mm.
- Filleted image as shown in below image.
Creation of Class C Surface:
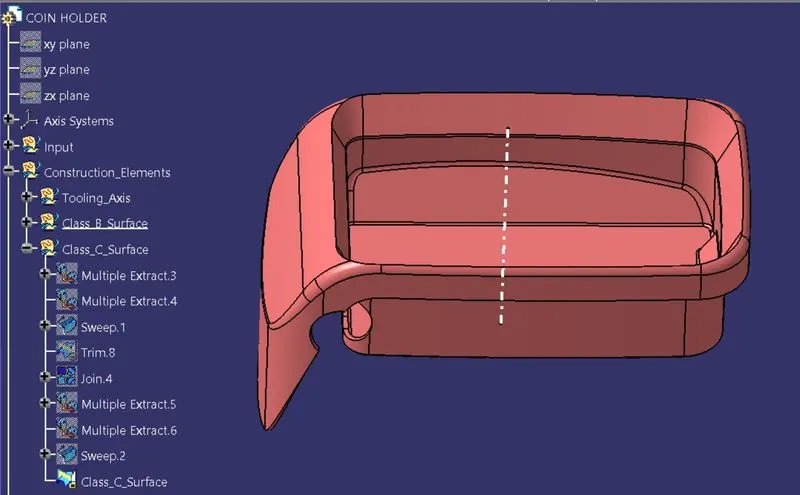
- For creating Class C surface, multiple extract command is used to highlight the boundary of Class A surface.
- Applying sweep command to create Class C surface with respect to class A surface and Extracted boundary lines.
- Then joining Class C surface and Class A surface to create solid body.
- The Class C surface is shown in below image.
Creation of Closed Part Body:
- Join all the sweep surfaces along with the Class B surface.
- The Final trim should be one single surface entity without any gaps.
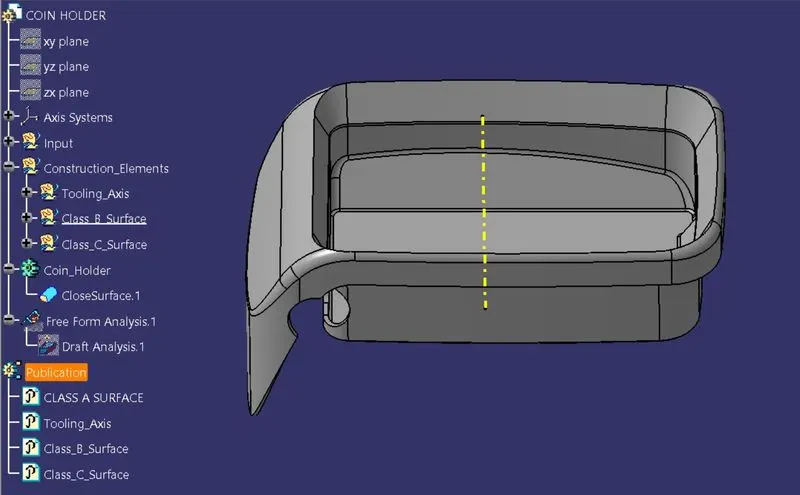
- Join the final trim surface with the Class A surface to obtain the final enclosed surface for the coin holder.
- Insert New Part Body, select the mechanical part design tab to create solid part body of Coin Holder.
- The closed solid part body of Coin Holder is shown below.
Creation of Screw Bosses & Dog House on B-Side:
Screw Bosses:
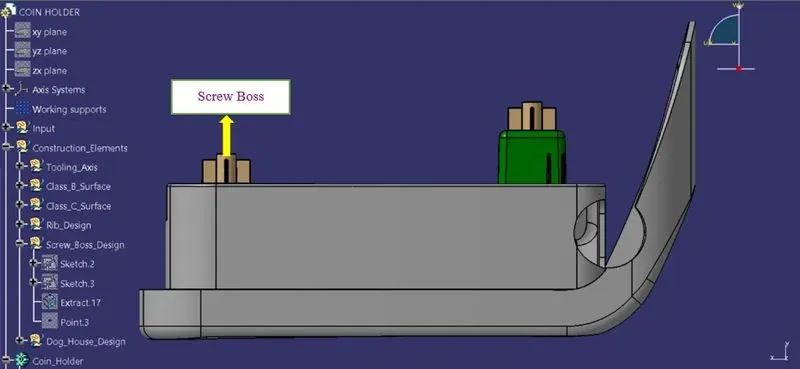
- In generative Shape Design Workbench, Extract the Base from B Surface and create a Plane.
- Create sketch on the extracted surface in that draw a outer circle diameter as 8.2 mm and inner circle diameter as 5.2 mm (M6) hole from wall thickness rule.
- Extrude the Boss to the value of 12.5 mm.
- In part Design Workbench, Use Thicken command to the Extruded Surface with the value of 1.5 mm.
- Sketch the Ribs for the Screw Boss as cross sectional.
- Extrude and Thicken it to the Rib design rule and obtain the Screw Boss by using Union Trim for internal faces to be removed.
- Provide Draft in Tooling direction and also give fillets as per optional Radii Rule.
- The Screw Boss image as shown below.
Dog House:
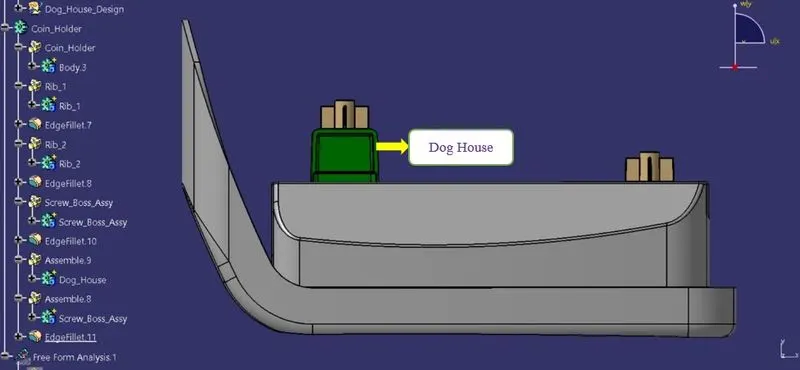
- Create a point on the B-side Surface and create a plane on the same Surface with before created point as reference.
- Create a Sketch on the extracted surface to create dog house.
- Clicking on the Sweep command, the dialog box appears in that select Profile type as second type, Subtype as With Draft Direction, Guide Curve 1 as Sketch.4, Draft direction as Tooling Axis, Angle as 1.5-degree, Length 1 as 21 mm, Length 2 as 1 mm and Click Ok to validate.
- Use Untrim command to the Extracted Surface and Offset it to 20 mm upwards.
- Use Trim command to Trim the Sweep Surface with offset surface to attain output.
- Jumping into Part Design Workbench to use thicken Surface command. By clicking on the Thick surface command, the dialog box appears in that select trim surface and the parameter as 2 mm, direction as outside.
- Again, changing to Generative Shape Design Workbench, in the select the thickened back side of side wall to extract the face. Use Extrapolate command to extrapolate the face and offset it to 20 mm forward direction.
- In part design workbench, use Split command to spilt the face and thickened dog house.
- Use Draft command to the inner side of dog house walls at the value of 0.5 mm and click ok to validate.
- Clicking on the Edge Fillet command, the dialog box appears in that select the inside edges of the dog house walls to the value of 1 mm.
- Again, Jumping into Generative Shape Design workbench, Extract the inner side walls of dog house and offset it to 1 mm (0.4 x T (2.5) = 1) as per Design Rules.
- Clicking on the Split command, the dialog box appears in that select Trimmed surface and click ok to validate.
- Using Fillet command to fillets outside edges of dog house to the value of 3 mm.
- And use draft command to draft inner cut surface of dog house to the value of 0.5 mm.
- Finally using Edge Fillet command to the drafted face to the value of 0.5 mm by selecting the needful edges.
- Using Paste special option to paste screw boss on the top of Dog House.
- The Dog House image as shown below.
Draft Analysis on Closed Part Body:
- Change View Mode Customization to Material mode.
- Click on Inert, select Analysis and select Feature draft analysis, then drag the compass to the Tooling Axis and lock the compass at specified direction.
- Select the component to check the part producibility or not.
- Changing the range to 0.45⁰ and Click Ok to validate.
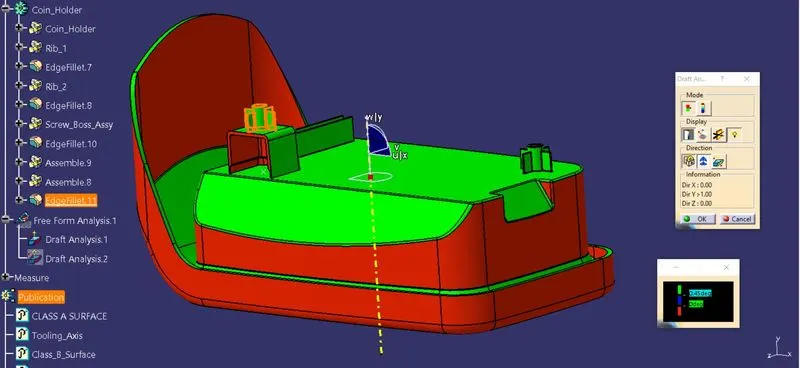
- The final Draft analysis passes on the Ribs, Screw Bosses and Dog House along Main Tooling axis but does not pass on the Side walls since Class A contained parallel walls and walls without draft. This component will be costly to manufacture or may even fail causing loss in Time and Cost.
- The design for the Walls should be reconsidered by the Class A design team.
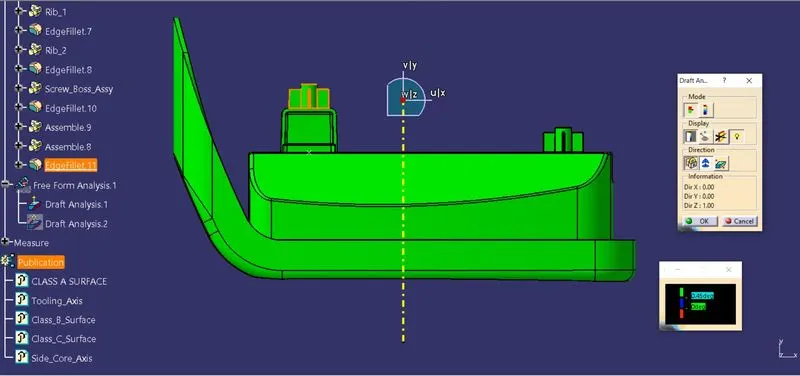
- Draft Analysis should also be done along the side core axis for the Dog house side walls to clear the tooling.
- Create the Side core Tooling Axis in clearing the direction of the Dog House passing perpendicular to the Main Tooling Axis and Publish it.
- The Draft analysis along the Side Core Axis is shown below.
Draft Analysis along Main Tooling Axis:
Draft Analysis along Side Core Tooling Axis:
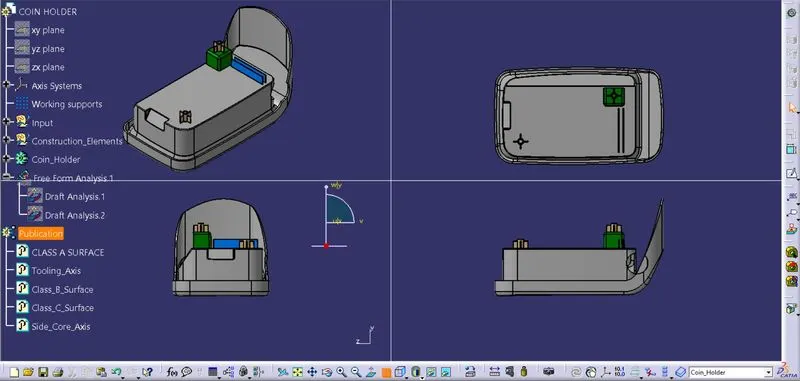
Standard Views (Isometric, Front, Side, and Top View):
Conclusion:
Successfully created the Ribs, Screw Bosses & Dog House design of automotive plastic component – Coin Holder from Class A surface by developing Tooling Axis, Class B surface, Class C surface, Closed Part Body and Draft Analysis using Catia V5 application.