Week 9 - Attachment Feature Creation - Challenge 1
COIN HOLDER WITH RIB DESIGN
Objective:
The main objective is to create Ribs on Automotive Plastic Component - Coin Holder using industry principles and Design Rules. Concepts such as Rib Root Thickness, Draft Angles, Draft Analysis, Determining the Tooling Axis, Class A, Class B and Class C surfaces. The Component is Designed to manufacture maintaining a wall thickness of 2.5 mm using Surface Design and Solid Design techniques in Catia V5 application.
Introduction:
Design Rules for Plastic Components:
- Nominal wall thickness of a plastic component is 3 mm. For a strength component such as Instrument Panel, Bumper, Door Trims the values of thickness are larger than 4 mm. For example, Thickness of IP may lie between 5 - 6 mm, for Bumper it may be 6 – 8 mm. For Smaller components the thickness may be between 2 – 3 mm as in this case of coin holder.
- Deviation of +/- 30% from the wall thickness is allowed with gradual increase or decrease to avoid any plastic defects while manufacturing. For example: A component having wall thickness 3 mm should deviate within the range of 2.1 mm minimum and 3.9 mm maximum.
- Ideal draft angle should be 3⁰ for the overall component along for the faces lying in the tooling direction.
Ribs Design:
- Rib is a B-Side Engineering feature which provides a means to economical stiffness and strength in Plastic Molded parts without increase in overall wall thickness.
- Rib also facilitates locating and arresting components of an assembly.
- It provides alignment in Mating Parts.
- It acts as Stop and Guides for Mechanisms.
Guidelines for Rib Design:
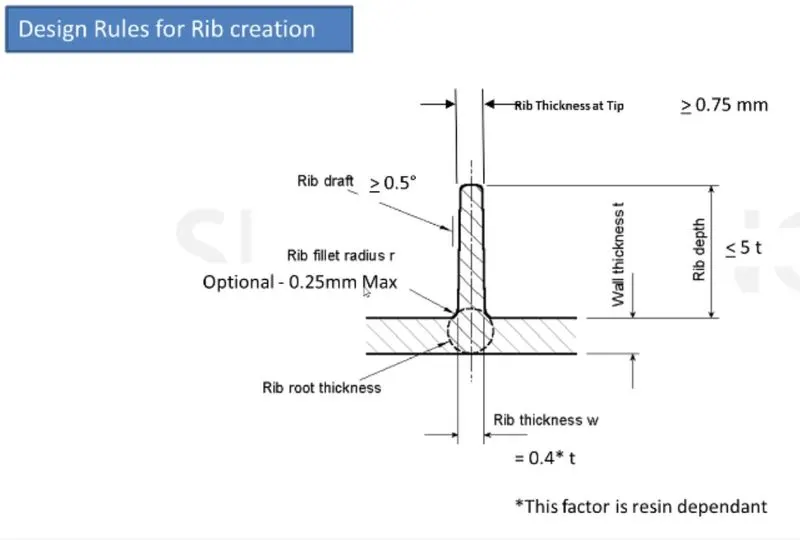
- Proper Rib design is necessary to avoid plastic defects which involves the following critical issues that needs to be considered which are:
- Draft Angle
- Rib Thickness at base
- Thickness at Top of the Rib
- Rib Height
- Location of Ribs and Spacing between 2 Ribs
- Optional Radius or Fillet Radius
- Rib Root Diameter
- Quality of Ribs
- Manufacturability
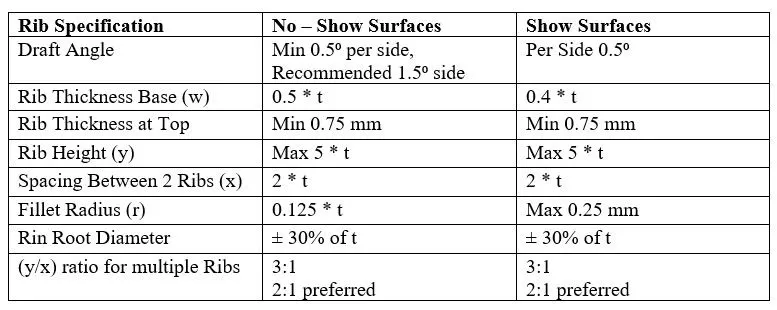
- These guidelines are separate for Show and No – show surfaces.
- The Below table gives specific values for both cases.
- Consider ‘t’ as wall thickness of base for component.
Draft Angle:
- Draft is an angular tapering given at the design stage to every Plastic component that has to be manufactured.
- It is given in the direction of the Mold Movement.
- The draft allows the parts to release easily from the mold without creating friction between the surface of component and the core and cavity plates.
- When a Plastic component cools down inside the mold, the natural tendency of it is to shrink and attach to the core or cavity half.
- The movement of mold opening causes friction on the walls of the component as well as the core/cavity blocks.
- This reduces the life of the mold as well as the component itself.
- The component may also have rough surface finish as well as weak structure due to this method.
- This problem can be solved by giving draft to the component.
- Most applications require minimum draft angles of around 0.5⁰ to 1⁰, however 3⁰ draft angles are widely accepted for cost saving purpose.
- 7⁰ Draft angles are given to textured surfaces like Instrument Panels.
- Minimum possible draft angles are given to screw bosses, ribs and stiffeners due to their critical nature.
- Walls having 0⁰ or negative draft are difficult to manufacture thus, are required to redesign from the Class A stage.
Tooling Axis:
- Tooling Axis is the direction in which the mold opens and closes.
- Part Drafts are given along this axis.
Draft Analysis:
- Draft Analysis is a tool in Catia which identifies the zones which deviates from the specified values of angles along a defined draft direction using colour codes.
- It highlights the region of draft using colours.
- Draft Analysis is the first step performed after receiving the Class A of the component.
- Draft analysis should be passed in order to make the plastic component manufacturable.
- Acceptable draft angles are used as range for draft analysis.
Class A Surface:
- In automotive design, a class A surface is any of a set freeform surfaces of high efficiency and quality. It is the visible aesthetic surface of any automotive component.
- Class A surface refers to those surfaces which are visible and abide to the physical meaning, in a product.
- This classification is primarily used in the automotive and increasingly in consumer goods industry.
- It is a requirement where aesthetics has a significant contribution.
- For this reason, the exterior of automobiles is deemed Class A.
Class B Surface:
- Class B surfaces are engineering surfaces which are invisible to the eyes or often on the back side of the Class A surfaces.
- It is mainly the thickness of the component or Class A.
- These surfaces need to be designed as per the Class A surface i.e., the continuity, thickness of the component, functionality etc should be maintained.
- These surfaces include the main engineering features such as Screw bosses, Ribs, Stiffeners and fixations.
- B surfaces also do not contain any aesthetic styling content and textures since it is not visible to eyes.
Class C Surface:
- Class C surfaces are connectors between Class A and Class B surfaces.
- This surface connects both A and B surfaces along or angled to the Tooling Axis.
- It contains the draft as per the design.
- It is basically the thickened surface between both A and B surface.
Design Methodology:
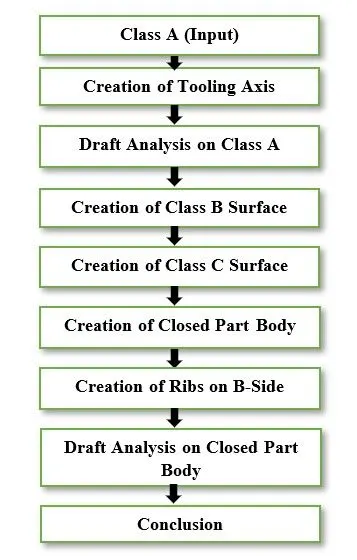
The design methodology of Coin Holder Design is explained through flow charts.
Description:
Class A (Input):
- After receiving the Class-A for the Coin Holder check the connectivity of the surfaces on it.
- Use Join operation, boundary operation and disassemble.
- The check is over if any discontinuities do not arise.
- Delete the operations after check.
Creation of Tooling Axis:
- Identify faces which can potentially create problems while manufacturing.
- Surfaces at angles along a desired Tooling Axis.
- Extract a plain surface and create a point on its center for Axis system creation.
- In this case Y axis can be possible Tooling Axis Direction.
- The highlighted coloured faces can be problem in terms of draft analysis.
- Intersect the YZ Plane with the Class A.
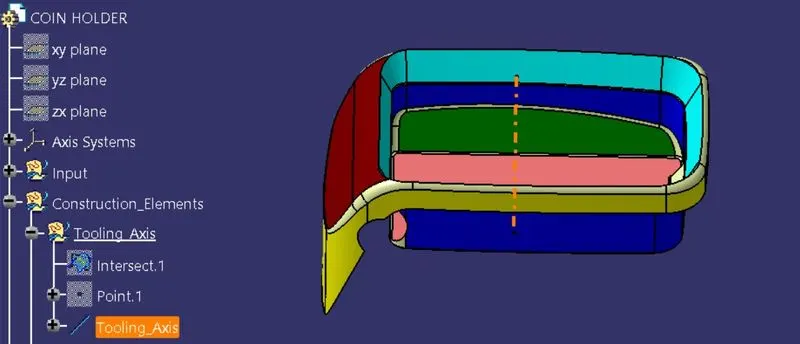
- Since Most of the Faces from the Intersect are either parallel or at 90⁰ or having comfortable draft angles, the Tooling Axis will be created in direction normal to the Base Surface along the origin of the axis system.
- Publish the Tooling Axis as the Class A for easy access using Toolsà Publications as per the below image.
Draft Analysis on Class A:
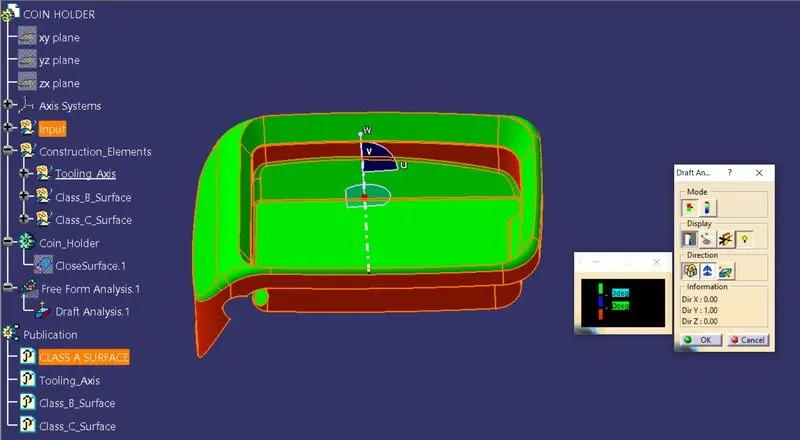
- Change View Mode Customization to Material mode.
- Go to Insert – Analysis – Feature Draft Analysis and move the compass to the Tooling Axis. Change the range to 3⁰. Apply the settings as shown below image.
- As shown the target area has 27⁰ draft angle on a face.
- The input Class A also has walls having negative angle to the tooling axis and some having 0⁰ too.
- This can be an issue while manufacturing the component as it would be very difficult to draw from the molds.
- So, this design needs to be reconsidered at the Class A Styling stage where improvising on the draft angles is required.
- Minimum Positive drafts can be considered while styling after which can be considered to be thickened and manufactured.
Creation of Class B Surface:
- Extract the relevant surfaces from the Class-A surface which excludes the Fillets and holes.
- Here the selected faces consist of Side walls, Base, Top walls, Initial trims, Outer Flange.
- Extract of these surfaces as shown in below image.
- Use Untrim Command to untrim the extracted surfaces and create a natural extend.
- Extrapolate the untrimmed surfaces so that each of them intersects clearly and pass way forward than the Class A will help in its trimming in further operations.
- Offset the extrapolated surfaces to the value of required Thickness of the part.
- In this case of Coin Holder, the thickness value is 2.5 mm.
- The offset faces are the part of B-Surface.
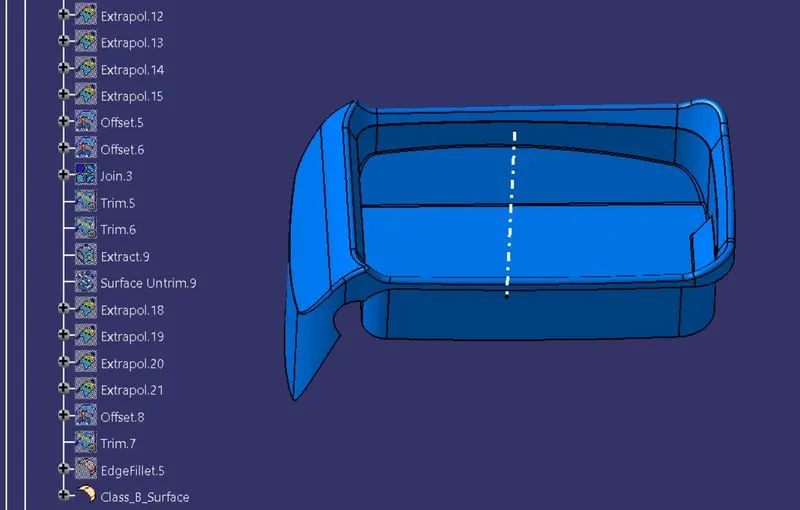
- Then, trim the extra surfaces to obtain similar extended surfaces as in class A.
- The surface obtained after trim is shown in below image.
- Apply fillets while maintaining the part thickness between the Class A and Class B surfaces.
- The value of Fillet is given by the equation (B surface fillet = A surface fillet + Thickness of the part).
- The sign + or – must be decided so as to maintain the part thickness which in this case is 2.5 mm.
- Filleted image as shown in below image.
Creation of Class C Surface:
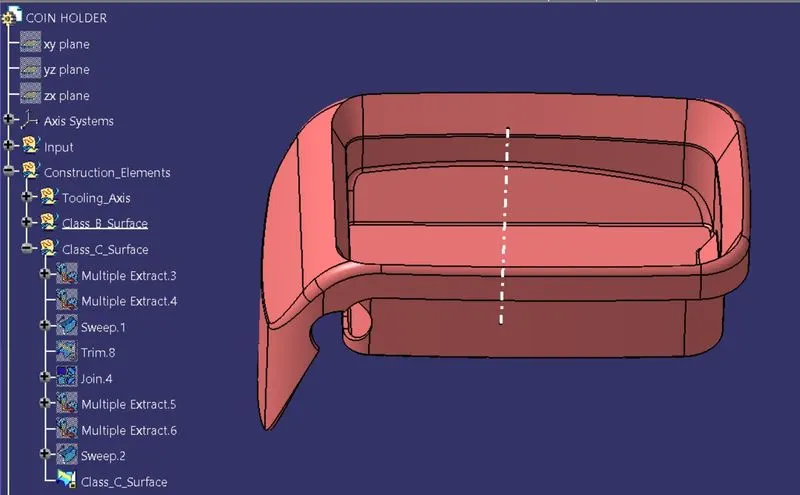
- For creating Class C surface, multiple extract command is used to highlight the boundary of Class A surface.
- Applying sweep command to create Class C surface with respect to class A surface and Extracted boundary lines.
- Then joining Class C surface and Class A surface to create solid body.
- The Class C surface is shown in below image.
Creation of Closed Part Body:
- Join all the sweep surfaces along with the Class B surface.
- The Final trim should be one single surface entity without any gaps.
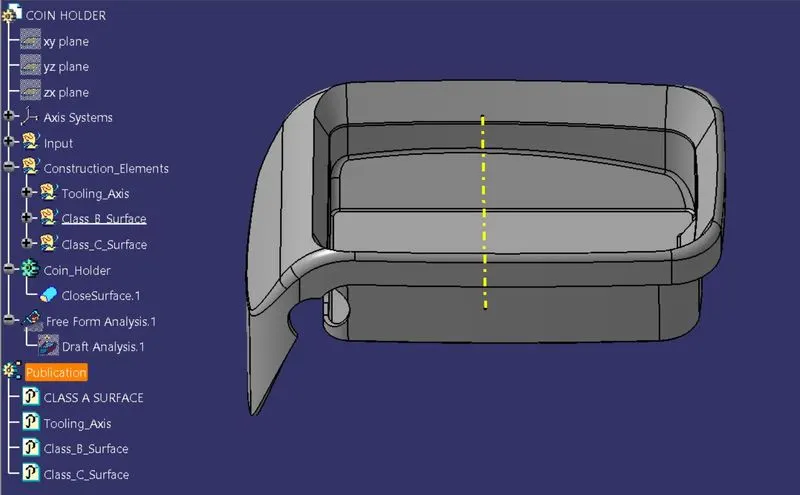
- Join the final trim surface with the Class A surface to obtain the final enclosed surface for the coin holder.
- Insert New Part Body, select the mechanical part design tab to create solid part body of Coin Holder.
- The closed solid part body of Coin Holder is shown below.
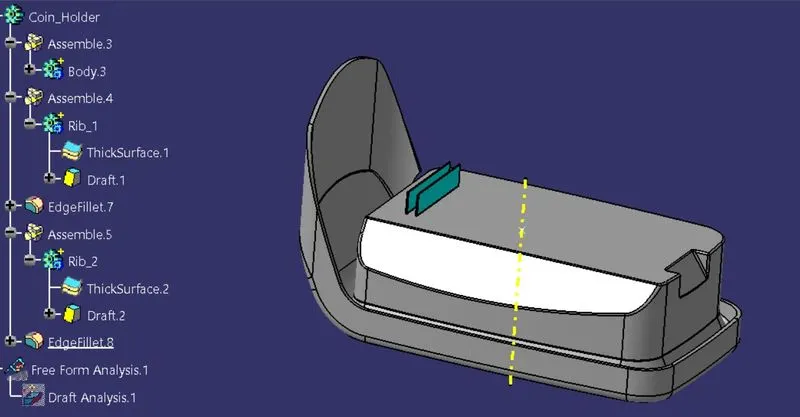
Creation of Ribs On B - Side:
- In generative shape design workbench, Extract the base from B surface and create a Point on origin to Axis System.
- Create a sketch on the B-side Surface to develop Ribs.
- By clicking on the Sketch tab, create a line and add dimensions to be iso-constrained and click Exit.
- Select Extrude command, the dialog box appears in that select Profile as Line.1, Direction as Tooling Axis and Limit 1 as 12.5 mm (5 * t = 12.5 mm, where, Thickness (t) = 2.5 mm) and Click Ok to validate.
- Also, extrude it 1 mm below the surface, so that it intersects the base.
- Switch to part design workbench and thicken the Rib to a Base thickness Value as per Design Rule.
- Thickness should be 0.5 times the base wall thickness (i.e., 0.5 x 2.5 = 1.25 mm).
- Thicken it 0.75 mm on each side.
- Assemble the Ribs to the main Coin Holder Part.
- Use Draft of 0.5⁰ on all the walls which are along the Tooling Direction.
- Also, give fillets of 0.25 mm to all the edges.
- Do similar operations for the 2nd Rib by Keeping in mind the spacing between the ribs to follow the design rules which is height to spacing ratio to be 3:1 or 2:1.
- Take a Section of the Final Part with the XY plane to check the application of Design rules of the Ribs are satisfied.
Draft Analysis on Closed Part Body:
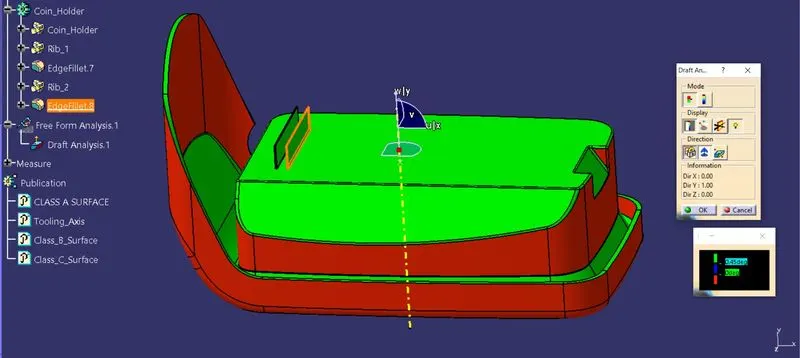
- Change View Mode Customization to Material mode.
- Click on Inert, select Analysis and select Feature draft analysis, then drag the compass to the Tooling Axis and lock the compass at specified direction.
- Select the component to check the part producibility or not.
- In this case, the final surface draft analysis does not pass because Class A surface contain parallel walls and walls without draft.
- So, this component will be costly to manufacture or may even fail causing loss in Time and Cost.
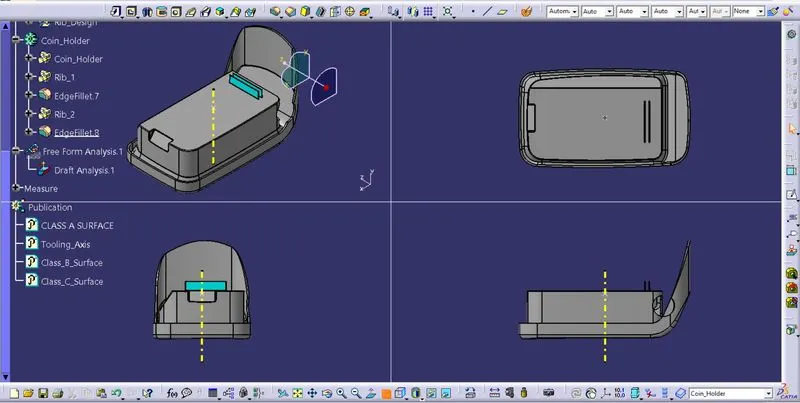
Standard Views (Isometric, Front, Side, and Top View):
Conclusion:
Successfully created Ribs on Automotive Plastic component - Coin Holder by applying industry principles, Design Rules and Draft Analysis using Catia V5 application.