Week-7 Challenge: DC Motor Control
EV BATCH -17
1. A. Explain a MATLAB demo model named ‘Speed control of a DC motor using BJT H-bridge’.
B. Comment on the armature current shoot-up from the scope results.
C. Refer to the help section of ‘The Four-Quadrant Chopper DC Drive (DC7) block’. Compare it with the H-bridge model.
AIM:
‘Speed control of a DC motor using BJT H-bridge’.
For this experiment, we’ll be controlling a motor using the PWM Expansion. To do this, we’ll be using an H-Bridge chip and sending it the appropriate control signals with the PWM Expansion, the H-Bridge will then take care of running the motor. Along the way, we’ll learn exactly how H-Bridges work and create more classes that take advantage of the ones we’ve made previously.
How H-Bridges Work
An H-Bridge is a circuit that allows voltages to be applied across a load in either direction. Electric current flows from the source to ground, and many components need to be oriented according to the direction of current to work as expected. An H-Bridge is a circuit built to change the direction of the voltage and thus the current flowing to a load.
An H-Bridge is made up of four switches: two in series, and two in parallel, with the load placed in between the switches. In this configuration the circuit takes an “H” shape.
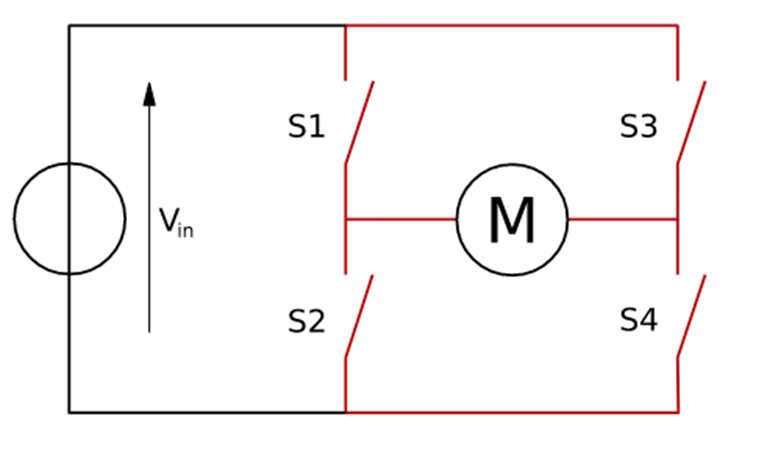
In order to change the direction of the voltage supplied, the H-Bridge controls the switches that deliver power to the load (S1). Looking at the diagram, if we close S1 and S4 while leaving the rest open, the voltage will be applied from left to right across the motor. If S2 and S3 are closed instead and the others open, the voltage will be applied from right to left.
Typical Applications
A few of the typical applications of H-Bridge circuits: * Construct AC (Alternating Current) from a DC source by using a PWM signal to control the H-Bridge. This is a process known as power inversion. * Provide the ability to reverse current across a DC motor, allowing for rotation in either direction.
Additionally, H-Bridges allow loads to be powered independently from the control signals that are controlling them, providing circuit isolation.
The way a PWM signal operates a motor is by switching the power supply on and off really quickly. Normally this can be done sending the PWM signal to a transistor, and have the transistor switch their power supply. By varying the pulse width of the PWM signal, the speed of the motor can be controlled.
An H-bridge can replace the transistor and add functionality by allowing the direction of the current to be easily changed. We still send a pulsating signal to the H-bridge in order to control the speed, except now we can switch the direction of the current flow by changing which switches are open.
In our circuit, we’ll be using an H-bridge Integrated Circuit (IC) chip so we don’t need to wire the internals ourselves, and to prevent short circuits that could arise if we directly controlled those switches
Description
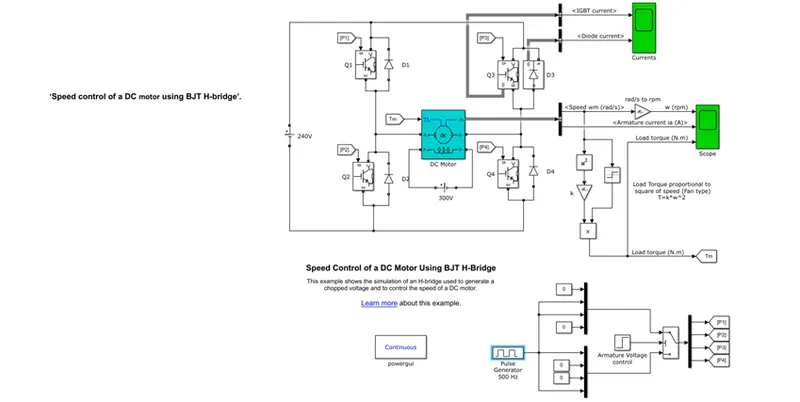
The Bipolar Junction Transistor (BJT) when used for power switching applications, operates as an IGBT. When it is conducting (BJT operating in the saturated region), a forward voltage Vf is developed between collector and emitter (in the range of 1 V). Therefore, the IGBT block can be used to model the BJT device.
The IGBT block does not simulate the gate current controlling the BJT or IGBT. The switch is controlled by a Simulink signal (1/0). The DC motor uses the present model (5 HP 24V 1750 rpm). It simulates a fan type load (where Load torque is proportional to square of speed). The armature mean voltage can be varied from 0 to 240 V when the duty cycle (specified in the Pulse Generator block) is varied from 0 to 100%.
The H-bridge consists of four BJT/Diode pairs (BJT simulated by IGBT models). Two transistors are switched simultaneously: Q1 and Q4 or Q2 and Q3. When Q1 and Q4 are fired, a positive voltage is applied to the motor and diodes D2-D3 operate as free-wheeling diodes when Q1 and Q4 are switched off. When Q2 and Q3 are fired, a negative voltage is applied to the motor and diodes D1-D4 operate as free-wheeling diodes when Q2 and Q3 are switched off.
Simulation
The motor starts in the positive direction with a duty cycle of 75% (mean DC voltage of 180V). At t= 0.5 sec., the armature voltage is suddenly reversed and the motor runs in the negative direction.
'Scope' shows motor speed, armature current and load torque and 'Currents' shows currents flowing in BJT Q3 and diode D3
Simulation results are shown below:
IGBT and DIODE current are shown below
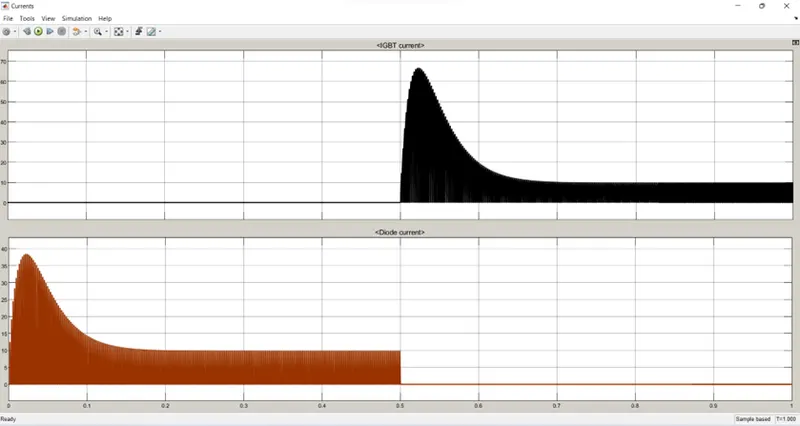
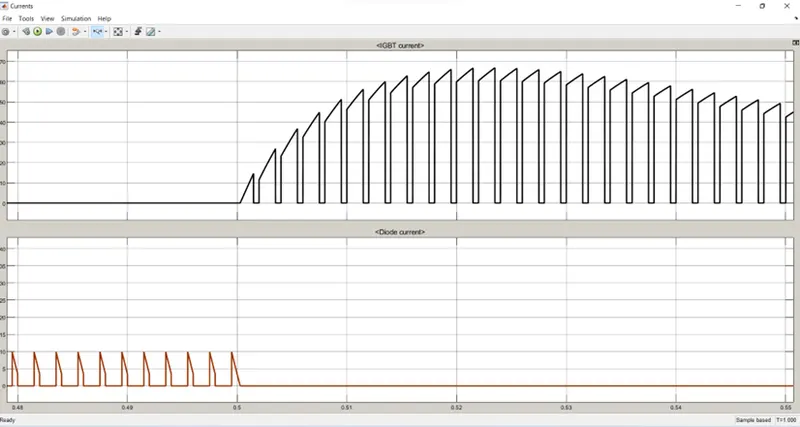
thus from above graph we can see that, for O to 0.5 sec, the current flows through diode D3 and from 0.5 sec to 1 sec the current flows through Q3.
The motor starts in the positive direction with a duty cycle of 75% (mean DC voltage of 180V). At t= 0.5 sec., the armature voltage is suddenly reversed and the motor runs in the negative direction.
'Scope' shows motor speed, armature current and load torque and 'Currents' shows currents flowing in BJT Q3 and diode D3.
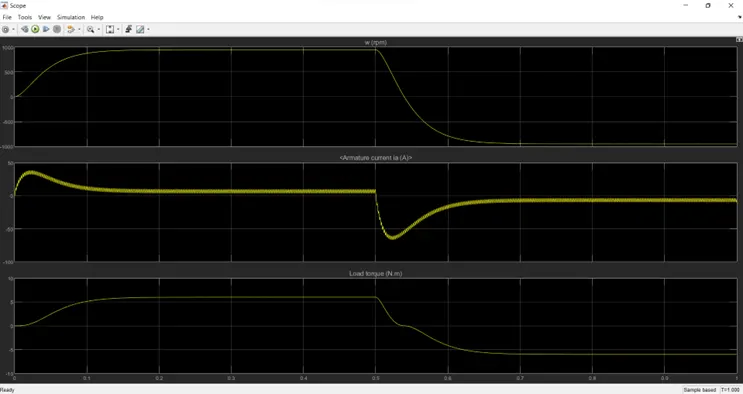
the waveform for speed, armature current and load torque is shown in above graphs. from armature current graph, we can see that, at starting there is sudden spike increase in current at O sec also and at 0.5 sec also.
We can see that, as the voltage gets changed in the circuit, the speed of motor also changes. In this transition of positive to negative direction of rotation we observe a high surge in current, this is due to the transient switching occurring in the circuit.
2II) As there is already current flowing in the circuit & on changing of switches after 0.5 sec, the current in the circuit adds to the changed direction of current and we observe a surge.

from armature current graph, we can see that, at starting there is sudden spike increase in current at O sec also and at 0.5 sec also means at transition from positive to negative direction of rotation we observe a high surge in current, this is due to the transient switching occurring in the circuit.
As there is already current flowing in the circuit & on changing of switches after 0.5 sec, the current in the circuit adds to the changed direction of current and we observe a surge in current.
As there is already current flowing in the circuit & on changing of switches after 0.5 sec, the current in the circuit adds to the changed direction of current and we observe a surge in current.
the surge in the current can be reduced by reducing the duty cycle. in above results, the duty cycle selected as 75%. by changing the duty cycle from 75% to 50%, the current surge can be reduced tremendously.
Change duty cycle to 50 in the pulse generator the current of diode and IGBT as shows below:
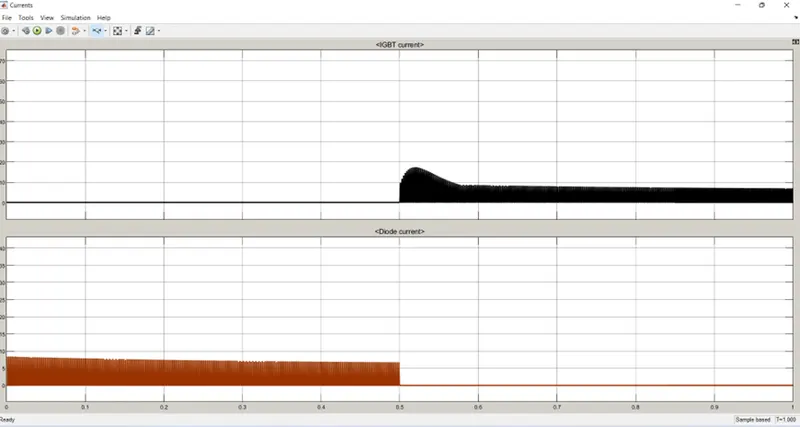
In above graph observe that IGBT current is 20 is started from 0.5 and diode current is 8 is from 0 to 0.5
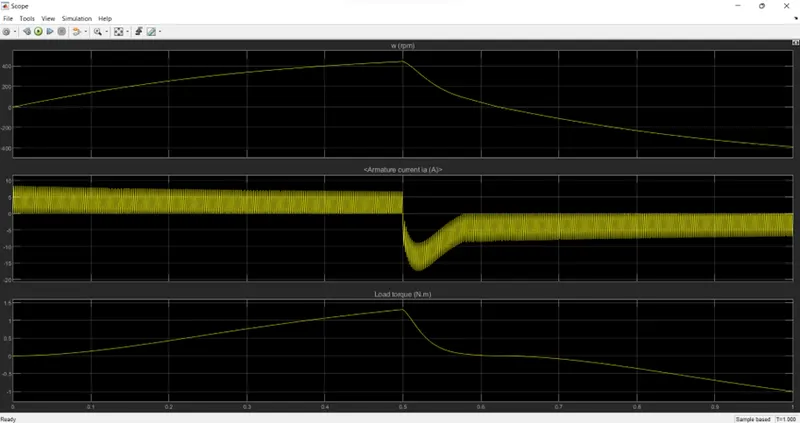
In this graph speed of the motor is linearly increasing up to 400 at 0.5 but sudden change in the reversal of current the speed of the motor is dropped rapidly and the torque also drops suddenly at 0.5
Change duty cycle to 40 in the pulse generator the current of diode and IGBT as shows below:
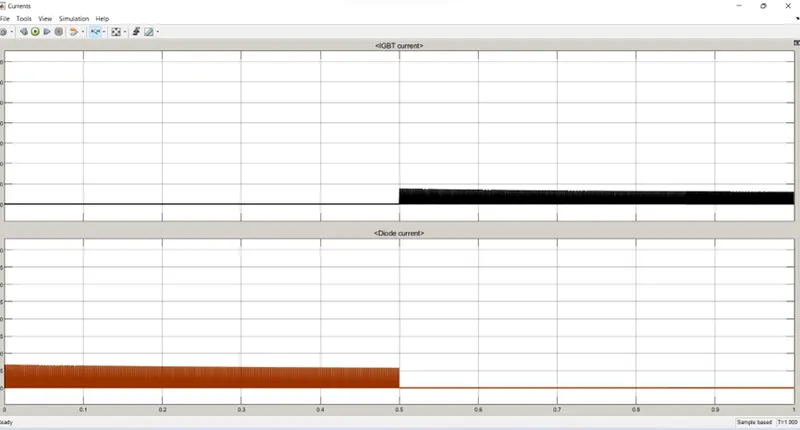
In above graph observe that IGBT current is 10 is started from 0.5 and diode current is 5 is from 0 to 0.5
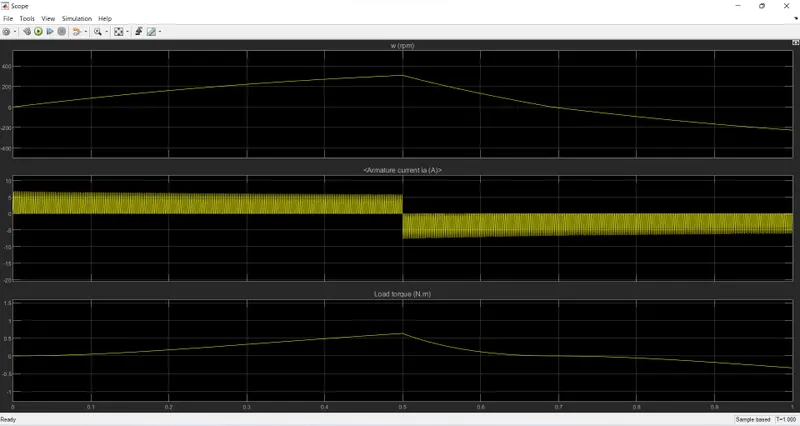
In this graph speed of the motor is linearly increasing up to 200 at 0.5 but sudden change in the reversal of current the speed of the motor is dropped rapidly and the torque also drops suddenly at 0.5
2.Refer to the help section of ‘The Four-Quadrant Chopper DC Drive (DC7) block’. Compare it with the H-bridge model.
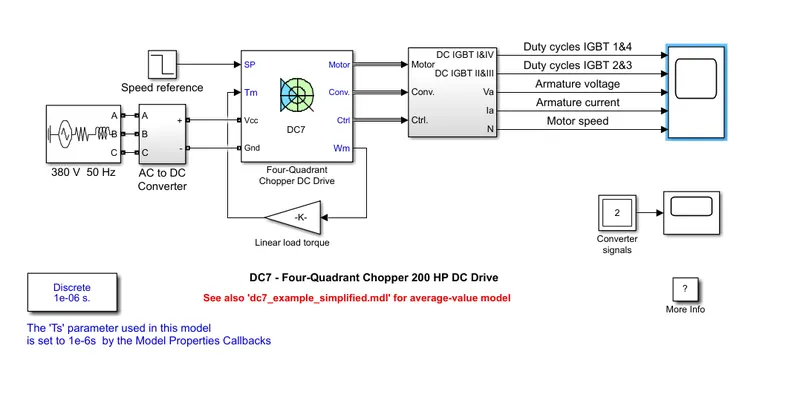
simulink model:
Description
The 200 HP DC motor is separately excited with a constant 150 V DC field voltage source. The armature voltage is provided by an IGBT converter controlled by two PI regulators. The converter is fed by a 515 V DC bus obtained by rectification of a 380 V AC 50 Hz voltage source. In order to limit the DC bus voltage during dynamic braking mode, a braking chopper has been added between the diode rectifier and the DC7 block.
The first regulator is a speed regulator, followed by a current regulator. The speed regulator outputs the armature current reference (in p.u.) used by the current controller in order to obtain the electromagnetic torque needed to reach the desired speed. The speed reference change rate follows acceleration and deceleration ramps in order to avoid sudden reference changes that could cause armature over-current and destabilize the system. The current regulator controls the armature current by computing the appropriate duty ratios of the 5 kHz pulses of the four IGBT devices (Pulse Width Modulation). For proper system behaviour, the instantaneous pulse values of IGBT devices 1 and 4 are opposite to those of IGBT devices 2 and 3. This generates the average armature voltage needed to obtain the desired armature current. In order to limit the amplitude of the current oscillations, a smoothing inductance is placed in series with the armature circuit.
Simulation
Before starting the simulation, set the initial bus voltage to 515 V via the GUI block ('Initial States Setting' button and 'Cbus' variable).
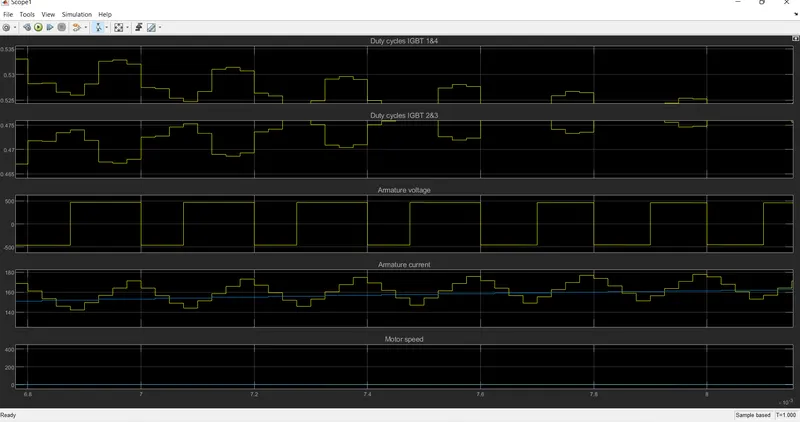
Start the simulation. You can observe the motor armature voltage and current, the four IGBT pulses and the motor speed on the scope. The current and speed references are also shown.
The motor is coupled to a linear load, which means that the mechanical torque of the load is proportional to the speed.
The speed reference is set at 500 rpm at t = 0 s. Observe that the motor speed follows the reference ramp accurately (+400 rpm/s) and reaches steady state around t = 1.3 s.
The armature current follows the current reference very well, with fast response time and small ripples. Notice that the current ripple frequency is 5 kHz.
At t = 2 s, speed reference drops to -1184 rpm. The current reference decreases to reduce the electromagnetic torque and causes the motor to decelerate with the help of the load torque.
At t = 2.2 s, the current reverses in order to produce a braking electromagnetic torque (dynamic braking mode). This causes the DC bus voltage to increase.
At t = 3.25 s, the motor reaches 0 rpm and the load torque reverses and becomes negative. The negative current now produces an accelerating electromagnetic torque to allow the motor to follow the negative speed ramp (-400 rpm/s). At t = 6.3 s, the speed reaches -1184 rpm and stabilizes around its reference.
Notes
1) The power system has been discretized with a 1 us time step. The speed and current controllers use a 100 us and 20 us sampling time respectively in order to simulate a microcontroller control device.
2) In order to reduce the number of points stored in the scope memory, a decimation factor of 25 is used. Some transitions may thus not appear on the scope. To view detailed simulation results, reduce the decimation factor to 1.
3) A simplified version of the model using an average-value converter can be used by selecting 'Average' in the 'Model detail level' menu of the graphical user-interface. The time step can then be increased up to the smallest control system sample time value. This can be done by typing 'Ts = 20e-6' in the workspace in the case of this example. See also dc7_example_simplified model.
results :
Compare it with the H-bridge model.
|
Four – Quadrant Chopper DC Drive |
H-Bridge |
|
To change the motor direction the polarity is changed |
To change the motor direction the current signal has to be interrupted |
|
It has broader torque and power output ranges |
It uses single pulse generator which gives narrow torque and power output range |
|
Up to 400v can be achieved |
Up to 350v can be achieved |
|
In this the current has chopped values |
In this the current has continuous values |
|
Regenerative braking is possible |
Regenerative braking is not possible |
3) four quadrant :
Chopper:
In power electronics chopper circuits, unidirectional power semiconductors are used. If these semiconductor devices are arranged appropriately, a chopper can work in any of the four quadrants. we can classify chopper circuits according to their working in any of these four quadrants as type A, type B, type C, type D and type E. Let us now take a look of these classifications and the characteristics of various classifications.
Type A Chopper or First–Quadrant Chopper
This type of chopper is shown in the figure. It is known as first-quadrant chopper or type A chopper. When the chopper is on, v0 = VS as a result and the current flows in the direction of the load. But when the chopper is off v0 is zero but I0 continues to flow in the same direction through the freewheeling diode FD, thus average value of voltage and current say V0 and I0 will be always positive as shown in the graph.
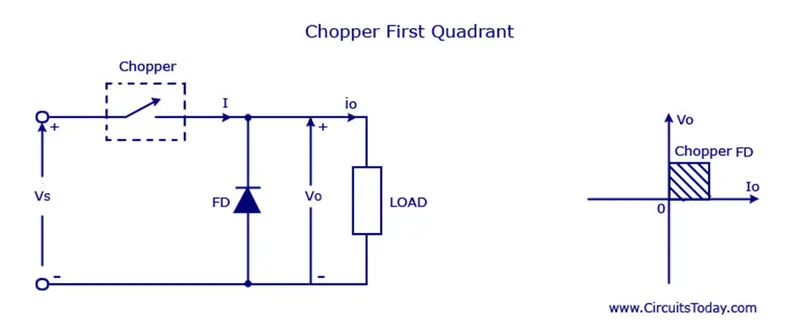
In type A chopper the power flow will be always from source to the load. As the average voltage V0 is less than the dc input voltage -Vs
Type B Chopper or Second-Quadrant Chopper
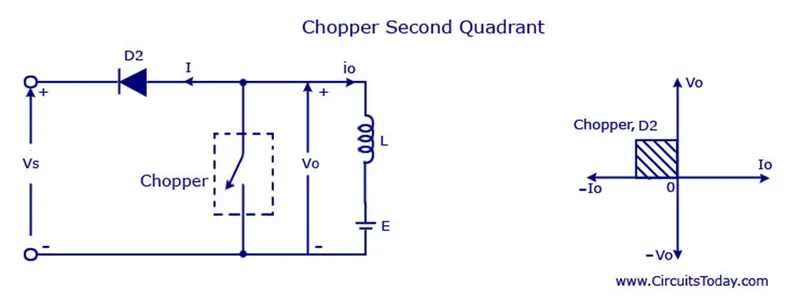
In type B or second quadrant chopper the load must always contain a dc source E . When the chopper is on, v0 is zero but the load voltage E drives the current through the inductor L and the chopper, L stores the energy during the time Ton of the chopper . When the chopper is off , v0 =( E+ L . di/dt ) will be more than the source voltage Vs . Because of this the diode D2 will be forward biased and begins conducting and hence the power starts flowing to the source. No matter the chopper is on or off the current I0 will be flowing out of the load and is treated negative . Since VO is positive and the current I0 is negative , the direction of power flow will be from load to source.
The load voltage V0 = (E+L .di/dt ) will be more than the voltage Vs so the type B chopper is also known as a step up chopper .
Type -C chopper or Two-quadrant type-A Chopper
Type C chopper is obtained by connecting type –A and type –B choppers in parallel. We will always get a positive output voltage V0 as the freewheeling diode FD is present across the load. When the chopper is on the freewheeling diode starts conducting and the output voltage v0 will be equal to Vs . The direction of the load current i0 will be reversed. The current i0 will be flowing towards the source and it will be positive regardless the chopper is on or the FD conducts. The load current will be negative if the chopper is or the diode D2 conducts. We can say the chopper and FD operate together as type-A chopper in first quadrant. In the second quadrant, the chopper and D2 will operate together as type –B chopper.
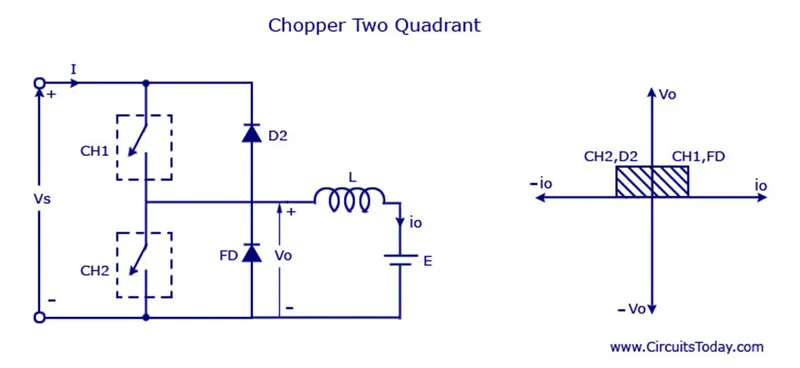
The average voltage will be always positive but the average load current might be positive or negative. The power flow may be life the first quadrant operation ie from source to load or from load to source like the second quadrant operation. The two choppers should not be turned on simultaneously as the combined action my cause a short circuit in supply lines. For regenerative braking and motoring these type of chopper configuration is used.
Type D Chopper or Two-Quadrant Type –B Chopper
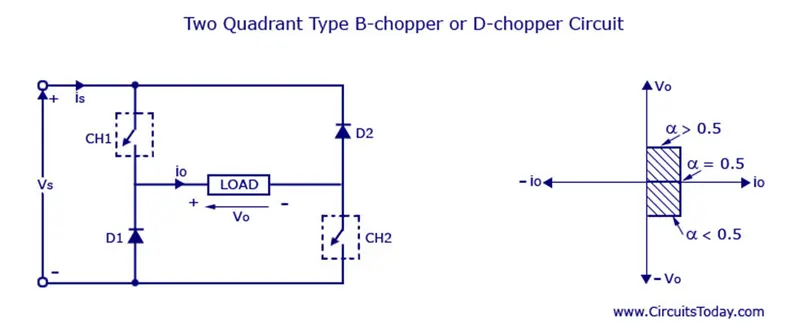
The circuit diagram of the type D chopper is shown in the above figure. When the two choppers are on the output voltage v0 will be equal to Vs . When v0 = – Vs the two choppers will be off but both the diodes D1 and D2 will start conducting. V0 the average output voltage will be positive when the choppers turn-on the time Ton will be more than the turn off time Toff its shown in the wave form below. As the diodes and choppers conduct current only in one direction the direction of load current will be always positive.
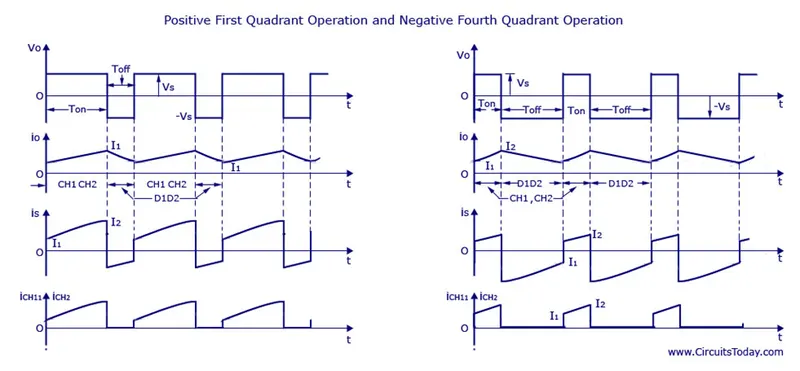
The power flows from source to load as the average values of both v0 and i0 is positive. From the wave form it is seen that the average value of V0 is positive thus the forth quadrant operation of type D chopper is obtained.
From the wave forms the Average value of output voltage is given by
V0= (Vs Ton-VsToff)/T = Vs.(Ton-Toff)/T
Type –E chopper or the Fourth-Quadrant Chopper
Type E or the fourth quadrant chopper consists of four semiconductor switches and four diodes arranged in antiparallel. The 4 choppers are numbered according to which quadrant they belong. Their operation will be in each quadrant and the corresponding chopper only be active in its quadrant.
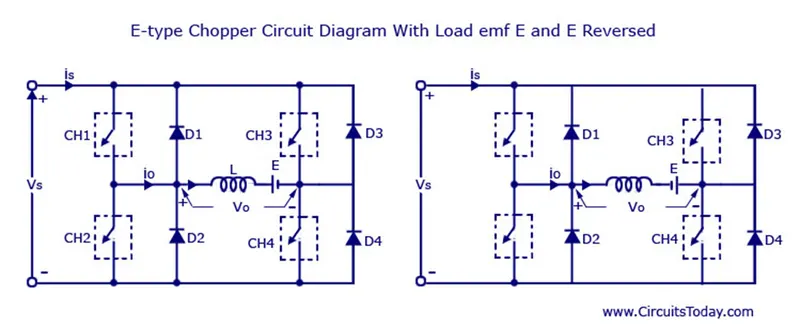
First Quadrant
During the first quadrant operation the chopper CH4 will be on . Chopper CH3 will be off and CH1 will be operated. AS the CH1 and CH4 is on the load voltage v0 will be equal to the source voltage Vs and the load current i0 will begin to flow . v0 and i0 will be positive as the first quadrant operation is taking place. As soon as the chopper CH1 is turned off, the positive current freewheels through CH4 and the diode D2 . The type E chopper acts as a step- down chopper in the first quadrant.
Second Quadrant
In this case the chopper CH2 will be operational and the other three are kept off. As CH2 is on negative current will starts flowing through the inductor L . CH2 ,E and D4. Energy is stored in the inductor L as the chopper CH2 is on. When CH2 is off the current will be fed back to the source through the diodes D1 and D4. Here (E+L.di/dt) will be more than the source voltage Vs . In second quadrant the chopper will act as a step-up chopper as the power is fed back from load to source
Third Quadrant
In third quadrant operation CH1 will be kept off , CH2 will be on and CH3 is operated. For this quadrant working the polarity of the load should be reversed. As the chopper CH3 is on, the load gets connected to the source Vs and v0 and i0 will be negative and the third quadrant operation will takes place. This chopper acts as a step-down chopper
Fourth Quadrant
CH4 will be operated and CH1, CH2 and CH3 will be off. When the chopper CH4 is turned on positive current starts to flow through CH4, D2 ,E and the inductor L will store energy. As the CH4 is turned off the current is feedback to the source through the diodes D2 and D3 , the operation will be in fourth quadrant as the load voltage is negative but the load current is positive. The chopper acts as a step up chopper as the power is fed back from load to source.
- Develop a 2-quadrant chopper using Simulink & explain the working of the same with the relevant results. (Refer to article – Multi quadrant operation of motor)
Simulink model:
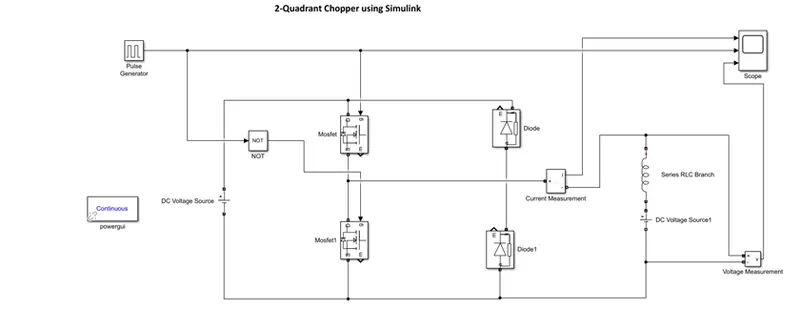
let us take two MOSFET blocks and diodes blocks and connect it as shown in circuit diagram. And pulse generator is used to give the gate pulse . current and voltage are measured by using voltage and current sensors and wich is shown is scope
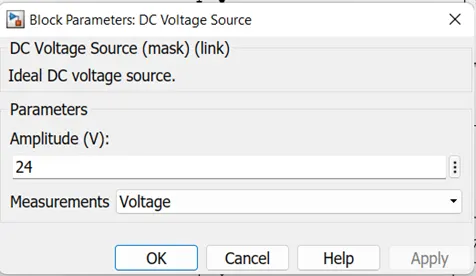
the dc voltage source is connected as shown.
let the voltage of dc voltage source be 24 volts.
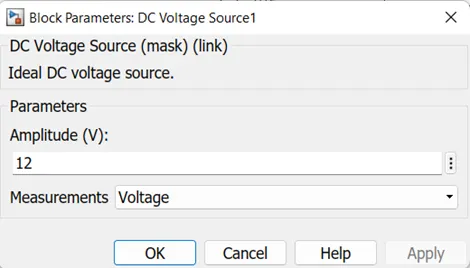
let us consider an series RLC branch block and select inductor L. thus block works as a load. to consider LE load i.e., motor load, and dc voltage source of 12 volt is also connected in series with inductor
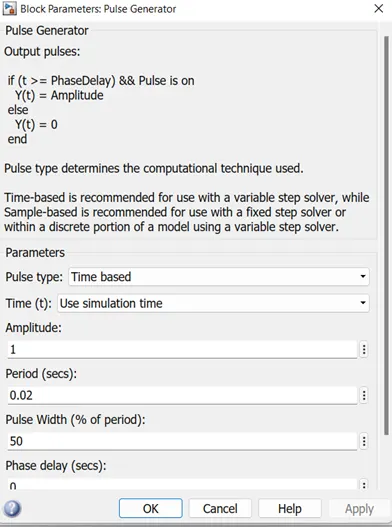
The pulse generator block is used to create gate pulse. the not gate is used in the model so that the two mosfet will not get closed at the same time. otherwise, short circuit will occur. due to use of not gate, when one mosfet is ON the other mosfet will get off and when other mosfet is ON the first mosfet will get off.
The amplitude of pulse generator is kept 10 so that we can clearly see the pulses at scope and let period be 0.02 seconds and let pulse width be 50%
the voltage waveform is not going less than zero. the minimum value of voltage is zero and maximum value is always in the positive direction. however, in current waveform, the current increases and decreases. the current may be positive as well as negative. and the pulse amplitude is 10 thus from pulse waveform we can see that the pulse amplitude is 10.
n 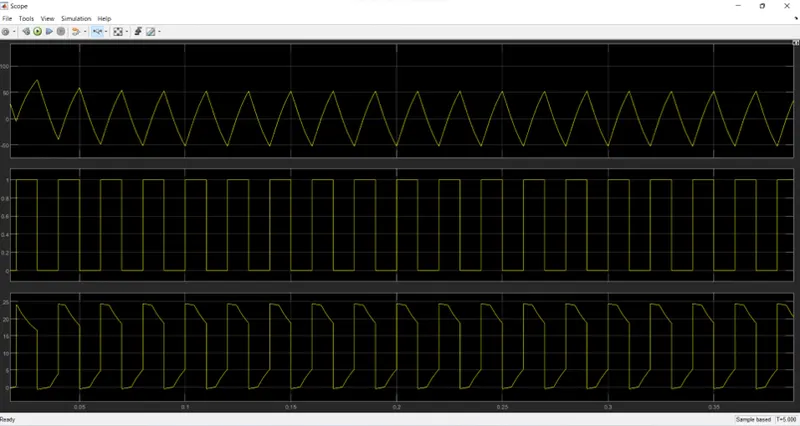
3. Explain in a brief about operation of BLDC motor.
A brushless DC motor (also known as a BLDC motor or BL motor) is an electronically commuted DC motor which does not have brushes. The controller provides pulses of current to the motor windings which control the speed and torque of the synchronous motor.
These types of motors are highly efficient in producing a large amount of torque over a vast speed range. In brushless motors, permanent magnets rotate around a fixed armature and overcome the problem of connecting current to the armature. Commutation with electronics has a large scope of capabilities and flexibility. They are known for smooth operation and holding torque when stationary
Construction of Brushless DC motor
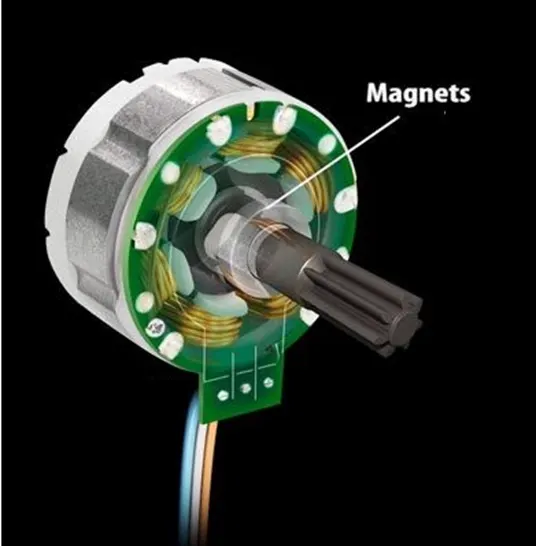
In this motor, the permanent magnets attach to the rotor. The current-carrying conductors or armature windings are located on the stator. They use electrical commutation to convert electrical energy into mechanical energy.
The main design difference between a brushed and brushless motors is the replacement of mechanical commutator with an electric switch circuit. A BLDC Motor is a type of synchronous motor in the sense that the magnetic field generated by the stator and the rotor revolve at the same frequency.
The simplest type of motor is the brushed DC motor. In this type of motor, electrical current is passed through coils that are arranged within a fixed magnetic field. The current generates magnetic fields in the coils; this causes the coil assembly to rotate, as each coil is pushed away from the like pole and pulled toward the unlike pole of the fixed field. To maintain rotation, it is necessary to continually reverse the current—so that coil polarities will continually flip, causing the coils to continue “chasing” the unlike fixed poles. Power to the coils is supplied through fixed conductive brushes that make contact with a rotating commutator; it is the rotation of the commutator that causes the reversal of the current through the coils. The commutator and brushes are the key components distinguishing the brushed DC motor from other motor types.
Fixed brushes supply electric energy to the rotating commutator. As the commutator rotates, it continually flips the direction of the current into the coils, reversing the coil polarities so that the coils maintain rightward rotation. The commutator rotates because it is attached to the rotor on which the coils are mounted
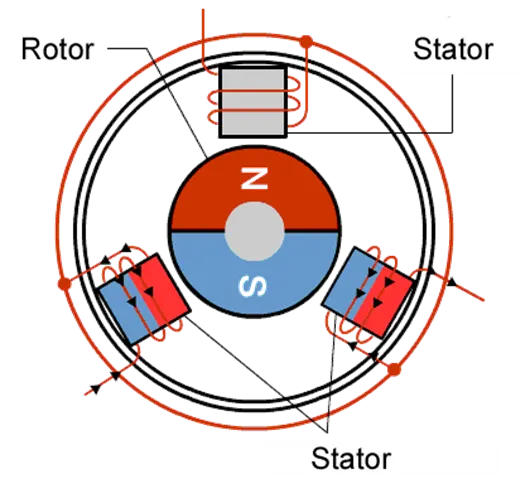
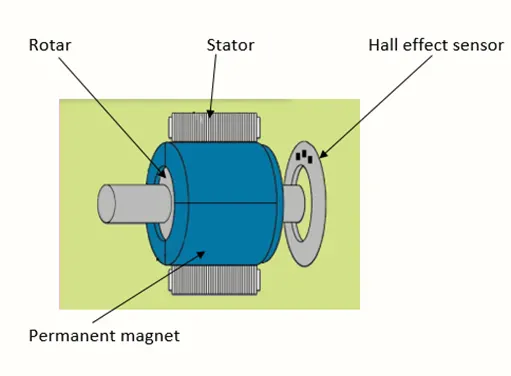
Brushless motor does not have any current carrying commutators. The field inside a brushless motor is switched through an amplifier which is triggered by the commutating device like an optical encoder.
The layout of a DC brushless motor can vary depending on whether it is in “Out runner” style or “Inrunner” style.
- Outrunner – The field magnet is a drum rotor which rotates around the stator. This style is preferred for applications that require high torque and where high rpm isn’t a requirement.
- In runner – The stator is a fixed drum in which the field magnet rotates. This motor is known for producing less torque than the out-runner style, but is capable of spinning at very high rpm.
Working Principle of Brushless DC motor
BLDC motor works on the principle similar to that of a Brushed DC motor. The Lorentz force law which states that whenever a current carrying conductor placed in a magnetic field it experiences a force. As a consequence of reaction force, the magnet will experience an equal and opposite force. In the BLDC motor, the current carrying conductor is stationary and the permanent magnet is moving.
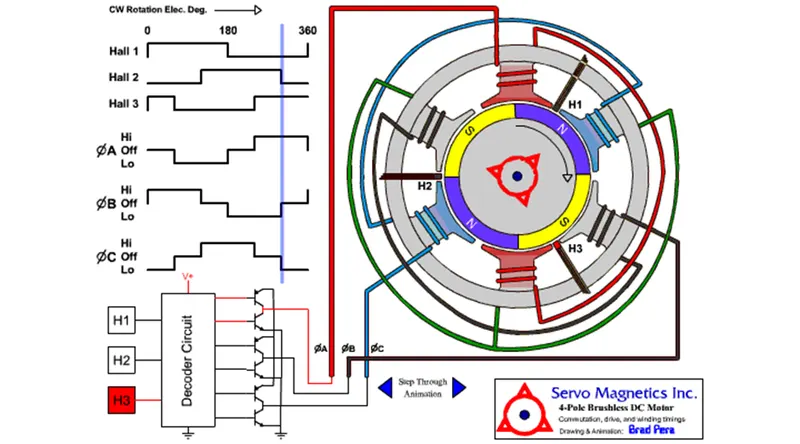
When the stator coils get a supply from source, it becomes electromagnet and starts producing the uniform field in the air gap. Though the source of supply is DC, switching makes to generate an AC voltage waveform with trapezoidal shape. Due to the force of interaction between electromagnet stator and permanent magnet rotor, the rotor continues to rotate.
With the switching of windings as High and Low signals, corresponding winding energized as North and South poles. The permanent magnet rotor with North and South poles align with stator poles which causes the motor to rotate.
PWM REGULATION
Whether for a brush or a brushless DC motor the working point (speed and torque) of an application can vary. The role of the amplifier is to vary the supply voltage or the current, or both, to achieve the desired motion output.
There are typically two different ways to vary the voltage or the current:
|
• |
Linear drivers (or linear amplifiers) |
|
• |
Chopper drivers (or chopper amplifiers) |
Linear amplifiers adapt the power delivered to the motor by linearly changing the voltage or current. It dissipates the power which is not delivered to the motor (lost power – see Figure 6). As a result, it requires a large heat sink to dissipate the power, increasing the amplifier size and making it more difficult to integrate in the application.
A chopper amplifier modulates the voltage (and current) by switching on and off the power transistors. The primary advantage is that it saves power when the transistor is off. This helps save on the battery life of the application, causes less heating from the electronic and allows a smaller size of the electronics. Most of the time, chopper amplifiers are using a PWM method.
The PWM method consists of varying the duty cycle at a fixed frequency (see Figure 7) to adjust the voltage or current within the desired target value.
Note that one advantage of the PWM technique to chop the current vs. others is that the switching frequency is a fixed parameter. It will make it easy for electronic designers to filter acoustic and electromagnetic noise generated.
When the transistor of the PWM is open 100% of the time, the voltage applied to the motor is the full bus voltage. When the transistor is open 50% of the time, the average voltage applied to the motor is half the bus voltage. When the transistor is closed 100% of the time, no voltage is applied to the motor.
Advantages of Brushless DC motor
- Less overall maintenance due to absence of brushes
- Reduced size with far superior thermal characteristics
- Higher speed range and lower electric noise generation.
- It has no mechanical commutator and associated problems
- High efficiency and high output power to size ratio due to the use of permanent magnet rotor
- High speed of operation even in loaded and unloaded conditions due to the absence of brushes that limits the speed
- Smaller motor geometry and lighter in weight than both brushed type DC and induction AC motors.
- Long life as no inspection and maintenance is required for commutator system
- Higher dynamic response due to low inertia and carrying windings in the stator
- Less electromagnetic interference
- Low noise due to absence of brushes
Brushless Vs. Brushed DC Motor
Brushes require frequent replacement due to mechanical wear, hence, a brushed DC motor requires periodic maintenance. Also, as brushes transfer current to the commutator, sparking occurs. Brushes limit the maximum speed and number of poles the armature can have. These all drawbacks are removed in a brushless DC motor. Electronic control circuit is required in a brushless DC motor for switching stator magnets to keep the motor running. This makes a BLDC motor potentially less rugged
Limitations of Brushless DC motor
- These motors are costly
- Electronic controller required control this motor is expensive
- Requires complex drive circuitry
- Need of additional sensors
Applications of Brushless DC motor
Brushless DC motors (BLDC) use for a wide variety of application requirements such as varying loads, constant loads and positioning applications in the fields of industrial control, automotive, aviation, automation systems, health care equipment’s etc.
- Computer hard drives and DVD/CD players
- Electric vehicles, hybrid vehicles, and electric bicycles
- Industrial robots, CNC machine tools, and simple belt driven systems
- Washing machines, compressors and dryers
- Fans, pumps and blowers.