Week 6:- Clamp Unit & Pin-Clamp Unit Design Challenge
Aim :- Design 3 Different types of Swivel Clamp Unit with Different Riser, Blade, and Clamp Arm for the given Car Panel. Maintain the stroke as 100mm.
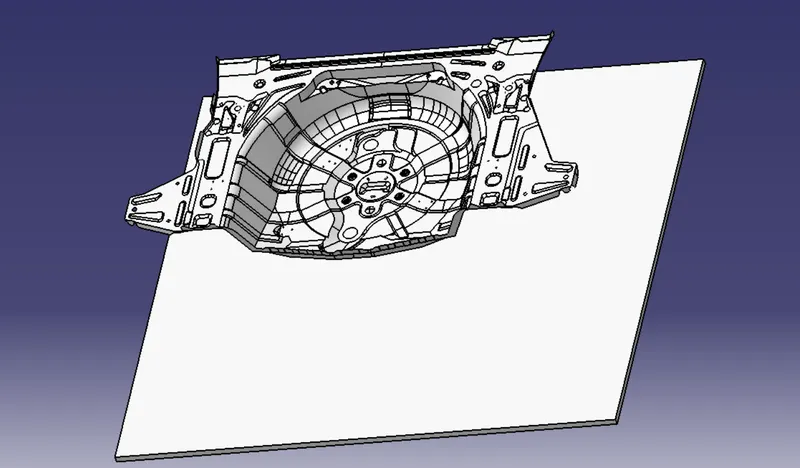
Project Panel :-
Introduction :-
This project to design 3-Swivel clamp units and 1-pin-clamp unit to fix it in fixed position. This project is done with respect to 3-2-1 principle , Considering clamp force to be imposed on panel according to Tunkers.
3-2-1 Principle (achived by clamps):-
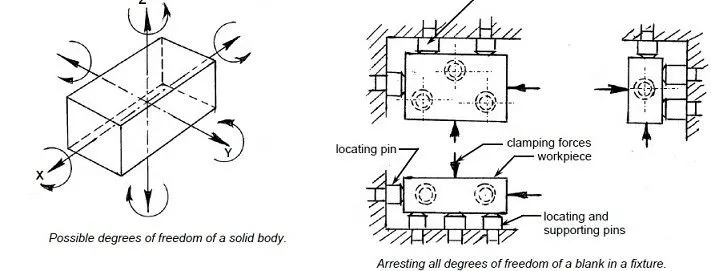
The 3-2-1 principle states that the six locators are sufficient to restrict the required degree of freedom of any workpiece. In this, motion is restricted using clamps and locators. A three-pin base can restrict five motions and six pins restrict nine motions.
The principle of location is being discussed here with the help of a most popular example which is available in any of the book covering jigs and fixtures. It is important that one should understand the problem first.
Any rectangular body many have three axis along x-axis, y-axis and z-axis. It can more along any of these axes or any of its movement can be released to these three axes. At the same time the body can also rotate about these axes too. So total degree of freedom of the body along which it can move is six. For processing the body it is required to restrain all the degree of freedom (DOF) by arranging suitable locating points and then clamping it in a fixed and required position. The basic principle used to locate the points is desirable below.
Clamping :-
A device designed to bind or constrict or to press two or more parts together so as to hold them firmly.any of various instruments or appliances having parts brought together for holding or compressing something
Clamp Unit :-
Clamps Hold the car parts firmly & prevent the part of detortion while carrying welding operation . Single clamping unit consist of following parts :-
- Finger :- Finger is a movable part which is used to hold the Car part from top against the Back-up and they are usually mounted on the clamp arm.
- L-Block:- L Shaped block (single or in combination) used to mount the finger to clamp arm, besides allowing adjustment fork locator pin in two directions.
- Shim and spacer: They allow the finger to be moved to the correct XYZ locating and /Or allow the customer to make adjustments to improve the quality of their product.
- Blade: Part onto which the aforesaid elements are attached to.
- Blade spacer: It allows the finger to be moved to the correct location along one direction.
- Riser: L- shaped tall block with regularly patterned holes to attach the abovementioned parts in modular way Blade space
Clamping Force:
Clamping force is the force required to hold a part against the locators. Clamping prevents the part from shifting or being pulled from the jig or fixture during the machining operation. The type and amount of clamping force needed to hold a part is usually determined by the tool working on the part and how the part is positioned in the tool. Sometimes the operation being performed is a factor, Clamping pressure, as a general rule, should Only be enough to hold the part against the locators. The locators should resist the bulk of the thrust. If a part must be clamped with a great deal of pressure the tool should be redesigned so that the tool thrust is directed at the locators and the tool body. Clamps must never be expected to hold all of the tool thrust.
Types of Clamps:
Various methods of clamping are common to both jigs and fixtures. The type of clamp the tool designer chooses is determined by the shape and size of the part, the type of jig or fixture being used, and the work to be done. The tool designer should choose the clamp that is the simplest, easiest to use, and most efficient.
- Strap clamps: Strap clamps are the simplest clamps used for jigs and fixtures Their basic operation is the same as that of a lever. Strap clamps can be grouped into three classes, each representing a form of lever.
- Screw Clamps: Screw clamps are widely used for jigs and fixtures. They offer the tool designer almost unlimited application potential, lower costs, and, in many cases, -less complex designs. The only disadvantage in using screw clamps is their relatively slow operating speeds. The basic screw clamp uses the torque developed by a screw thread to hold a partin place—either by direct pressure or by its action on another clamp.
- Swing Clamps: Swing clamps combine the screw clamp with a swinging arm that pivots on its .mounting stud. The holding power with this clamp is generated by the screw. The rapid action needed is achieved by the swinging arm.
- Hook Clamps: Hook clamps are similar to swing clamps but they are much smaller (Figure They are useful in tight places or where several small clamps rather than one large clamp must be used. A variation of the hook clamp is shown in Figure 4—18. The modified hook clamp is made to be operated from the opposite side of the tool. It is useful in tight places or where a safety hazard may be present if the tool is operated from the front side.
- Cam-action clamps: Cam-action clamps, when properly selected and used, provide a fast, efficient, and simple way to hold work (figure 4—20). Because of their construction and basic operating principles, the use of cam-action clamps is limited in some types of tools.
- Wedge Clamps: Wedge clamps apply the basic principle of the inclined plane to hold work in a manner similar to a cam. These clamps are normally found in two general forms, flat wedges and conical wedges.
- Toggle-Action Clamps: Toggle-action clamps, shown in Figure 4—29, are made with four basic damping actions: hold down, squeeze, pull, and straight-line. Toggle clamps are fast-acting. Because of how they are made, they have the natural ability to move completely free of the work, thus allowing for faster part changes. Another advantage is their high ratio of holding force to application force.
Power Clamps:
Power-activated clamps are an alternative to manually operated clamping devices. Power clamping systems normally operate under hydraulic power or pneumatic power, or with an air-to-hydraulic booster. The system used is determined by the type of power supply available. The air-to-hydraulic system is preferred because it can operate from the regular shop line pressure and no pumps or high-pressure valves are needed. The advantages of power clamps are better control of clamping pressures, less wear on moving parts of the clamp, and faster operating cycles.
Purpose of Clamp unit :-
The purpose of clamping tools to securely hold the work piece in position without obstructing the production process, high clamping forces combined with compact dimensions are therefore the most important requirements for a clamping tool .
Design of Swivel Clamp unit:
- Study the PLP (Principle Location points) data along with the nearby spot data.
- Depending on the angle of cross section. Mylars will be having shimming either in one direction or in 2 directions. General thumb rule if the section is inclined more than 15deg or clamping surface is 3D profile then 2 direction shimming are provided.
- Take an Overview of the working height if you're having manual welding for robotic welding also it's important to see the working height in consideration of the robotic gun, turn table height is manual loading is done
- Put the proper gun at the spot location. If process c type of gun shape sticks to X,C or Y type of gun. Do the proper gun study and place the gun as per the GEO or re-spot decision and operator approach. once gun is placed considering the throat depth and throat gap start building the clamp and rest block at the PLP.
- Panel Section Creation :- Take a section at PLP either clamp opening direction or normal direction . Sections should be normal to base. Panel section through X, Y or Z direction passing through PLP .Sections should be normal to Most importantly used for finalization of gun shape.
- Finalization of a base plane — consider following things before deciding base late. Height of maximum and minimum weld spot from the floor. No gun arm should touch the base plate. Operator ergonomics while accessing all the Spots.
- Construction of Rest and Clamp Block: If standard mylar has to be used (Few companies make standard height & length of steel blank with few holes & dowels for clamping ) then select the proper blank size as per the requirement; consider 5mm above the panel.
- Select the clamping cylinder as per the point distance from the PLO. Once clamp and rest block is build,start construction of mounting plate or fabrication structure as per the company standard to make the connection with the base plate. Shimming is 5mm solid+5mm shim pack,in few companies 3mm shims are used . Make connection plate between rise and mylar. Material can be C45 Teflon,Aluminium or S-Grun as per the customer requirement. Generally S-Grun mylars are made are more thickness.
Parts of Clevis Clamp Unit:
1)Clamp cylinder
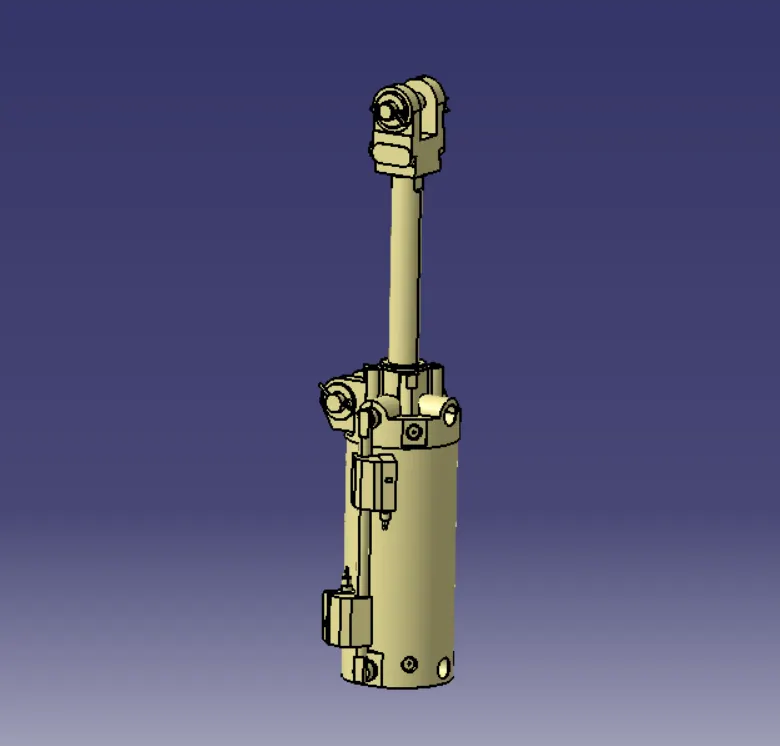
In clevis clamp unit, swivel type cylinder is used. Pneumatic cylinder (sometimes known as air cylinder) are mechanic! devices which use the power pf compressed gas to produce a force in a reciprocating linear motion. Like hydraulic cylinder, something forces a piston to move in the desired direction The Piston is a disc or cylinder, and the piston rod transfers the force it develops to the object to be moved. Engineers sometimes prefer to use pneumatics because they are quieter, cleaner; and do not require large amounts of space for uid storage. Because the operating uid is a gas, leakage from a pneumatic cylinder will not drip out and contaminate the surroundings, making pneumatics more desirable where cleanliness is a requirement. Once actuated, compressed air enters into the tube at one end of the piston and imparts force on the piston. Consequently, the piston becomes displaced.
2)Finger
A finger is a NC block, which is mounted on clamp arm of the cylinder, and press the car panel towords the rest, so it holds the car panel.
3)Clamp Arm
A clamp arm is make part, its made as per the position of clamp cylinder, stopper and shim. clamp arm made from hard material
4)Stopper
The function of stopper is to restrict clamp going beyond the limit. Stopper is mounted between clam arm and rest or blade, stopper has two part, when this two part meets they restrict motion.
5)Blade
Blade is make part, designed according to position of riser, clamp cylinder, clamp arm, rest mylar & stopper.
6)Riser
Riser is standard part, which provide height to the Pin uni9t clamp sustain under load of Car panel, clamping cylinder, blades
Power clamp Cylinder are Used :-
CKG_1B_63_100Y.1
Design Of Swivel Clamp Unit:-
UNIT 1.
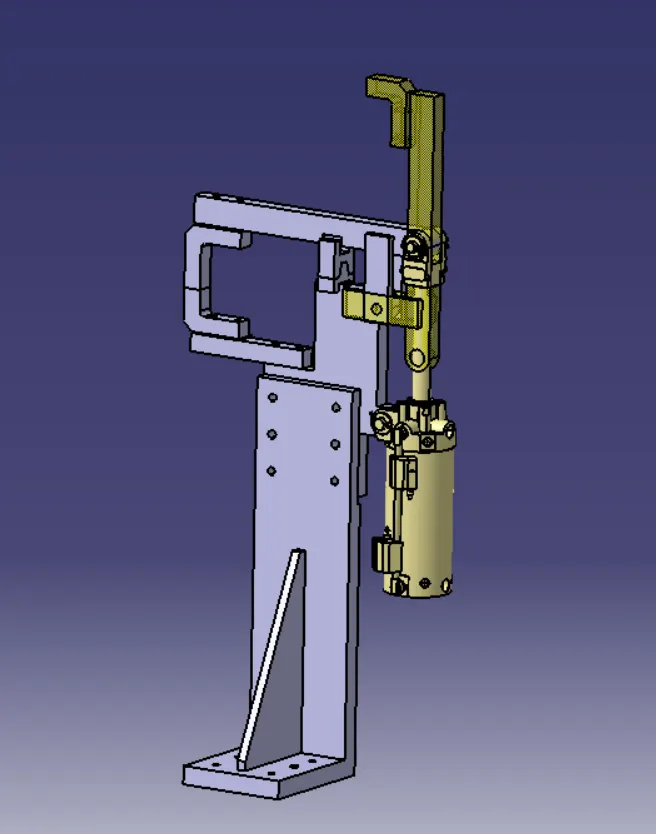
UNIT 2.
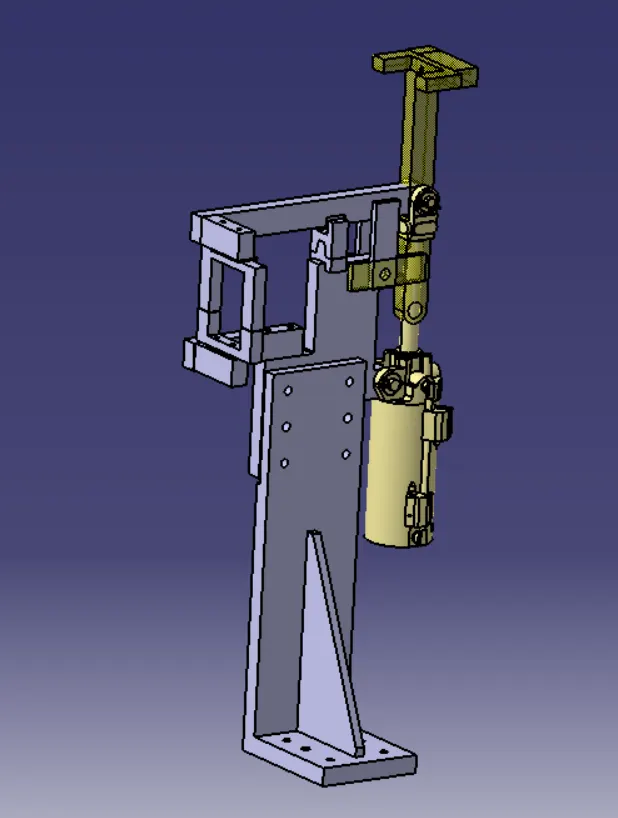
UNIT 3.
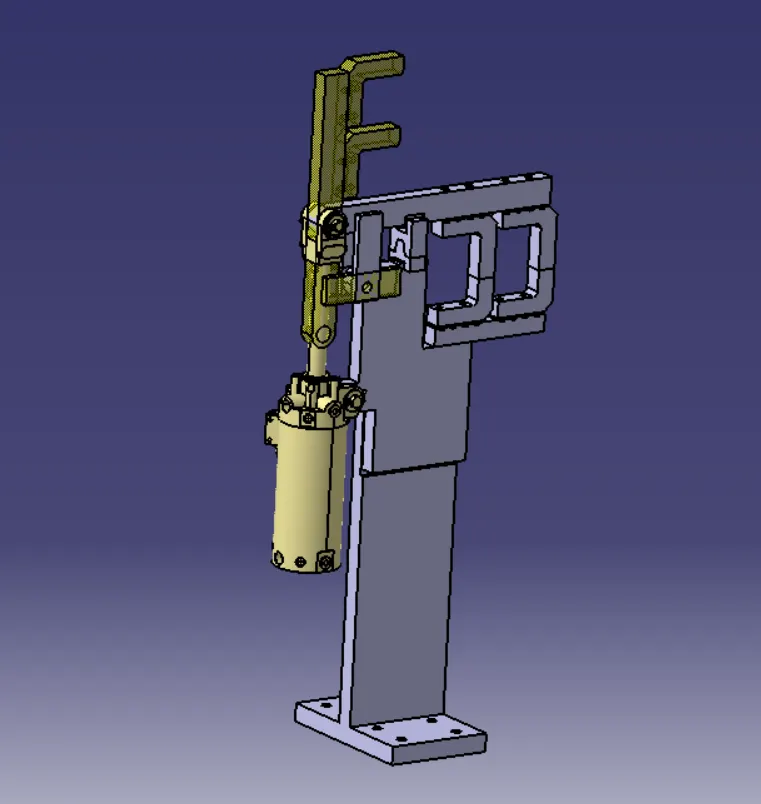
Design a Pin-Clamp Unit:
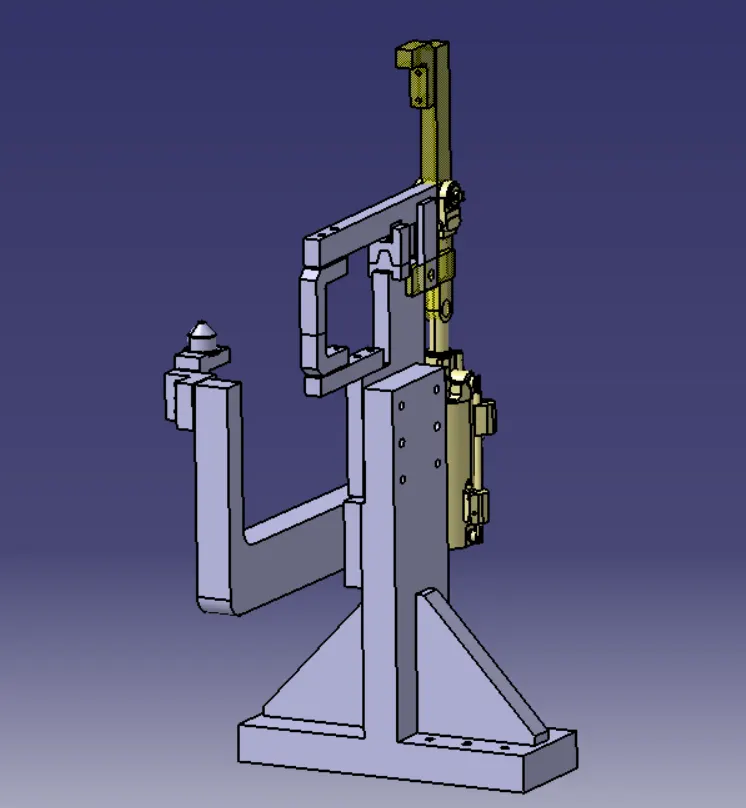
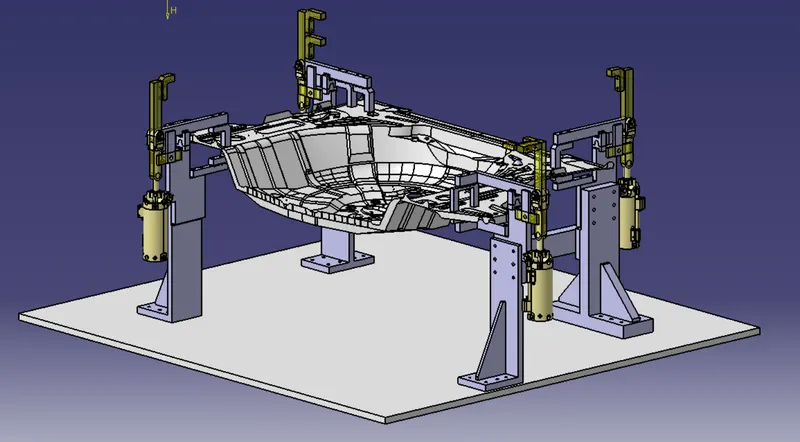
Panel After Clamping :-
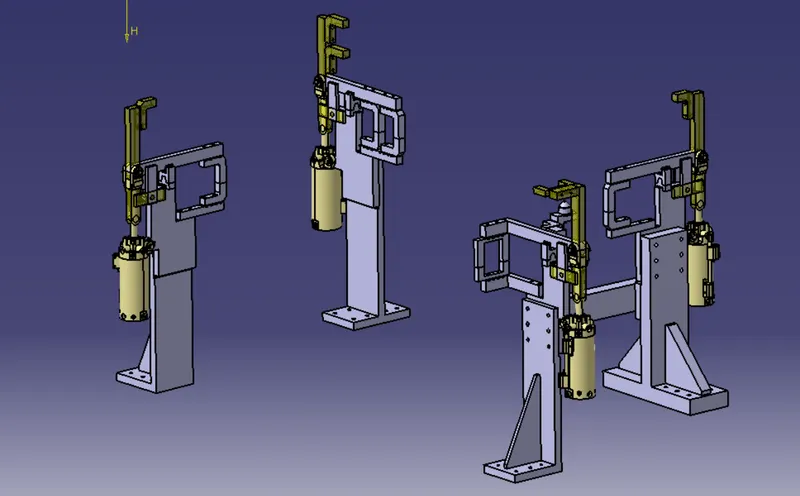
Panel With Clamping
Conclusion :-
Hence as per objective ,the 3 Different types of swivel clamp units & pin-clamp unit has been designed . Also the materials used,purpose of clamp units,(3-2-1 principle )achiveing by clamping .PLP (Principle locating points)& clamp plans are briefly explained in details.