Week 4-1D Element Creation Challenge
Project 1: 1D Element Creation Challenge
Abstract:
The main objective of this project is to create 1D Element for the given 3D part. Meshing this 1D element is simple and less time consuming than 3D mesh.
Mesh the following items,
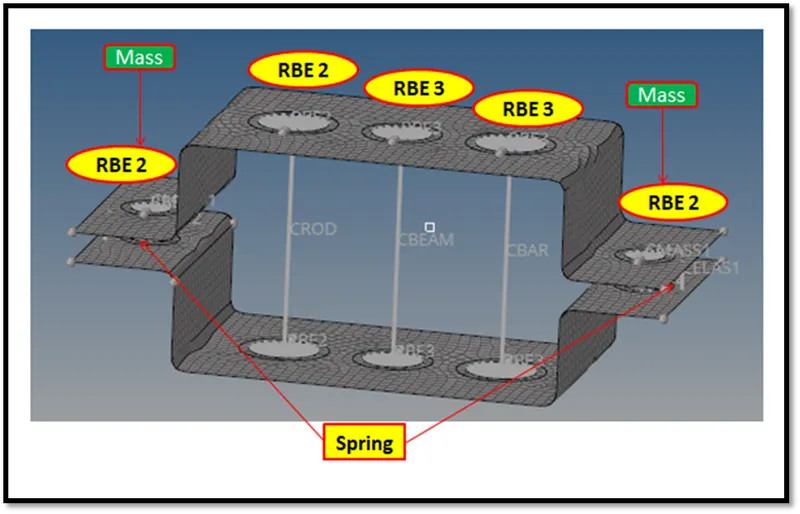
- Rod element:- Translational DOF should be Constrained with RBE2 link
- Beam element:- All DOF should be constrained with RBE3 link
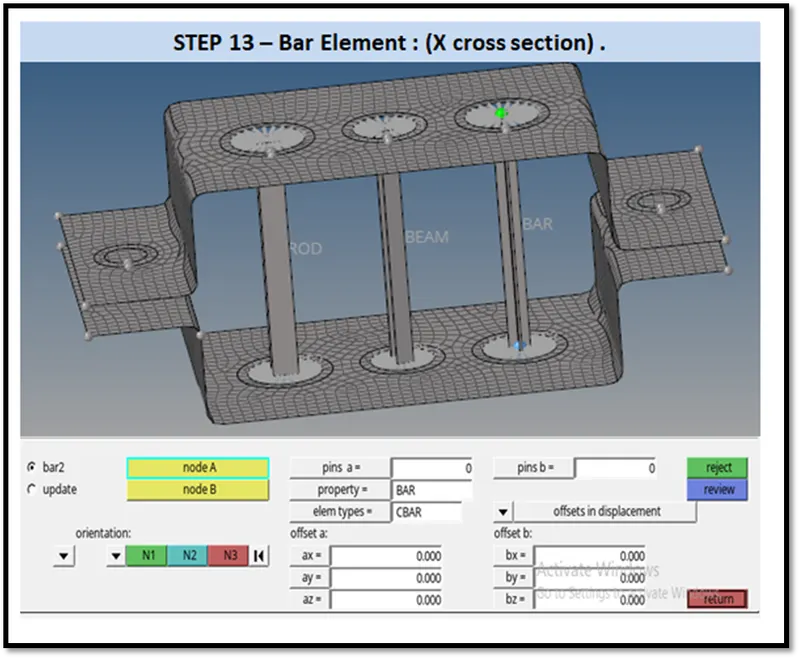
- Bar element:- Constrain only x and y DOFs With RBE3 link
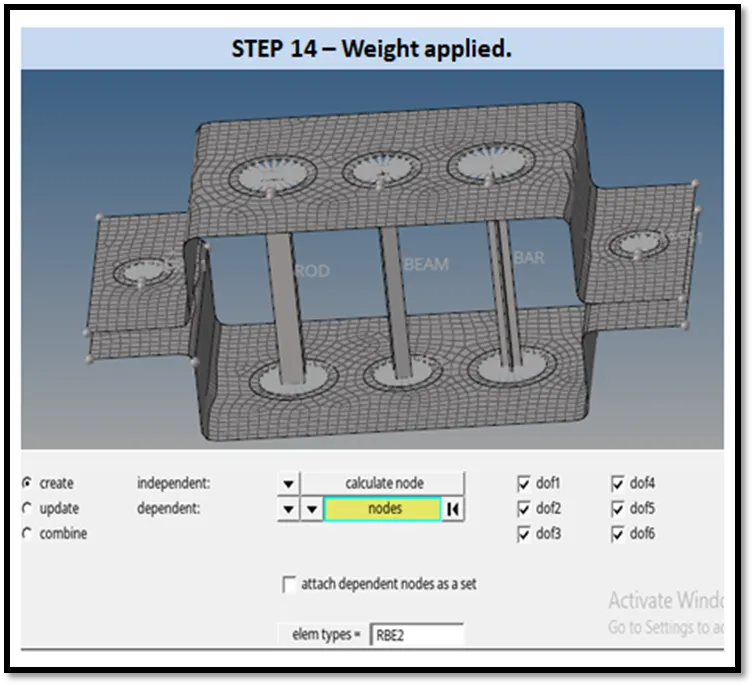
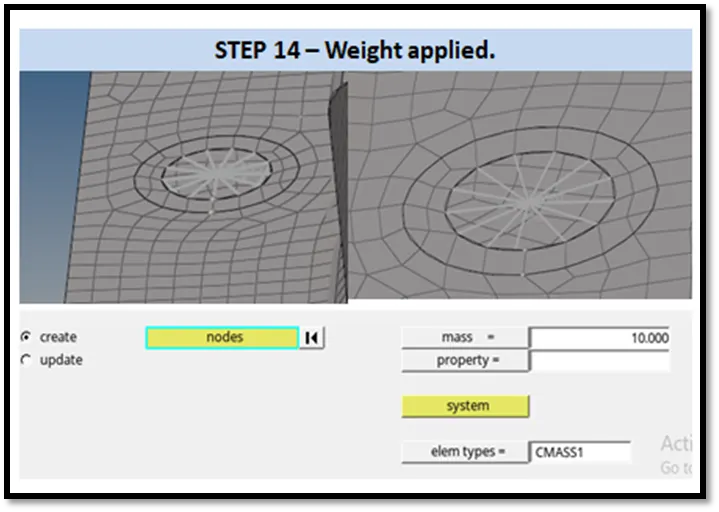
- Apply the mass of magnitude 10 with the RBE2 link
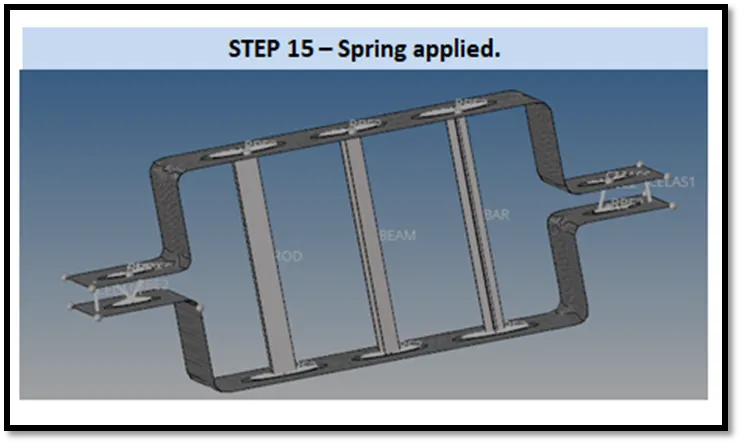
- Join the two components with Spring elements
Keywords:
Nodes,Lines,Trim,Surface,Rod,Beam,Bar,Mass
Input Data:
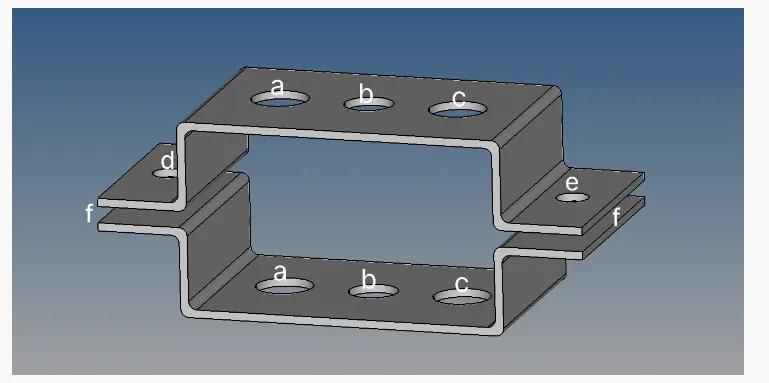
- The Radius of the hole in the Right view to be 5 units (Assumed).
Procedure:
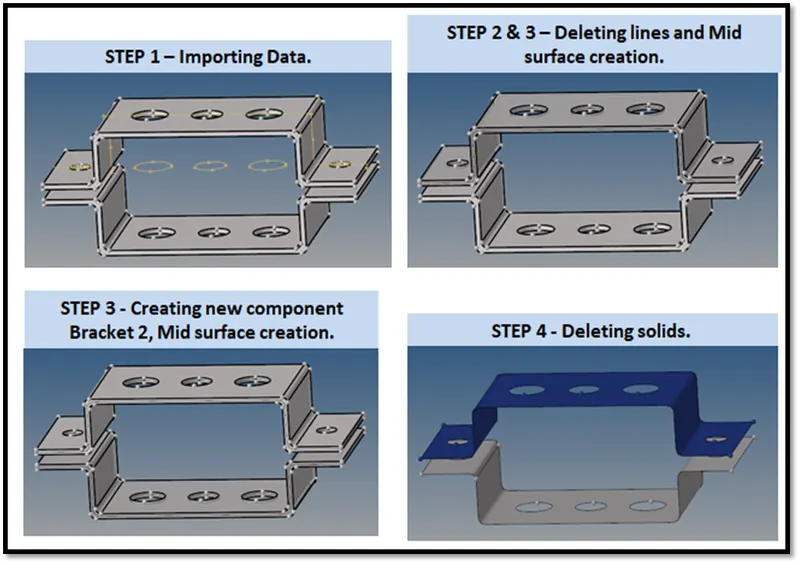
- The step 1 is importing data , Tool Bar -> Import sover desk ->Import geometry ->Import
- The step 2 is Deleting lines , Main Menu Page -> Geom ->Delete -> lines->displayed->Delete entity
- The step 3 is Mid surface creation, Main Menu Page -> Geom ->Mid surface->Auto midsurface.
- Select Bracket 1 surface -> extract.
- Creating new component Bracket 2,otherwise while mid surfacing both the bracket will combine.
- Then create mid surface for bracket 2.
- The step 4 is Deleting solids,Main Menu Page -> Geom ->Delete -> solids->displayed->Delete entity
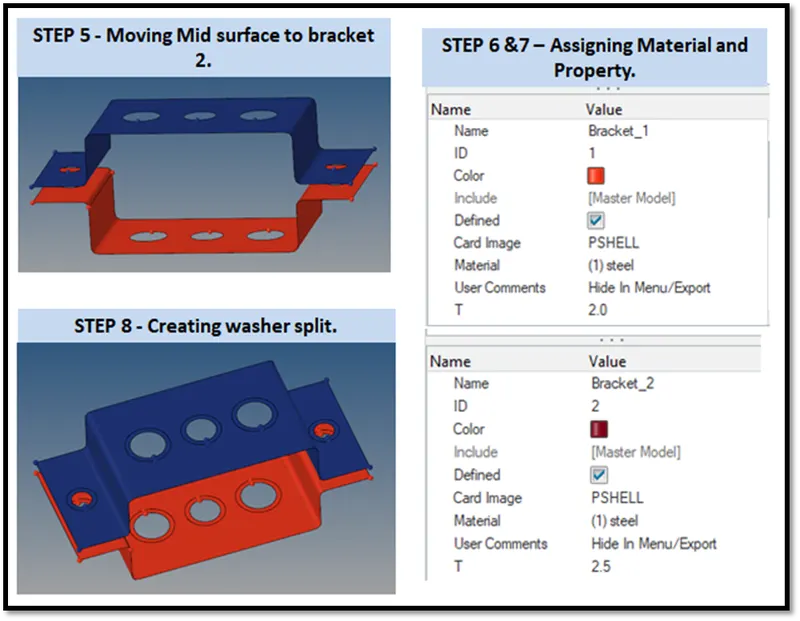
- The step 5 is Moving Mid surace to bracket 2,Main Menu Page -> Tool ->Organize.
- Dest component / current component - Bracket 2
- first select surfaces
- then , delete the mid surface
- The step 6 is assinging Material to get 3D representation in 2d part,Tab area -> create ->Material.
- Material - > steel , Card image - Mat 1
- creating Properties for Bracket 1 and Bracket 2.
- Assigning Bracket 1 Property -> card image - PSHELL (for midsurfacing) - solver (optistrut),Thickness - 2
- Assigning Bracket 1 Property -> card image - PSHELL (for midsurfacing) - solver (optistrut),Thickness - 2.5
- The step 7 is assinging Material & components to Bracket 1 & 2,
- For Bracket 1 -Tab area -> Bracket 1 ->Property.
- Click Bracket 1 property, This will assign the automatically assign material to this Bracket
- For Bracket 2-Tab area -> Bracket 1 ->Property.
- Click Bracket 2 property, This will assign the automatically assign material to this Bracket
- The step 8 is Creating washer split,Main Menu Page -> Geom ->quick edit ->washer split.
- select the hole edges and offset value - 5
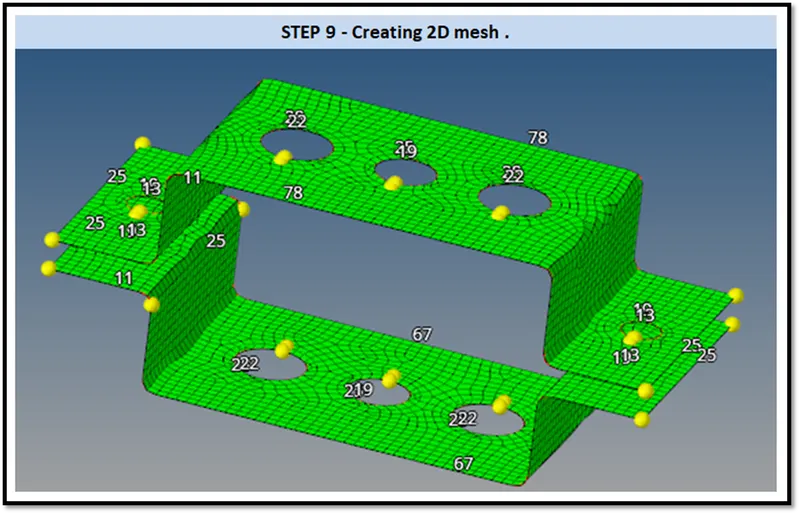
- The step 9 is Creating 2D mesh ,Main Menu Page -> 2D->Automesh.
- select surface -> displayed.
- element size - 5
- mesh type - mixed
- Maintain the nodes as same in cut out area and washer cut area by clicking right & left click
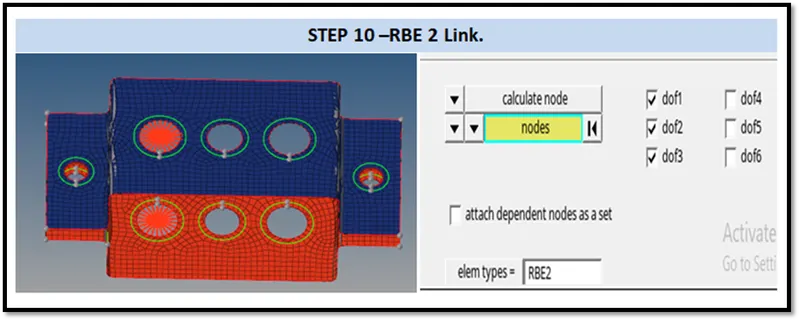
- The step 10 is Creating RBE2 Link ,Main Menu Page -> 1D->Rigids.
- Independent -> Calculate nodes.
- dependent ->nodes ->By path.
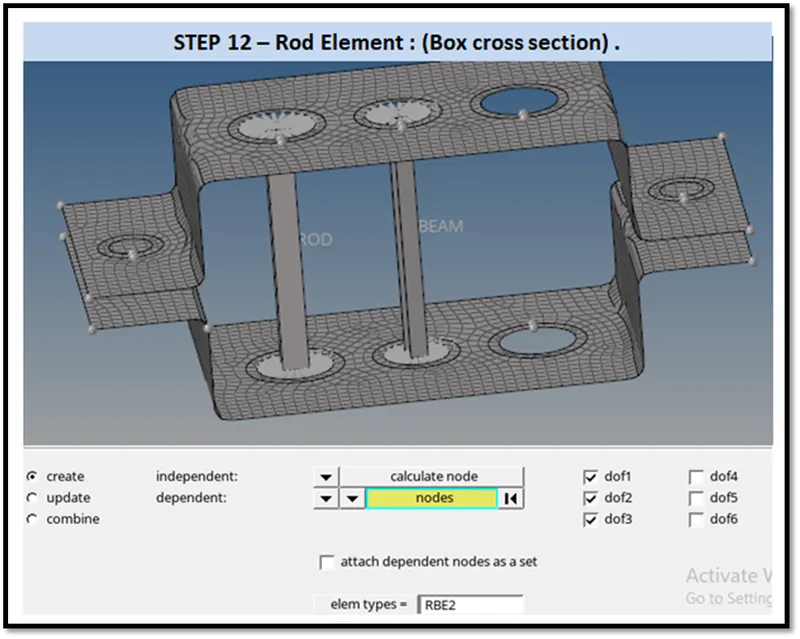
- Only Translational DOF are Constrained with RBE2 link
- click nodes
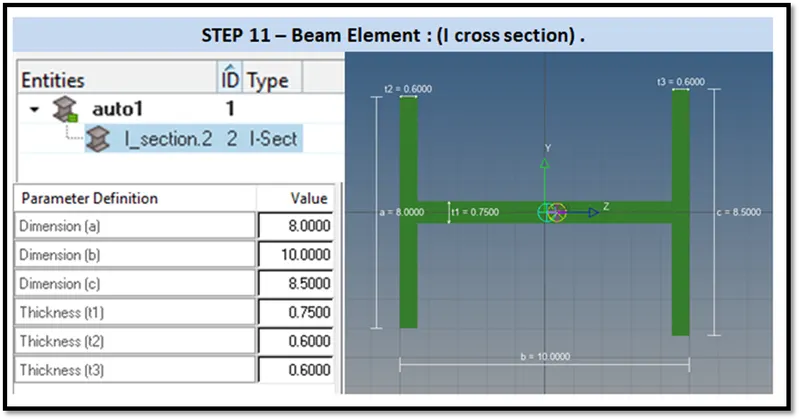
- The step 11 is Creating I cross section ,Main Menu Page -> 1D->Hyperbeam ->standard section->Hypermesh->I section.
-
Beam element:- All DOF should be constrained with RBE3 link
Cross-Section: I Section- Dimension a= 8 mm
Dimension b= 10 mm
Dimension c= 8.5 mm
Thickness t1= 0.75 mm
Thickness t2= .6 mm
Thickness t3= .6 mm
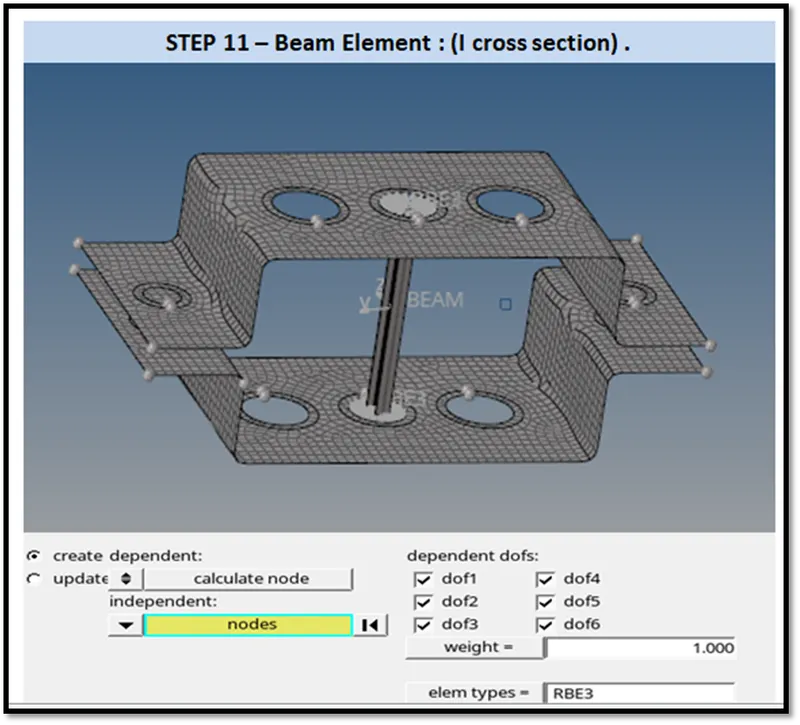
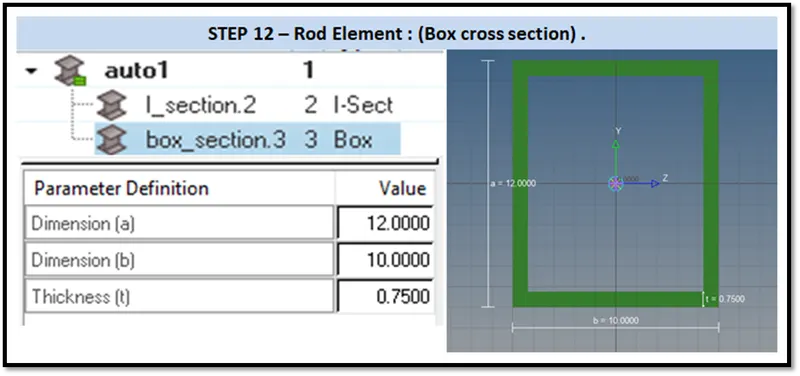
- The step 12 is Creating Box cross section ,Main Menu Page -> 1D->Hyperbeam ->standard section.
-
Click create
- Rod element:- Translational DOF should be Constrained with RBE2 link
-
Cross-Section: BOX- Dimension a= 12 mm
dimension b=10 mm
Thickness t= 0.75 mm
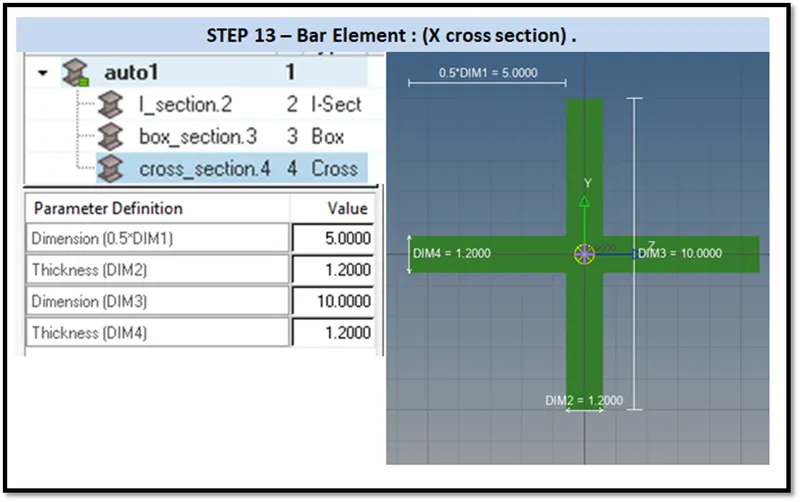
- The step 13 is Creating x cross section ,Main Menu Page -> 1D->Hyperbeam ->standard section->Optistrut->x section.
-
Bar element:- Constrain only x and y DOFs With RBE3 link (dof1,dof2,dof4,dof5)
Cross-section: X section- Dimension DIM1= 5 mm
Thickness DIM2= 1.2 mm
Dimension DIM3= 10 mm
Thickness DIM4= 1.2mm
- The step 14 is Applying mass at RBE2 Link ,Main Menu Page -> 1D->Masses.
- The step 15 is Applying spring ,Main Menu Page -> 1D->spring.
Conclusion:
- All a,b,c,d,e,f were captured below.
- Refer attached model for reference,
https://drive.google.com/file/d/1IYJsNI3xcLGOZiC0ZtfI_6sd7-55u87P/view?usp=sharing