Week - 4
- Objective: To create a simulink model for working of washing machine as given:
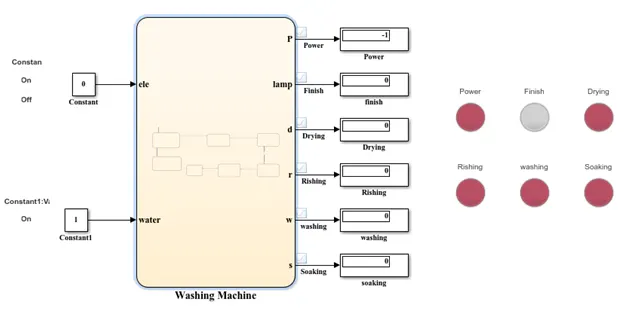
- If power is available system gets activated.
- If water supply is not available, stop the process and indicate through LED.
- Soaking time should be 200s followed by washing time of 100s.
- The rinsing happens for next 20s and dryer runs for 50s,after all the process is complete turn on the finish LED.
Introduction:
- Washing Machine:
The basic idea of a clothes washer is simple: it sloshes your clothes about in soap suds for a while and then spins fast to remove the water afterward. But there's a bit more to it than that. Think of a clothes washer and you probably think of a big drum that fills with water—but there are actually two drums, one inside the other. The inner drum is the one you can see when you open the door or the lid. In a front-loading clothes washer, common in Europe, the drum faces forward. You push your clothes inside the door from the front and the whole drum rotates about a horizontal axis (like a car wheel). The drum has lots of small holes to let water in and out and paddles around the edge to slosh the clothes around. In a top-loader, more common in the United States and Asia, you open a lid on top and drop your clothes into the drum from above. The drum is mounted about a vertical axis but doesn't actually move. Instead, there's a paddle in the middle of it called an agitator that turns the clothes around in the water.
- The parts of the washing machine
All washing machines have the same basic parts: a watertight container called the tub; a drum, which fits inside the tub, to hold the washing; electrically operated valves to allow water into the tub; a heating element to raise the water temperature; an electric motor to turn the drum; a pump to drain the water; and a programmer to control the switching of the various components. Once you understand how the different parts work in the washing process, maintaining and repairing your machine is much easier.
- How a programmer works
The programmer is the brain of the washing machine: once you choose the desired setting for the types of fabrics in the wash load, the programmer takes over. Every programmer is a permutation of the same factors: the amount of water taken in via the inlet valves (which dictates how far the clothes fall when they drop off the top of the drum—and so how hard they hit the water); the temperature of the water and detergent solution; how long the drum turns for during the wash and spin sequences and how fast it turns. The programmer also controls the operation of the pump to drain the machine at various points in the wash cycle.
- What happens during a wash-cycle
- Setting the programmer controller and switching on the machine activates the door interlock: once the door is shut it cannot be opened until the programmer is finished.
- As soon as the door is locked, the programmer begins. The inlet valves are opened, allowing water to flow into the drum. On the way it passes through the detergent tray, collection powder or liquid.
- The water entering the drum compresses air in a pressure chamber. this pressure is relayed along a flexible pressure tube to a pressure switch, which shifts the inlet valves at the programmed water level.
- The heating element comes on raising the water temperature to the programmed level, on very hot washes, only the hot inlet valve may open. Thus, reduces the time the heating element is on.
- The motor is started, driving the drum at around 55rpm. This is the best speed for washing clothes: they stick to the drum until the top of a revolution then fall back into the detergent solution.
- The motor is switched off and the pump turned on to empty dirty water from the tub via a lint filter and the drain hose. After a hot wash the cold inlet valve may open first to cool fabrics gradually and protect them from damage.
- The pump is switched off and the cold valve open to start the rinse cycle. A repeated sequence begins the tub filling to the programmed level, the drum revolving and the water being pumped out.
- At the end of the final rinse, the spin cycle starts. The motor is switched on, revolving the drum at high speed. At the same time the pump is switched on to remove the water coming out of the clothes.
- The motor is switched off. After a delay to allow the drum to stop spinning, the door lock is disengaged. The programmer is now finished and the door can be opened.
Simulink:
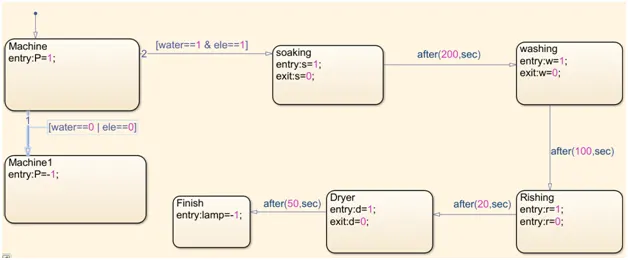
Observation:
- When whole process is completed Finish LED glows
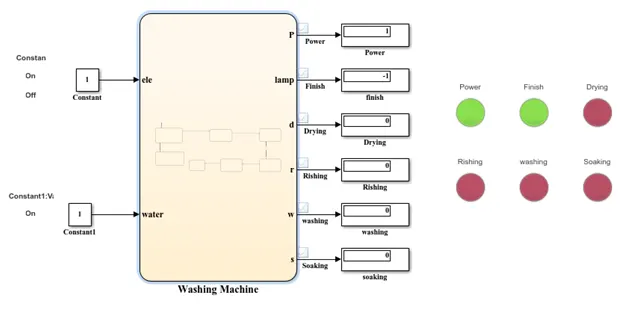
- When water supply is not available LED turns
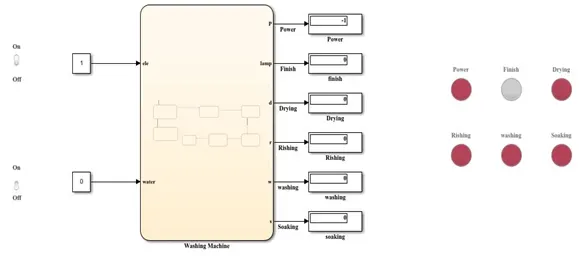
- When power supply is not available LED turns
Conclusion: A state flow model of washing machine is shown in above figure. The simulink is done in MATLAB 2020a. From observation we can see that the objective of simulation addressed.
- Objective: To make simulink chart for the gear shift logic as per below condition
Speed range (kmph) Gear
0 -15 1
16-25 2
26-40 3
41-60 4
Above 60 5
Give speed input will the simulation is running, display the gear number.
Introduction:
- Gear Box Working Principle:
A Gear Box is an assembly consisting of various gears, synchronizing sleeves and gear-shifting mechanism fitted inside a metal housing. The metal housing usually made of aluminum/iron casting accommodates all the gears in it. Gearbox is a part of the ‘transmission’ system as the gears play an important role in transmitting the engine power to the wheels.
- Gearbox Operation:
Generally, there are two sets of gears in a conventional gear box – the input & the output. The input gears are fixed on the countershaft making it a single unit. It drives the individual gears on the main-shaft which rotate freely on the bearings. Thus, the gearbox passes the drive to the wheels depending upon the gear which engages on the main-shaft. When you push the shifter-sleeve towards the desired gear, that gear locks onto the main-shaft and rotates it. Thus, the main shaft rotates at the speed of the engaged gear and provides the output as per the engaged gear’s ratio.
- Gearbox: Speed vs Traction
You need both the speed as well as the traction while driving an automobile. The gears in the gearbox help you choose either of them depending on the driving conditions. The lower gear i.e. 2nd and 1st gear will give you greatest traction while the higher gears i.e. 5th and 6th (if available) will give you the highest speed. The number of gears in the gearbox provides the perfect combination of traction and speed. Thus, it helps the driver/rider choose the most appropriate combination to enhance efficiency at all times. Hence, choosing the right gear according to road and load conditions is very important. With short gearing, you get better acceleration or pick-up while with tall gearing you achieve higher top speed.
- Types of Gear Box:
In general, an automotive gearbox is mainly classified into four categories:
- Manual – With up to 6 forward gears in a car and up to 13 forward gears in a truck
- Fully Automatic Transmission - up to 9 speed
- Continuously Variable Transmission - CVT
- Automated Manual Transmission (AMT) – up to 5 speed.
- Dual Clutch Transmission
According to the shifting mechanism, the manufacturers further classify the automotive gear into three more categories:
- Sliding mesh – typically used in two-wheeler/bikes.
- Constant mesh - typically used in old generation trucks.
- Synchromesh - used in the newer generation cars & trucks.
According to the types of shifting mechanism location:
- Column Shift – Gear lever mounted on the steering column, operated by hand.
- Floor Shift - Gear lever mounted on the floor, operated by hand.
- Peddle Shifters - Gear-shifters fitted on the steering wheel, operated by fingers.
Simulink:

Observation:
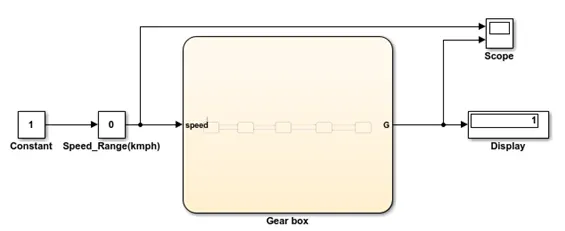
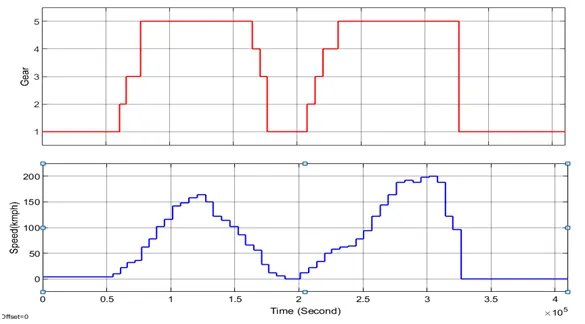
Conclusion:
A state flow model of gear box system is shown in the figure above. The simulink model is created in a MATLAB 2020a. From observation we can see the change in gear with respect to speed change.