Week - 4
Challenge 1:
AIM:- Implement control logic of a “washing machine” using Stateflow.
OBJECTIVE:-
- Implement control logic of a “washing machine” using Stateflow as per given sequence:
- If the power supply is available, the system gets activated
- If the Water supply is not available, stop the process & indicate through LED
- Soaking time should be 200s followed by washing time of 100s.
- Then rinsing happens for next 20s & dryer runs for 50s
After all the processes have completed turn ON the finished LED
INTRODUCTION:- A washing machine (laundry machine, clothes washer, or washer) is a home appliance used to wash laundry. The user generally adds laundry detergent, which is sold in liquid or solid form. There are basically four types of washing machine, which are as follows
- Fully-automatic washing machines:A fully-automatic washing machine does everything at the touch of a button. This washing machine comes with a single tub that acts as a washer, dryer and also rinses the clothes. These can come as front and top load machines, and the programs and efficiency can also vary between the machines, depending on the brand.
- Semi-automatic washing machines:Unlike the fully-automatic washing machines, semi-automatic washing machines are only partially automatic washing machines. This means that you will need to do some parts manually, like fill up the water in the tub before starting the machine, or if you have a twin-tub semi-automatic washing machine, you’ll need to move the washed clothes into the drying tub. These are always going to be top loading.
- Front load washing machines:A front load washing machine is a fully-automatic washing machine that loads from the front side. These machines usually consume less water and energy, and usually yield better laundry results than their top load counterparts.
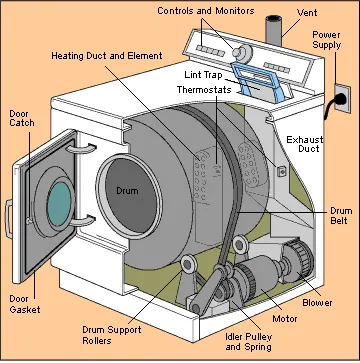
Figure 1.1 front load washing machine
4.Top load washing machines:- Both manual washing machines and fully-automatic washing machines come in a top load form. These kinds of machines are loaded from the top. This is good for people who want a machine in which they don’t need to bend down completely to load the clothes in the machine. Fully-automatic top load washing machines usually take up less space, so they’re good for people looking to fit a washing machine into a narrower space.
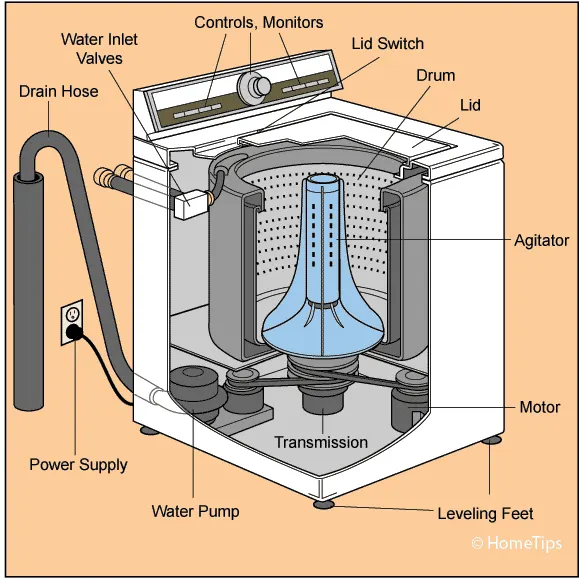
Figure 1.2 top load washing machine
Front load vs Top load washing machines:
|
Front load |
Top load |
|
|
Pros |
· Larger capacity · Better cleaning performance · More cycle options · More energy efficient · Use less water · More efficient drying |
· Can add laundry mid-cycle · Shorter wash cycles · Minimal vibration · Simpler control panel · Costs less · Fits into smaller places |
|
Cons |
· More expensive · Longer wash cycles · More vibration during spin cycle · Water can get trapped inside, causing malodor |
· Lower cleaning performance · Uses more water and electricity · Smaller capacity · Longer drying time |
Software Used:- MATLAB & SIMULINK
Control Logic of a “Washing Machine” Using Stateflow:-
Case 1:-With power and water at ‘OFF’ condition is shown below. In this condition power supply, water supply, soak, wash, rinse and dry are under ‘OFF’ condition which is shown in red colour LED below fig3.
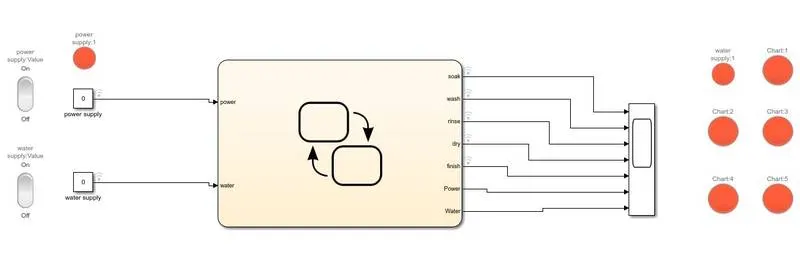
Figure 1.3 SIMULINK BLOCK DIAGRAM OF 'WASHING MACHINE'
Blocks Inside The Chart With Port Details:-
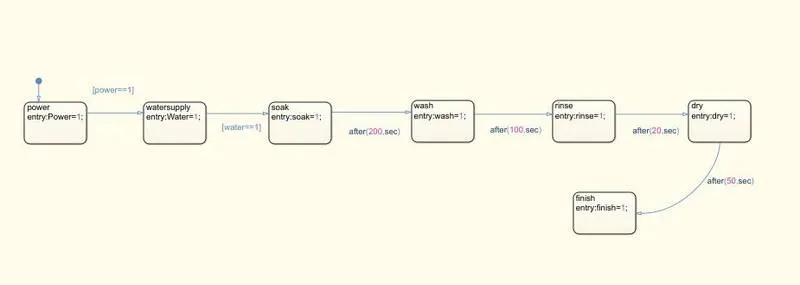
Figure 1.4
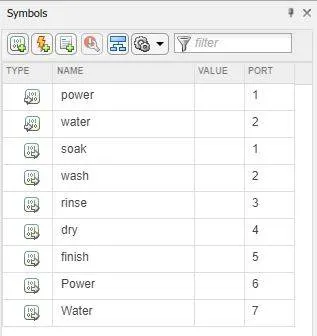
Figure1.5
Case 2:- When Power Supply Is Turned ‘ON’ and Water Supply Is Turned ‘OFF’.
Under this condition the power supply will only show ‘green colour’ LED and remaining process will show ‘red colour’ LED because without water supply the washing machine can’t operate.
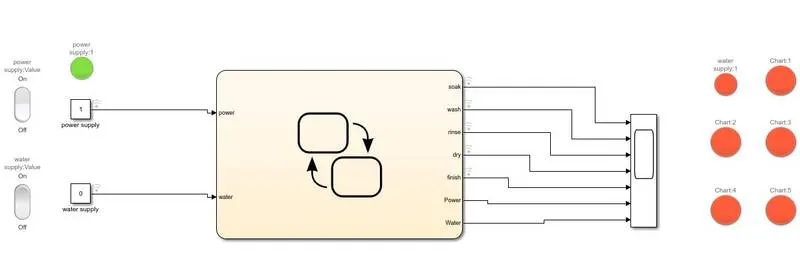
Figure1.6
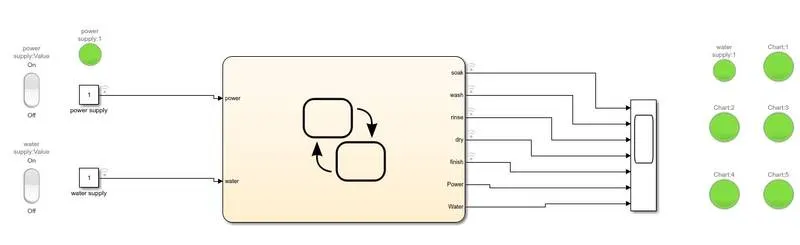
Case 3:- When Both Power And Water Supply Are Turned ‘ON’.
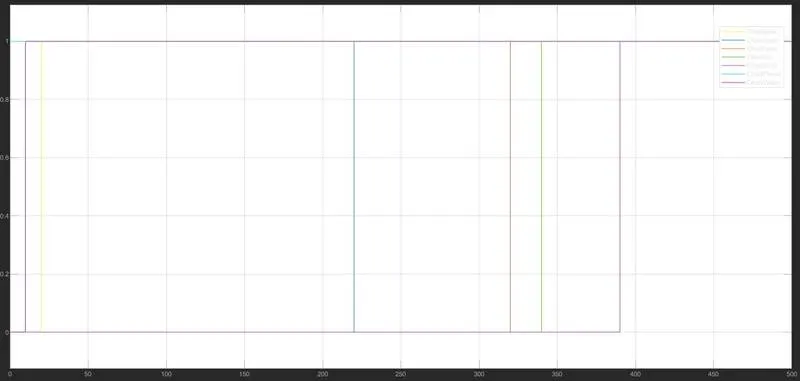
Under this condition the washing machine will operate with soaking time 200 sec followed by Washing time of 100sec and then rinsing happens for next 20 sec & dryer runs for 50 sec. After completion of entire process the green LED all process will be shown including finish LED green.
Output Graph:-
Conclusion:- control logic of a “washing machine” using Stateflow as per given sequence is implimented properly.
- Challenge2:-
AIM: - Make a Simulink chart for the “Gear shift” logic
OBJECTIVE: - Make a Simulink chart for the “Gear shift” logic as per below conditions:
|
Speed Range (kmph) |
Gear |
|
0 to 15 |
1 |
|
16 to 25 |
2 |
|
26 to 40 |
3 |
|
41 to 60 |
4 |
|
Above 61 |
5 |
Give speed input while the simulation is running & display the gear number.
INTRODUCTION:-
Gear Lever Mechanisms
The gear changing mechanism starts, quite obviously, with the gear lever. In early cars the lever ran straight down into the gearbox because the engine and gearbox were separated by a short shaft and this brought the gearbox into a convenient position for a directly-acting lever. The modern practice is to bolt these two major components together, in what became known as "unit construction". This gave greater rigidity to the transmission, as well as cutting manufacturing costs. It did mean, though, that the gearbox was mounted further forward than it used to be and this, in turn, meant that a floor-mounted lever could not be directly coupled to the gearbox. If it was it would have been extremely awkward for the driver, being either too far forward or so long that efficient, accurate changes would be difficult to achieve. The answer was to incorporate a remote control mechanism between the lever and the gearbox. Most floor-mounted, remote control mechanisms are based on a rod, though cables have been used, the rod running forward from the gear lever to the striker arm in the gearbox. This may sound simple enough but there are problems involved in this type of linkage.
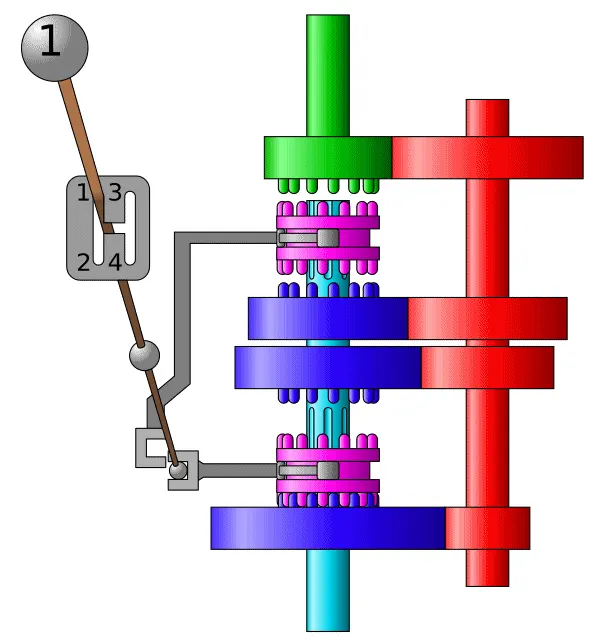
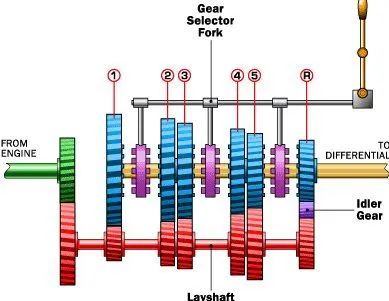
Most stem from the fact that a gear lever must move in two planes, forward and back and then from side to side to move across the gear "gate". The connecting rod must obviously be able to duplicate these movements. A rod that is simply bolted to the gear lever and striker arm could move in both directions, but its action would undoubtedly be harsh. Also, the distance between the lever and the striker arm is often around 70 cm (2ft) and a rod of this length must be supported in bearings if it is to transmit the gear lever's movements smoothly and without any flexing. Incorporating plain bearings or bushes would not affect the back and forth movement of a simple rod but they would clearly prohibit side to side action. The answer to the problem is simple. Most remote control rods are cranked at the gear lever end. This means that the sideways action of the lever is converted into rotation of the rod, an action with which the simple bearings do not interfere.
Gear Changing
A good many drivers think of gear changing as one simple action. This is more a tribute to the design of gear changing mechanisms than a reality, because a change of gear does, in fact, comprise four separate stages. To take the sequence in turn, the gear lever must first be moved to select the correct fork and is then used to move it in the appropriate direction. Then the dog clutch must be engaged with the pinion and, lastly, the dog must be locked in position. The third of these tasks, that of engaging the dog clutch with the pinion, is really the task of synchromesh but all the others fall firmly in the province of the gear selector mechanism. There are two common gear selector mechanisms that are of concern to the classic car enthusiast, the sliding selector and the ball-type, though these were greatly modified and improved by individual manufacturers.
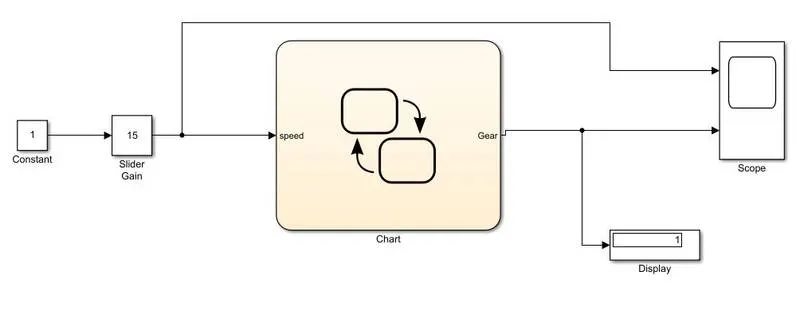
SIMULINK BLOCKS:-
- Constant
- Slider gain
- Chart
- Display
- Scope
SIMULINK DIAGRAM:-
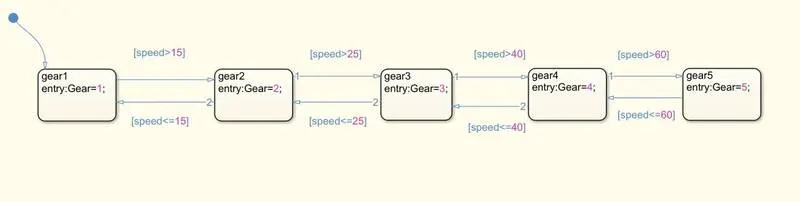
Case-1:- For a speed input of 15km/hr, The gear is shifted to 1st position.
Graph:-
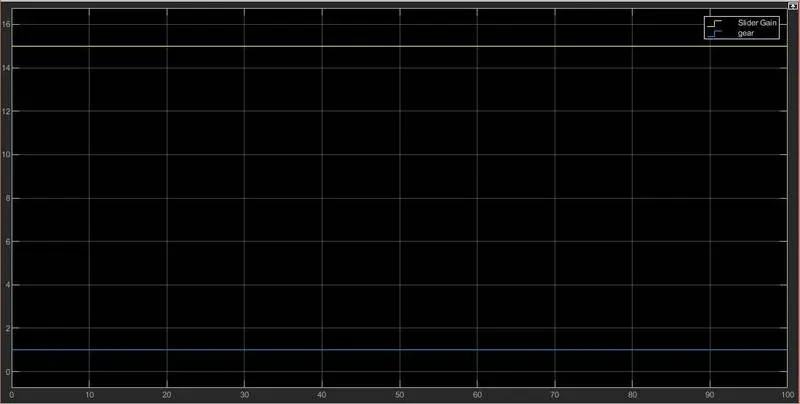
Case-2:- for a speed input of 20km/hr, the gear is shifted to 2nd position.
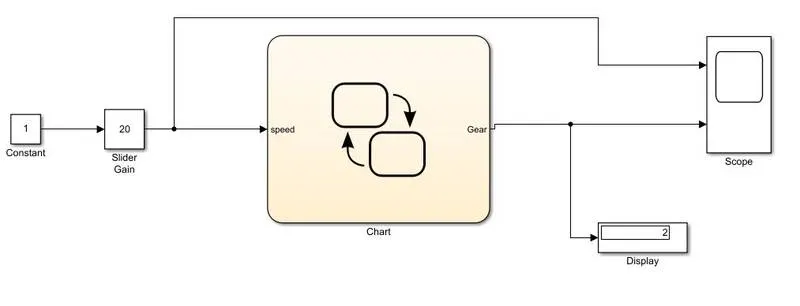
Graph:-
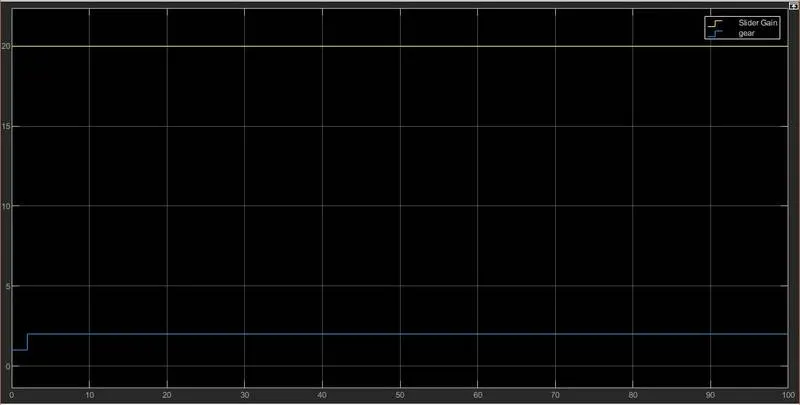
Case-3:- for a speed input of 30km/hr, the gear is shifted to 3rd position.
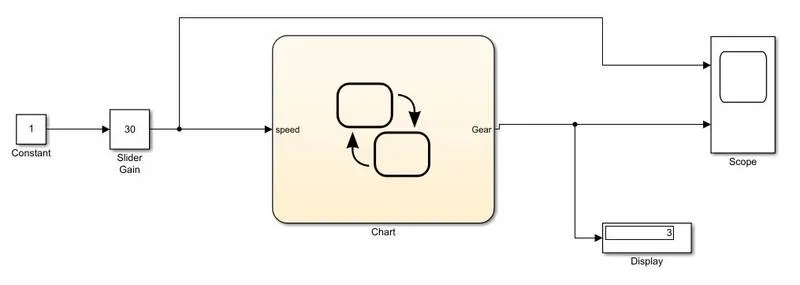
Graph:-
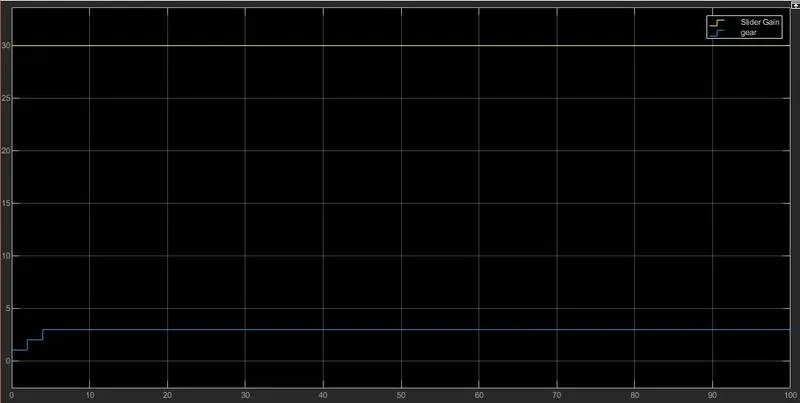
Case-4:- for a speed input of 50km/hr, the gear is shifted to 4th position.
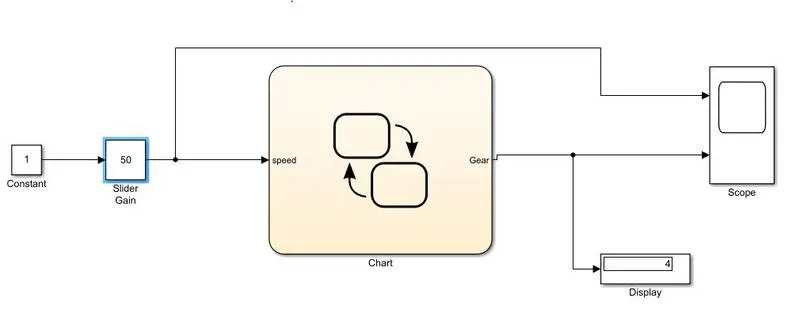
Graph:-
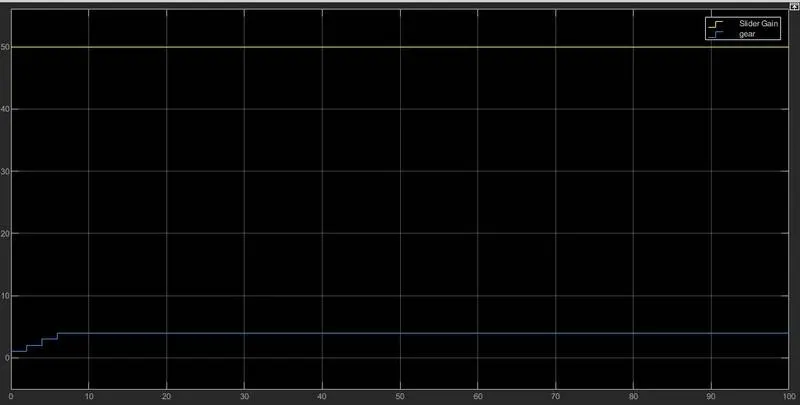
Conclusion: - After delay of every 2 seconds, the gear shifts from one position to another position.