Week 1 Challenge
1. 1. Write the steps involved to upload a .std file through web mail?
TO IMPORT A STAAD.Pro (*.std) FILE:-
- Select STAAD Import from the backstage > The Import from STAAD.Pro dialog opens.
- Click [...] in General settings to browse and select a STAAD.Pro (*.std) file to import.
- Select Use Mapping File in Section Mapping settings, and then click [...] to browse and select a mapping file to import.
- Set the catalog type and catalog instance assignments for the imported member types. This data is used by AECOsim Building Designer to rebuild the members' structural data as defined in the structural member catalogs.
- In Steel settings, select a section definition that is to be designated as the Default Section Name. This section definition is applied to imported members whose section data is not available in AECOsim Building Designer.
- Check Verify to scan the imported file for unknown sections > The Unknown Sections dialog appears providing an opportunity to write the unknown sections to the active XML section definition file before importing.
- In Revision Tracking, check Use Design History. Design History tracks changes to a DGN file. Viewing details about the revision by using the controls on this tool.
- Click Import > The Update design result dialog box appears. Review detailed information about each imported member and select which ones you want to import before accepting them into the target DGN file.
- Click Update to complete the import process > The structure is updated.
1. 2. Name the different materials that can be designed using STAAD Pro.
TO CREATE MATERIAL DEFINITION:-
- To create a new isotropic material definition for use with your model, use the following procedure.
- You may want to set the input units to a familiar set of units for defining materials before creating a new material definition.
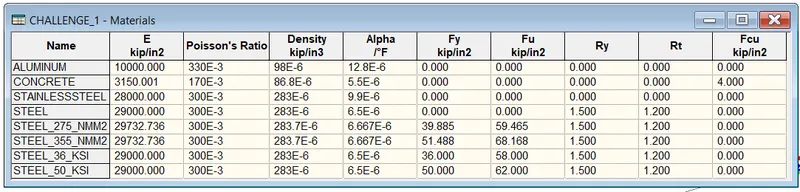
- STAAD.Pro includes a set of predefined materials for concrete, aluminum, steel, and stainless steel.
- Select the Materials page in the Analytical Modeling page control bar > The Material - Whole Structure dialog and the Materials table open.
- In the Material - Whole Structure dialog Isotropic tab, click Create > The Isotropic Material dialog opens.
- Type a Title to identify the material. This title must be different than the predefined material names or any other existing user-defined material name.
- Type the values of the Material Properties used for analysis: Young's Modulus (E), Poisson's Ratio (ν), Density (γ), Thermal Coefficient (α), Critical Damping, Shear Modulus (G).
- Select the Type of Material from the drop-down list.
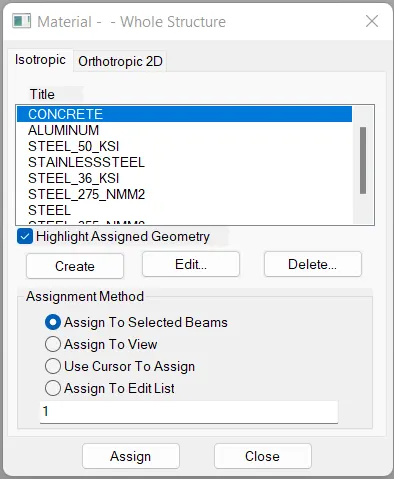
- Type the strength values in the Design Properties section. The fields corresponding to the selected material type are active.
- Click OK.
1. 3. Is it possible to capture images in STAAD Pro? If yes how?
- YES, it is possible to capture images in STAAD Pro.
- We can take pictures of models and structural results in staad pro using the take picture command, the command is available in the utility panel with a camera logo.
- Plot the appropriate diagram and take a picture of it by clicking the Take Picture icon as shown in the screenshot below.

- Take pictures of as many items you need to and each time you will be prompted to provide a caption for the picture.
- You can provide appropriate captions for each and these will be used in the report.
- Subsequently you may click on the Report Setup to launch the Report Setup dialog box as shown in the screenshot.
- Select the Pictures from the Available list of Pictures and click on the > or the >> icons to include these as part of the report.
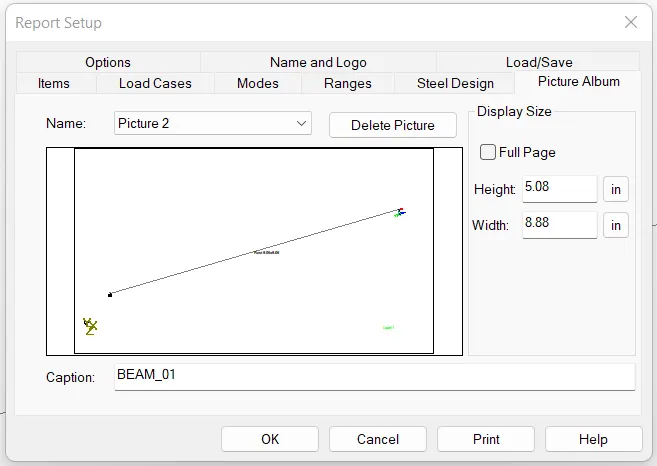
- You can then do a print preview of the report by clicking on the icon right next to the Report Setup icon and take a printout.
1. 4. Name the three ways by which you can create a model.
There are 3 ways by which you can create a model in as STAAD pro are as below:

- Analytical model.
- Physical model.
- Building planner model.
1. 5. Write the steps followed to assign properties in a model.
The steps that we followed in order to assign the properties in a model have been discussed below:
- In order to assign the properties to the model,first of all go to the Properties Panel.
- After that click on the materials.
- And then select the desired material from the list and that list contains the following materials like Concrete, Steel, Aluminium, Stainless Steel etc.
- After this check the assignment method according to your preference,click on the below options according to your preference.
- Here i have choose the option Use Cursor to the Assign and just as shown in the below given image.
- After doing the above steps, check the radio button and after that go ahead and assign the material property to the model.
_________________________________________________________________________________________________________________________________________
2. 1. Name any six design parameter involved in RCC design.
Six design parameters that are involved in RCC design are listed below:
- Target Compressive strength, fck
- Reinforcement steel grade, fy
- Cover
- Depth
- Min & Max Reinforcements
- Bar diameter.
2. 2. What are the different cursor types available in STAAD Pro?
The different cursor types that are available in STAAD Pro are listed below:
- Nodes cursor.
- Plates cursor.
- Beams cursor.
- Plates and Solid cursor.
- Loads cursor.
- Solids cursor.
- Physical Member cursor.
- Geometry cursor.
2. 3. How will you generate different views for a model? State the steps involved.
The step-by-step procedure to generate different views for a model are discussed below:-
- So in order to generate the different views for a model,first we need to go to the option Views from the top tool panel in the STAAD Pro software just as shown in the below given image.
- After clicking the Views option from the top tool panel there will be different options in Tools section.
- In that section we can see that there will be various cubes that are filled with one side in every cube and that filled side of the cubes indicates the view like the cube that's upper side is filled it means it indicates the Top View,the one with the right side filled it indicates the Right view and so on just as shown in the below given image.
2. 4. Explain the procedure to define a “Simply Supported” condition in STAAD Pro
The detailed procedure to define a "Simply Supported" condition in the STAAD Pro has been discussed below:-
- In order to define a simply supported condition in the STAAD Pro software,first we need to go to the option Supports,in that window there will be another dialouge box named as the Supports-Whole Structure,in that dialouge box there will be an option called Create just click on that option just as shown in the below given image:
- After that there will be one another dialouge box named as Create Support,in that dialouge box there are many options like Fixed, Pinned, Fixed But, Enforced etc. From that options just click on the Pinned option just as shown.
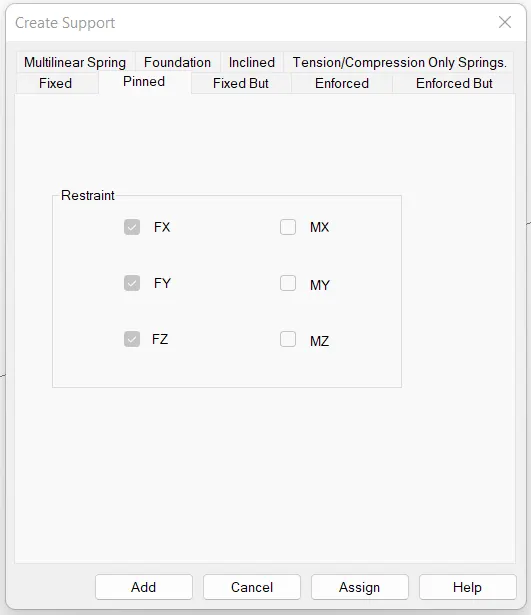
- Now click on the option Add and then click the Pinned support and now the simply supported end condition has been created and now it can be assigned to the desired place.
2. 5. Name any five topics that you will include while creating DBR.
DBR is the Design Brief Report.So basically DBR is a short brief of what you are going to make,why you are going to make,where you are going to make. In short it is a core detail of our project. So the five topics that will include creating DBR is listed below:
- Name of the project and the location of the project.
- Structural Layout.
- Introduction to the construction methodology.
- Quality Assurance and Quality Control.
- Budget of the Project.
2. 6. Describe the term “Multi material design” of STAAD Pro.
- The term "Multi material design" of STAAD Pro defines the structure that is designed by implemention more than one structural material.
- As STAAD .Pro supports several steel, concrete and timber material in a seprate member.
- For example, suppose i am designing a R.C.C building but at the same time few parts of that RCC buidling is composed of different materials like Steels in order to make the sheds, garage etc.
- So these types of building are designed with different materials is known as the "Multi Material Design".
3. 1. Name the structure systems in STAAD Pro? Explain each system?
The structure systems in STAAD Pro software are:
- Space
- Plane
- Frame
- Trusses.
SPACE:-
These space are the three-dimensional truss like structures that is designed to carry loads for the longer spans without any intermediate supports. The space structures are rigid and light-weight in nature and it is structurally effective. It has low transportation cost.
- In space structure the geometry, loading, deformation are of 3D only.
- Any kind of joint supports are provided.
PLANE:-
Plane are RCC or steel structures. It is a two-dimensional structure which is constructed with straight elements which are conected by the rigid or the hinged connections.
- In plane structure the geometry, loading, deformation are of 2D only.
- Any kind of joint supports are provided.
FRAME:-
Frame are 2 dimensional structures and which is constructed with straight elements which are conected by the rigid or the hinged connections.
- In frame structure the geometry is only 2D. where as loading and deformation are perpendicular to XZ plane.
- Any kind of joint supports are provided.
TRUSSES:-
Trusses are created by arranging the structural elements in the triangle forms which can take loads in both compression and tension.
- In trusses structure the geometry, loading, deformation are of 3D only.
- Only pinned joint supports are provided.
3. 2. Explain the coordinate system adopted in STAAD Pro software.
- The co-ordunates system that are adopted in STAAD Pro software are X,Y and Z co-ordinates. So basically the co-ordinate system adopted in STAAD Pro software are:
- Global Axis
- Local Axis
GLOBAL AXIS:-
- Mainly global axis are fixed in the co-ordinate system.
LOCAL AXIS:-
- Local axis is variable in nature. We can change the local axis but not the global axis.
- It is depends upon the member orientation.
- Longitudinal axis is always the local x-axis.
As the STAAD Pro software. Basically it uses a conventional cartesian co-ordinate system, and in this system Y is a global axis which is in upward direction. We can say that the height of the building is always parallel to the global Y-axis.
3. 3. Elaborate DBR and its uses.
DPR - Design Basis Report:-
- DBR is a Project Management document which consist of various informations regarding the construction of the structure.
- This DBR is a detailed report which tells the minute details of the ongoing construction work.
- It defines the final stage in the process of defining the Client's requirement for the construction work.
- This report basically consist of all the major and important structural details that is relevant or we can say that is related to the project like description of the client, site information, special requirements if any, the technical requirements, components required, the project requirements and the other issue related to the construction.
USES:-
- To specify and compile the data required for analysis and design of structural elements of the project.
- It clearly depicts the assumptions and specifications that are being used to develop the construction documents for a project.
- It will also help avoid the "scope creep" that can derail the project schedule and lead to budget overruns.
- It is basically transforms that "WHAT" into the "HOW".
3. 4. Explain the different types of analysis options in STAAD pro.
- Linear static analysis
- Second order analysis (P-delta)
- Non-Linear analysis
- Member Imperfection Analysis
- Pushover analysis (Deformation).
3. 5. Explain the difference between Fixed and Fixed But condition.
Fixed condition:-
- Fixed condition in the STAAD Pro software is the condition where all the degrees of freedom that is horizontal or vertical or moment are fixed or we can say these coditions are restrained we cannot change accordingly. Those condition we can say are the fixed conditions.
Fixed-But condition:-
- So for the fixed-end condition we can say that this condition can be customized its end conditions accordingly.
- In this condition we can change the end condition it is not restrained.
- We can release some of the required degree of freedom.
_________________________________________________________________________________________________________________________________________
Practical
1. Create a STAAD Model with the following Specification
a. A beam of span 16m
b. Support : Fixed on one end and Roller support(Horizontal) on the other end
c. A point load of 50 kN at the mid-point
d. Draw SFD and BMD using software
AIM:-
- To create a beam of 16 m long span with the help of the STAAD Pro software.
- To provide a fixed support at the one end and thed roller support at the other end.
- To draw the SFD and BMD diagram using the STAAD Pro software.
PROCEDURE:-
- Given data:-
- Length of Beam = 16m.
- Support = Fixed on one end and roller on the other end.
- Point load = 50KN at mid-point.
- So in order to create a beam of 16m long span, first of all open the STAAD Pro software.
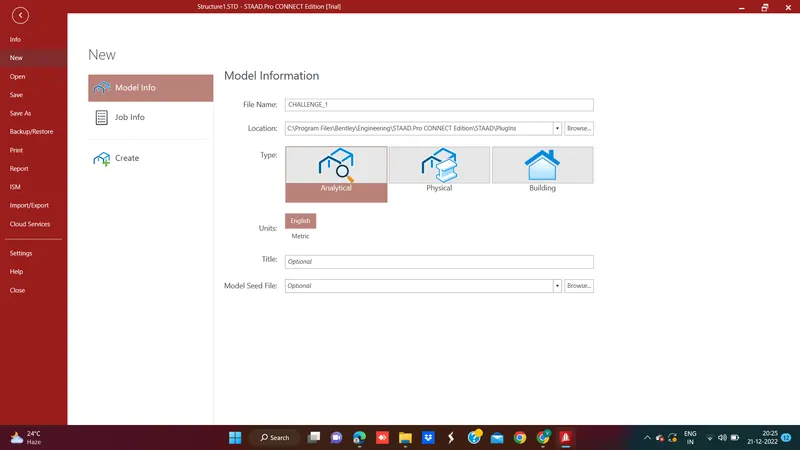
- After opening the software, Click on the option New which is present at the left side of the screen just click on the New option and fill out the all necessary data and then just click on the option Create just as shown in the below given image:
To create a beam of span of 16m:-
- After clicking on the Create option a new drawing space will opens
- After this we will be modelling the beam of required span.
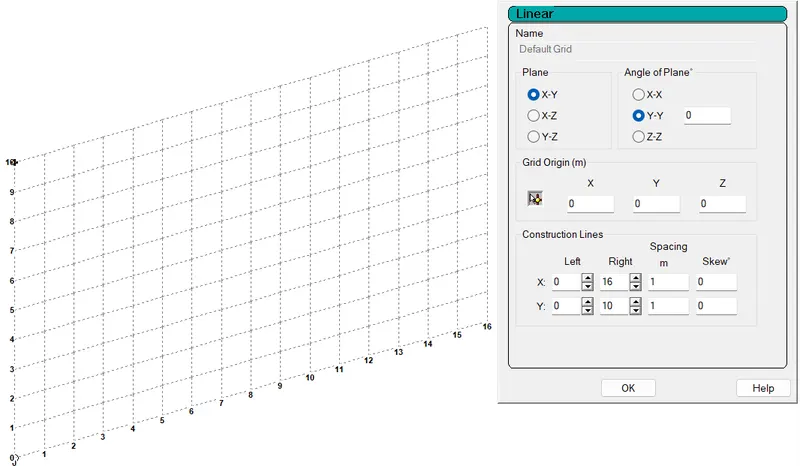
- So in order to create a beam of required span first go to the option Geometry and create grid of 16m after clicking the Edit option.
- After clicking the Edit option there will be another dialouge box named as the Linear and in that dialouge box in the Construction lines option give spacing as 1m and then click OK option just as shown in the below given image:
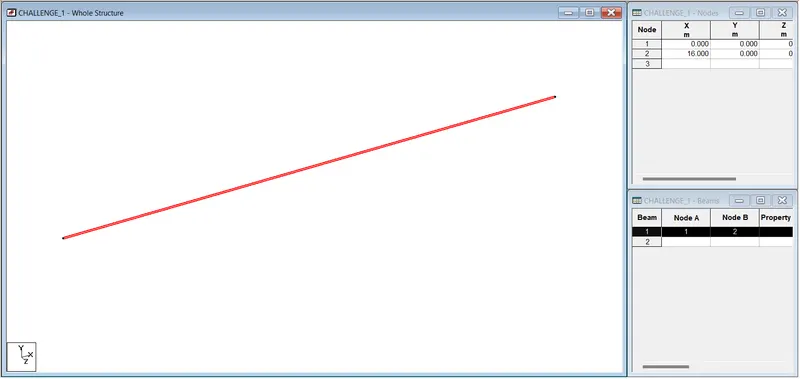
- After creating the grid draw a beam of span 16m.
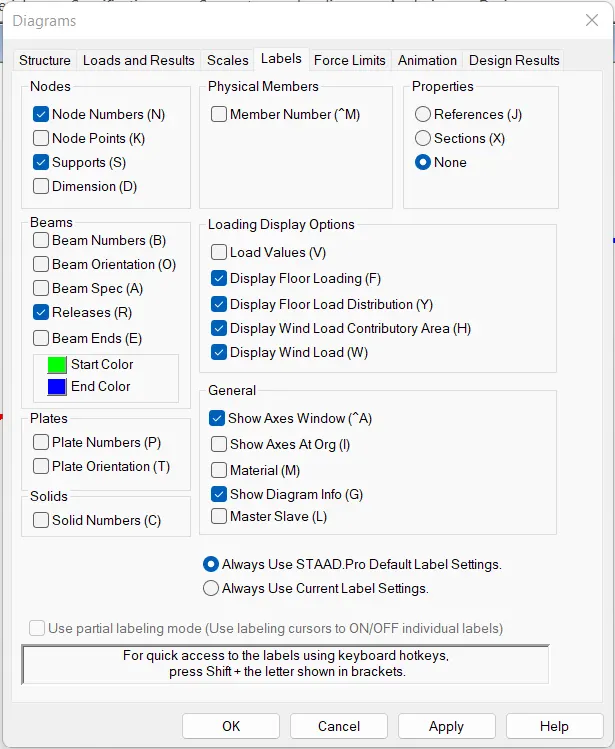
- And to view the nodes just right-click and then there will be a drop-down list in that list there will be an option called Labels.
- After clicking on the option Labels there will be another dialouge box named as the Diagrams in that dialouge box there will be an option called Node Numbers (N) just click on that option and then followed by APPLY and then click OK.
- The nodes numbers are visible now as shown
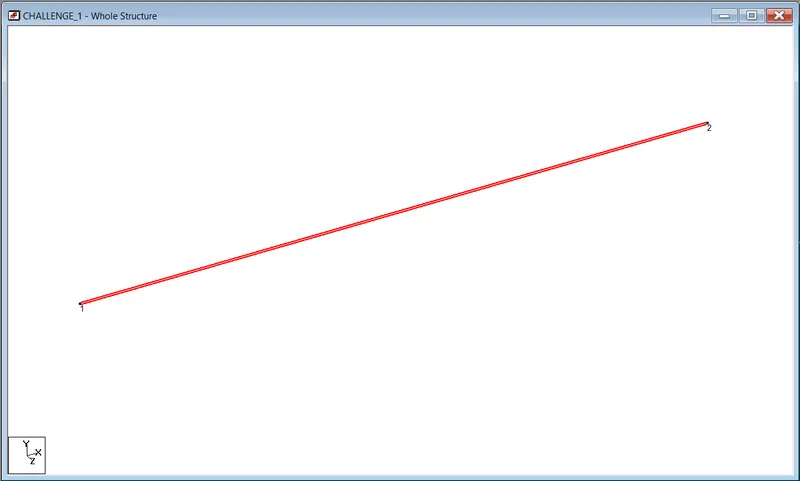
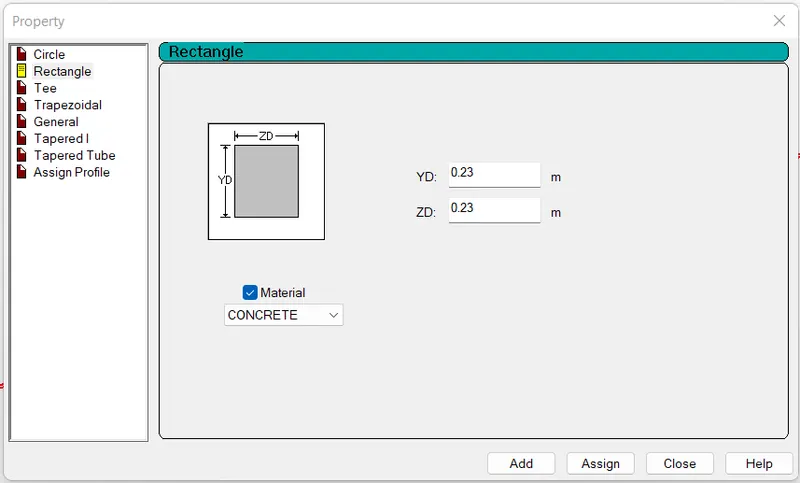
- Assign the property, just go to the property tab and assign
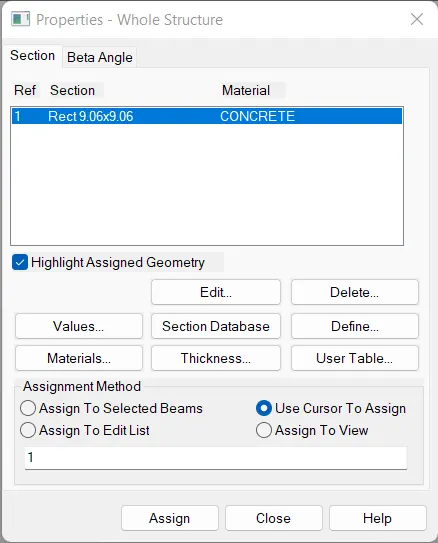
- And now we have to assign the materials, so in order to assign the material just go to the material tab click on the isotrophic option choosed the material here i choose CONCRETE.
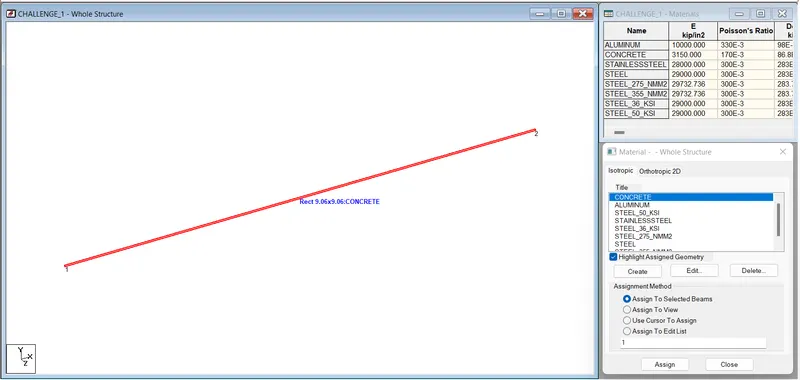
- Now, just click on the material and check the assignment method,click on the option Use cursor to assign,then click on the beam and now the material has been assigned to the beam.
- The material properties are assigned as shown
To create Support : Fixed on one end and Roller support(Horizontal) on the other end:-
- Next we have to assign the supports to the beam.
- So in order to assign the supports to the beam, first we need to go to the option supports, then there will be a dialouge box named as Supports whole structure in that dialouge box there will be an option called create just click on that option after that there will be another dialouge box named as the Create support in that dialouge box click on the option Fixed and then click on the option Add as wee need Fixed support at the first end as shown below
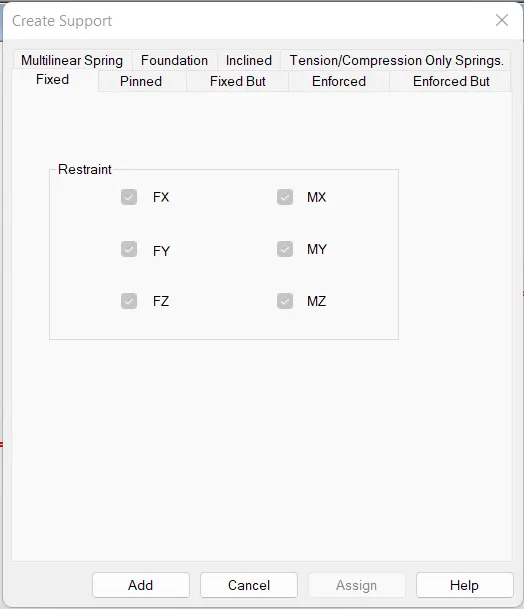
- After that again click on the create option and now click on the option Fixed But and choose FX and MZ because at another end we need roller support as shown
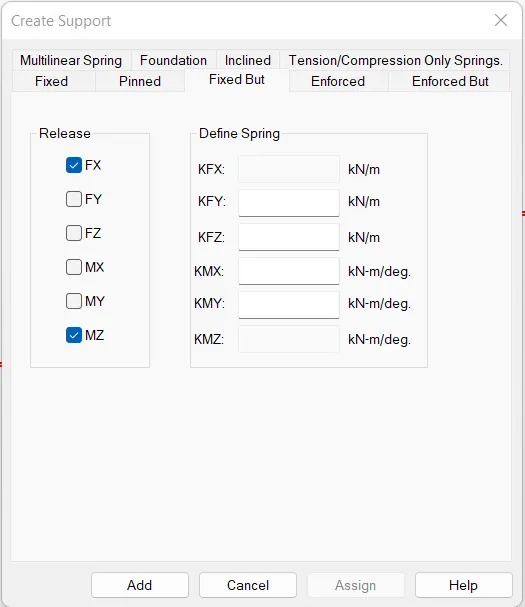
- Now we have provided the both the support at both the ends, Fixed support at the one end and the Roller support at the other end, just click on the option Assign just as shown.
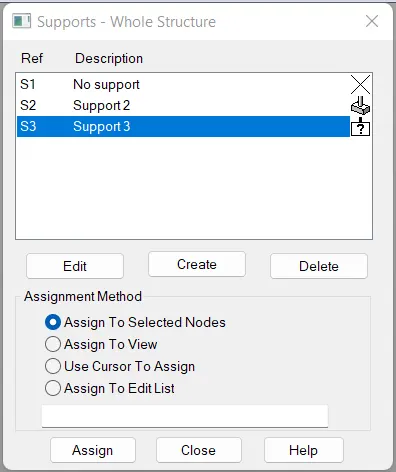
- Supports are assigned as shown
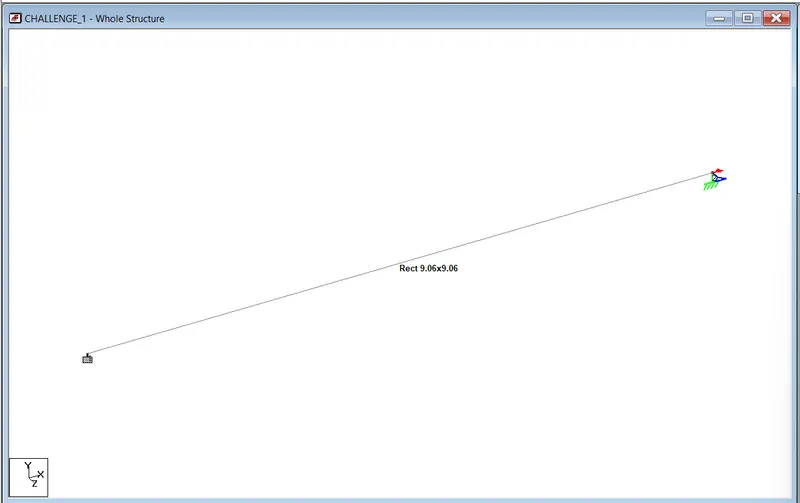
To create A point load of 50 kN at the mid-point:-
- Now we have to apply the load of 50 KN at the mid-point of the beam.
- So in order to apply the load first we need to go to the Loadings option after clicking to the loadings option there will be another dialouge box named as the Load and Definition and in that dialouge box there is option called NEW just click on that option.
- After clicking on the option New there will be another dialouge box named as the Create New Definitions/Load Cases/Load Items in that dialouge box there is option called Member Load then there will be an option called Concentrated Force then in that dialouge box fill the load of 50KN at a distance of 8m as it is a point load and the click on the option Add just as shown.
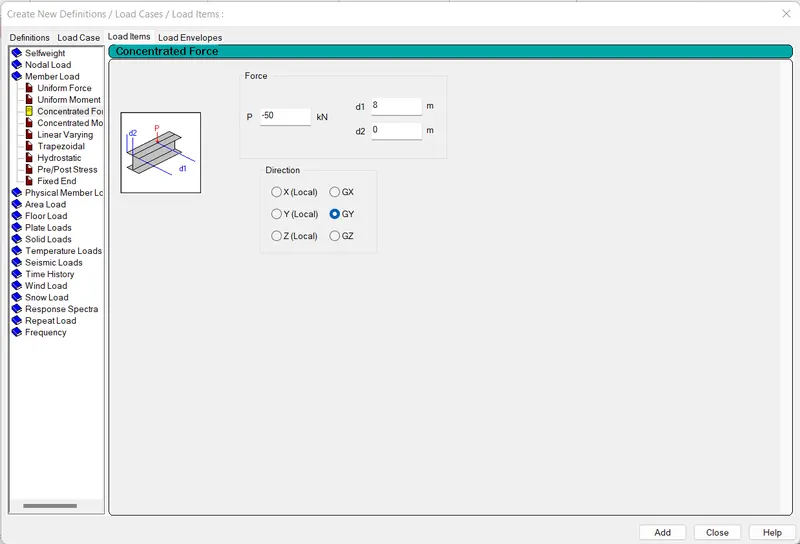
- And then there will be another dialouge box named as the Load & Definition click on the Load and then click on the option Assign as shown.
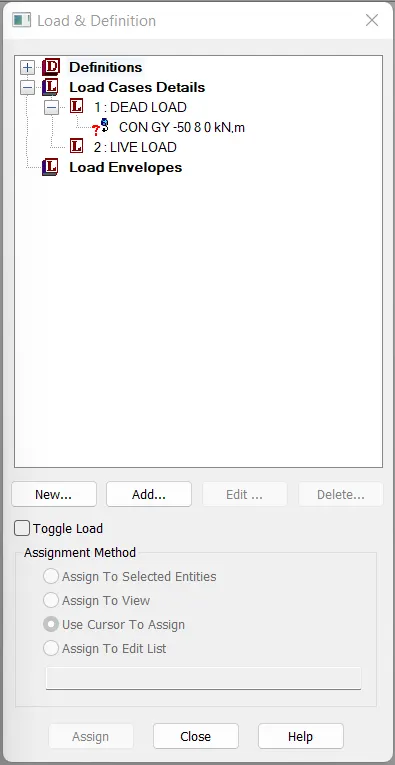
- Now the point load of 50 KN at mid-point has been assigned.
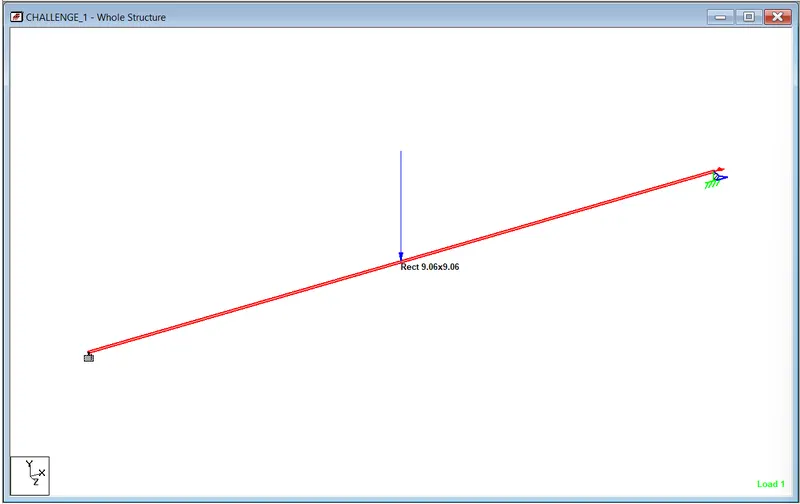
- Go to analysis tab, click assign and ok.
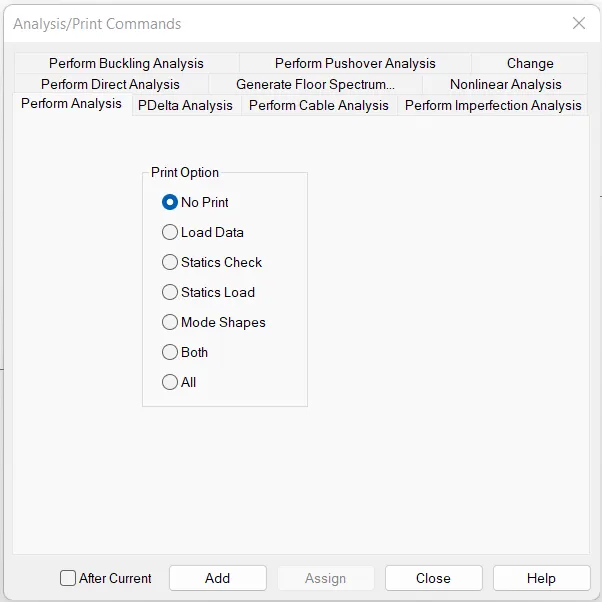
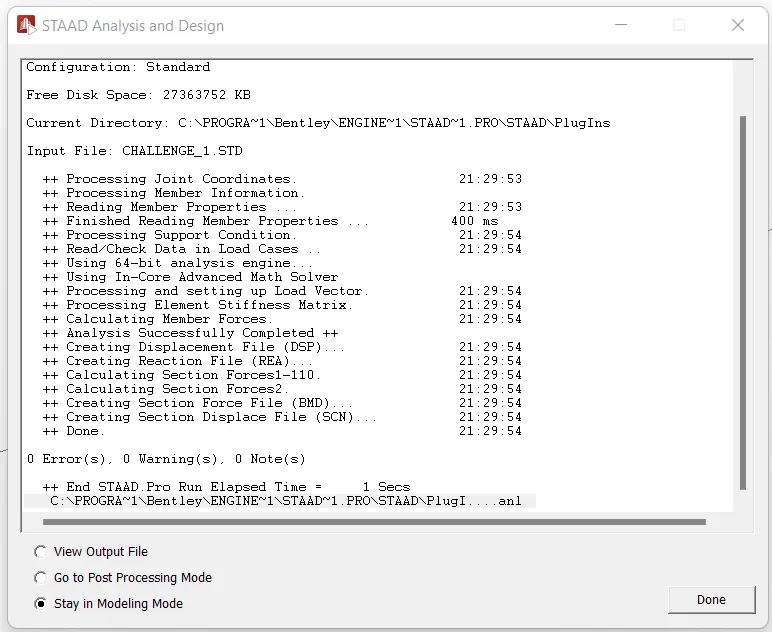
- And now after assigning the point load now we will be doing the Run analysis just.
- The run analysis of our model has been done with no errors, no warnings and no notes as we can see in the above image.
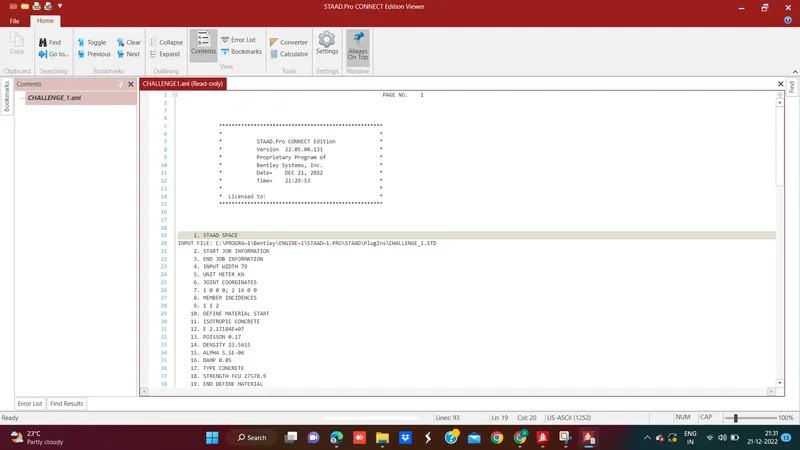
- Select view output, to view the output
To draw SFD and BMD using software:-
- So in order to draw SFD and BMD diagram in the software itself, after Run Analysis there will be an option called Go to Post Processing Mode just click on the option and then click on the option done.
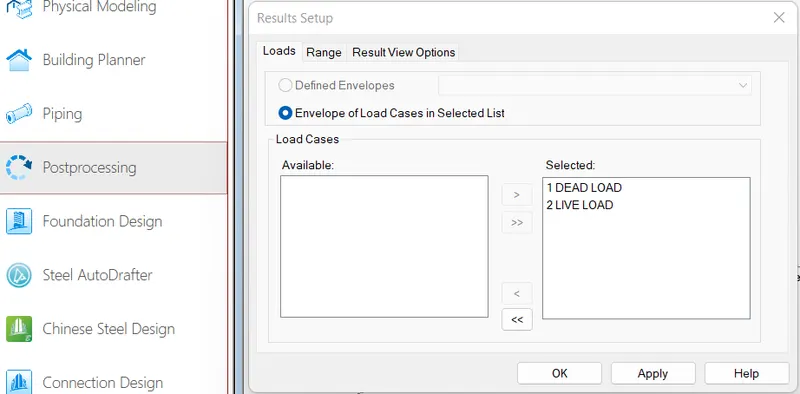
- After that there will be another dialouge box named as Result Setup in that dialouge box there will be an option Envelope of Load Cases in Selected List click on the option Dead load and Live load and then click on the option apply.
- Below is the result. But we can not see the deflection properly.
- So in order to view the deflection properly just right click and then there will be a drop-down list in that list click on the option Labels just as shown.
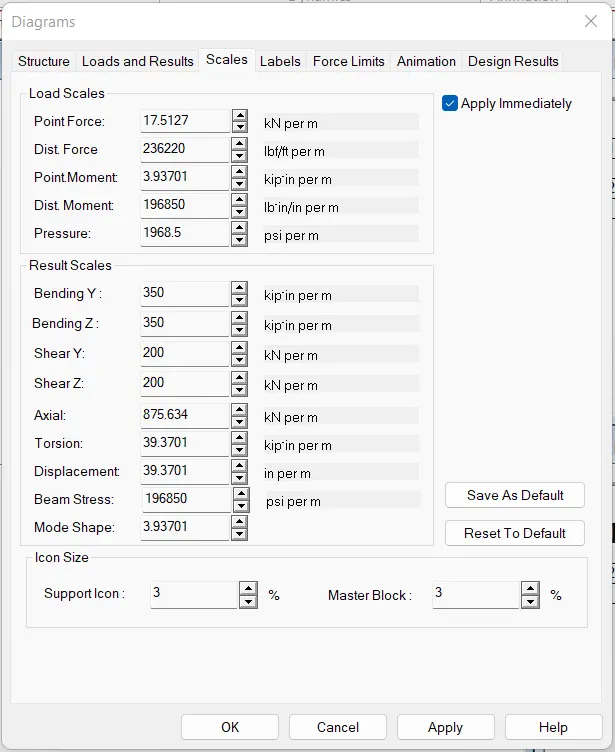
- After that there will be another dialouge box named as the diagrams,in that dialouge box change the scales and just click on the Apply option and then click on OK just as shown.
- In order to view values. Go to Result tab, there will be annotate option, click on it.
- Go to beam results, select all in bending that is ends, maximum and midpoints.
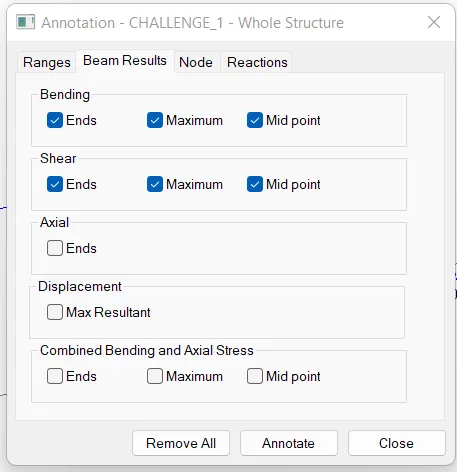
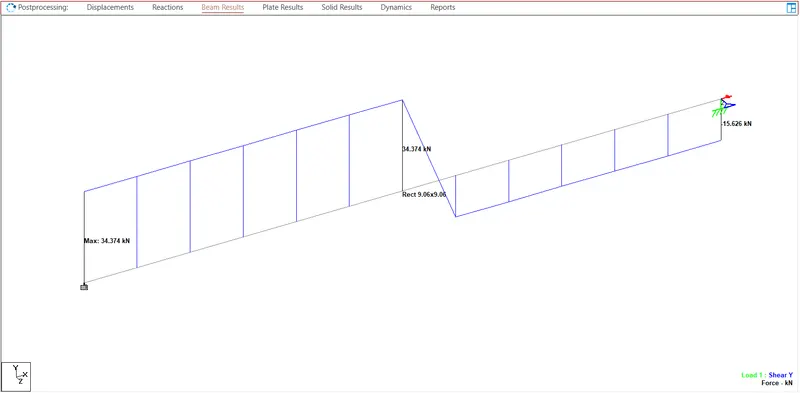
- Below are the given results for shear force and bending moment.
Shear Force (Fy):-
Bending Moment (Mz):-
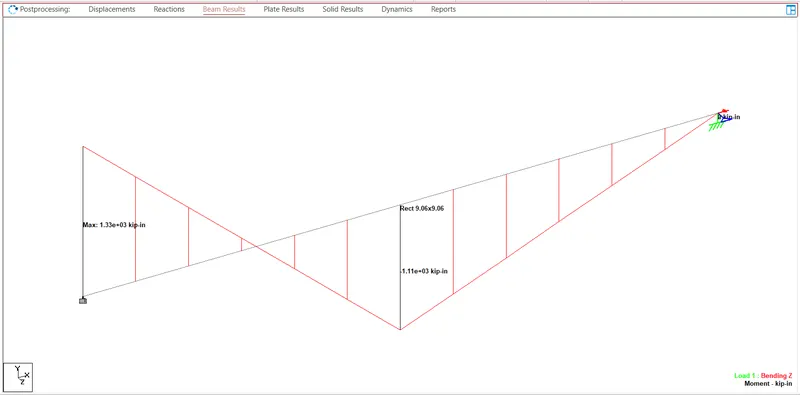
RESULT:-
SFD AND BMD WILL SHOWED