Usage of Navigation tool , Timeliner and Clash Detection test using Naviswork
1) Use the Architecture/ Structure Project file developed by you in Week 6 to 8. Export the Revit architecture and structure model to Navisworks Cache file following the export settings discussed in class :
AIM & INTODUCTION :
AIM :
- To Export the Revit Architectural and Structural model to Navisworks Cache file by using the project file developed in Week 6 to 8.
INTRODUCTION :
- In naviswork, we can open the 3D models created from the Revit by exporting the Revit file as NWC file.
- The Export of the Revit file can be saved as both Architectural and Structural File separately.
- The saved NWC file can be opened from the Naviswork Software and view the entire model easily.
- We can explore the interiors of the entire 3D model through the Walk and Realism Tool.
- Also, the visiting of the 3D model can be Recorded with the Record Tool. So, we can save it as a video and watch.
- We can append the Both separately saved Architectural and Structural NWC file into the NavisWork workspace and analyse Clash detection.
- By using the Clash detective tool, Clash detection of the building model can be analysed.
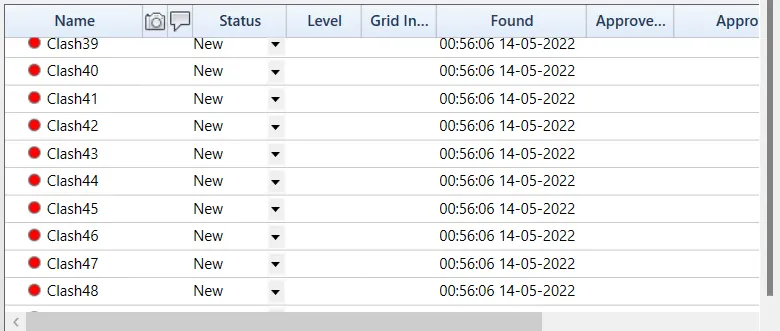
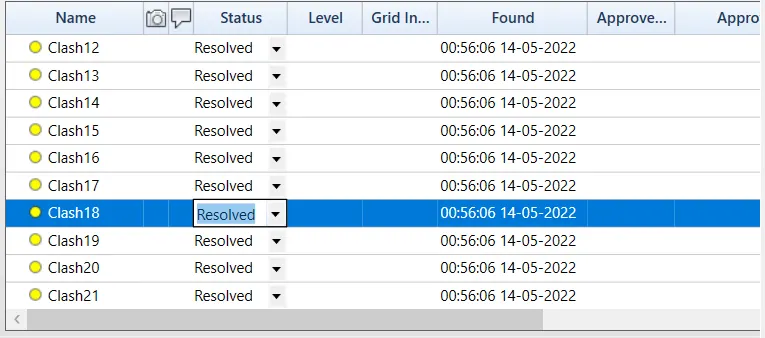
- The detected clash can be customized, whether it is approved, resolved, reviewed, Active.
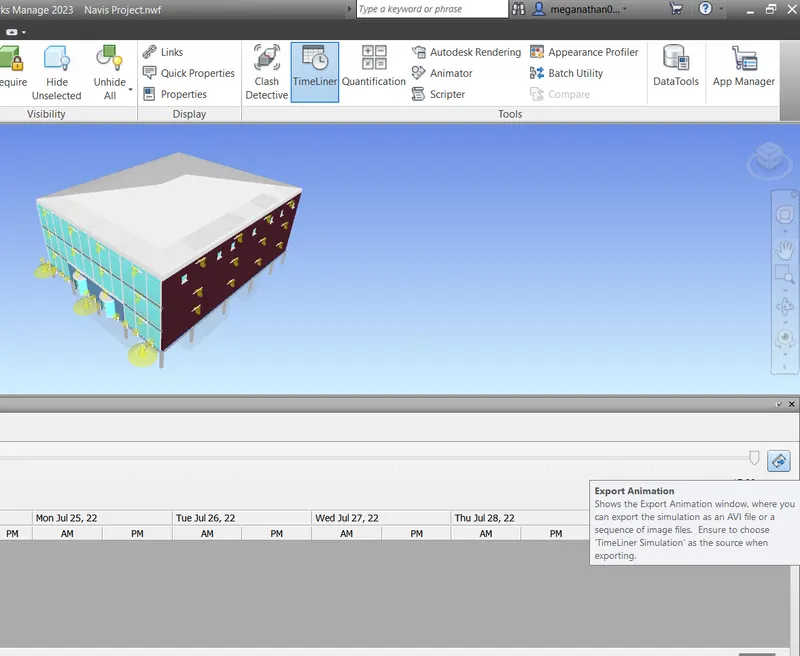
- Followed by the Timeliner tool is used to see the time required to finish the Whole 3D model.
- This Timeliner tool helps to create a visual video of the construction of the every parts of the building model by giving the start and end date.
PROCEDURE :
- Open the Revit software and from open < Week 8 (Architectural model).
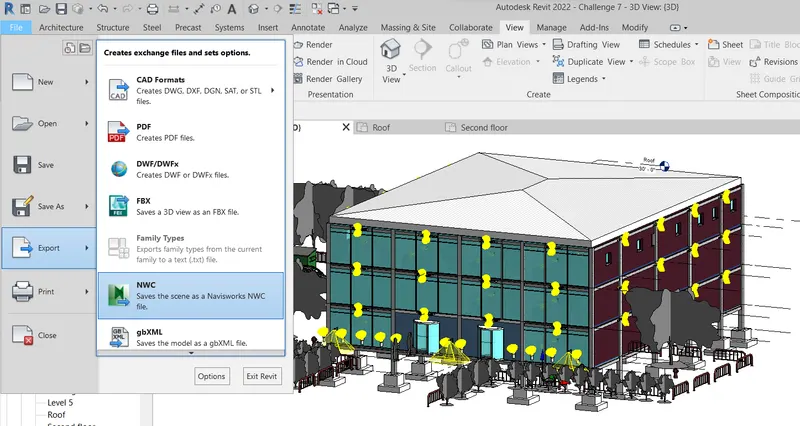
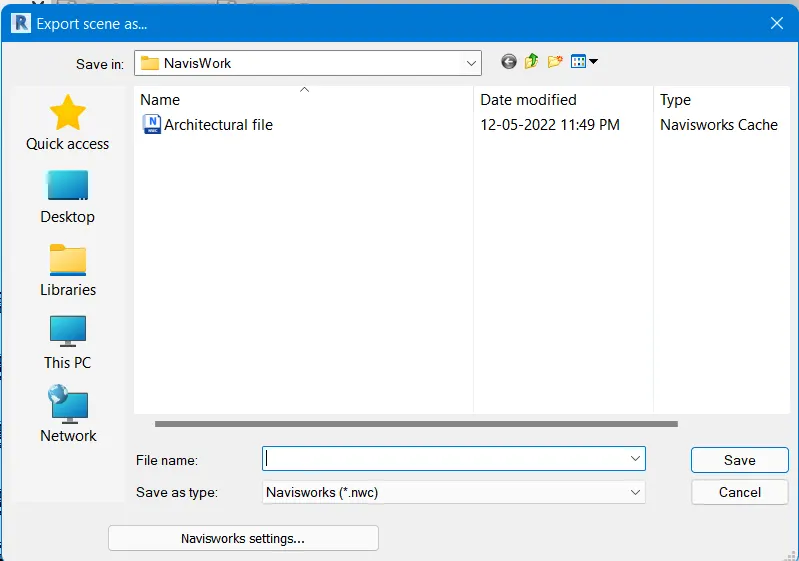
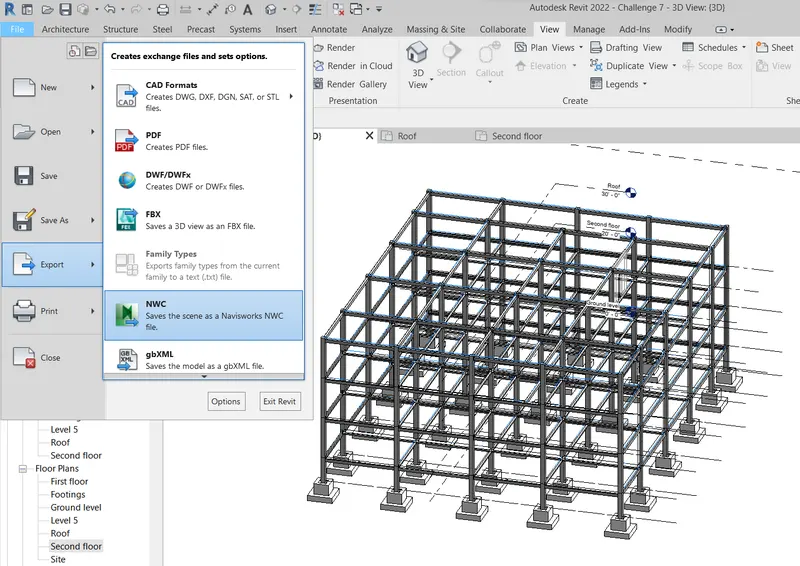
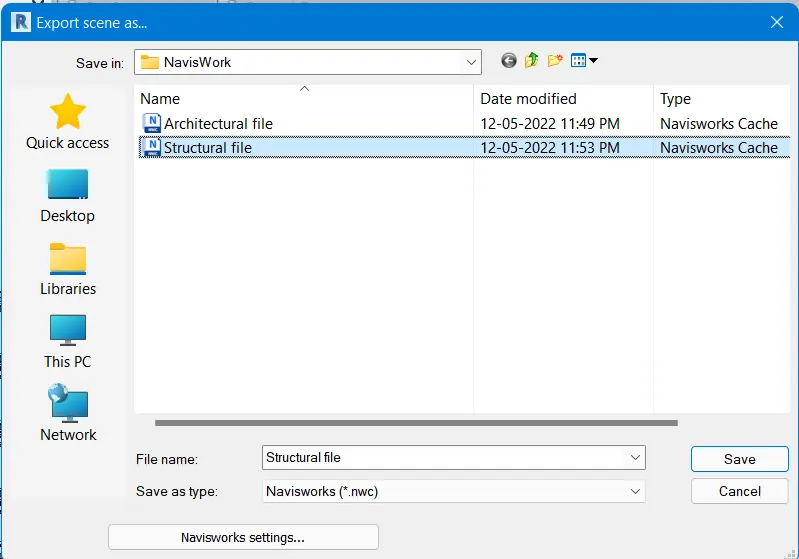
- Then try to export the file as NWC file from File < Export < NWC with appropriate name as "Architectural file".
- Likewise, from File < Open < Week 8 (Structural Model).
- And export the file as NWC file from File < Export < NWC with appropriate name as "Structural file".
RESULT :
1. ARCHITECTURAL PROJECT FILE :
2. STRUCTURAL PROJECT FILE :
2) Use Navigate Tool to walk around the model and walk through the rooms created and record your moving as animation in your Navisworks file :
AIM & INTODUCTION :
AIM :
- To walk around the Exported 3D model using Navigate Tool and Record the moving as animation in Navisworks file.
INTRODUCTION :
- In naviswork, we can open the 3D models created from the Revit by exporting the Revit file as NWC file.
- The Export of the Revit file can be saved as both Architectural and Structural File separately.
- The saved NWC file can be opened from the Naviswork Software and view the entire model easily.
- We can explore the interiors of the entire 3D model through the Walk and Realism Tool.
- Also, the visiting of the 3D model can be Recorded with the Record Tool. So, we can save it as a video and watch.
- We can append the Both separately saved Architectural and Structural NWC file into the NavisWork workspace and analyse Clash detection.
- By using the Clash detective tool, Clash detection of the building model can be analysed.
- The detected clash can be customized, whether it is approved, resolved, reviewed, Active.
- Followed by the Timeliner tool is used to see the time required to finish the Whole 3D model.
- This Timeliner tool helps to create a visual video of the construction of the every parts of the building model by giving the start and end date.
PROCEDURE :
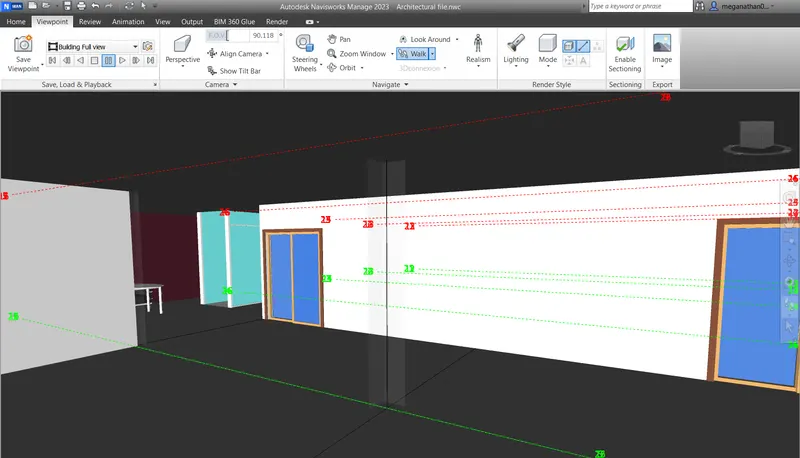
- Open the NavisWorks software and open the saved NWC Architectural file from Application Button < Open < Architectural file.nwc .
- Then zoom the display view into the 3D model to do the walk into it.
- To start walk through the room select Walk tool from ViewPoint < Walk.
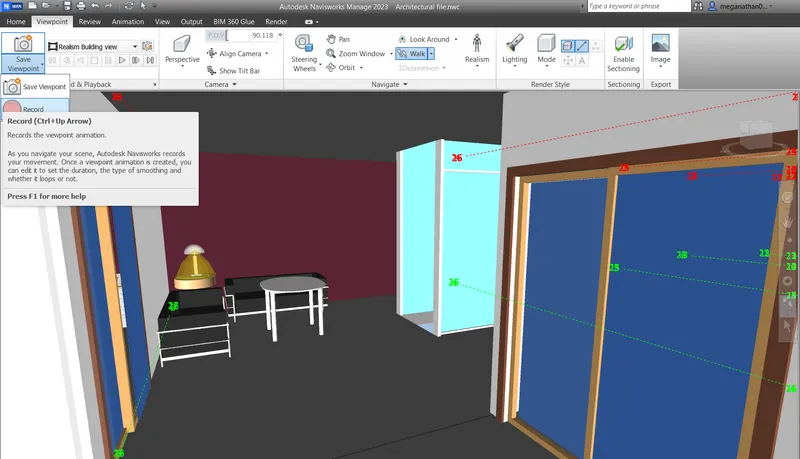
- And to record the walk through of the room, the recording has to be done.
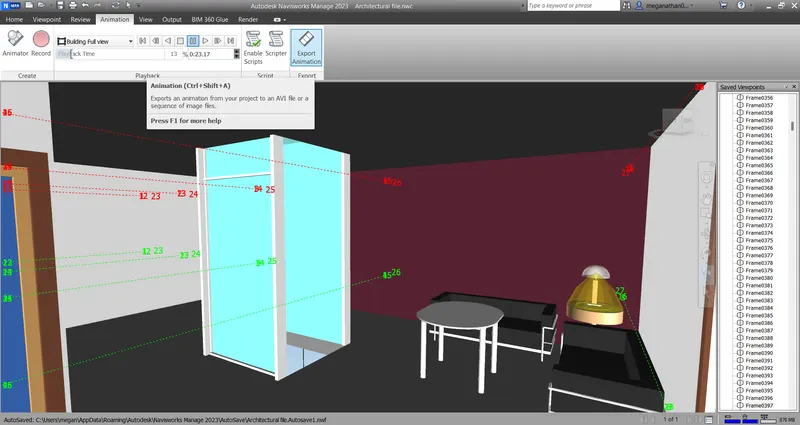
- To start recording select Save ViewPoint then save the view name and click the Record buttom .
- After evoking the recording try to walk around into the rooms of the 3D model.
- The walking is enhansed by moving the mouse cursor along with clicking and holding the left mouse button.
- While walking around the Rooms of the 3D model, we can change the appropriate view to walk by evoking the PAN tool.
- The PAN tool can be evoked from ViewPoint < PAN .
- The changing of the view is done by clicking + holding the current view and drag it into the appropriate view.
- After the completion of the walk through, the recording should be stopped by clicking the stop button.
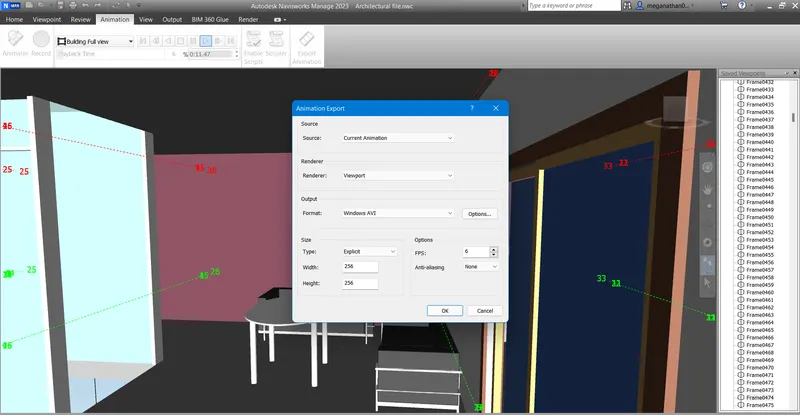
- The recorded video can be played and watched from Animation tab < Play or Stop.
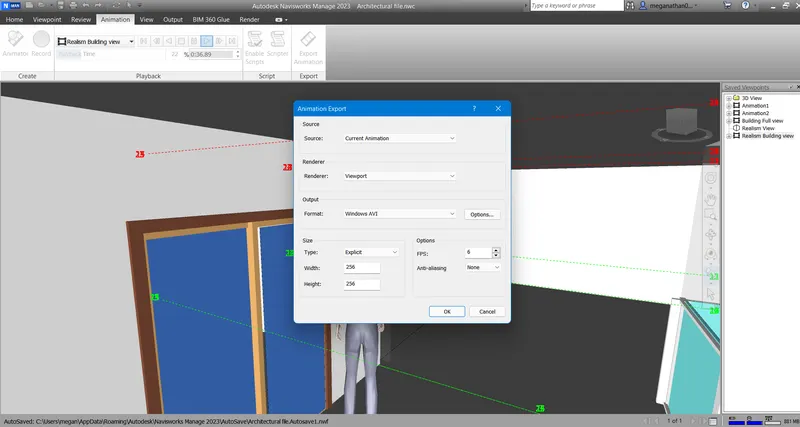
- And the Recorded visual can be saved Externally by Exporting the recording with the Export button from the Animation tab.
RESULT :
3) Use Navigate tool to use Realism feature to walk through the model and record your moving as animation in Navisworks file :
AIM & INTODUCTION :
AIM :
To use Realism feature to walk through the model and record the moving as animation in navisworks file by using Navigate tool.
INTRODUCTION :
- In naviswork, we can open the 3D models created from the Revit by exporting the Revit file as NWC file.
- The Export of the Revit file can be saved as both Architectural and Structural File separately.
- The saved NWC file can be opened from the Naviswork application and view the entire model easily.
- We can explore the interiors of the entire 3D model through the Walk and Realism Tool.
- Also, the visiting of the 3D model can be Recorded with the Record Tool. So, we can save it as a video and watch.
- We can append the Both separately saved Architectural and Structural NWC file into the NavisWork workspace and analyse Clash detection.
- By using the Clash detective tool, Clash detection of the building model can be analysed.
- The detected clash can be customized, whether it is approved, resolved, reviewed, Active.
- Followed by the Timeliner tool is used to see the time required to finish the Whole 3D model.
- This Timeliner tool helps to create a visual video of the construction of the every parts of the building model by giving the start and end date.
PROCEDURE :
- Open the NavisWorks software and open the saved NWC Architectural file from Application Button < Open < Architectural file.nwc .
- Then zoom the display view into the 3D model to use the Realism feature to walk through into it.
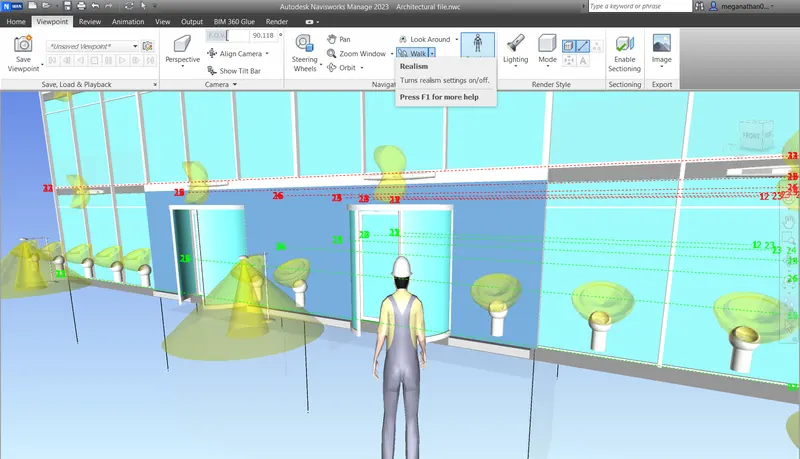
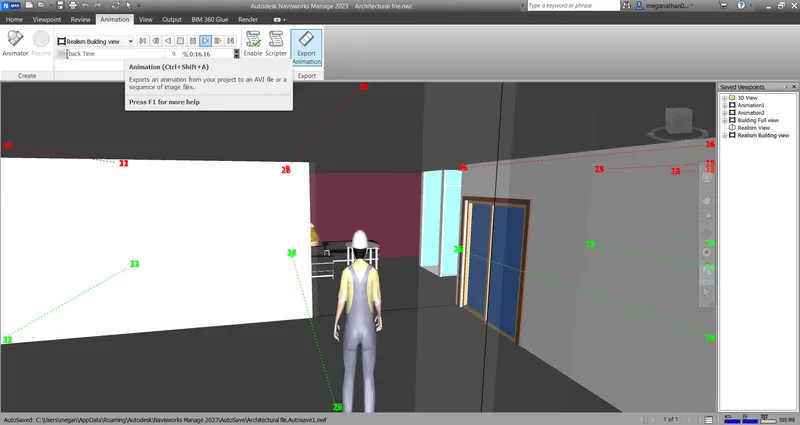
- To start Realism walk through the room, select Realism tool from ViewPoint < Realism < Third person.
- After evoking the Realism tool, a person will be appeared in the display as a real person view to walk into the 3D model.
- And to record the Realism featured walk through of the room, the recording has to be done.
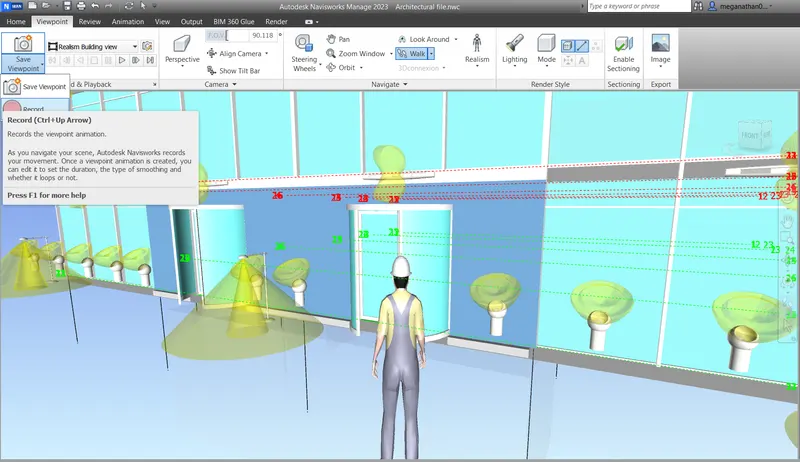
- To start recording select Save ViewPoint then save the view name and click the Record buttom .
- After evoking the recording try to walk around into the rooms of the 3D model as a Third person.
- The walking is enhansed by moving the mouse cursor along with clicking and holding the left mouse button.
- While walking around the Rooms of the 3D model, we can change the appropriate view to walk by evoking the PAN tool.
- The PAN tool can be evoked from ViewPoint < PAN .
- The changing of the view is done by clicking + holding the current view and drag it into the appropriate view.
- After the completion of the walk through, the recording should be stopped by clicking the stop button.
- The recorded video can be played and watched from Animation tab < Play or Stop.
- And the Recorded visual can be saved Externally by Exporting the recording with the Export button from the Animation tab.
RESULT :
4) Embed both architecture and structure *.nwc file to your Navisworks file. Create a clash detection test between the two models :
AIM & INTODUCTION :
AIM :
To Create a Clash detection test between two embeded files such as Architecture and Structure .nwc file in the Navisworks.
INTRODUCTION :
- In naviswork, we can open the 3D models created from the Revit by exporting the Revit file as NWC file.
- The Export of the Revit file can be saved as both Architectural and Structural File separately.
- The saved NWC file can be opened from the Naviswork Software and view the entire model easily.
- We can explore the interiors of the entire 3D model through the Walk and Realism Tool.
- Also, the visiting of the 3D model can be Recorded with the Record Tool. So, we can save it as a video and watch.
- We can append the Both separately saved Architectural and Structural NWC file into the NavisWork workspace and analyse Clash detection.
- By using the Clash detective tool, Clash detection of the building model can be analysed.
- The detected clash can be customized, whether it is approved, resolved, reviewed, Active.
- Followed by the Timelinear tool is used to see the time required to finish the Whole 3D model.
- This Timeliner tool helps to create a visual video of the construction of the every parts of the building model by giving the start and end date.
PROCEDURE :
- Open the NavisWorks software and open the saved NWC Architectural file from Application Button < Open < Architectural file.nwc .
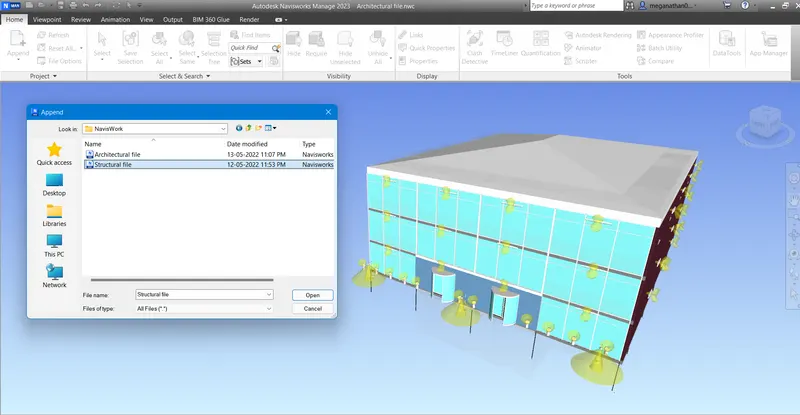
- Then try to add the Structural file.nwc into the Existing Architectural file.nwc.
- The structural file.nwc is added from Home < Append < Structural file.nwc.
- Here, we can see both the Architectural and the Structural files are embedded into a single file.
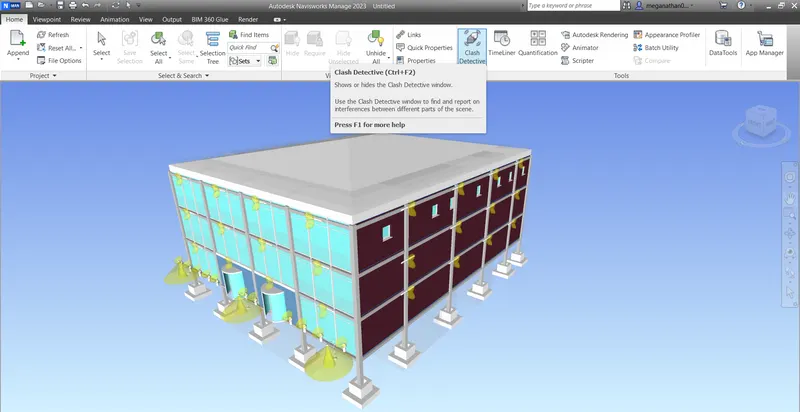
- Now, the clash detection between the two files can be tested by the Clash detective tool.
- The Clash Detector tool was evoked from Home < Clash detective.
- After the opening of the Clash detection tab < Add test and give the name of the test appropriately.
- Then click the Select option and select the Architectural file in Section A and the Structural file in Section B.
- Followed by click Run Test to see the no. of clashed between the two embedded files.
- The Status of the clashes between two files can be changed such as Approved, Reviewed, Active, Resolved.
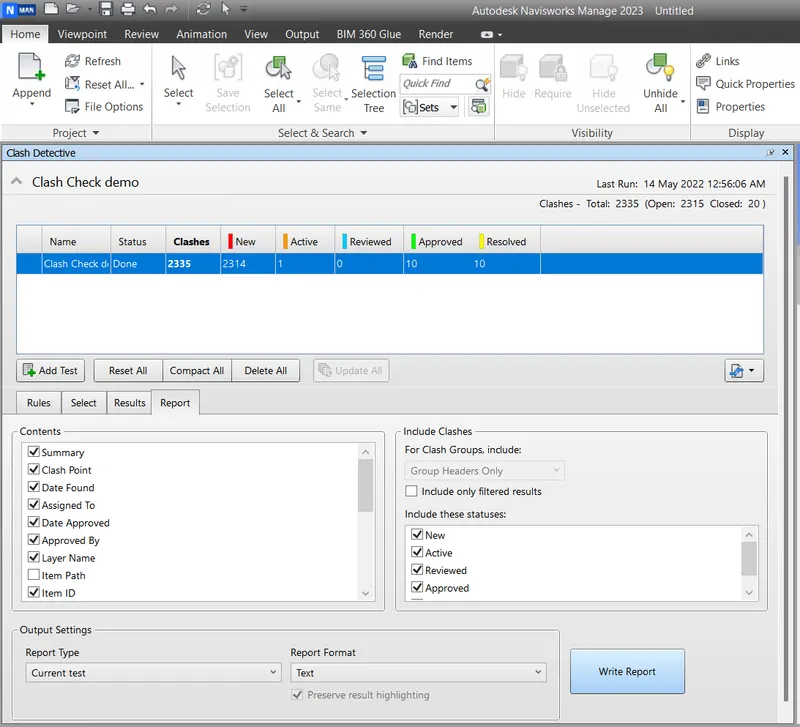
- Then the Results can be saved after color coding in NavisWorks.
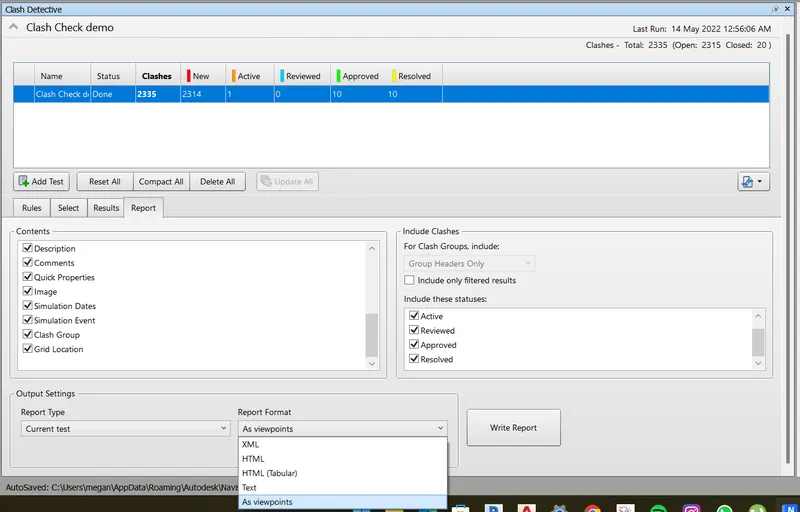
- The Saving of the Result is done by Clicking Report then selecting the appropriates.
- The appropriates to save the report are Report type and Report format and click Write Report to save the Result as a file.
RESULT :
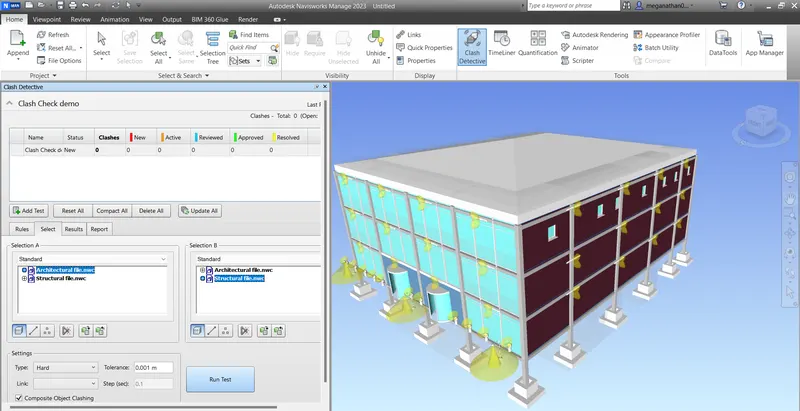
a. ) Run the Clash Detection Test :
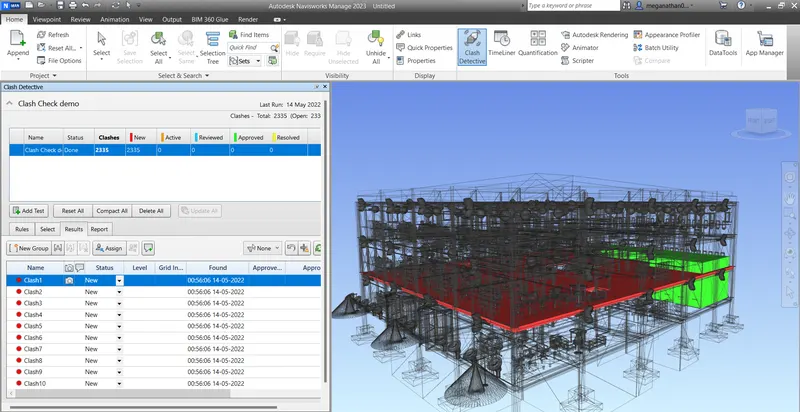
b. ) Study the clashes between the two models :
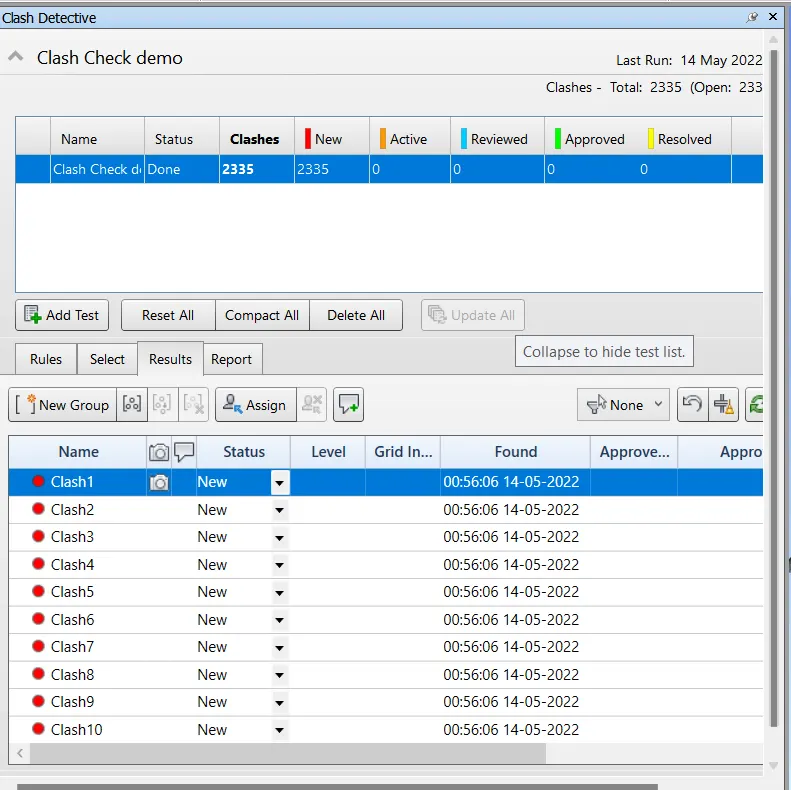
c. ) List which of the clashes could be approved :
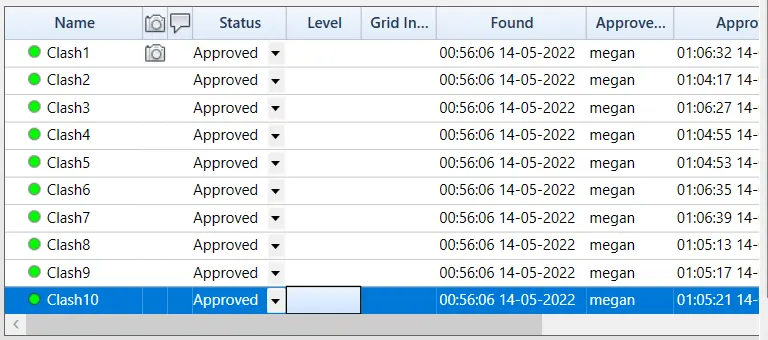
d. ) List which of the clashes could be neglected ( will be taken care later) :
e. ) List which of the clashes can be resolved :
f. ) Save the results after color coding the clashes to the Navisworks file :
g. ) In case of resolution annotate the clash and save the view to defined views in Navisworks :
5) Using the Timeliner feature in Navisworks prepare a schedule for the project developed in week 6 to 8 by adding reasonable assumptions for task start date and end date and simulate the task completion as a visual simulation. Record it and save the timeline simulation to Navisworks file :
AIM & INTODUCTION :
AIM :
- To create a schedule for the project developed in week 6 to 8 by adding resonable assumptions by using the Timeliner feature. Record and save the timeline simulation to NavisWorks file
INTRODUCTION :
- In naviswork, we can open the 3D models created from the Revit by exporting the Revit file as NWC file.
- The Export of the Revit file can be saved as both Architectural and Structural File separately.
- The saved NWC file can be opened from the Naviswork Software and view the entire model easily.
- We can explore the interiors of the entire 3D model through the Walk and Realism Tool.
- Also, the visiting of the 3D model can be Recorded with the Record Tool. So, we can save it as a video and watch.
- We can append the Both separately saved Architectural and Structural NWC file into the NavisWork workspace and analyse Clash detection.
- By using the Clash detective tool, Clash detection of the building model can be analysed.
- The detected clash can be customized, whether it is approved, resolved, reviewed, Active.
- Followed by the Timeliner tool is used to see the time required to finish the Whole 3D model.
- This Timeliner tool helps to create a visual video of the construction of the every parts of the building model by giving the start and end date.
PROCEDURE :
- After the Clash detection of the two embedded 3D model, the Timeliner feature will be used to schedule the project developement.
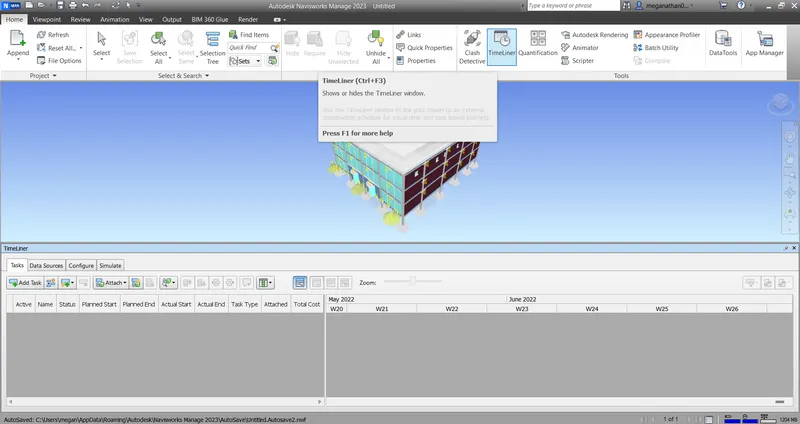
- The Timeline tool will be evoked from Home < TimeLiner and click it to open the Timeliner tab.
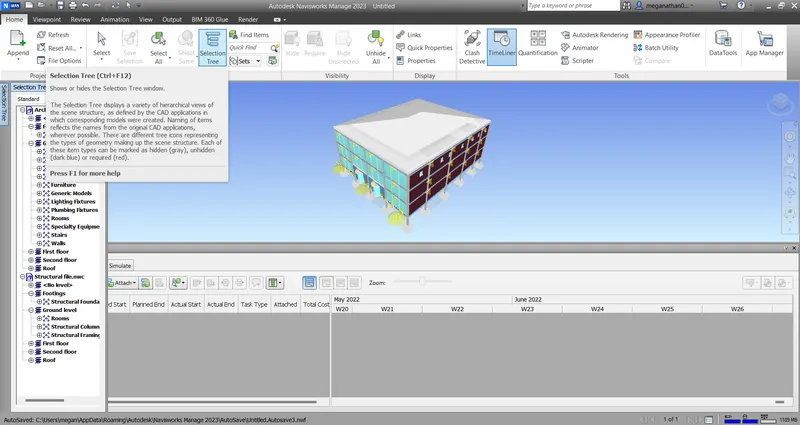
- Followed by open Selection Tree tool from the Home < Selection Tree.
- In Selection Tree, we can see the Levels and elements of the both Architectural and Structural files.
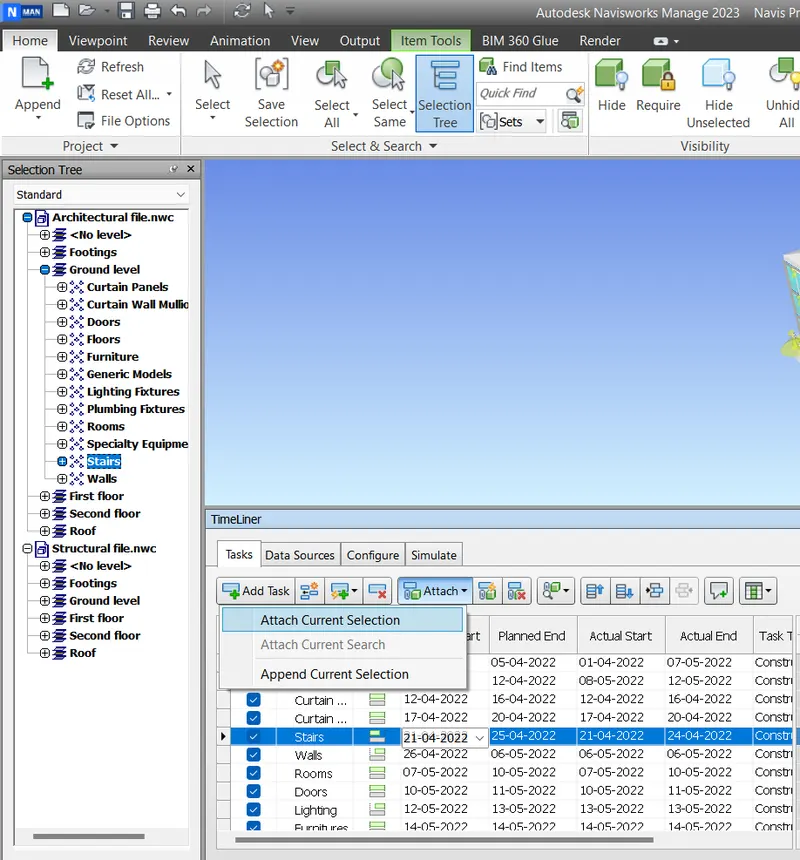
- Then Add Task in Timeliner tab and give the appropriate name and attach the appropriate building stage to schedule it.
- Such as the given name of the First task is Footing, the select the Footing from the Structural File and attach it to the First task.
- Like that add new tasks and give appropriate name as per the new construction after the footing upto Roof.
- After Completing the tasks upto the Roof, then try to add Start date and End date of the Scheduled Construction.
- The Start and End date of the Schedule varies such as Planned Start, Planned End, Actual Start and Actual End.
- Then change the Task type as Construct for all the tasks created.
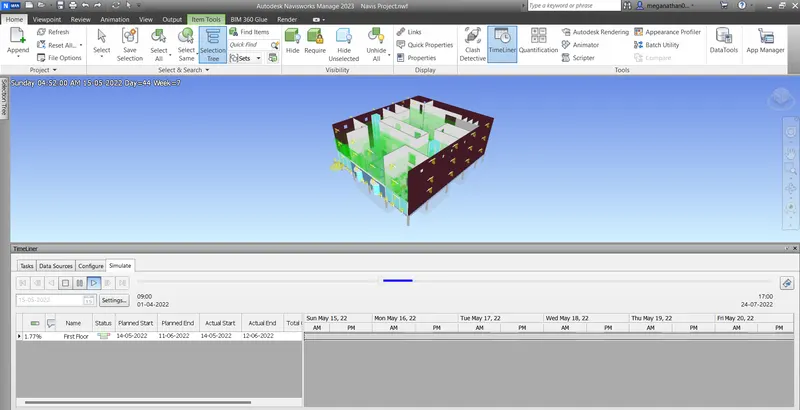
- After creating ther schedule with appropriate start and end date upto roof, we can stimulate the schedule as visual video as stage by stage construction.
- The stimulation of the Visual video of the schedule is evoked by clicking the Stimulate option near configure at Timeliner tab.
- Here, we can play and stop the visual video of the Timeliner featured Schedule.
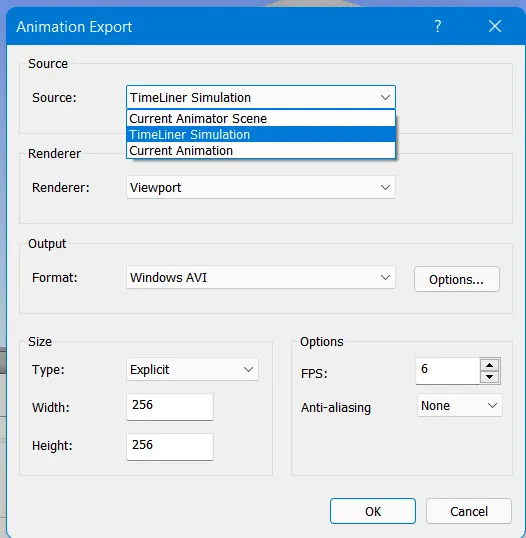
- We can also Export the Animation video of the Schedule by selecting the Export Animation Button at the Top right corner of the Timeliner tab.
RESULT :