Project 1 (Mini Project on Vehicle Direction Detection
AIM: Vehicle Direction Determination of Left Turn, Right Turn & Straight Drive With MBD Code Development
EXPLANATION :
Vehicle Direction Determination
General Overview:
Identifying the direction of the vehicle is one of the important & diverse features in Autonomous driving & Advanced Driver Assistance Features. This particular sub-feature of identifying the direction of vehicle is basically identifying the direction the vehicle is taking based on the camera input.
Camera reads the road signs & stores into its memory with unique values for left turn, right turn & straight drive. Depending on the direction it is taking, final indication is given to the driver – as an indication if he is driving in the recommended direction or not.
Vehicle Direction Determination can also be coupled along - side features like GPS systems to identify whether the vehicle is reaching its destination in an optimized manner. This sub feature can also be used along with Lane Detection, Highway Warning, Ramp Entry / Exit in Wrong Way Detection etc.
Objective:
- Development of MATLAB Simulink model as per requirement.
- Tag the requirements to the simulink model; tagging requirement 1 & requirement 2 to their corresponding subsystems is fine.
- MBD compliant changes, Data Dictionary creation & code generation is added advantage, and that is not scope of this project.
- If choosing code generation, Storage class for Input signals: ImportedExtern; Storage class for Output signal: Export to File; Storage class for local signals: localizable; Storage class for calibration signals: Const.
- Choose sample time for all signals as 0.01s
Requirement - 1:
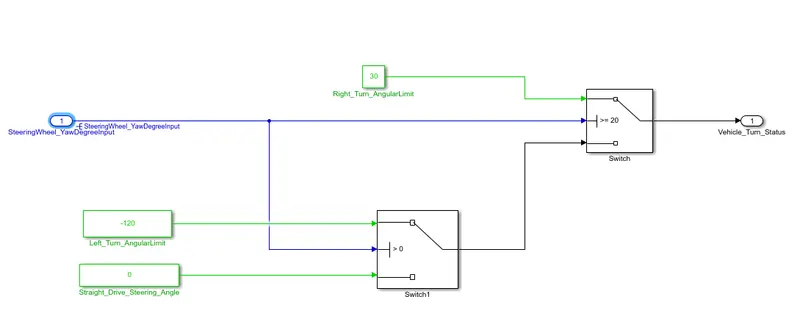
- Steering wheel input as yaw rate (Signal name: SteeringWheel_YawDegreeInput) is the input for this system.
- This is compared against 3 angular values, one each for left turn, right turn & straight drive (Calibration Values: Right_Turn_AngularLimit, Left_Turn_AngularLimit, Straight_Drive_Steering_Angle) to say which specific direction the steering wheel is turning towards.
- Use switch blocks to compare & develop this requirement. Keep this requirement in a subsystem & output of this requirement is a local signal (Signal Name: Vehicle_Turn_Status).
Requirement – 2:
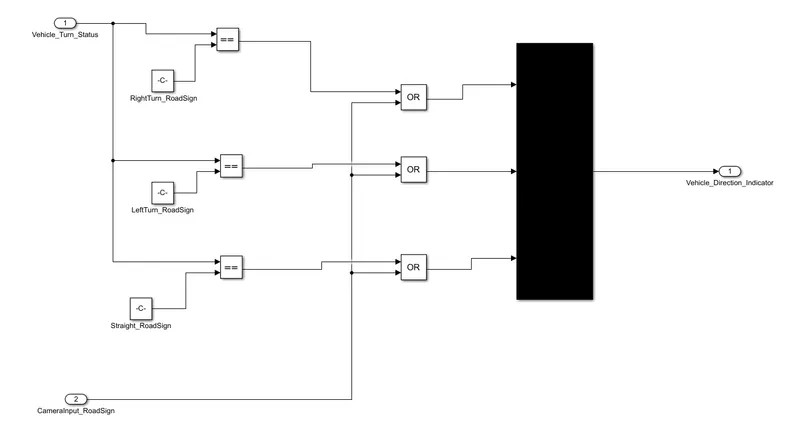
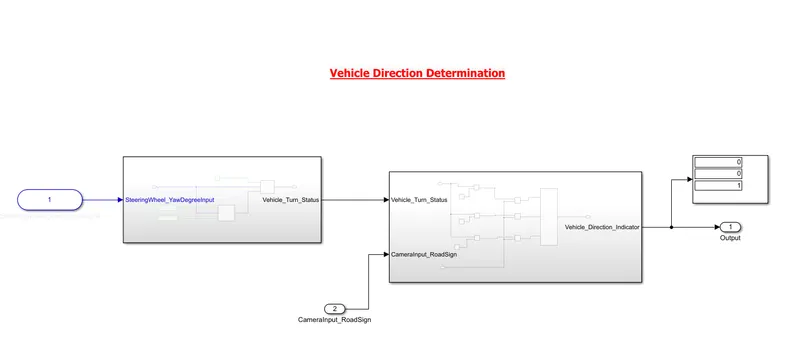
- Keep this requirement as a separate subsystem. Inputs to this requirement are local signal from requirement 1 (Signal Name: Vehicle_Turn_Status) & an input signal from camera (Signal Name: CameraInput_RoadSign), which confirms the occurrence of a road sign.
- Signal Vehicle_Turn_Status is compared against calibration values (Calibration Values: RightTurn_RoadSign, LeftTurn_RoadSign, Straight_RoadSign), if each of them is found equal, then each of the three corresponding output is compared against the camera input signal,
- Using a logical operator block, only one among them is finally given as output signal (Signal Name: Vehicle_Direction_Indicator).
Signals & Calibration Data List:
|
Signal / Calibration Name |
Signal Type |
Data Type |
Dimension |
Min |
Max |
Initial Value |
Units |
|
SteeringWheel_YawDegreeInput |
Input |
Int16 |
1 |
-180 |
180 |
- |
Deg |
|
CameraInput_RoadSign |
Input |
Boolean |
1 |
0 |
1 |
- |
- |
|
Vehicle_Turn_Status |
Local |
Int16 |
1 |
-180 |
180 |
- |
Deg |
|
Right_Turn_AngularLimit |
Calibration |
Int16 |
[1 1] |
-180 |
180 |
30 |
Deg |
|
Left_Turn_AngularLimit |
Calibration |
Int16 |
[1 1] |
-180 |
180 |
-120 |
Deg |
|
Straight_Drive_Steering_Angle |
Calibration |
Int16 |
[1 1] |
-180 |
180 |
0 |
Deg |
|
RightTurn_RoadSign |
Calibration |
Int16 |
[1 1] |
-180 |
180 |
30 |
|
|
LeftTurn_RoadSign |
Calibration |
Int16 |
[1 1] |
-180 |
180 |
-120 |
|
|
Straight_RoadSign |
Calibration |
Int16 |
[1 1] |
-180 |
180 |
0 |
|
|
Vehicle_Direction_Indicator |
Output |
Boolean |
1 |
0 |
1 |
>PROCEDURE FOR REQUIREMENT 1:
Requirement - 1:
- Steering wheel input as yaw rate (Signal name: SteeringWheel_YawDegreeInput) is the input for this system.
- This is compared against 3 angular values, one each for left turn, right turn & straight drive (Calibration Values: Right_Turn_AngularLimit, Left_Turn_AngularLimit, Straight_Drive_Steering_Angle) to say which specific direction the steering wheel is turning towards.
- Use switch blocks to compare & develop this requirement. Keep this requirement in a subsystem & output of this requirement is a local signal (Signal Name: Vehicle_Turn_Status).
>STEPS :
>Firstly create input as steering wheel yaw(inport) name as steering wheel_yaw
>Then by using switch block option in Simulink were of connecting with left turn, right turn and straight turn blocks of 3 blocks
>Finally connected of output as Vehicle_Turn_Status(out putport)
>Finally convert into a subsystem block
>SIMULINK BLOCK :
Requirement – 2:
- Keep this requirement as a separate subsystem. Inputs to this requirement are local signal from requirement 1 (Signal Name: Vehicle_Turn_Status) & an input signal from camera (Signal Name: CameraInput_RoadSign), which confirms the occurrence of a road sign.
- Signal Vehicle_Turn_Status is compared against calibration values (Calibration Values: RightTurn_RoadSign, LeftTurn_RoadSign, Straight_RoadSign), if each of them is found equal, then each of the three corresponding output is compared against the camera input signal,
- Using a logical operator block, only one among them is finally given as output signal (Signal Name: Vehicle_Direction_Indicator).
>STEPS :
>Here we create the two inputs as Vehicle_Turn_Status(inport)and CameraInput_RoadSign(inport) now we have to check the inputvalues pass to right and left and straight so we useing the relation operation (==) and logical operators (or) and connecting of final out put block
>We should give one output result so we using the mux block to convert as one result output while changing of values
>Alternative each connecting right left and straight block the given of input value pass and with the condition given of output value result
>The camera_inputsignroad is connected of because the output is compared against the camera input signal
>All blocks are connected of logical operators to (or) to mux and output port block
>Finally convert into Simulink block
>SIMULINK BLOCK :
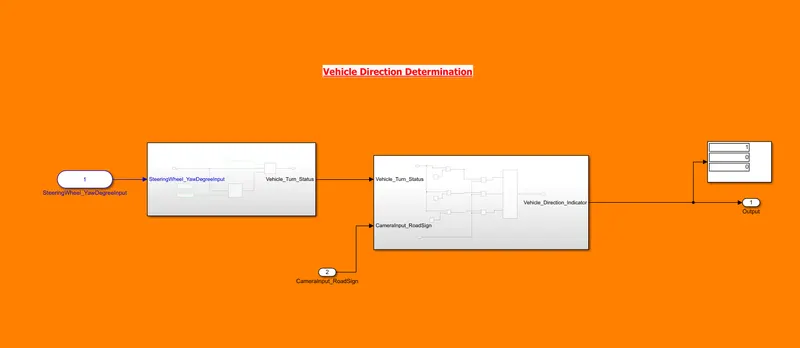
>Now given of requirement 1 and requirement 2 is input is connected of SteeringWheel_YawDegreeInput and output is connected of Vehicle_Direction_Indicator and we connected of display in this scope is not required as given in the question camera-input as input only
>FINAL SIMULINK BLOCK :
>MBD CODE DEVELOPMENT:
>By given of Signals & Calibration Data List ,assgin in sldd.file
>To create a SLDD:
What Is a Data Dictionary(SLDD)?
A data dictionary is a persistent repository of data that are relevant to your model. You can also use the base workspace to store design data that are used by your model during simulation. However, a data dictionary provides more capabilities.
The dictionary stores design data, which define parameters and signals, and include data that define the behavior of the model. The dictionary does not store simulation data, which are inputs or outputs of model simulation that enter and exit Inport and Outport blocks.
It meanly to derive of share at file easily to one to another which mean is useful of SlDD
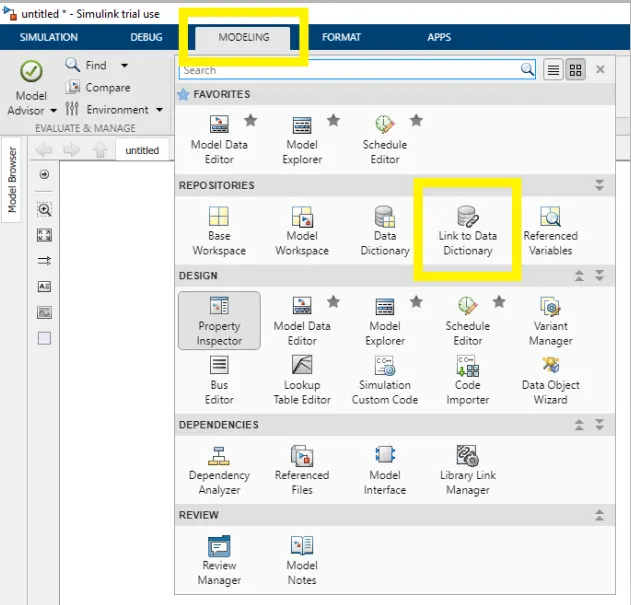
>HOW TO CREATE THE SLDD IN SIMULINK :
>Firstly open of Simulink and go with modeling
>NEXT :
>Create a new file now
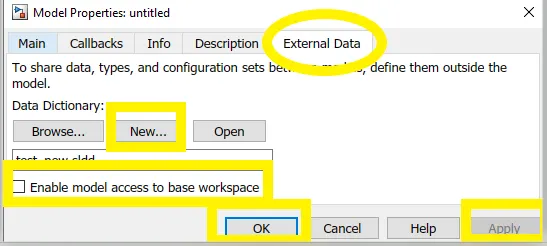
>Now open Simulink its automatic open and see it the corner of screen window and unlock it
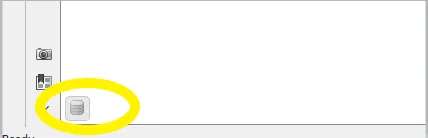
>Then it shows new page :
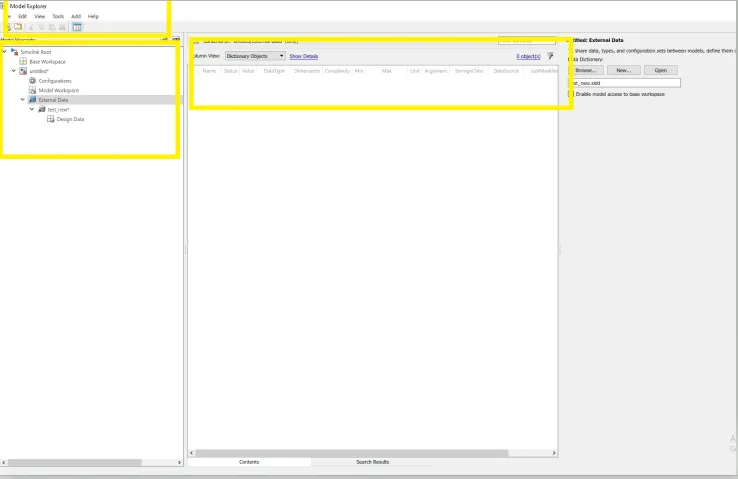
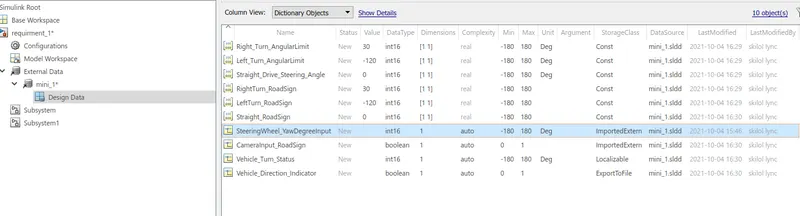
>Now i creating and adding the constant and signals in sldd file editing :
>As per question condition changing and adding of const and signals
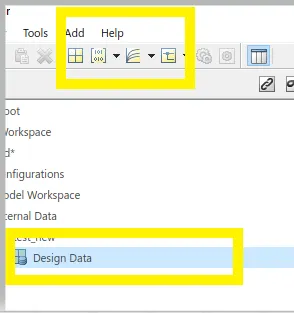
>By click on design data then its show to add parameters
>Now by clicking the add option we have several options
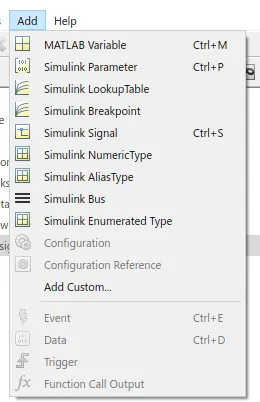
>Now add and editing of signals data :
AFTER CHANGING DATA:
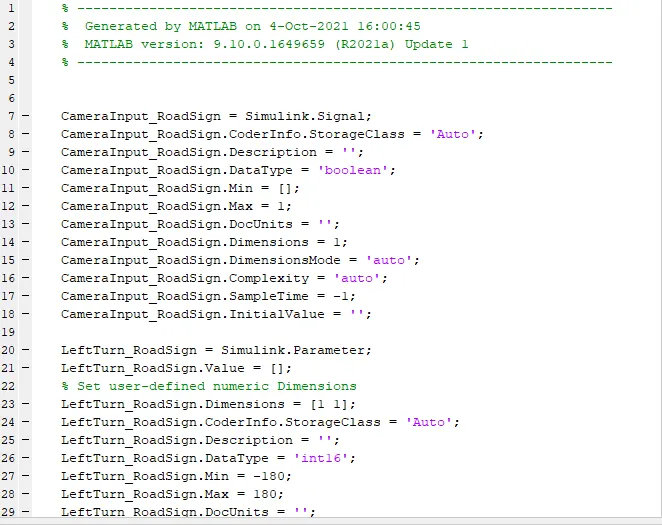
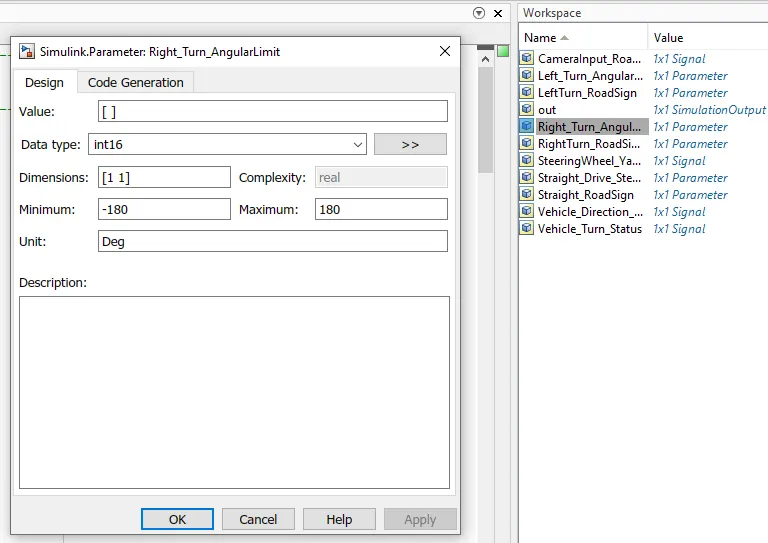
>IN Matlab window the run file import because it will depends the values as respectively which are make in SLDD file
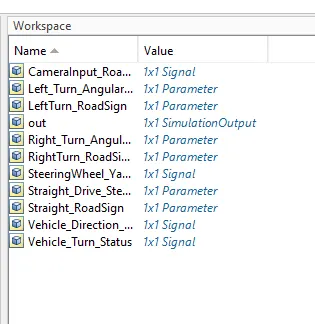
>IN workspace:
>By clicking on values:
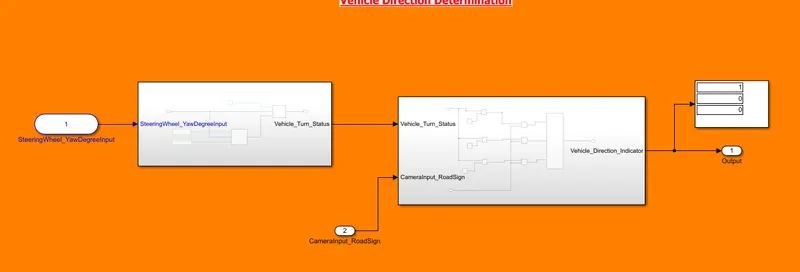
>FINAL RESULT :
>IF VEHICLE IS RIGHT TURN :
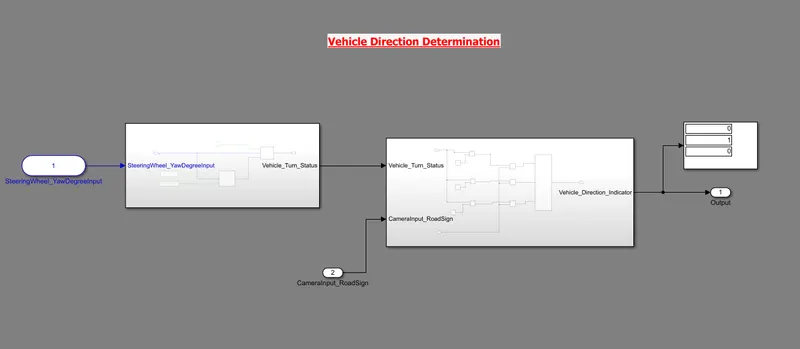
>IF VEHICLE IS LEFT TURN :
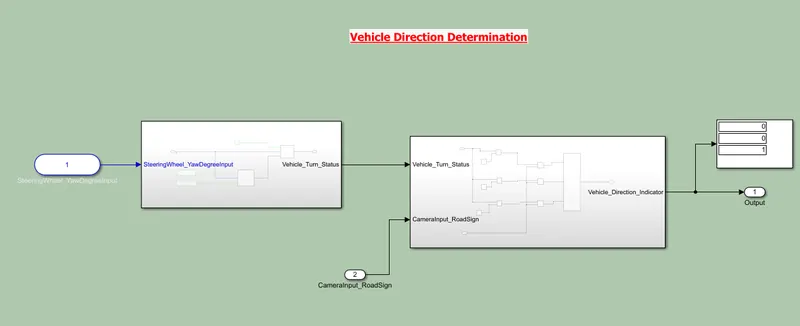
>IF VEHICLE IS STRAIGHT DRIVE:
>OBSERVATION :
>By changing the values at different values and see the result in the display block as were (1) is represented statement true and (0) is represented as false
>Obsorver in different blocks straight and right turn , left turn
>SIMULINK BLOCK :
>CONCLUSION :
- Completed all objectives as per given conditions in the Simulink model
- Development of MATLAB Simulink model as per requirement.
- Tag the requirements to the simulink model; tagging requirement 1 & requirement 2 to their corresponding subsystems is fine.
- MBD compliant changes, Data Dictionary creation & code generation is added advantage, and that is not scope of this project.
- If choosing code generation, Storage class for Input signals: ImportedExtern; Storage class for Output signal: Export to File; Storage class for local signals: localizable; Storage class for calibration signals: Const.
- Choose sample time for all signals as 0.01s