Project 1 _Creating an Architectural plan for the provided plot size and develop relevant basic structural drawings
AIM: Design and Draft a layout of a residential building with the following details:
a. Plot Size: 60’x20’(18.3m x6m)
b. Orientation- Facing East
c. Develop the following: 1. Architectural Drawing (Floor Plan, Elevations, and Sections) 2. Structural Drawing (Column, Beam, Footing Plan).
INTRODUCTION:
1. Firstly define the units with precision requirement of the drawing.
2. Assign the origin before proceeding for sketching.
3. All the units are taken in FEET/INCHES.
4. Inner/Outer walls are of dimensions 4.5"/9".
5. All dimensions (Column, footing etc.) are referenced with respect to Grid lines.
6. Here Dimensions are assigned arbitrarily on the basis of intuitions to just elaborating the procedure of sketching.
7. Legends attached with the Figure(d) are correlated with beam at floor level too.
PROCEDURE:
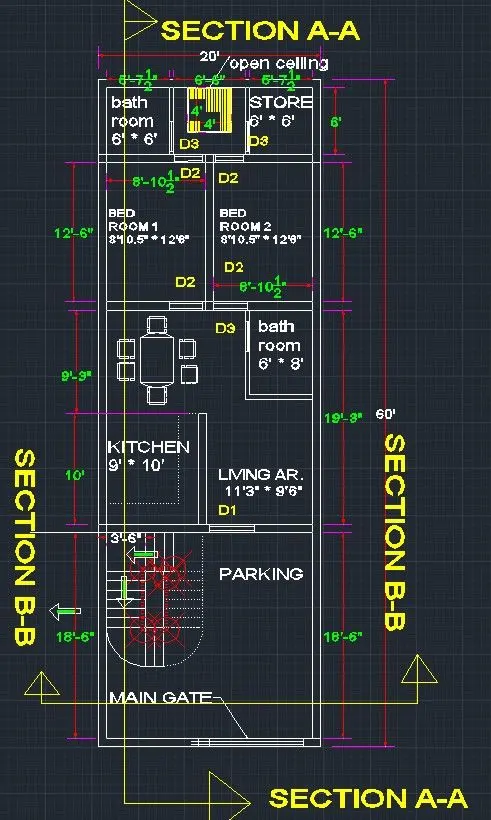
FIGURE (a):
1. Line command is nested with tra command to draw the above attached figure.
2. Doors are classified into 3 types as D1,D2 & D3 of dimensions 4',3' & 2'3'' respectively.
3. Staircase has 20 steps with a riser of 6" & thread of 10".
4. Lendings are provided three times with the dimensions of 42" * 42".
5. Arrows marked over staircase indicating upward direction .
6. Faded lines of staircase denotes projected area of elevated portion of staircase.
7. Two sections are cut out named as A-A and B-B having names of "side elevation" & "Front elevation" respectively.
8. Main Gate have a dimension of 10' from the edge of column to column.
9. Hand Rail & Balusters(marked with red points) are offseted from the edge of every step with a dimension of 3".
10. Open Ceiling ('JAILA') is provided at the backside of this plot with dimension of 4' * 4'.
11. Dinning table dimensions are as follows:
rectangular side : 3' * 4'
semi-elliptical side with radii of 1.5' on either side of rectanular portion.
Chairs are managed with a dimensions 20" * 22".
12. Open ceiling/Jaila is set in such a way that it has projection from the room side of 2' while has projection of 1.5' from the remaining two parallel side.
FIGURE(b):
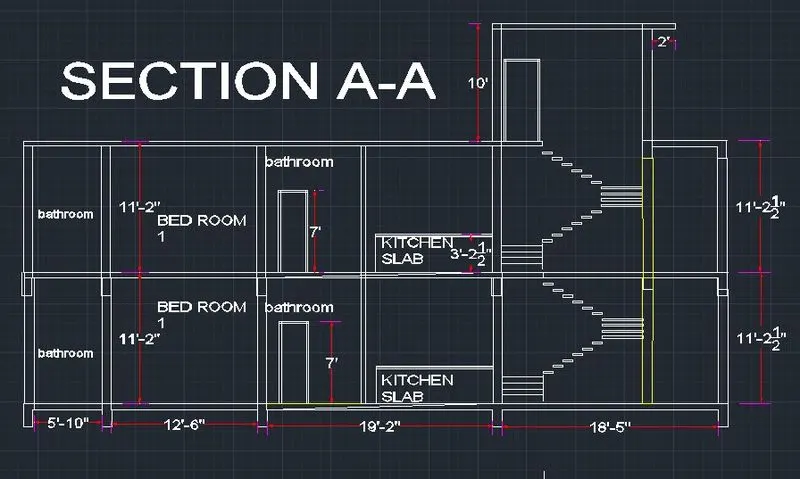
Figure (b):
1. Firstly, Use Ray command to draw the lines at the points intersect by the section line A-A in the plan view.
2. Draw the lines across the ray lines drawn above, keeping in mind the dimensions of each part.
3. After Passing the required line across the ray lines as per the need of sketching, Rotate the sketch with 90degree.
4. 11' 2.5" dimension is specified from the floor to floor which is in utility purpose.
5. No chajja is provided in any floor except at the Mummty level with a projection of 2'.
6. Behind Staircase, has a kitchen slab at a height of 3.2' from the floor with a thickness of 0.2'.
7. Slabs are of thickness 4" at each level.
8. Beams cross-sections are provided with a dimension of 10" * 2' with the projection from the roof slab of 1.5' only.
9. Walls are of two types with a dimension of 4.5"/9" whose labelling is not done for avoiding hodge-podge.
10. Pillar marked with yellow colour is depicting the column on other side of the building as that portion does not have any obstruction.
11. Stairs are drawn with a longitudinal load transfering action to the beam passing over the forehead of the kitchen.
FIGURE (c):
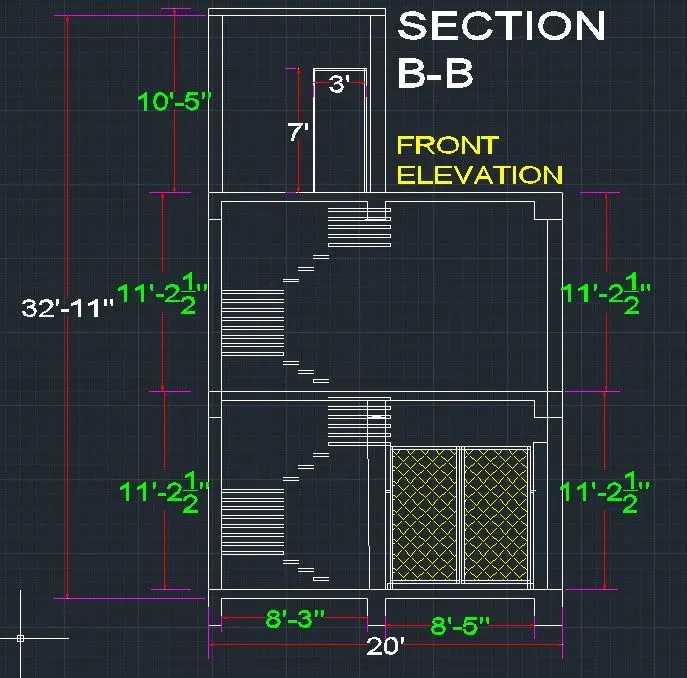
Figure (c):
1. Draw the ray lines at all the vertices intersected by the section line B-B in floor plan view.
2. Draw a line passing across the ray lines drawn in above step keep in mind the dimension over elevated portion.
3. This drawn line passing over the rays line would set the base of the elevated front view.
4. After setting the baseline, draw the slab with thickness of 4" using line command.
5. Walls are extended over the projection part of the floor beam base.
6. Each step is of dimension 42" * 10" with riser of 6".
FIGURE(D):
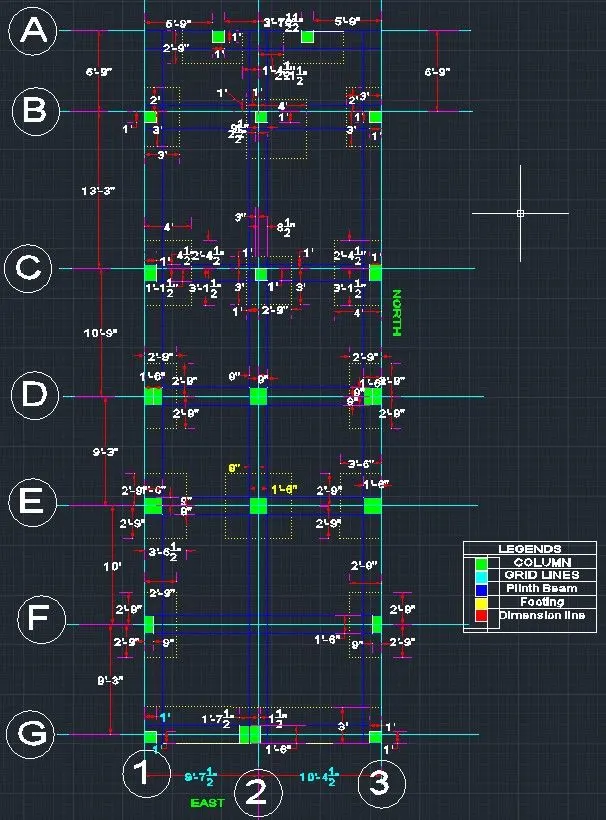
FIGURE(D):
1. Firstly draw the grid lines at right angle to each other with proper labelling & texting in order to avoid any human error.
2. Set the ANNOTATE properties before labelling & texting such as Dimensions lines, Extension lines over dim. lines, Offset of dimension lines from an object, lines & symbols, its type & size based on scale of representation.
3. After drawing the GRID LINES, Column sections are drawn over the plot area with dimension set with the grid lines only.
4. it's better to draw the outer walls first and then proceed further to go inside with referenece from grid lines only.
5. After Drawing the column sections, draw the footing plan with line command around the column cross-section with offset projections measured from the grid lines.
6. after drawing the footing plan, Column sections are connected using Line command (BLUE COLOUR) with maximum offset of column should come within plinth beam in order of avoiding any stress concentration over the bearing face of joint.
7. After Drawing the plinth beam, hatching pattern may be selected for aesthetic & simplification in understanding.
8. Its better to draw the distinct lines using Layer option.
FIGURE(e):
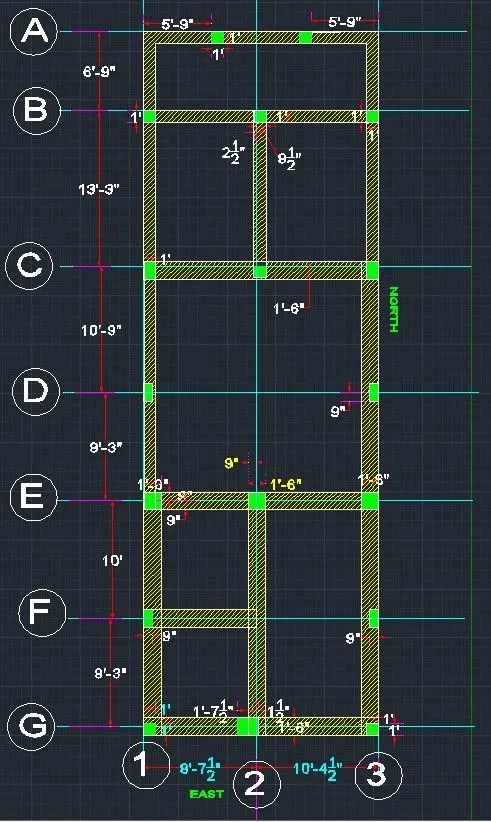
1. Firstly, Draw the Grid lines at right angle to each other.
2. Here the beam plan is drawn after cutting the floor plan above the lintel level.
3. Hatched beam shown here are projected below from the roof slab of 1' dimension.
4. Unhatched beams are hidden beams inside the slab for aesthetic appearence.
5. here all the dimensions are referenced from the Grid lines marked before.
6. Legends depicted in figure (d) is applied here also.
7. Here Beams over column(Bathroom on the left side & store on the right side) at the backside of this plan is not drawn for avoiding the congestion.
8. Here column are classified into three types as (18" * 18", 9" * 18", 12" * 12") which can be easily visualised.
RESULT:
In this challenge, i have first drawn the drawing in the AUTOCAD software and then attahed here in the JPEG format after taking the snapshots above.
Here Structural Dimensions are given on the intuitions basis only, no calculation is done for structural analysis.