Preparing Schedule & Cost Estimation for a building using REVIT
1Q]
AIM: -
Use the Shortcut key in Revit and complete the given tasks
PROCEDURE: -
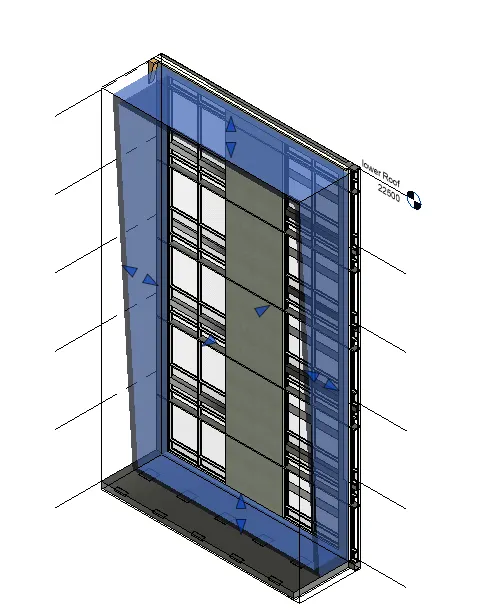
- Using 3D model create a section Box
Open the Revit File
In the Properties box
Go to Extents parameter
Click Tick mark on Section box
or Type BX
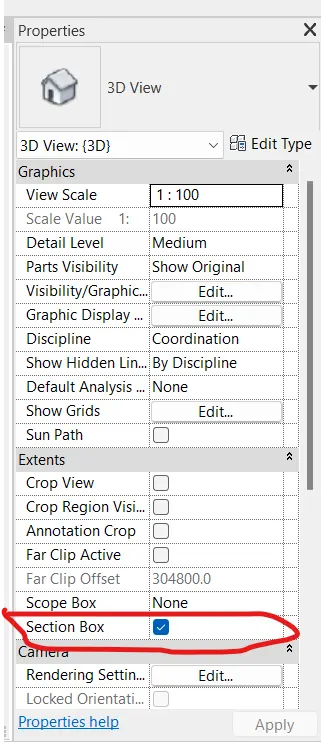
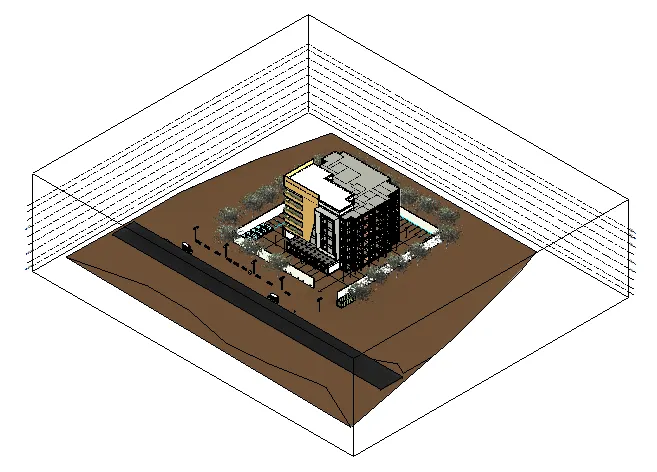
Section box appears arround the model
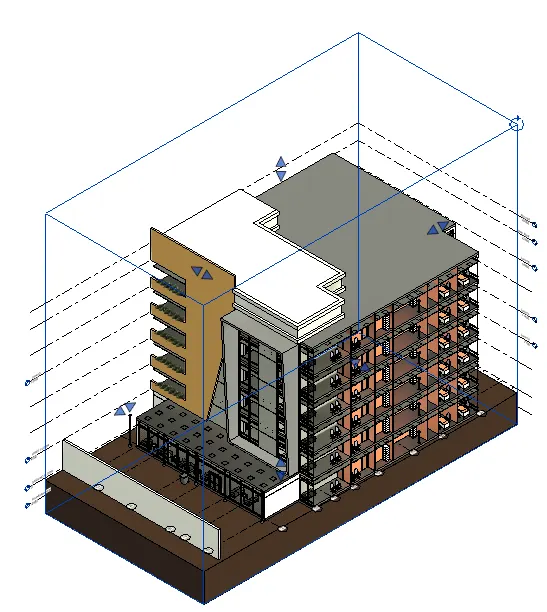
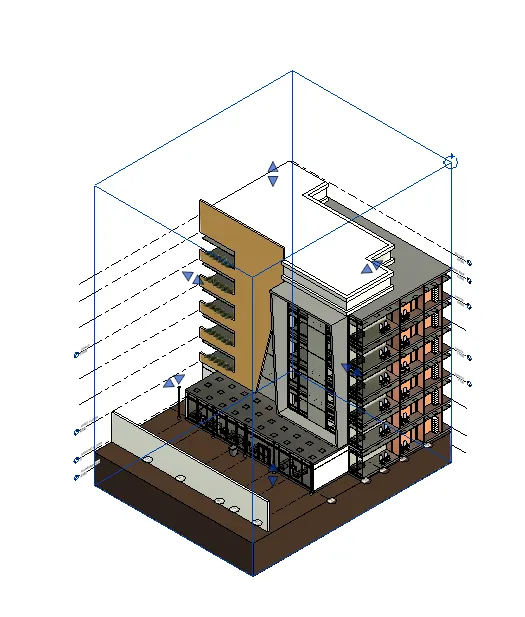
Move the cursors of the Section Box as per the requirement.
So the required components appears and the rest of the model hides.
2. To create similar doors and windows in a floor plan layout
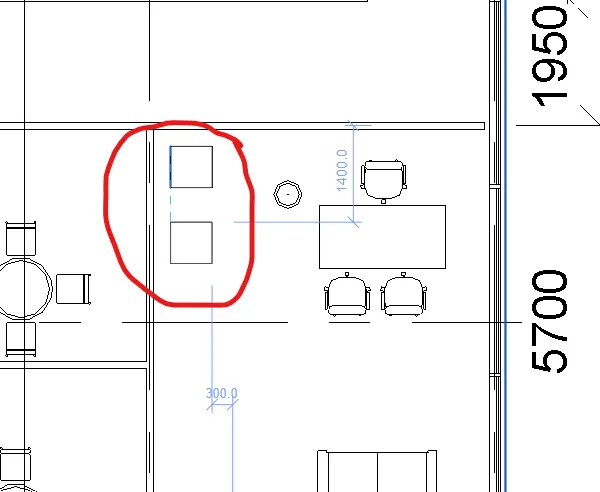
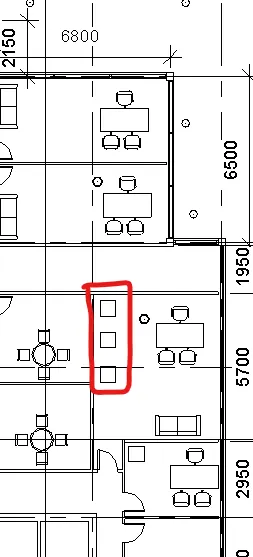
Open Ground Floor Plan
Select the component to create
Type “CS”-shortcut key
Similar component appears
Place it as per requirement.
press Escape twice.
3. To reduce the thickness of lines in Plan views
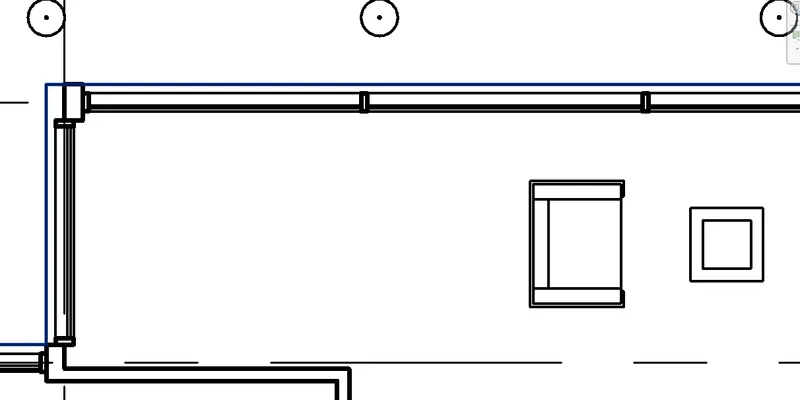
Open the Floor plan
Zoom it, we can see the Thick lines of the wall.
Type “TL” – shortcut key
Now the thickness of the lines reduced.
Before use of " TL" - Line thickness visible After use of "TL" tool- Line thickness reduced
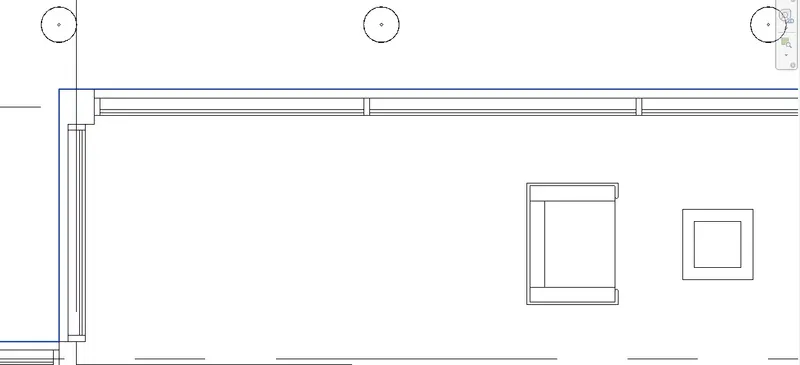
4. To apply override settings to a floor in the model section view.
Open the Floor plan
Type “VG” - shortcut key
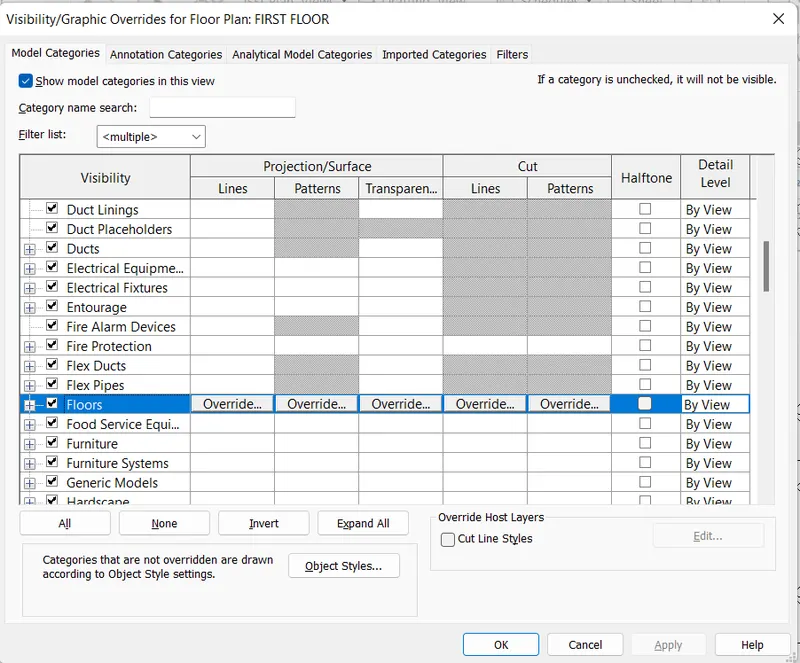
Visibility Graphics dialogue box opens
Select Floor option
Click on override option under patterns
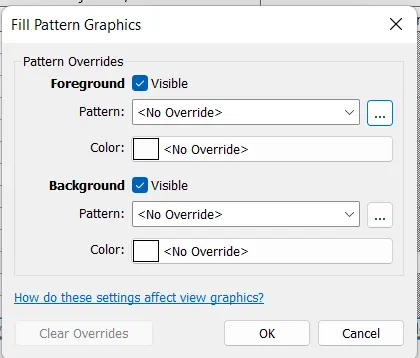
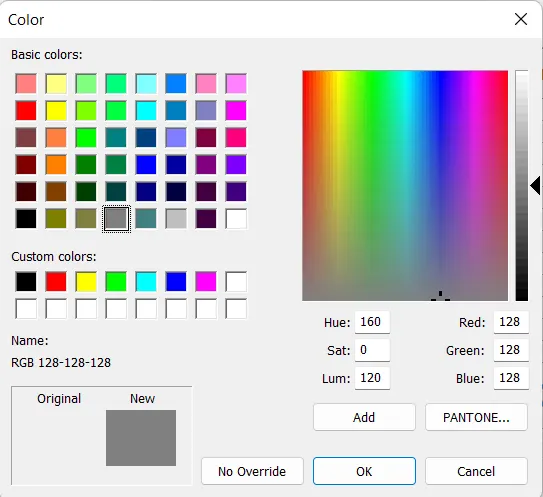
Select the appropriate pattern
Change the colour as per requirement.
Press OK
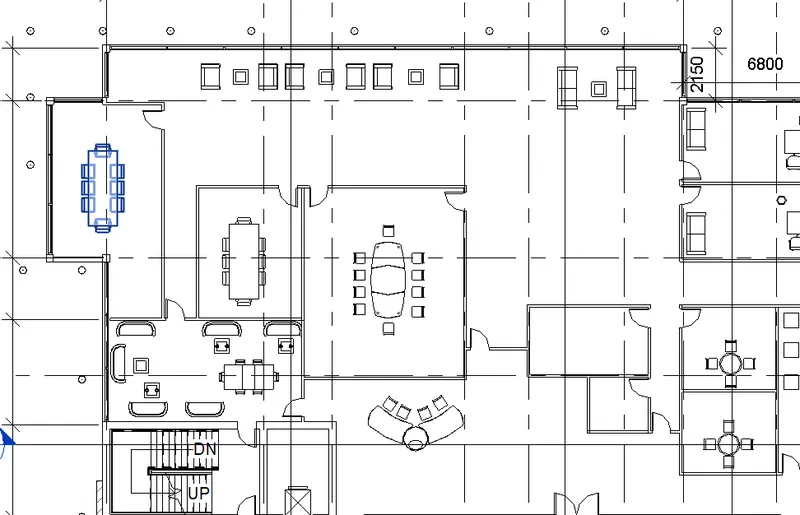
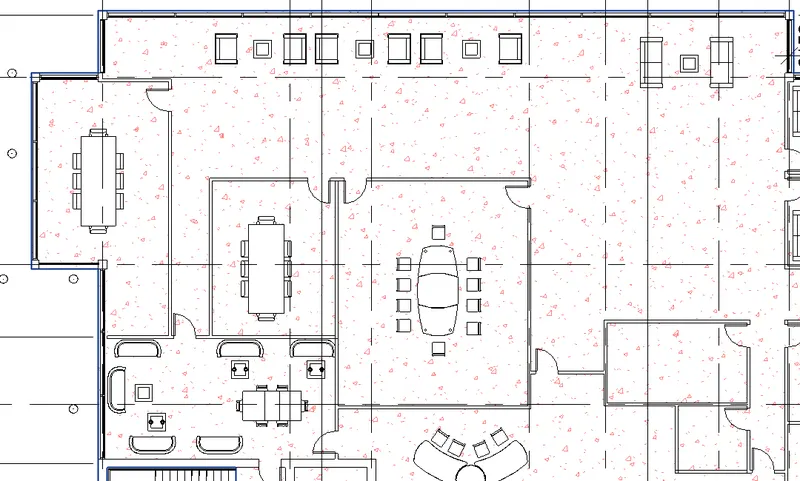
We can see the changes occured before and after applying the override settings to a floor in the model
5. To increase the range of visibility in a plan view
Open the Plan view
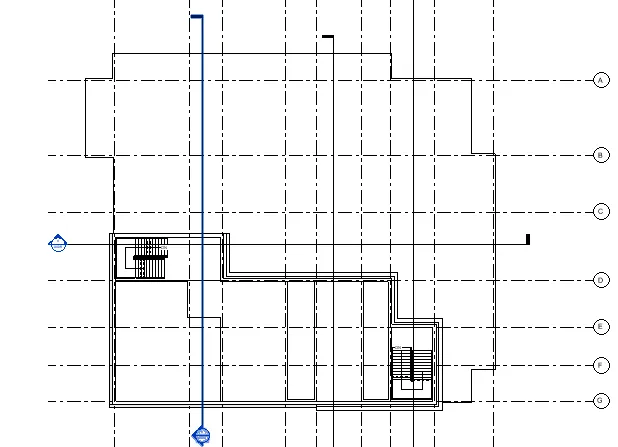
Type “VR”- shortcut key
View Range dialogue box opens
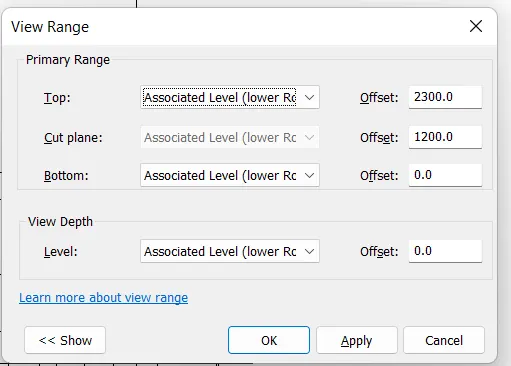
Change values of
Primary Range:
Top- unlimited
Cut plane- unlimited
Bottom - unlimited
View Depth:
Level- unlimited
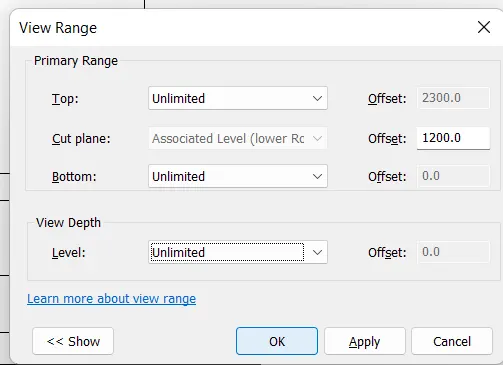
Press Apply
After changing the View Range
Now we can see that trees and parking is visible .
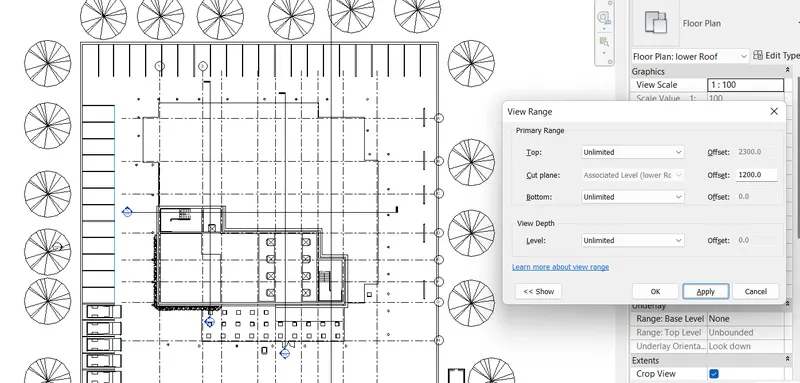
In this way we can change or edit the view Range in a plan view
6. To select the previously selected items.
Open the Floor plan
Select the walls
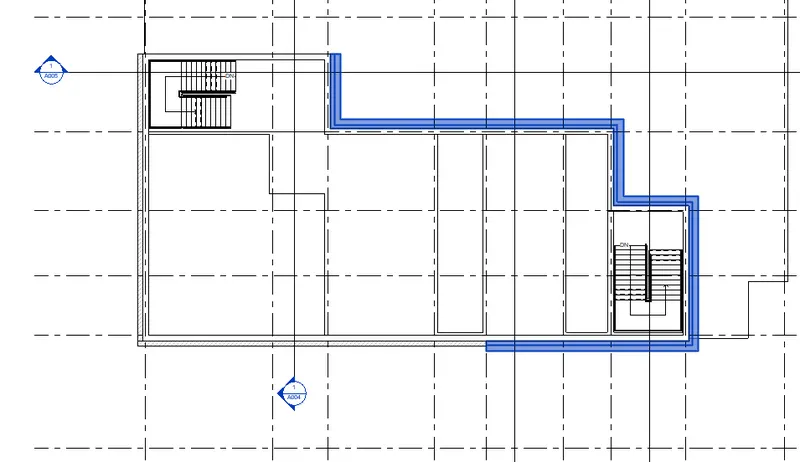
Unfortunately, I missed the sequence
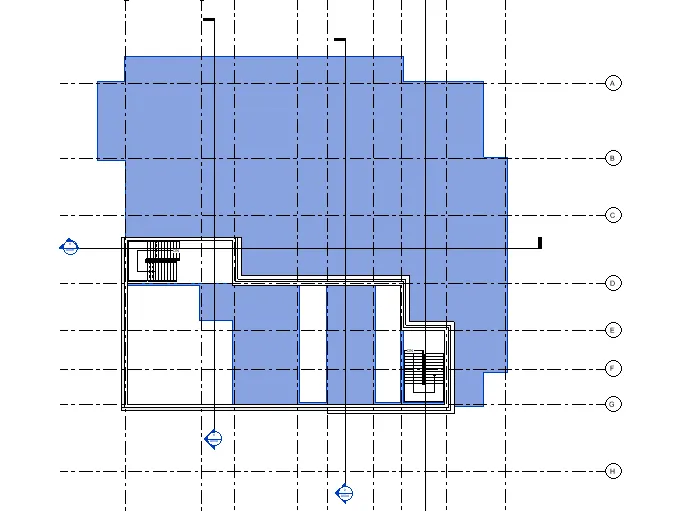
Now, to select the previously selected items and to avoid the selection process from beginning
Press Control + Left arrow (ctrl+ <-) – shortcut key
We go back to previously selected walls selection
7. To add annotations to the model views.
Open the Floor plan
Type “DI” - shortcut key
Dimension icon appears in the model space.
Now we can mark the dimension.

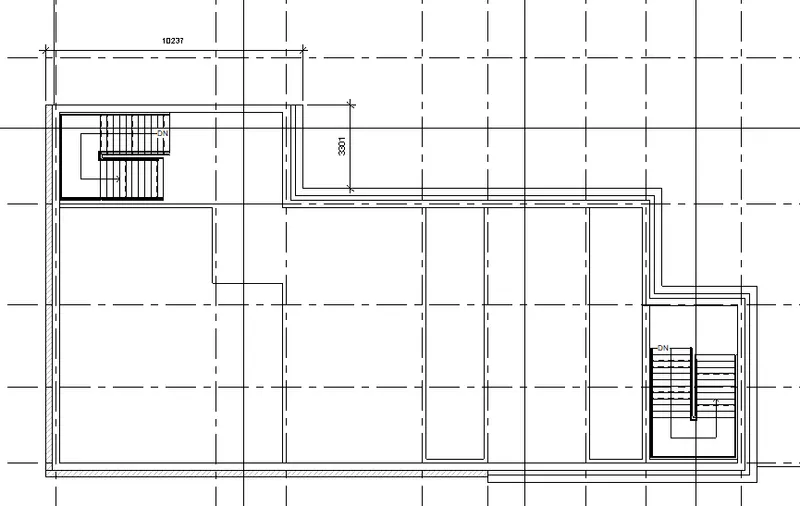
8. To bring the model elements in Line
Open the Floor plan
Draw Walls over the plan to use the Align command.
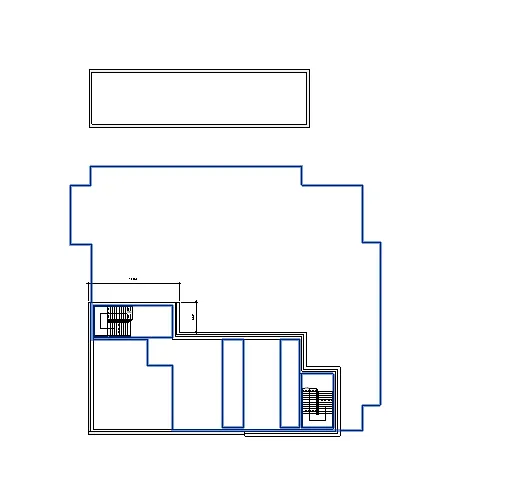
Now we have to align the walls along with the plan.
Type “AL” – shortcut key
Select the line where we have to align the newly created walls.blue dotted line appears.
and then select the the walls created
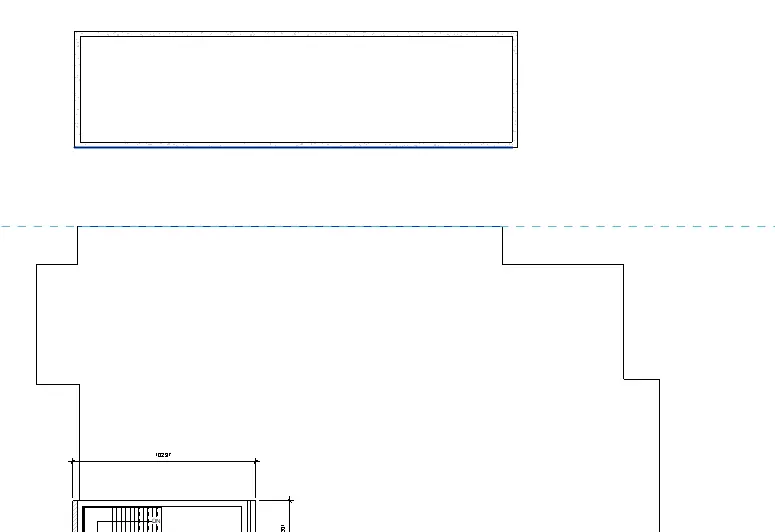
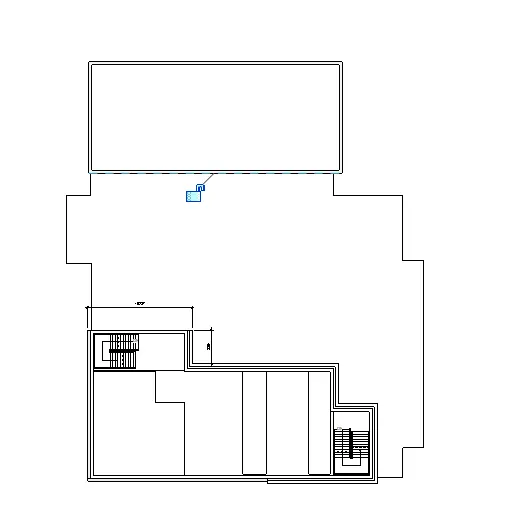
Press Ok
We can see that walls aligned with the model.
9. To Rotate the model Element
Open the Floor plan
I want to rotate the Furniture
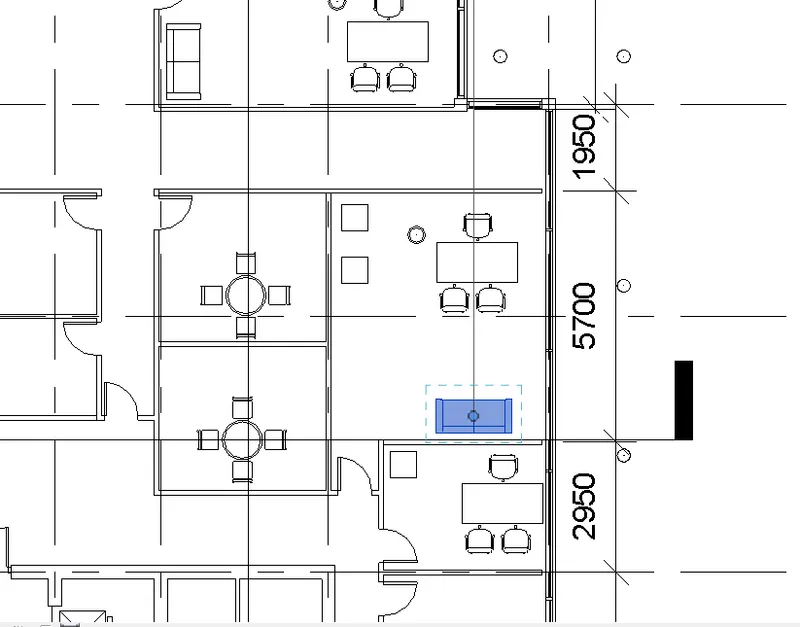
Select the furniture to rotate
Type “RO”- shortcut key
Provide the angle and direction to rotate
Press enter
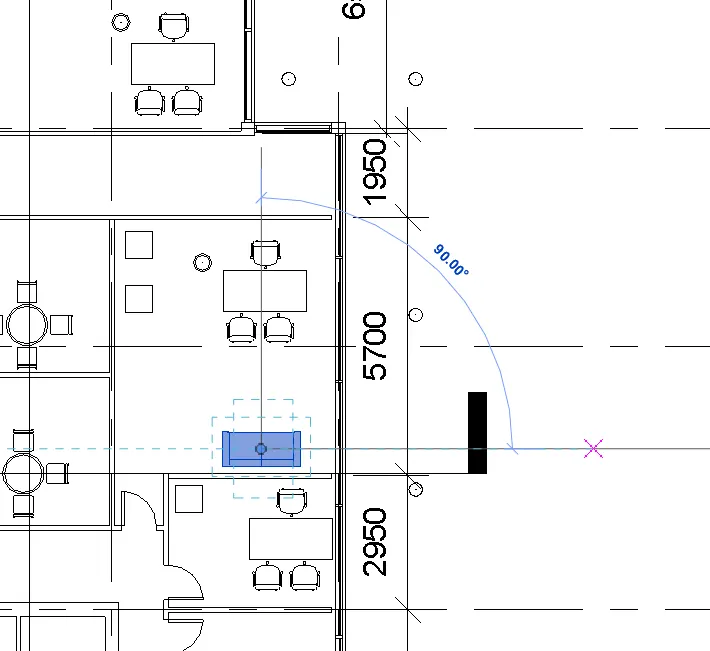
We rotated the furniture 90 degrees
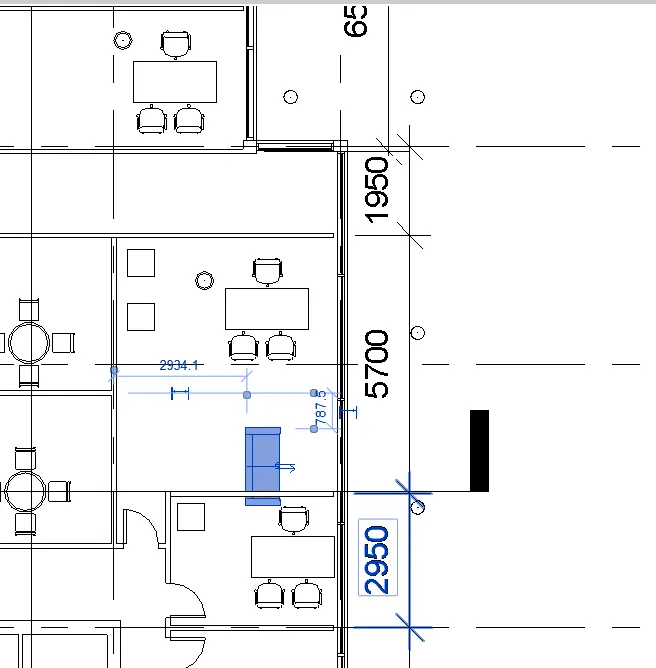
11. To copy a model Element
Open the Floor plan
I want to COPY the Light
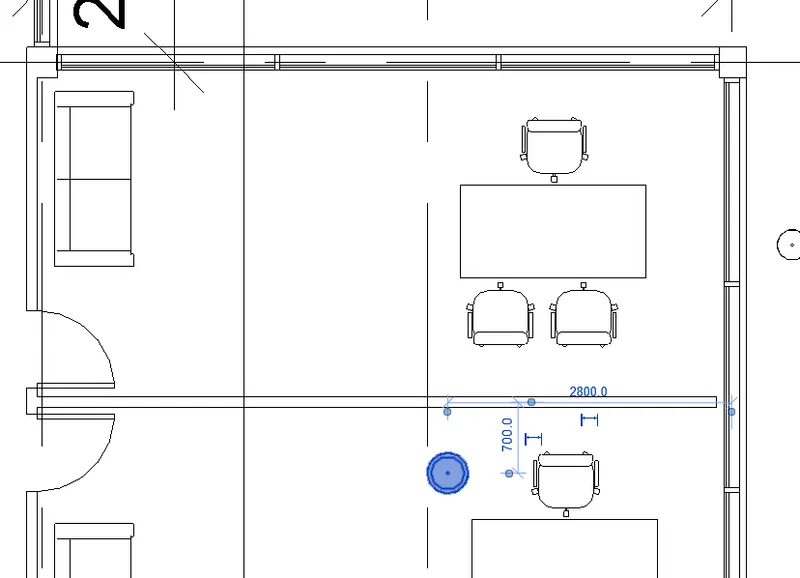
Select the Light to copy.
Type “CO”- shortcut key
Click on the Light at centre
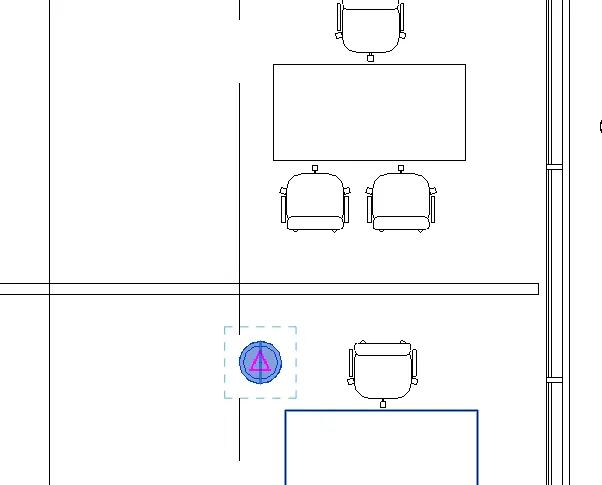
Place the Light at required location
Press Escape twice.
We copied the Light element and placed at location.
12. To mirror an element about an axis
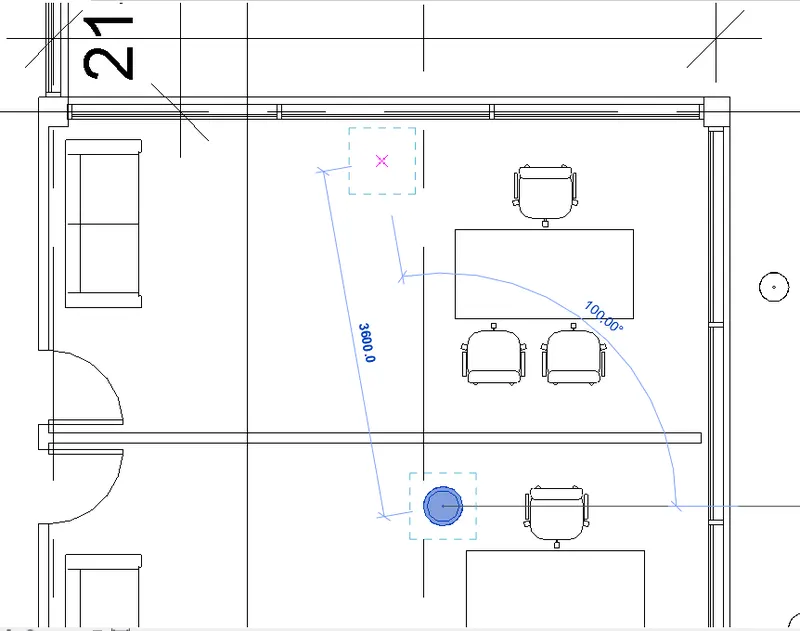
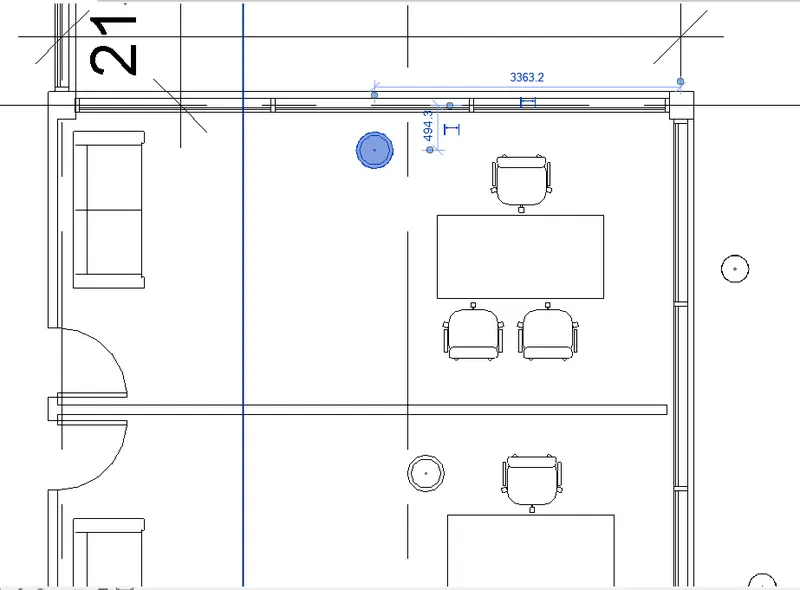
Open the Floor plan
Select the Elements to mirror
Type "MM"
Select the axis about to mirror
Press Enter
Selected elements mirrored about an axis.
13. To create an Array of model Elements
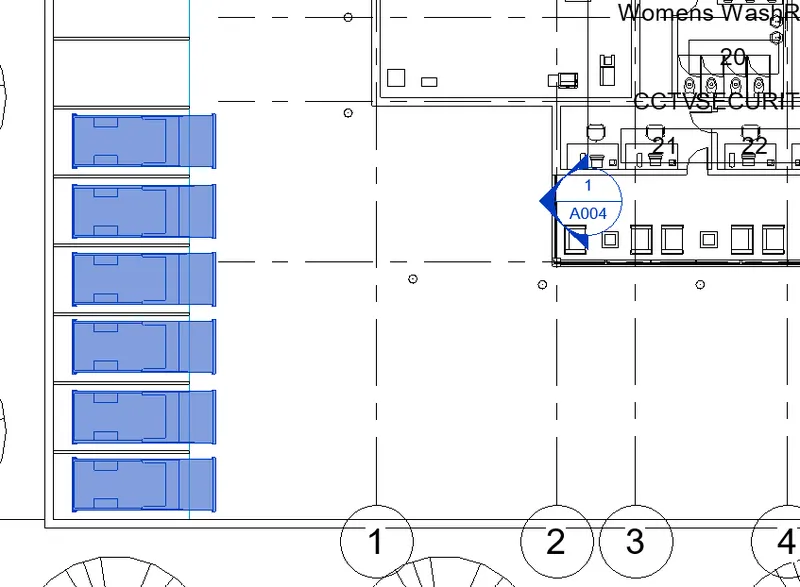
Open the Floor plan
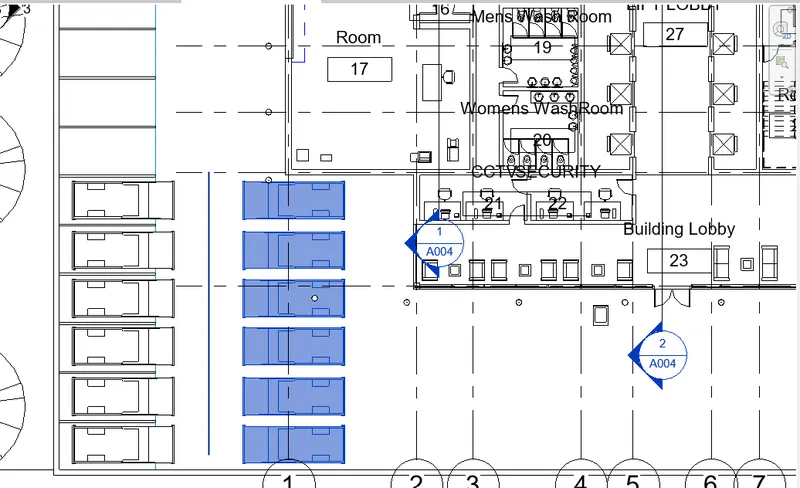
I want Array the cars available in the plan.
Type "AR"
Select the element to Array
Press Enter

The modify tab appears
mention the distance between elements in the model space.
Now, Enter the no of elements required
Modify/ Site : linear
Number: 5
Move to: 2nd
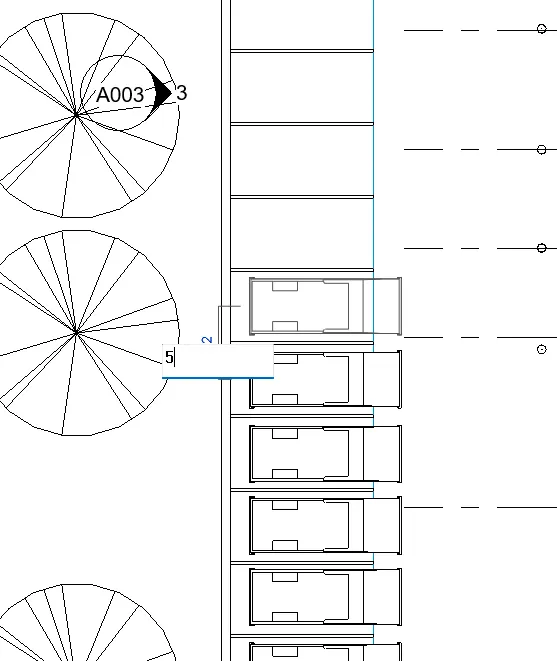
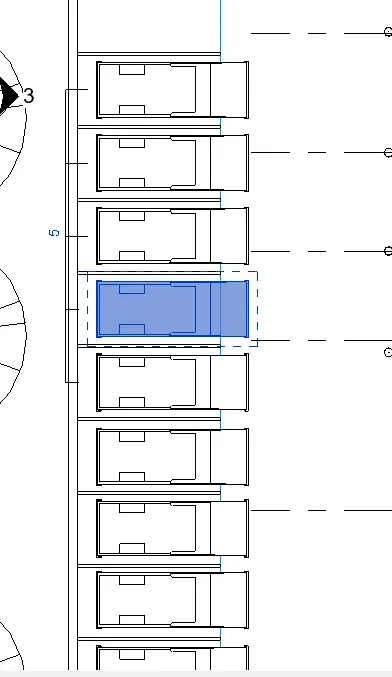
We selected the car
We used the Linear Array command to repeat the element.
RESULT: -
We used the shortcut keys to complete the given Tasks.
Sr.No TASKS SHORTCUT KEY 1 Using 3D model create a section Box BX 2 To create similar doors and windows in a floor plan layout CS 3 To reduce the thickness of lines in Plan views TL 4 To apply override settings to a floor in the model section view. VG 5 To increase the range of visibility in a plan view VR 6 To select the previously selected items. CTRL +<- 7 To add annotations to the model views. DI 8 To bring the model elements in Line AL 9 To Rotate the model Element RO 10 To move an object to another Location MV 11 To copy a model Element CO 12 To mirror an element about an axis MM 13 To create an Array of model Elements AR
2Q]
AIM: -
Prepare schedule for the following
- Walls
- Doors
- Windows
- Material- Concrete
PROCEDURE: -
WALL: -
Open the Project File.
Select VIEW Tab
Go to Create Panel
Click on Schedules Tool
Choose Schedule/Quantities option from the dropdown list

New Schedule dialogue box opens
Go to Category
Select Walls option
Press OK
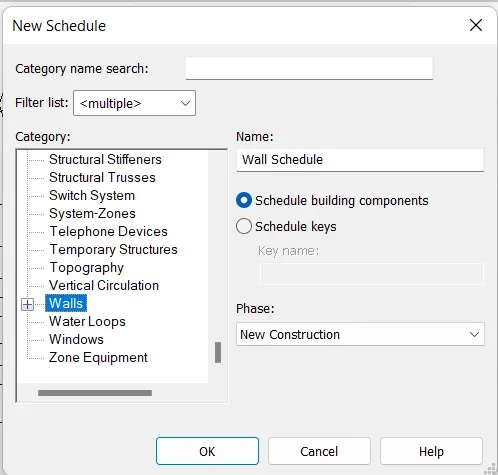
Schedule Properties dialogue box opens
Go to Available Fields list
Select the items from the list
Move the selected items to Scheduled fields box
Tick mark on include elements in links option
Press OK
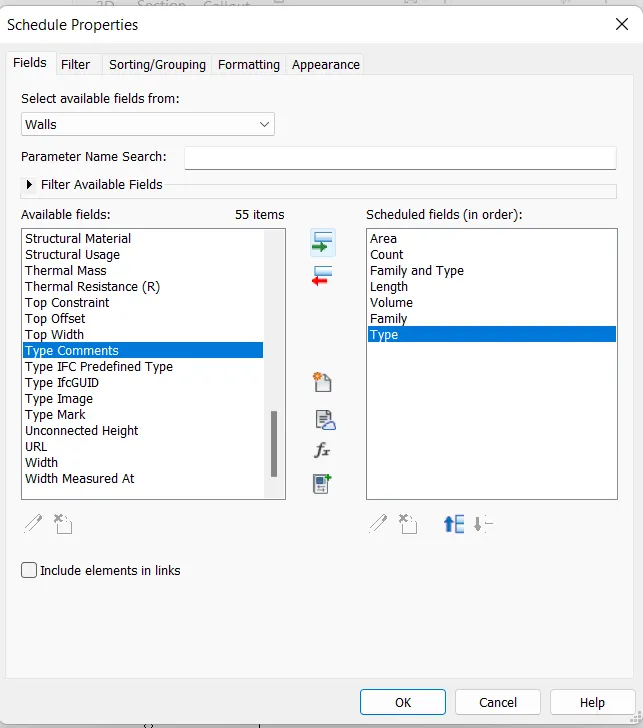
Complete Walls Schedule is displayed in the model space.
Go to Properties panel
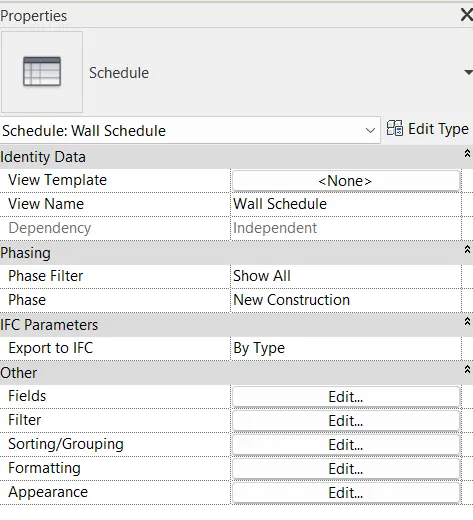
In the Other parameter
Sorting/Grouping option is available
click on the Edit option
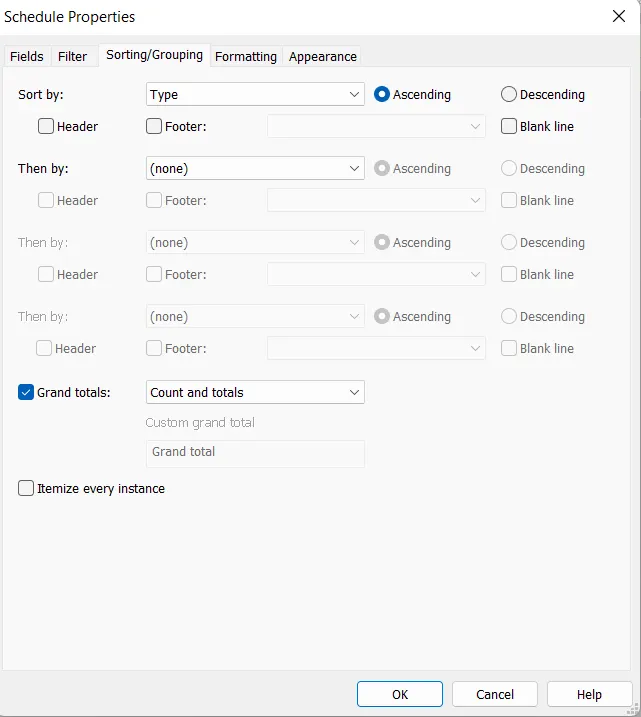
Schedule Properties dialogue box opens
Sort by: Select the required itemfrom the dropdown list
Then By: Select the required itemfrom the dropdown list
Then by: Select the required itemfrom the dropdown list
Grand Totals: Select the required itemfrom the dropdown list
Press OK
Click on Formatting parameter in the Properties
Schedule Properties dialogue box opens
Change the data if required
Press OK
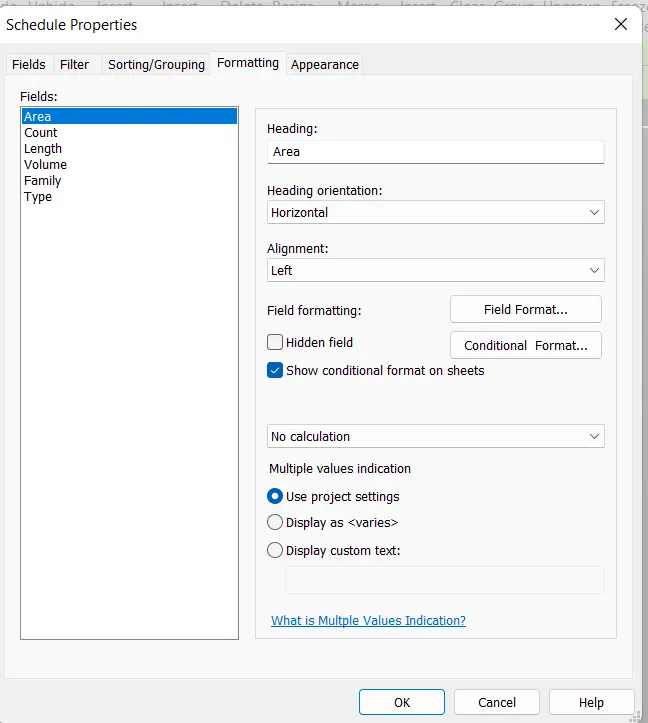
Wall Schedule list is displayed on the screen as per the settings we have made.
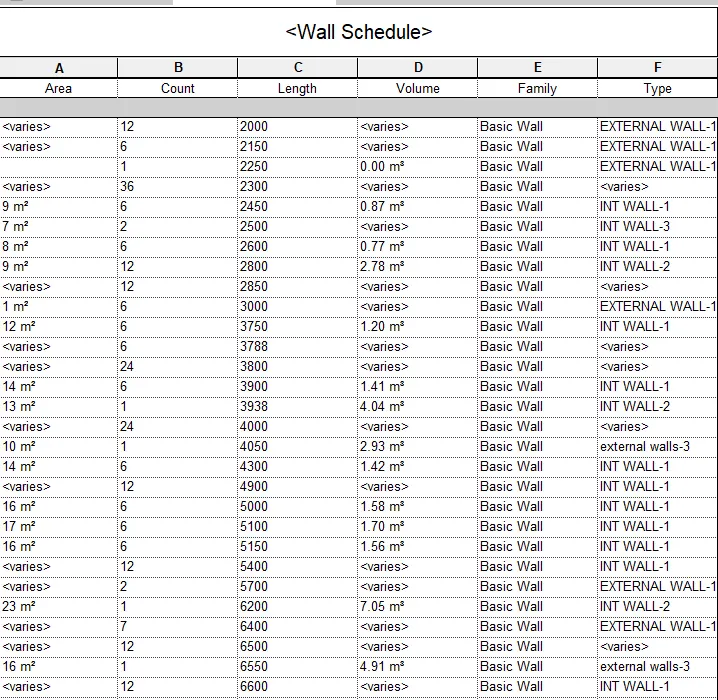
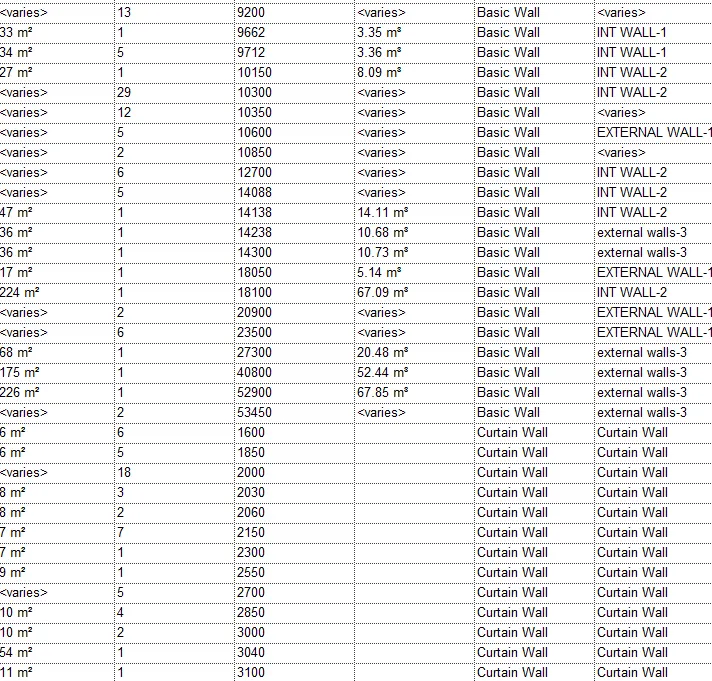
WINDOW SCHEDULE: -
Select VIEW Tab
Go to Create Panel
Click on Schedules Tool
Choose Schedule/Quantities option from the dropdown list
New Schedule dialogue box opens
Go to Category
Select Windows option
Press OK
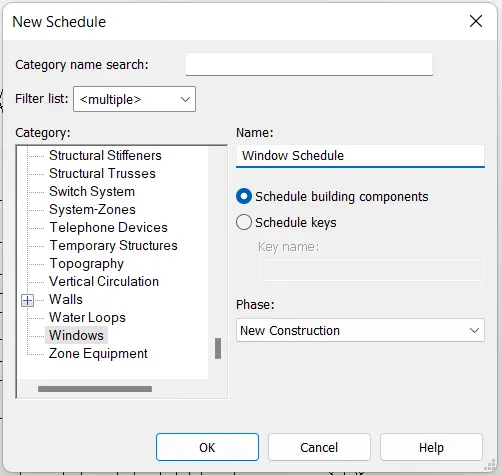
Schedule Properties dialogue box opens
Go to Available Fields list
Select the items from the list
Move the selected items to Scheduled fields box
Tick mark on include elements in links option
Press OK
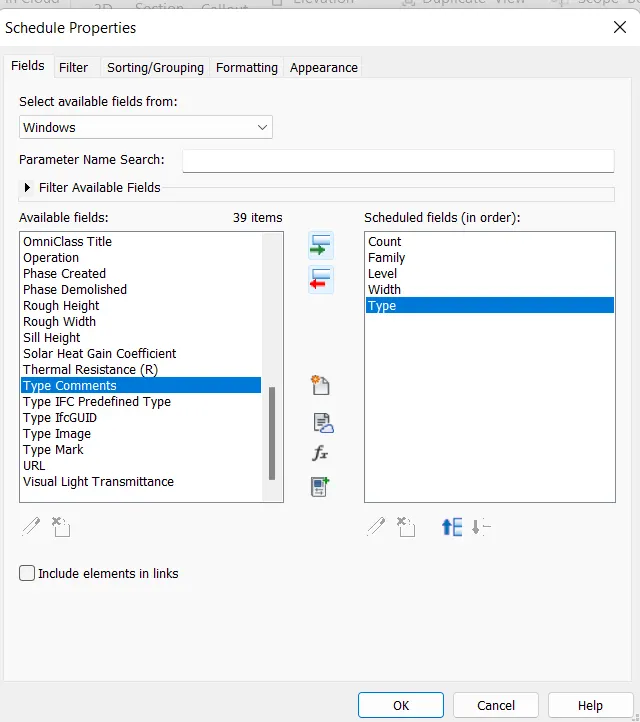
Complete Window Schedule is displayed in the model space.
Go to Properties panel
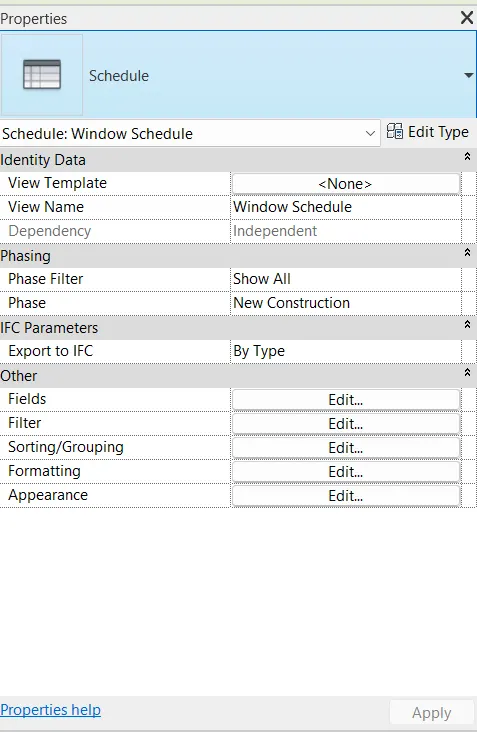
In the Other parameter
Sorting/Grouping option is available
click on the Edit option
Schedule Properties dialogue box opens
Sort by: Select the required itemfrom the dropdown list
Then By: Select the required itemfrom the dropdown list
Then by: Select the required itemfrom the dropdown list
Grand Totals: Select the required itemfrom the dropdown list
Press OK
Click on Formatting parameter in the Properties
Schedule Properties dialogue box opens
Change the data if required
Press OK
Window Schedule list is displayed on the screen as per the settings we have made.
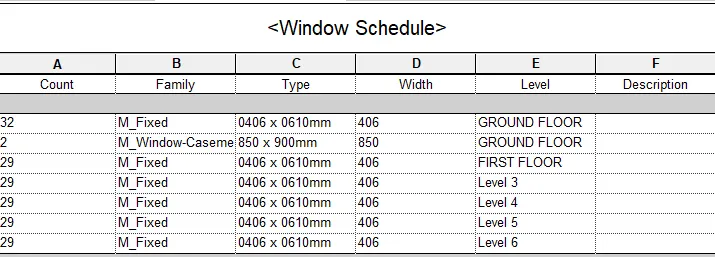
DOORS: -
Select VIEW Tab
Go to Create Panel
Click on Schedules Tool
Choose Schedule/Quantities option from the dropdown list
New Schedule dialogue box opens
Go to Category
Select Doors option
Press OK
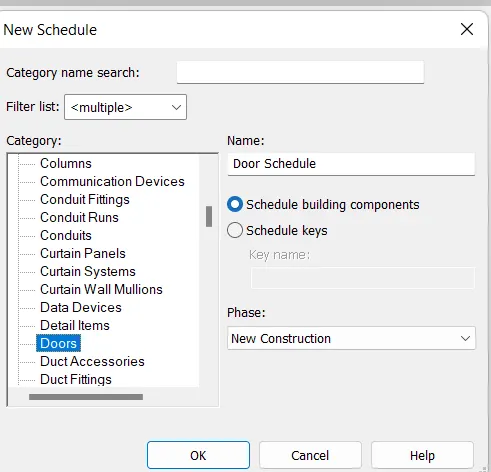
Schedule Properties dialogue box opens
Go to Available Fields list
Select the items from the list
Move the selected items to Scheduled fields box
Tick mark on include elements in links option
Press OK
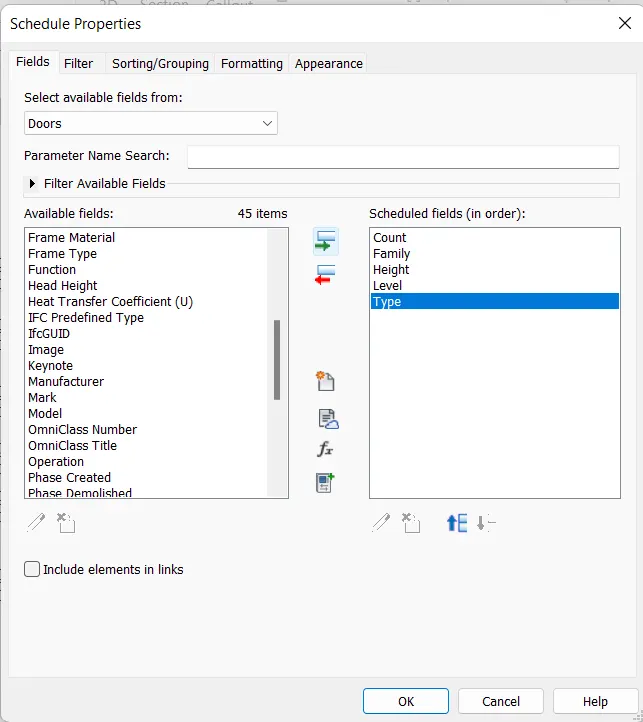
Complete Door Schedule is displayed in the model space.
Go to Properties panel
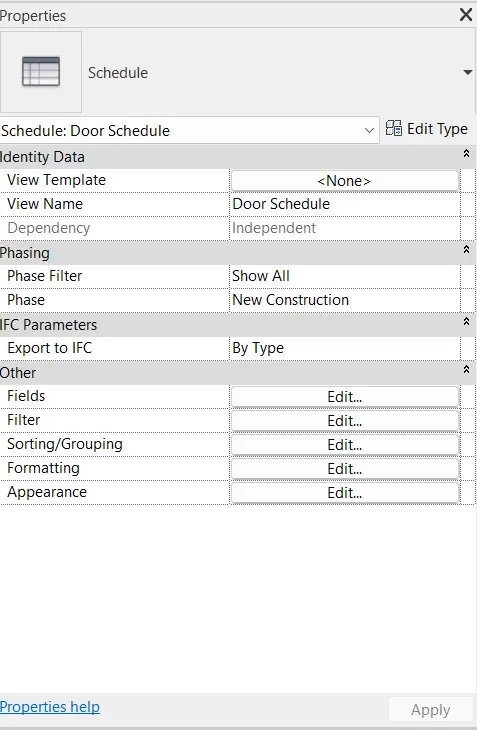
In the Other parameter
Sorting/Grouping option is available
click on the Edit option
Schedule Properties dialogue box opens
Sort by: Select the required itemfrom the dropdown list
Then By: Select the required itemfrom the dropdown list
Then by: Select the required itemfrom the dropdown list
Grand Totals: Select the required itemfrom the dropdown list
Press OK
Click on Formatting parameter in the Properties
Schedule Properties dialogue box opens
Change the data if required
Press OK
Door Schedule list is displayed on the screen as per the settings we have made.
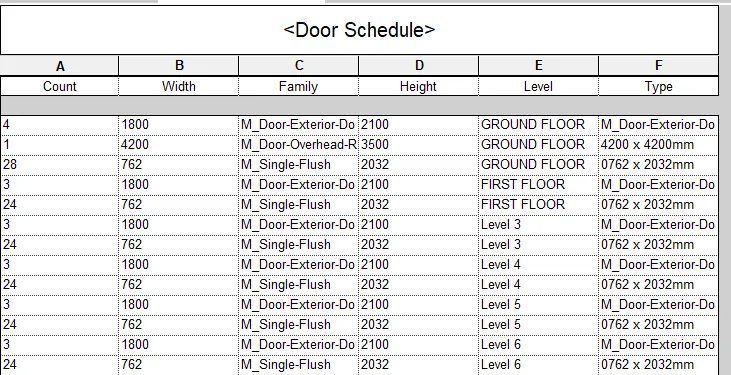
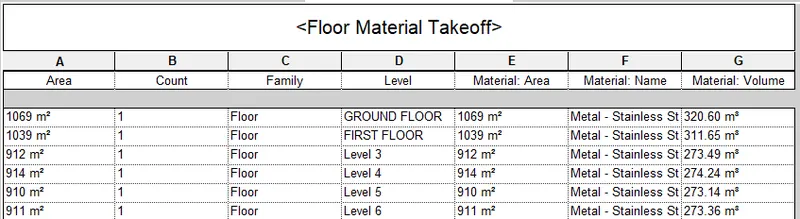
MATERIAL- CONCRETE: -
Select VIEW Tab
Go to Create Panel
Click on Schedules Tool
Choose Material Takeoff option from the dropdown list

New Schedule dialogue box opens
Go to Category
Select Walls option
Press OK
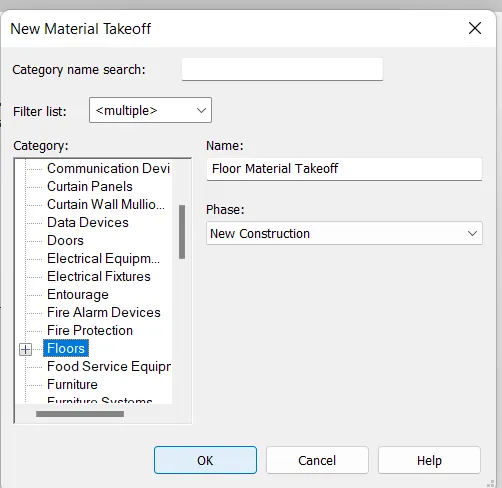
Schedule Properties dialogue box opens
Go to Available Fields list
Select the items from the list
Move the selected items to Scheduled fields box
Tick mark on include elements in links option
Press OK
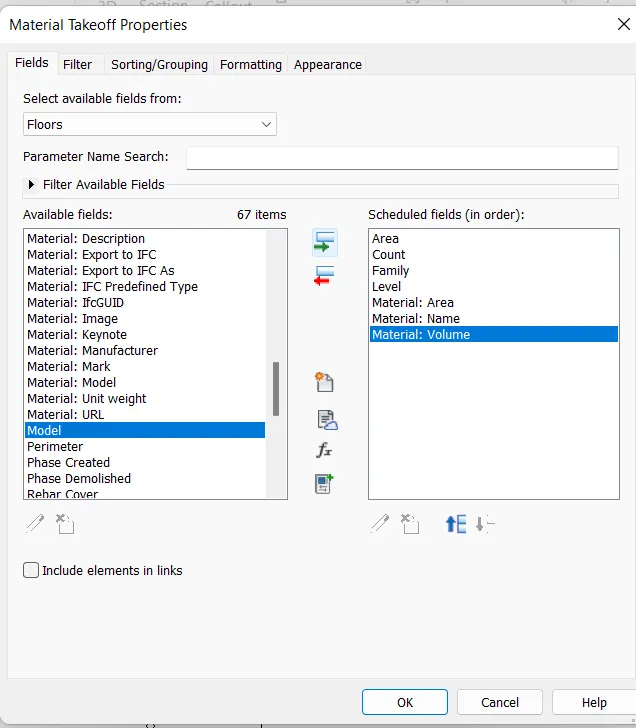
Complete Floor Schedule is displayed in the model space.
Go to Properties panel
In the Other parameter
Sorting/Grouping option is available
click on the Edit option
Schedule Properties dialogue box opens
Sort by: Select the required itemfrom the dropdown list
Then By: Select the required itemfrom the dropdown list
Then by: Select the required itemfrom the dropdown list
Grand Totals: Select the required itemfrom the dropdown list
Press OK
Click on Formatting parameter in the Properties
Schedule Properties dialogue box opens
Change the data if required
Press OK
Floor Schedule list is displayed on the screen as per the settings we have made.
RESULT: -
We prepared the schedule for the following
- Walls
- Doors
- Windows
- Material- Concrete
3Q]
AIM: -
Calculate Area and Volume of each room
Prepare a schedule report for area ad volume of each room.
PROCEDURE: -
Open the Project File.
Select VIEW Tab
Go to Create Panel
Click on Schedules Tool
Choose Schedule/Quantities option from the dropdown list
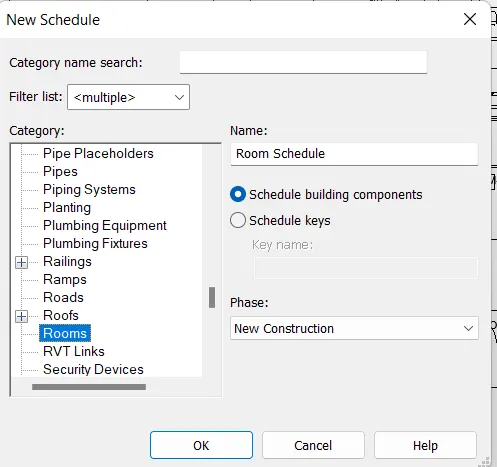
New Schedule dialogue box opens
Go to Category
Select Rooms option
Press OK
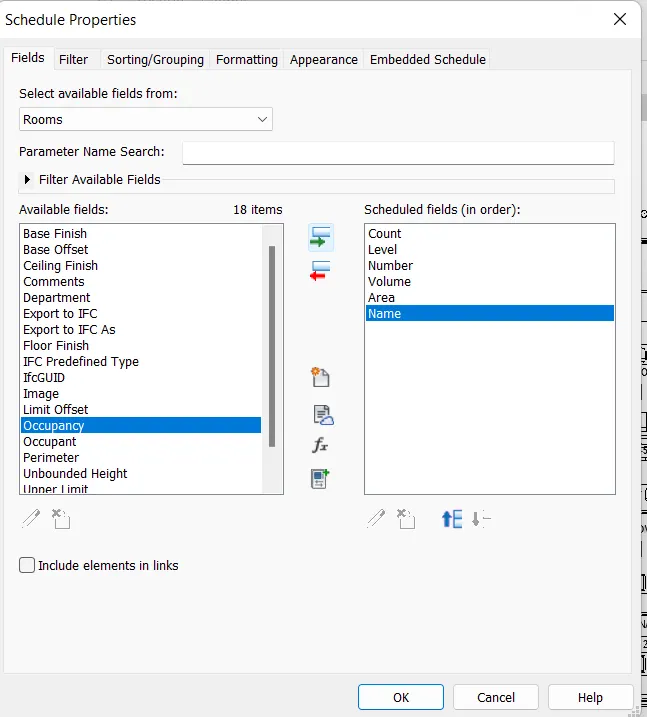
Schedule Properties dialogue box opens
Go to Available Fields list
Select the items from the list
Move the selected items to Scheduled fields box
Tick mark on include elements in links option
Press OK
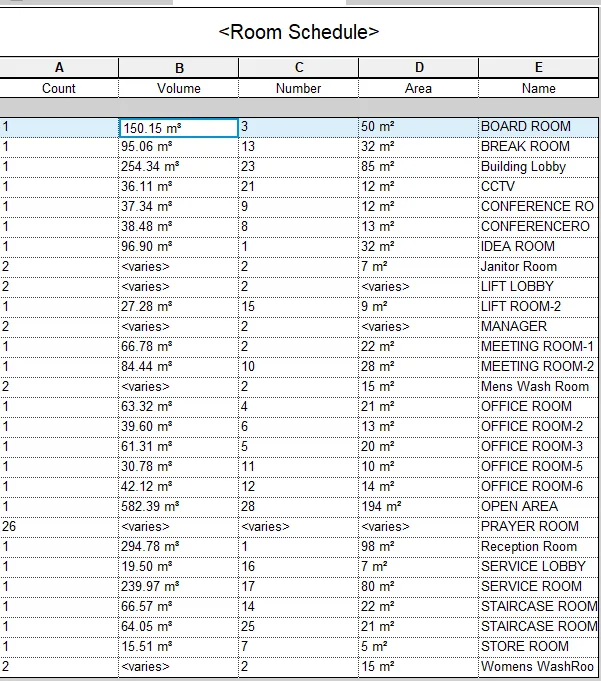
Complete Rooms Schedule is displayed in the model space.
Go to Properties panel
In the Other parameter
Sorting/Grouping option is available
click on the Edit option
Schedule Properties dialogue box opens
Sort by: Select the required itemfrom the dropdown list
Then By: Select the required itemfrom the dropdown list
Then by: Select the required itemfrom the dropdown list
Grand Totals: Select the required itemfrom the dropdown list
Press OK
Click on Formatting parameter in the Properties
Schedule Properties dialogue box opens
Change the data if required
Press OK
Rooms Schedule list is displayed on the screen as per the settings we have made.
RESULT: -
We calculated Area and Volume of each room
Prepared a schedule report for area ad volume of each room.
4Q]
AIM: -
Using the schedule prepare total cost of materials and Individual Material Take off used in the project
PROCEDURE: -
WALL: -
Select VIEW Tab
Go to Create Panel
Click on Schedules Tool
Choose Material Takeoff option from the dropdown list
New Schedule dialogue box opens
Go to Category
Select Walls option
Press OK
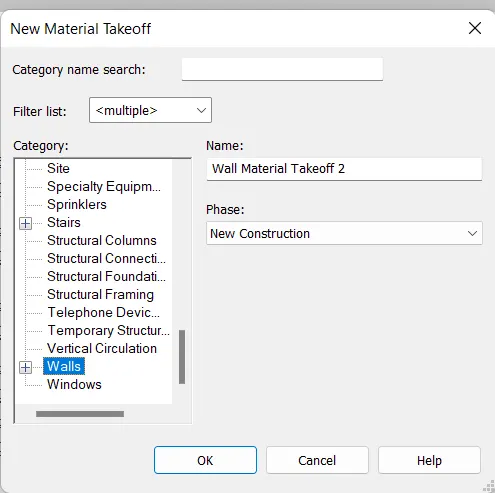
Schedule Properties dialogue box opens
Go to Available Fields list
Select the items from the list
Move the selected items to Scheduled fields box
Tick mark on include elements in links option
Press OK
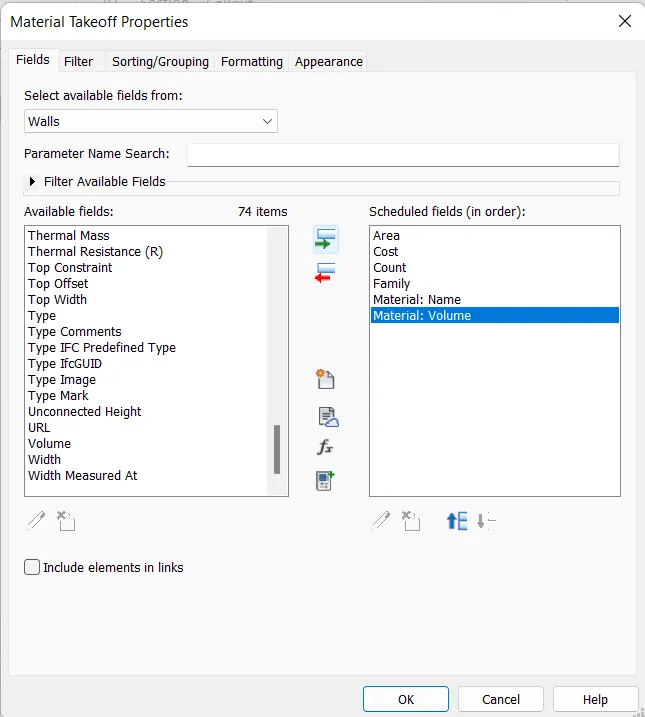
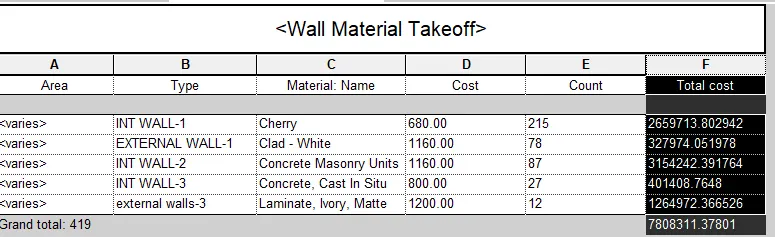
Complete Wall Schedule is displayed in the model space.
Go to Properties panel
In the Other parameter
Sorting/Grouping option is available
click on the Edit option
Schedule Properties dialogue box opens
Sort by: Select the required itemfrom the dropdown list
Then By: Select the required itemfrom the dropdown list
Then by: Select the required itemfrom the dropdown list
Grand Totals: Select the required itemfrom the dropdown list
Press OK
Click on Formatting parameter in the Properties
Schedule Properties dialogue box opens
Change the data if required
Press OK
Wall Schedule list is displayed on the screen as per the settings we have made.
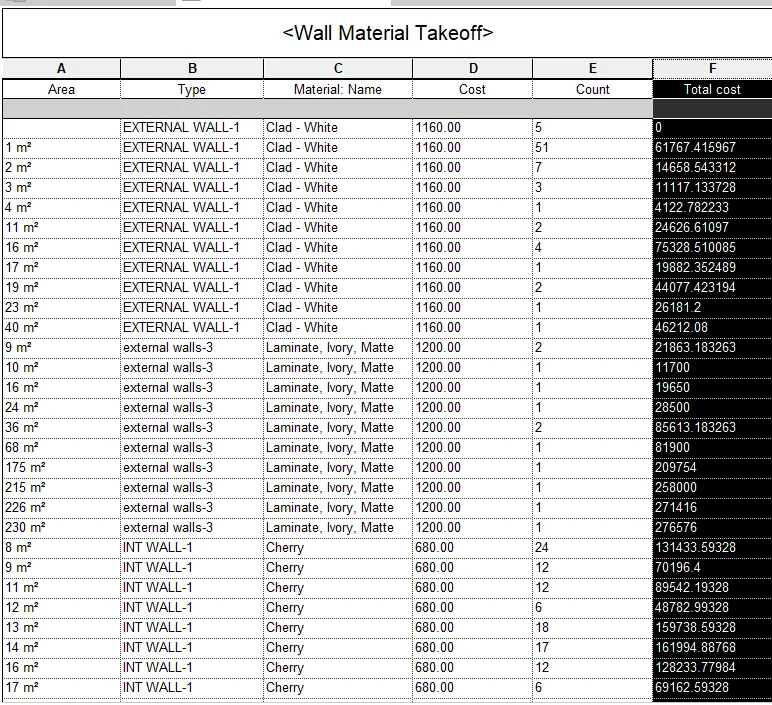
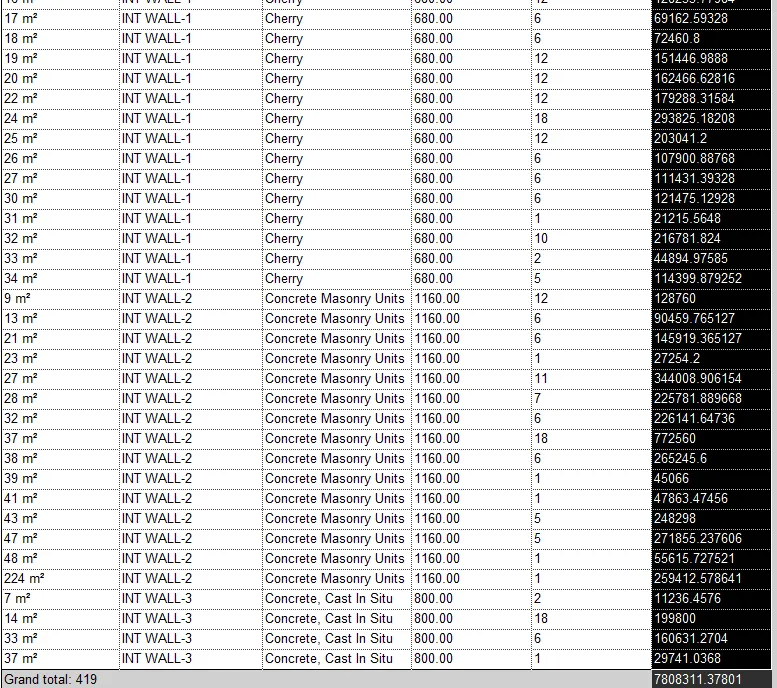
WINDOW: -
Select VIEW Tab
Go to Create Panel
Click on Schedules Tool
Choose Material Takeoff option from the dropdown list
New Schedule dialogue box opens
Go to Category
Select Walls option
Press OK
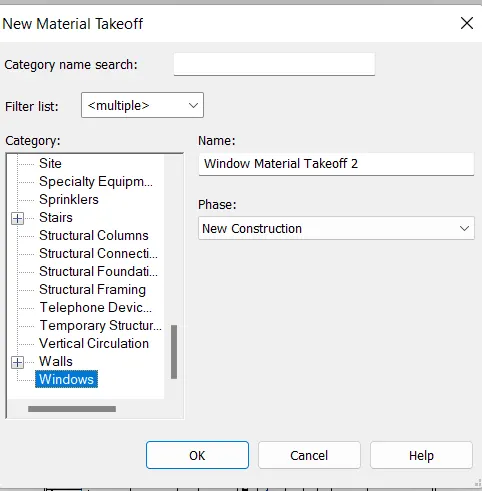
Schedule Properties dialogue box opens
Go to Available Fields list
Select the items from the list
Move the selected items to Scheduled fields box
Tick mark on include elements in links option
Press OK
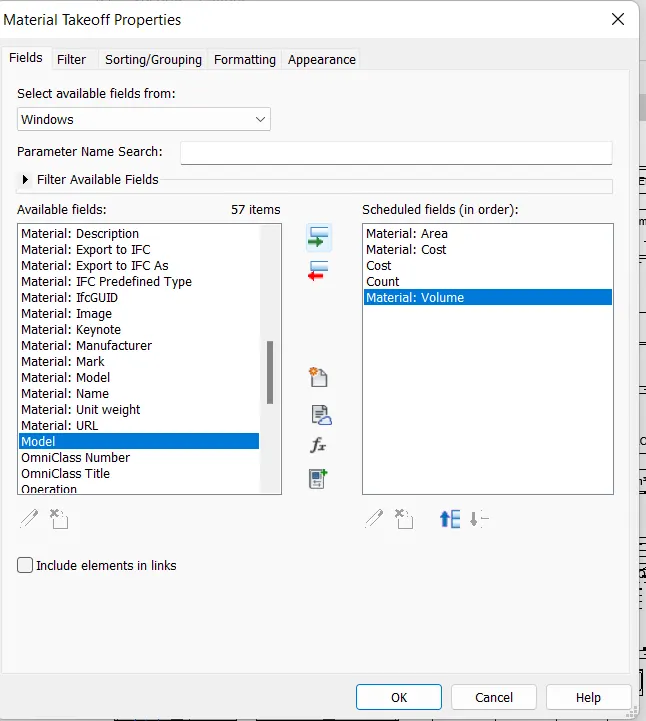
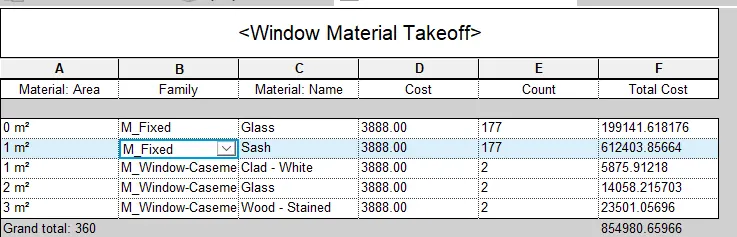
Complete WINDOW Schedule is displayed in the model space.
Go to Properties panel
In the Other parameter
Sorting/Grouping option is available
click on the Edit option
Schedule Properties dialogue box opens
Sort by: Select the required itemfrom the dropdown list
Then By: Select the required itemfrom the dropdown list
Then by: Select the required itemfrom the dropdown list
Grand Totals: Select the required itemfrom the dropdown list
Press OK
Click on Formatting parameter in the Properties
Schedule Properties dialogue box opens
Change the data if required
Press OK
WINDOW Schedule list is displayed on the screen as per the settings we have made.
DOOR: -
Select VIEW Tab
Go to Create Panel
Click on Schedules Tool
Choose Material Takeoff option from the dropdown list
New Schedule dialogue box opens
Go to Category
Select DOOR option
Press OK
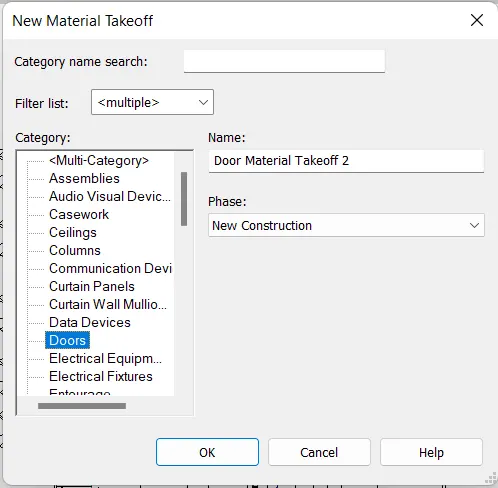
Schedule Properties dialogue box opens
Go to Available Fields list
Select the items from the list
Move the selected items to Scheduled fields box
Tick mark on include elements in links option
Press OK
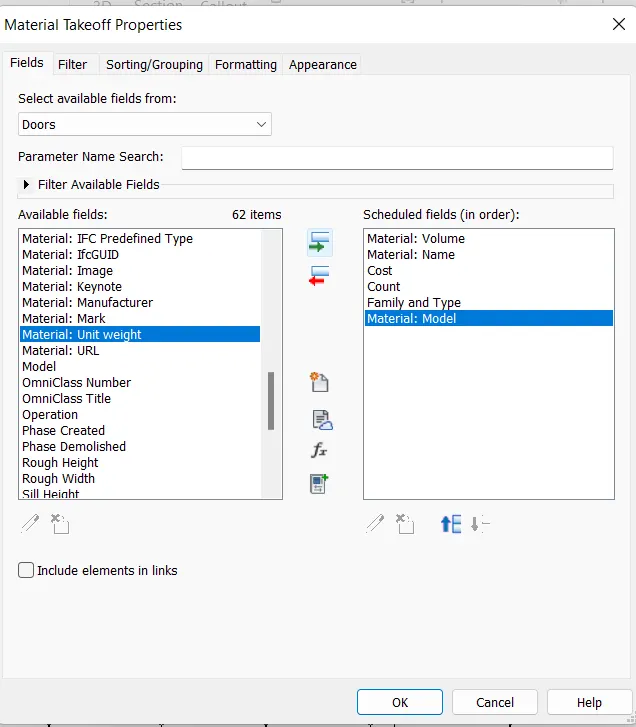
Complete DOOR Schedule is displayed in the model space.
Go to Properties panel
In the Other parameter
Sorting/Grouping option is available
click on the Edit option
Schedule Properties dialogue box opens
Sort by: Select the required itemfrom the dropdown list
Then By: Select the required itemfrom the dropdown list
Then by: Select the required itemfrom the dropdown list
Grand Totals: Select the required itemfrom the dropdown list
Press OK
Click on Formatting parameter in the Properties
Schedule Properties dialogue box opens
Change the data if required
Press OK
DOOR Schedule list is displayed on the screen as per the settings we have made.
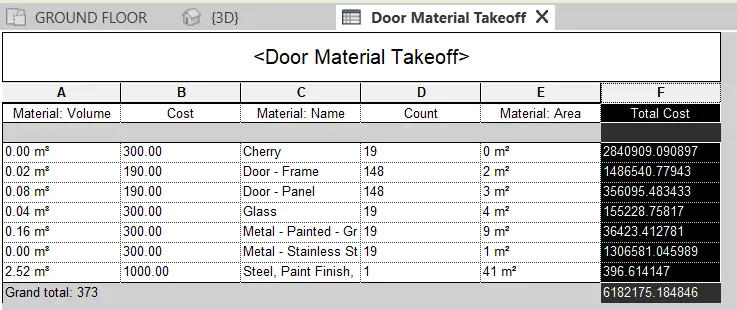
DOOR: -
Select VIEW Tab
Go to Create Panel
Click on Schedules Tool
Choose Material Takeoff option from the dropdown list
New Schedule dialogue box opens
Go to Category
Select CURTAIN PANELS option
Press OK
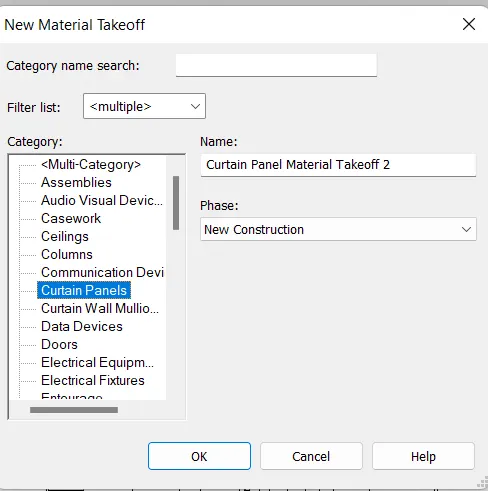
Schedule Properties dialogue box opens
Go to Available Fields list
Select the items from the list
Move the selected items to Scheduled fields box
Tick mark on include elements in links option
Press OK
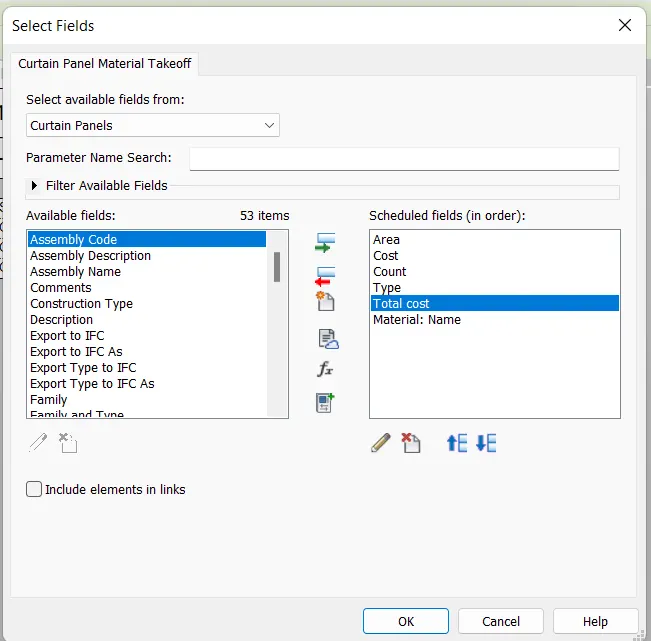
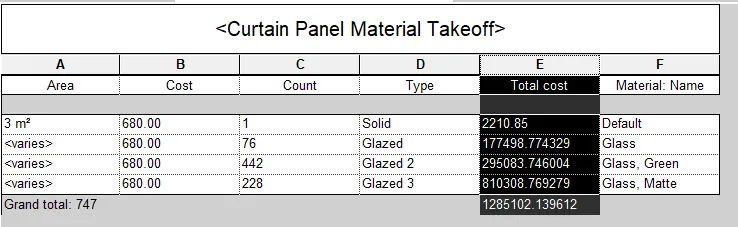
Complete CURTAIN PANELS Schedule is displayed in the model space.
Go to Properties panel
In the Other parameter
Sorting/Grouping option is available
click on the Edit option
Schedule Properties dialogue box opens
Sort by: Select the required itemfrom the dropdown list
Then By: Select the required itemfrom the dropdown list
Then by: Select the required itemfrom the dropdown list
Grand Totals: Select the required itemfrom the dropdown list
Press OK
Click on Formatting parameter in the Properties
Schedule Properties dialogue box opens
Change the data if required
Press OK
CURTAIN PANELS Schedule list is displayed on the screen as per the settings we have made.
RESULT: -
We prepared total cost of materials and Individual Material Take off used in the project Using the schedule for
- Walls
- Doors
- Windows
- Curtain panels
5Q]
AIM: -
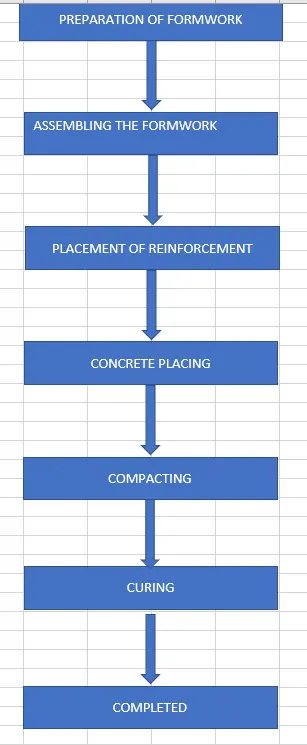
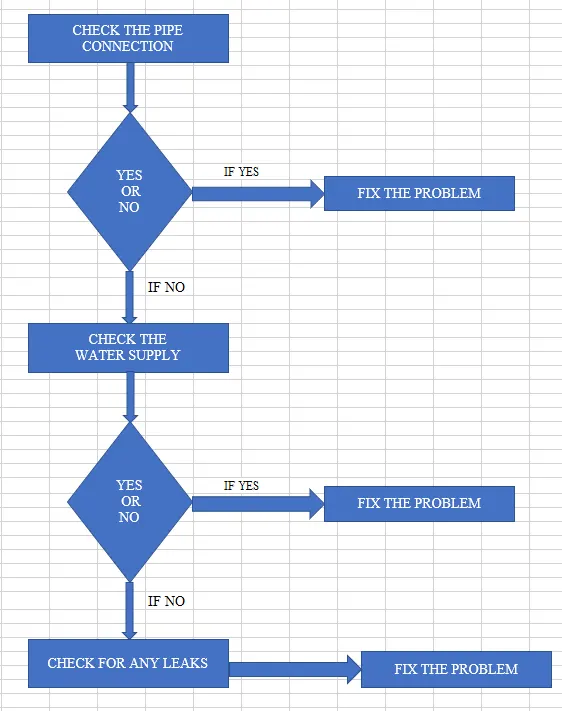
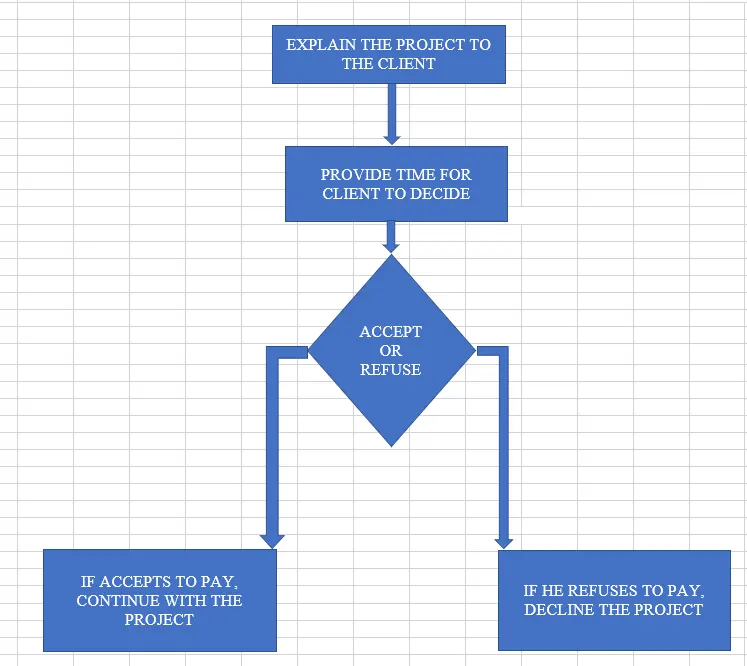
Using the concept of visual programming list a flowchart
- How to decde framings for a structure
- If there is no water coming from the pipes
- If request for money from client has been declined for the project
PROCEDURE: -
How to decide Framings for a structure
Open Excel
Click on Insert tab
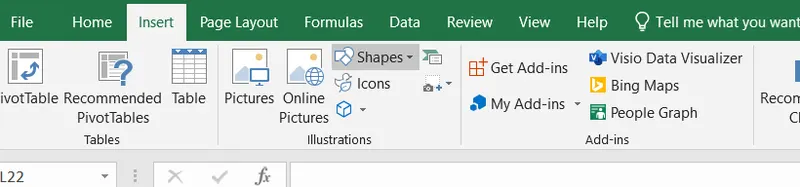
Under Illustrations panel
Click on shapes
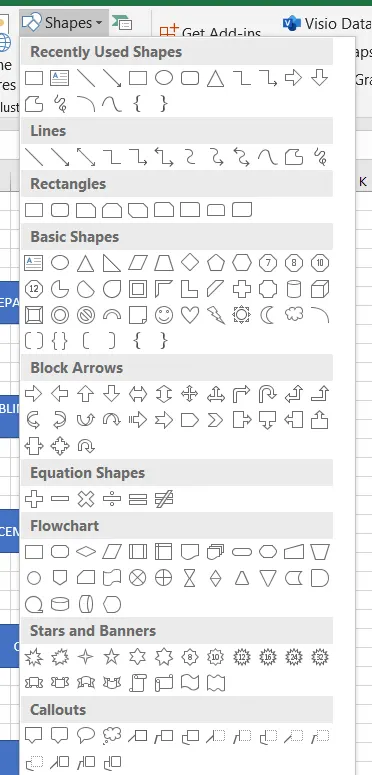
All the shapes are available required for Flowchart
Create the Flowchart
If There is no water coming from the PipeLine
Open Excel
Click on Insert tab
Under Illustrations panel
Click on shapes
All the shapes are available required for Flowchart
Create the Flowchart
If REQUEST FOR MONEY FROM CLIENT HAS BEEN DECLINED FOR THE PROJECT
Open Excel
Click on Insert tab
Under Illustrations panel
Click on shapes
All the shapes are available required for Flowchart
Create the Flowchart
RESULT: -
We created the Flow chart for the concept of visual programming
- How to decde framings for a structure
- If there is no water coming from the pipes
- If request for money from client has been declined for the project
6Q]
AIM: -
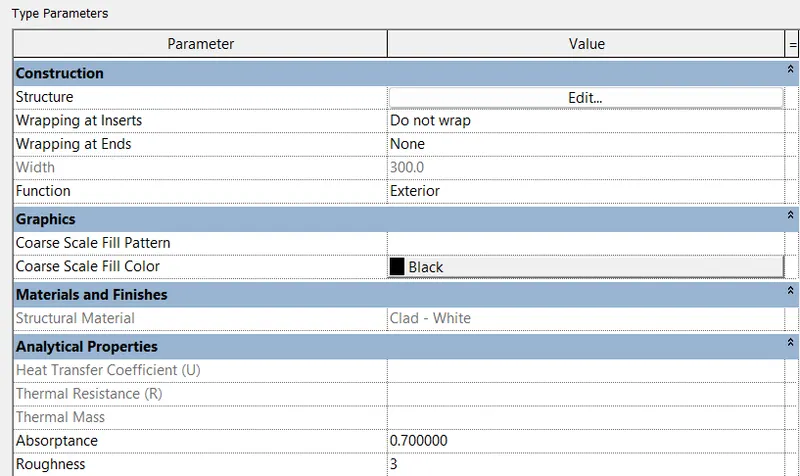
List the Parameters associated with each model.
- Wall
- Floor
- Door
- Window
- Table
- Building
PROCEDURE: -
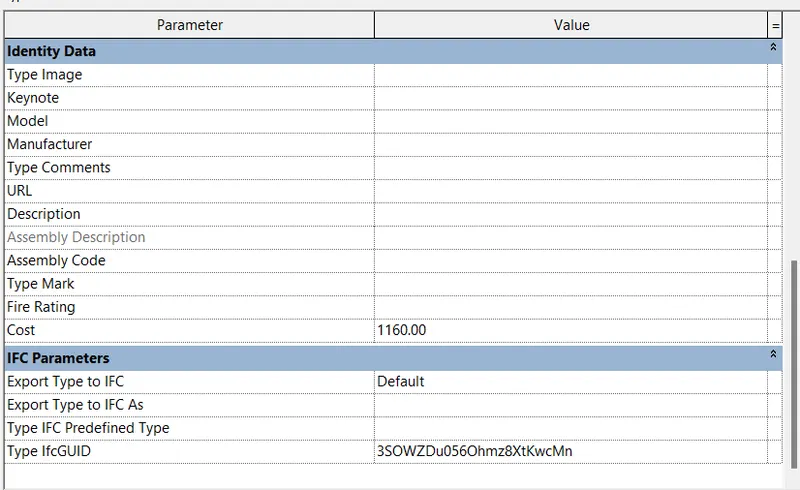
WALL: -
Open Revit Project file
Click on wall in the model space
Now, Go to Properties
Click on Edit Type
List of parameters are available
FLOOR: -
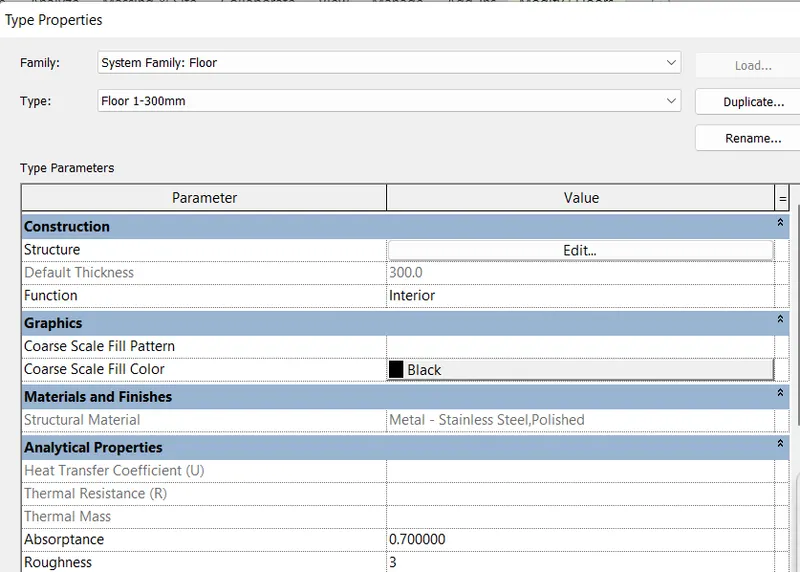
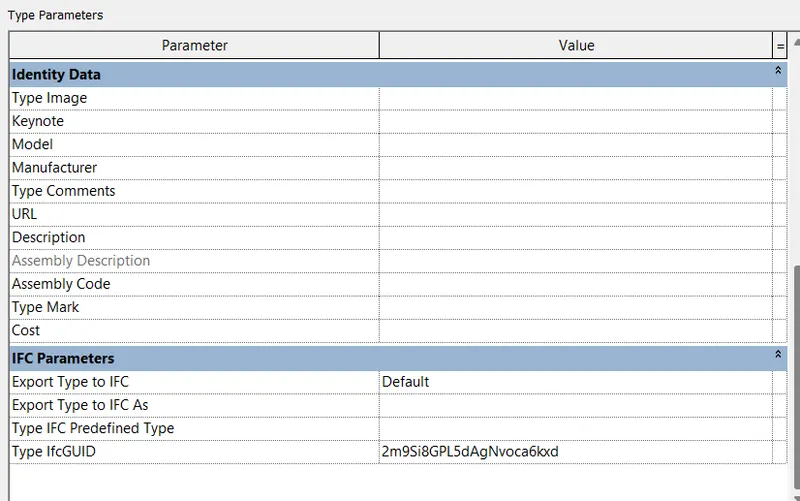
Open Revit Project file
Click on FLOOR in the model space
Now, Go to Properties
Click on Edit Type
List of parameters are available
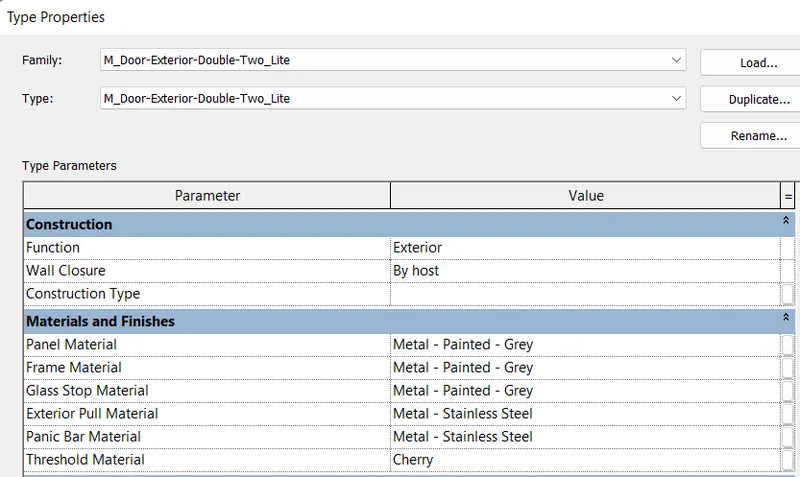
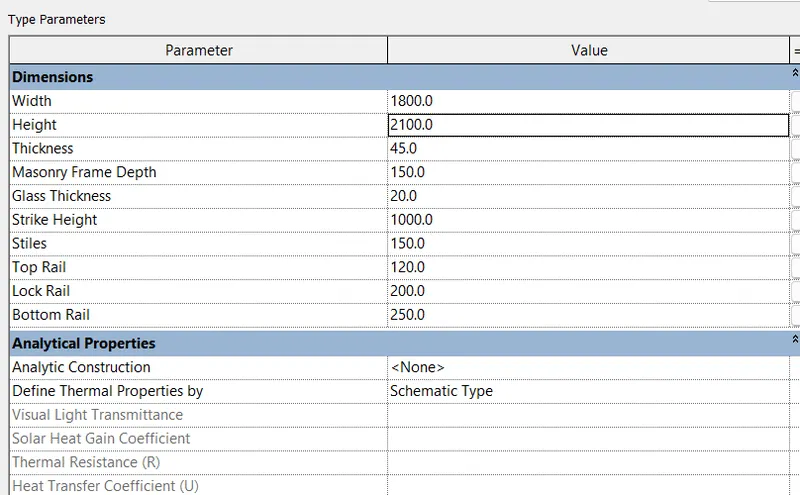
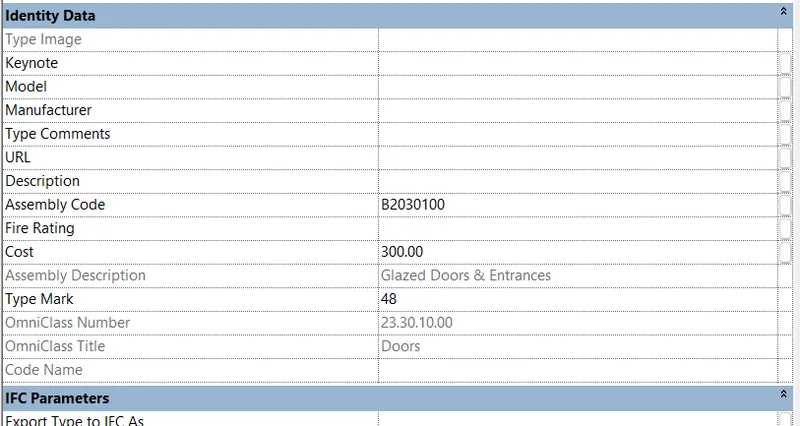
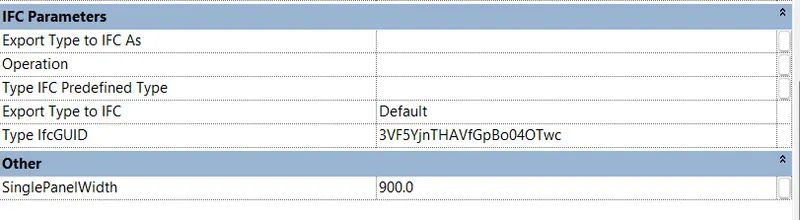
DOOR: -
Open Revit Project file
Click on DOOR in the model space
Now, Go to Properties
Click on Edit Type
List of parameters are available
WINDOW: -
Open Revit Project file
Click on WINDODW in the model space
Now, Go to Properties
Click on Edit Type
List of parameters are available
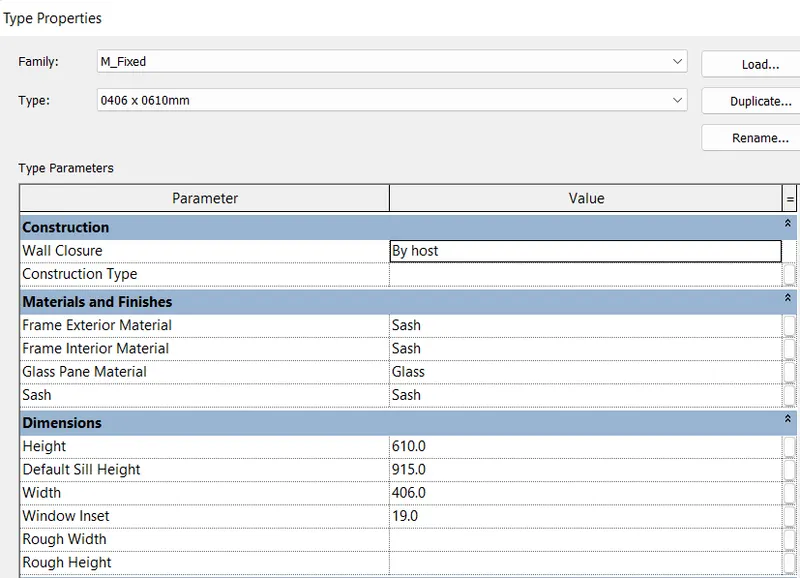
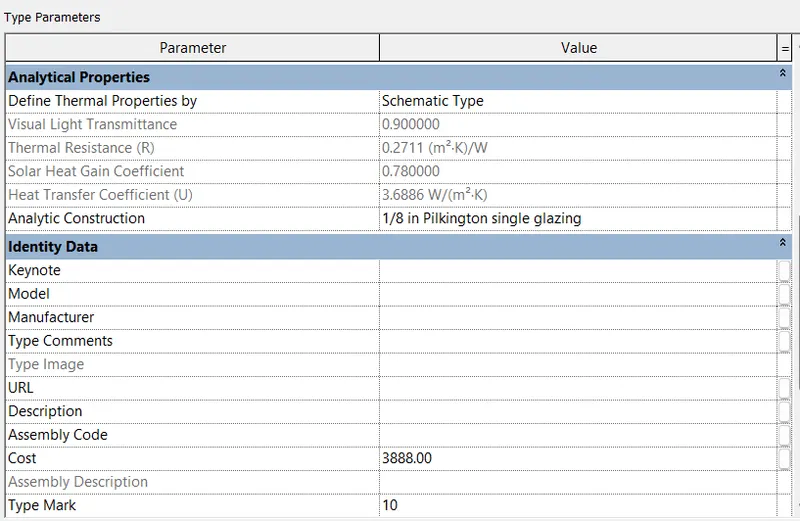
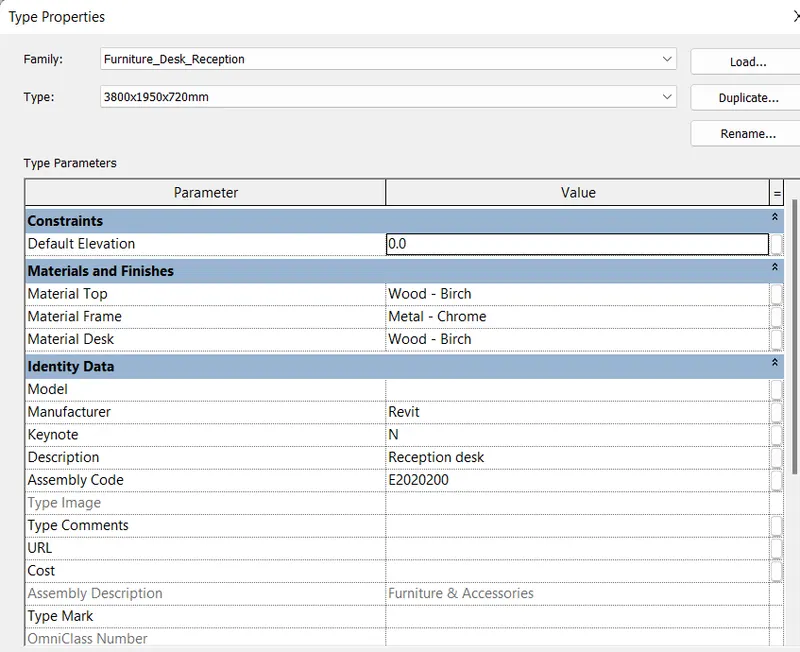
TABLE: -
Open Revit Project file
Click on TABLE in the model space
Now, Go to Properties
Click on Edit Type
List of parameters are available

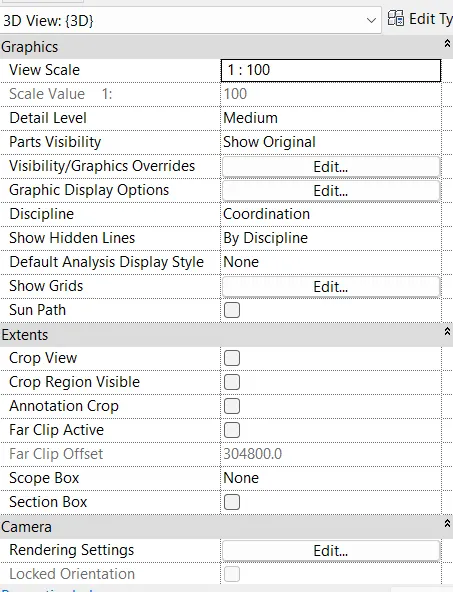
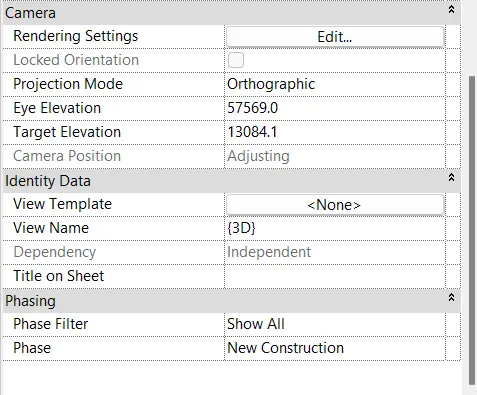
BUILDING: -
Open Revit Project file
Click on BUILDING in the model space
Now, Go to Properties
List of parameters are available
RESULT: -
We listed the parameters associated with each Model Element
We attached the screenshot of list of parameters associated with each model element.
- Wall
- Floor
- Door
- Window
- Table
- Building
RESULT: -
We listed the Parameters associated with each model.
- Wall
- Floor
- Door
- Window
- Table
- Building