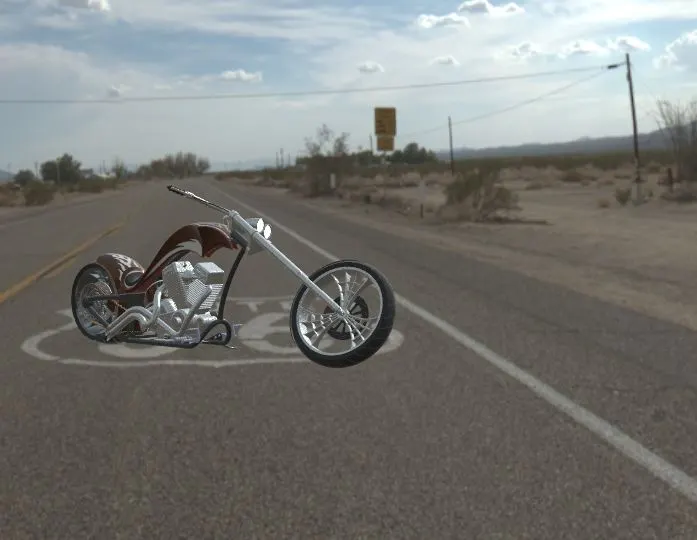
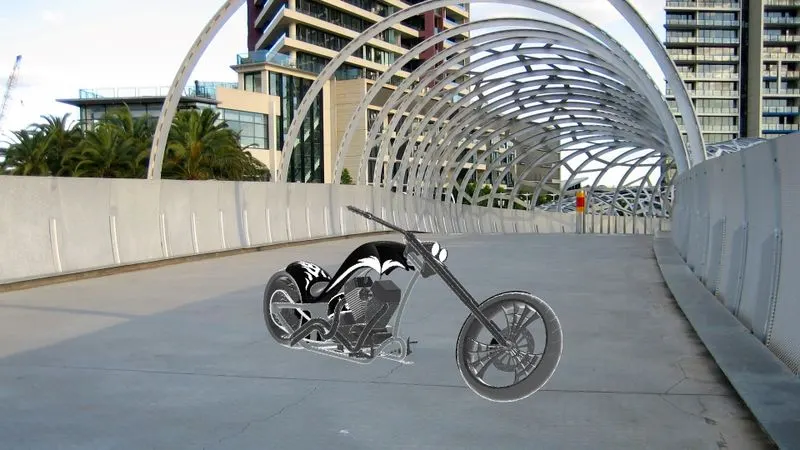
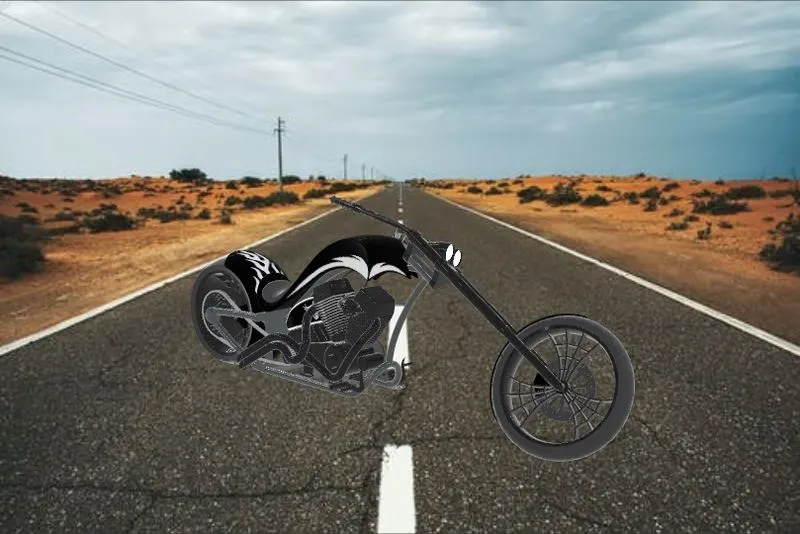
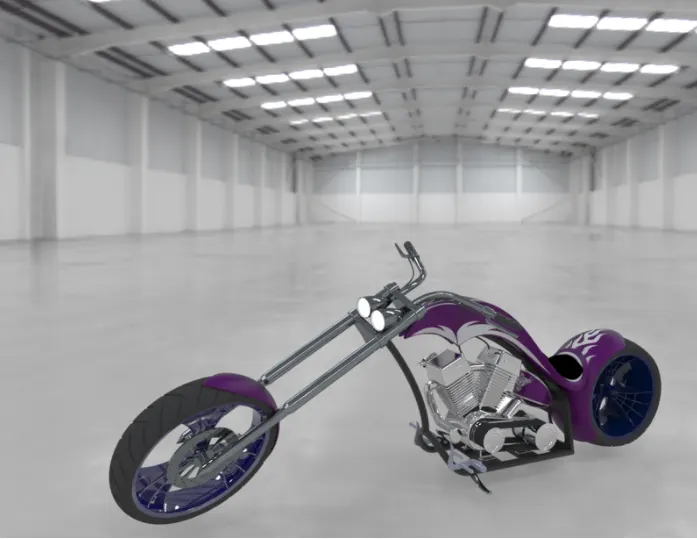
Photo Realistic Rendering
Design Assembly and Renderng of American chopper motorcycle
Objective :
- Main aim of this project is to learn and demonstrate the design philosphy of retro american chopper motorcycle using solidworks .
- Rendering the model using both photoview 360 and solidworks visualize to give it realistic view with sutiable envrionments .
Introduction :
A chopper is a type of custom motorcycle which emerged in California in the late 1950s. A chopper employs radically modified steering angles and lengthened forks for a stretched-out appearance. these can be built from scratch or modified (chopped) from original motorcycle.these are bikes with high rake angles and trail low seat heights long wheelbase and long front suspension travel . the rider sits with upper torso upright or leaning slightly rearward . A set of tubes which connect the rear fender and which are often extended several feet high is a signature feature on many choppers .
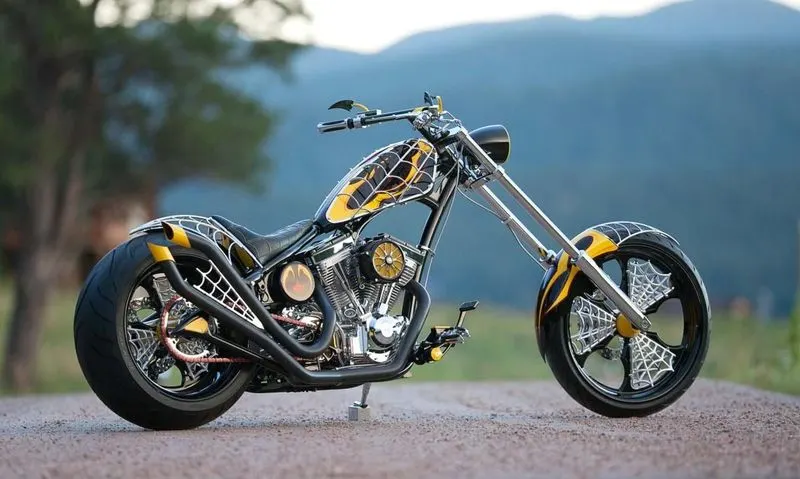
Example of american chopper
Design methodology :
Description :
Modelling of all indivdual parts of chopper and sketches used as well as features is explained briefly
1.Transmission Belt:
Transmission belt is a machine component used to transmit power from oe shaft/ pulley or a rotating component to another . Belts may be used as a source of motion, to transmit power efficiently or to track relative movement. Belts are looped over pulleys and may have a twist between the pulleys, and the shafts need not be parallel. these belts are made mostly of rubber canvas material having upsides such as low slip ,long life and low maintenance costs .
here belt used in the chopper is used to drive the chain shaft driven by engine flywheel.
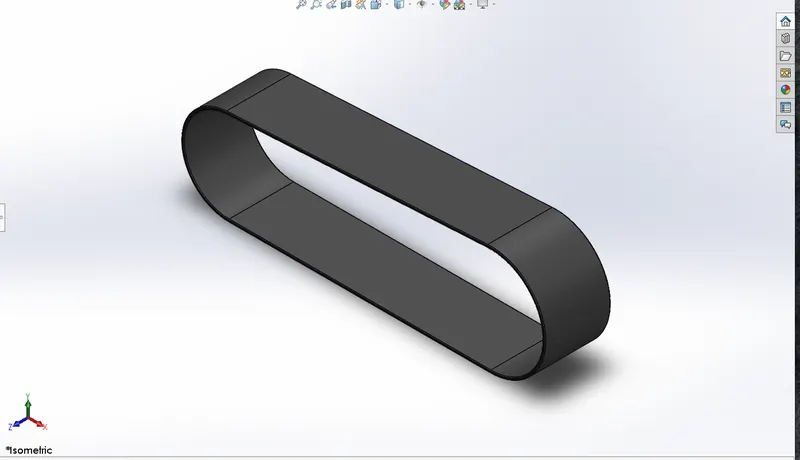
Commands used :
Sketch , Extrude ,Fillet,Apperance , Offset entities
Procedure :
- Sketch on front plane - Two 3-point arcs of radius 61mm and 70mm Respectively.
- Give horizontal relation between the centres of both the arcs and use Smart dimension to give a distance value of 350mm between both the centres .
- Draw lines above and below to connent both arcs
- Make both the lines tangent to all 4 points with arcs.
- Use sketch offset on the whole sketch of 3.5mm in outer direcion
- Extrude the sketch region Blind 88mm
- Use fillets of 1mm on sharp edges of belt
- Apply appereance of Matte Rubbber on the part
- Thus transmission belt is modelled .
2. Kickstand or Side stand :
This is a machine component used to support the chopper in rest position.this is generally mounted on the left side of chassis lower side and has a free movement of 90 deg so that stand can be swayed up when not required or while driving. this component should have high/ compressive strength to withstand the load bike while in rest position .
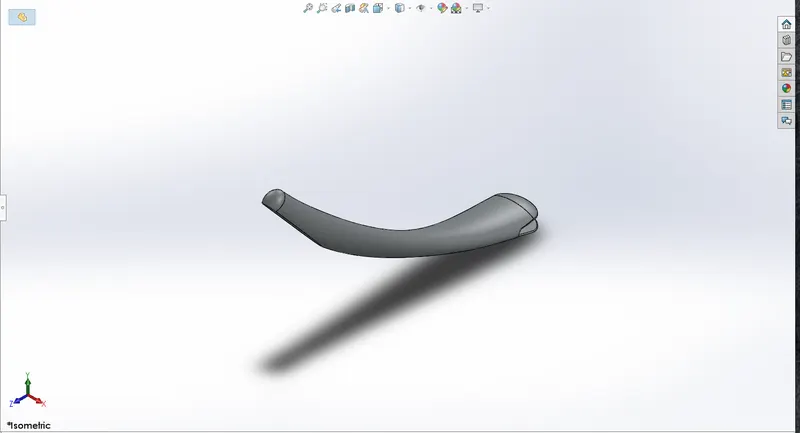
Commands used :
sketch , loft ,Split , Dome , Extruded boss ,Extruded cut , Fillet ,Appearance, pierce
Procedure:
- Sketch an ellipse on the front plane of 40mm width and height of 18mm and make its centre point coincident to orgin.
- Sketch a spiline perpendicular to the front plane giving appropiate weights
- Create a plane perpendicular to the other end of the spiline and sketch an ellipse of width 30mm and height of 12mm
- create a pierce relation between the ellipse and the spiline .
- Use loft feature more specifically the centre line loft by selecting the spiline as the centre line and the 2 ellipses as references .
- sketch a line on the new plane and use split feature to create a flat bottom cut for the kickstand.
- Sketch a centre point rectangle on the right plane on the origin of width 28mm and height 8mm.
- Extrude cut through all both to create a cut-out for the stand mount to the chassis.
- Sketch a circle of 9mm diameter on the cut section face and extrude boss the same up to next to create a stand mount.
- Apply fillets of 2mm and 0.5mm at appropriate edges.
- Apply the chromium plate appearance to the part and save the part as Kickstand.
3.Front Fender:
A fender is an automobile part that is bound to the vehicle frame and is placed as a cover on the upper side of the tyres. Its primary purpose is to prevent sand, mud, rocks, liquids, and other road spray from being thrown into the air by the rotating tire. Front wheels require the fenders to provide mud and gravel protection on the rear side i.e., the rider side and the engine. This part is also known as mud guard.
commands used:
Revolve,Split ,Dynamic mirror entity,Fillet,Appearance
Procedure :
- Rename the Front plane, Top plane and the Right plane as Vertical plane Front fender, centre plane fender and mid plane front fender Respectively.
- Sketch a 3point arc of radius 125mm and end points distance 160 mm
- Apply vertical relation of orgin to centre point of arc
- Make the end points of arc horizontal
- Apply vertical distance of 280mm from the origin to centre point of arc
- Apply sketch offset of 6mm inwards
- Sketch horizontal construction line along origin
- Revolve the closed sketch about the origin line with direction 1 5deg and direction 2 130 deg
- sketch the construction line on the fender face and apply dynamic mirror entity for the line
- Sketch a spiline of appropiate dimensions on one side of the centre line of fender face
- Use split feature to cut parts and select consume body to give fine cut on the top of fender
- Do similar split option on the other end of fender
- Apply appropriate fillets on sharp edges
- Apply appearance of painted metallic car
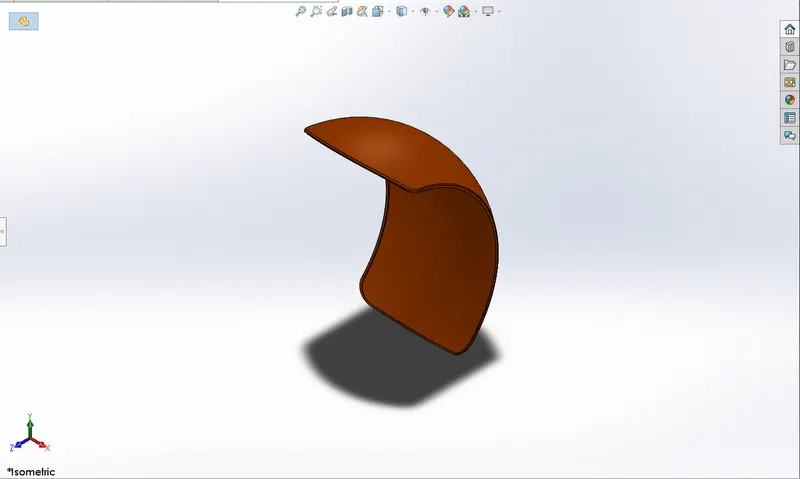
4. Rear Fender :
A Fender is an automobile part that is bound to vehicle frame as its importance is explained above .As front wheelsa rear wheels require fenders to provide mud and gravel protection on front side i.e., the rider side and chassis.
+
Commands used :
Revolve , split, shell ,Dynamic mirror entity, fillet
Procedure :
- Rename the Front plane, Top plane and the Right plane as Vertical plane Rear fender, centre plane rear fender and mid plan rear fender Respectively.
- Sketch a 3point arc of radius 290mm and end points distance 364 mm
- Apply vertical relation of orgin to centre point of arc
- Make the end points of arc horizontal
- Apply vertical distance of 280mm from the origin to centre point of arc
- Apply sketch offset of 6mm inwards
- Sketch horizontal construction line along origin
- Revolve the closed sketch about the origin line with direction 1 10deg and direction 2 140 deg
- sketch the construction line on the fender face and apply dynamic mirror entity for the line
- Sketch a 3-point arc of radius 265mm on one side of outer face of fender, make the distance between origin and the arc centre point 227mm
- Use split feature to cut parts and select consume body to give fine cut on the top of fender
- Do similar split option on the other end of fender
- Apply appropriate fillets of 45mm on 4 edges
- Use shell feature with value of 4mm on iniside face of fender
- Apply appearance of painted metallic car
5. Chain :
A chain is set of several links made of small plates and pin joints connected in a loop to make power transmission component. this is mainly used to transmit power from one shaft to another using sprockets as connecting means to shafts. the main advantage of chain is high power transmission capacity, good flexibility , low cost . the disadvantage of chain is high maintenance
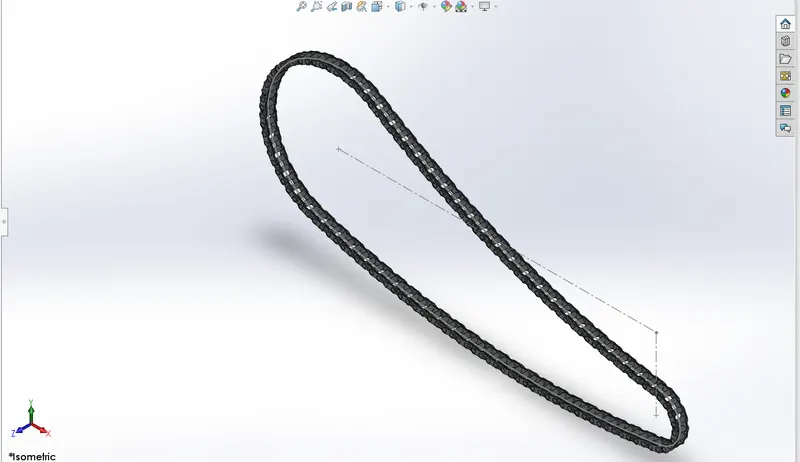
Commands used :
Extruded boss,make and save block ,fillet , curve driven pattern ,mirror
Procedure :
- Rename the Front plane, Top plane and the Right plane as Midplane chain, centre plane chain and front plane chain Respectively.
- sketch the chain path with two 3-point arcs of same dimensions as the rear and the front sprocket with diameters of 289mm and 99mm respectively.
- Give 650mm as the horizontal dimension and 147mm as vertical dimension between the 2 arc centers.
- Join 2 arcs from top and bottom with 3-point arcs of 1500mm dia and keep tangency at points.
- Create two chain links with pins of diameter 8mm and centre to centre distance of 15.13mm and extrude the pins with midplane 25mm.
- Sketch the link plates with appropriate dimensions and extrude the plates of 1 link offset by 9.5mm and value of 2mm.
- Fillet the sharp edges of pins with value of 0.5mm
- Create a block of both the links and save it as a block for future.
- Make the centre of the first link coincident to the tangency point of chain path sketch.
- Select the linear pattern curve driven upto next tangency point of chain path.
- Import the saved link blocks and repeat the process of the pattern for all new tangency points for smooth transition of chain links.
- Put all the pins in a new folder and all the plates in ft.
- Mirror the plates folder across the chain path sketch.
- Apply chromium plate appearance to the body.
6. Oil Tank:
Oil tank is a component used to store the oil for lub and cooling purposes of engine components. The oil tank used in this chopper is used for engine lub and cooling and is placed right below the rider seat on the top of gear box.
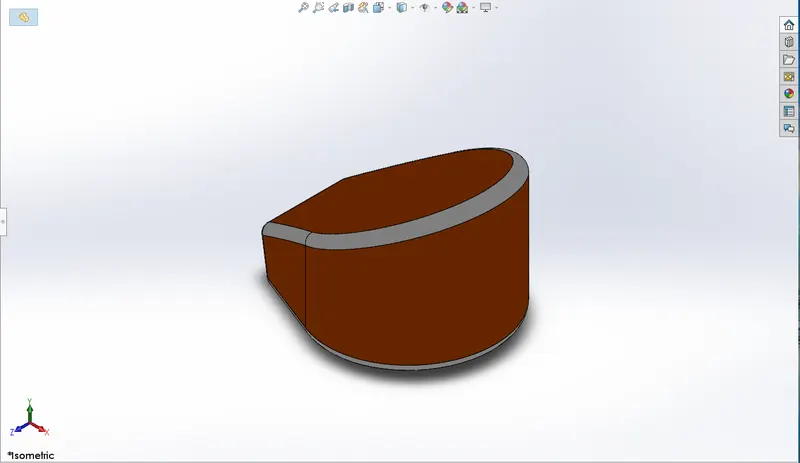
Commands used:
Extruded box, Fillet , Combine, Shell
Procedure:
- Rename Front plane to the Mid plane Oil Tank.
- Start a sketch on the top plane with a horizontal construction line of length 230mm passing through the origin.
- Sketch a line 50mm on one end of construction line perpendicular to it.
- Sketch and angled line and complete the sketch with an arc as shown below.
- Create a reference point vertical to origin 146mm above.
- Make the angled line collinear to the reference point.
- Make a tangent relation between the angled line and the arc.
- Mirror the whole skecth along contruction line.
- Extrude the sketch blind 170mm.
- Now sketch on the midplane
- Extrude this sketch through all in both directions
- Use Combine feature and select type as common.
- Fillet all the edges 10mm.
- Create a shell of 3mm to create a hallow tank.
- Apply appearance white on fillet and red on the oil tank.
7. Pedal:
A pedal is motorcycle component used by the rider to place his/her foot on it. This is also called as foot peg. In a chopper type motorcycle, the pedals are placed in forward position such that legs of rider are fully extended in a comfortable manner.
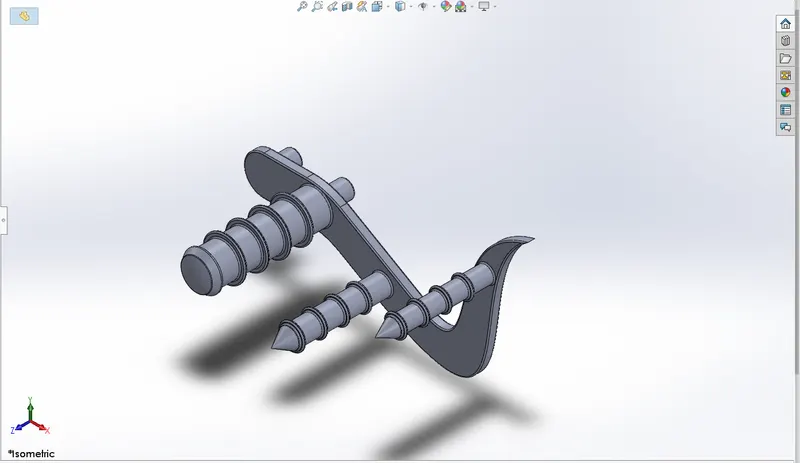
Commands used:
Extruded boss, Revolve, Fillet, Dome, Chamfer, Linear Pattern.
Procedure:
- Create the following sketch on the front plane.
- Make use of sketch Fillets as shown with value of 60mm radius.
- Add spline weighs as shown and make sure the tangency is maintained.
- Extrude the sketch(except the circles) blind 8mm.
- Extrude the first two circles of dia 16mm in reverse direction 20mm and merge the results.
- Create fillet of 1mm on both flat faces of first extruded plane.
- Sketch the following as shown in the figure.
- Revolve the sketch and merge results.
- Create a dome of 3mm on end face of this revolved part.
- Apply fillet of 1mm on the end face of dome.
- Extrude the remaining 2 circles of diameter 18mm and 15mm of primary sketch 100mm from the surface.
- Use chamfer on 18mm dia boss.
- Use chamfer on 15mm dia boss.
- Offset the circles as shown in the figure.
- Extrude boss the sketch with offset 20mm from the surface blind 2.5mm ,fillet the face with 1mm.
- Use linear sketch pattern with spacing between instances as 20mm and number of instances as 4
- apply chromium plate to entire part
8.Front Wheel
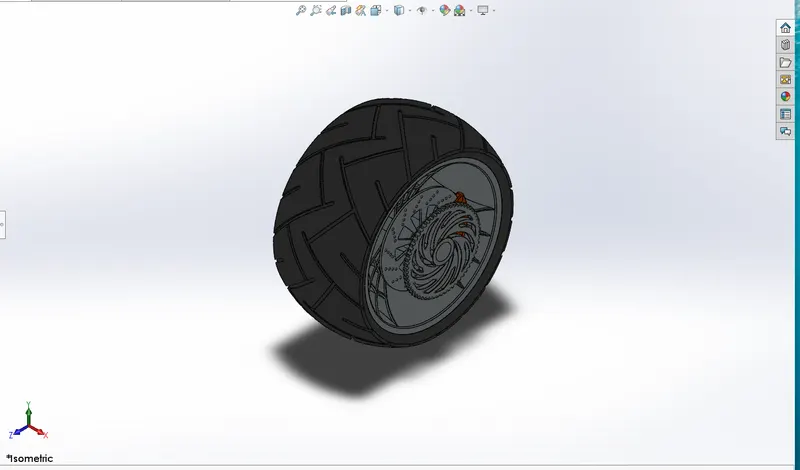
Wheel consists of the rims and the tyre which make it component that makes connection between the motorcycle and the ground . the rim is an important strength component which ensures safe load carrying capacity of the bike . it should have high comporessive strength so as to ensure safety while driving .
Front wheel of choppers are always larger than the rear wheel with narrow section compared to the latter
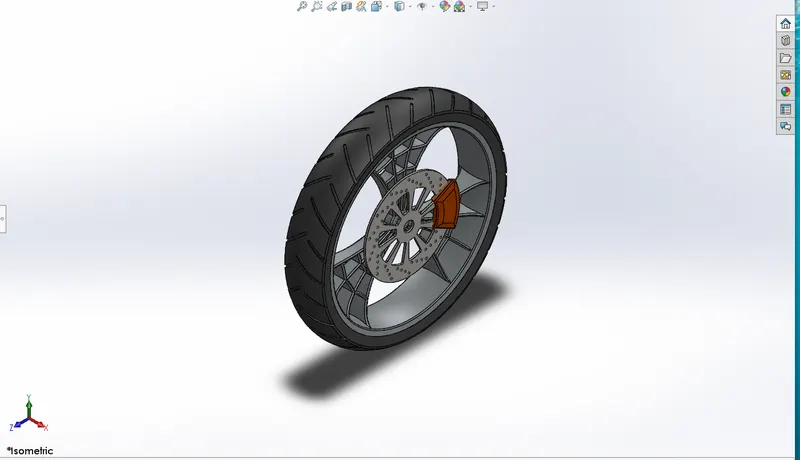
Commands used :
Revolve , Extrude , Extrude cut, Revolve cut,circular pattern,combine ,fillet, chamfer ,appearance.
Procedure :
- Create a horizontal mid point line of 110mm on the front plane origin .
- Sketch a 40mm vertical line on both ends of the mid point line and close the sketch
- Create a horizontal line of 140mm,300mm above the origin and make its midpoint vertical to origin .
- create a 3-point arc and make its cenetred with respect to above line and give it radius of 230mm.make sure that end points of arcs have horizontal relation
- close the sketch lines and give an angle of 75deg and sketch fillet of 7.5mm
- now create a centre line connecting mid point of above line with mid point of the arc and make sure its vertical. Give a vertical distance of 28mm to this line
- makesure the sketches are fully defined and revolve avout the line on origin
- now create a sketch on right plane to create spokes using 3point arc , spilines and construction lines .
- Extrude boss the sketch using midplane and d1=122mm and deselect merge the resuls.
- Create another sketch on right plane and create 4 spilines connecting wheel part and extrude cut through all both and deselect auto select and assign only required body cut .
- Make cob web Sketches
- Offset the spokes 4.5mm inward and trim the external 3 circles and make it construction
- Use the intrsection points of onstruction lines and 3 circles as reference points to create cob web arcs
- make 3 points arc at intersection points and give required dimensions
- Offset all the arcs upto 8mm below and trim extra and now extrude all the arcs upto the spoke vertex on both sides
- create a new sketch on front plane and convert using intersection surface (inner face of rim)
- Revolve cut the sketch about the centre line and deselect auto select and select only required body
- combine spokes and cob web with revolved rim
- Fillet the front and back face of spokes as required
- Now model model disc brake rotor crate asketch on right plane wih circle on right plane (345mm)
- Extrude its offset 45mm and blind 7mm and deselect merge results
- now create a ventilation holes 160mm vertical to origin on face of disc and use circular sketch pattern with 14 instances about the disc centre then extrude cut the sketches by using upto next
- Create new sketch on the same disc face for slot cuts
- sketch 2 circles about the origin with 100 dia and 240mm dia and to connect the both circles sketch both vertical lines
- sketch another line connecting both the circles 25deg part from the previous line
- Trim outer edges and provide sketch fillets of radius 5 to 4 corners
- Extrude cut the sketch by using upto next
- Use circular patterb with 10 instances about the rotor centre now sktch a circle of 40 dia on the right plane nd extrude cut it through all both to create an axle hole
- likewise sketch calliper for disc brake and tyre of front wheel using requied features like sketch, convert entity, sketch fillet Revolve
- For tyre treads sketch on front plane using required features Extrude cut , trim , round fillets ,circular pattern
- and now apply the required appearences .
9.Rear wheel
Wheel consists of the rims and the tyre which make it component that makes connection between the motorcycle and the ground . the rim is an important strength component which ensures safe load carrying capacity of the bike . it should have high comporessive strength so as to ensure safety while driving .
rear wheel of choppers are always smaller than the front wheel with broad section compared to the latter .
Commands used :
Sketch, trim , Extend , Revolve boss ,Extrude boss, Extrude cut, Revolve Cut, Circular pattern , combine , fillet , chamfer.
Prodecure :
- Create a horizontal mid point line of 300mm on the front plane origin
- Sketch a 45mm vertical line of 320mm , 273mm above the origin and make its midpoint vertical to origin
- Create a 3-point arc and make its centred with respect to the above line and give it radius of 600mm .add horizontal relation with each other
- Close the sketch with lines and give an angle of 75 and sketch fillet of 5mm
- create a centre line connecting mid point of above line with mid point of the arc and make sure its vertical and give distance 40mm to this line
- Make sure the sketches are fully defined and revolve about line on origin
- Now create a sketch on right plane to create spokes using 3point arc , spilines and construction lines .
- Extrude boss the sketch using midplane and d1=300mm and deselect merge the resuls.
- Create another sketch on right plane and create 4 spilines connecting wheel part and extrude cut through all both and deselect auto select and assign only required body cut .
- Make cob web Sketches
- Offset the spokes 4.5mm inward and trim the external 3 circles and make it construction
- Use the intrsection points of onstruction lines and 3 circles as reference points to create cob web arcs
- make 3 points arc at intersection points and give required dimensions
- Offset all the arcs upto 8mm below and trim extra and now extrude all the arcs upto the spoke vertex on both sides
- create a new sketch on front plane and convert using intersection surface (inner face of rim)
- Revolve cut the sketch about the centre line and deselect auto select and select only required body
- combine spokes and cob web with revolved rim
- Revolve cut the sketch about the centre line and deselect auto select and select only required body
- combine spokes and cob web with revolved rim
- Fillet the front and back face of spokes as required.
- Now model model disc brake rotor crate asketch on right plane wih circle on right plane (330mm)
- Extrude its offset 105mm and blind 7mm and deselect merge results
- now create a ventilation holes 145mm vertical to origin on face of disc and use circular sketch pattern with 16 instances about the disc centre then extrude cut the sketches by using upto next
- Create new sketch on the same disc face for slot cuts
- sketch 2 circles about the origin with 90dia and 210mm dia and to connect the both circles sketch both vertical lines
- sketch another line connecting both the circles 25deg part from the previous line
- Trim outer edges and provide sketch fillets of radius 5 to 4 corners
- Extrude cut the sketch by using upto next
- Use circular pattern with 9 instances about the rotor centre
- likewise sketch calliper for disc brake and tyre of front wheel using requied features like sketch, convert entity, sketch fillet Revolve
- For tyre treads sketch on front plane using required features Extrude cut , trim , round fillets ,circular pattern
- and now apply the required appearences .
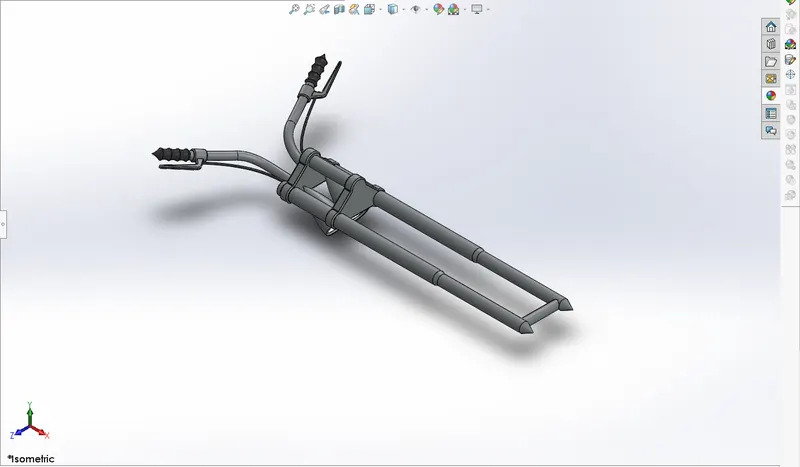
- 10.Front forks:
- Front fork is a component that helps in manoeuvrablity of motorcycle .it houses various sub components such as head lights , handle bars, handle grip , triple clamps, brake lever , clutch lever ,cables and axle .
- the front forks of this american chopper has a high rake angle of 57deg
Commands used :
Revolve boss, Extrude boss , Linear pattern ,Extrude cut ,Revolve cut , Dome, Body move/copy,projected curve , sweep ,mirror, combine , fillet , chamfer
Procedure :
- Create the sketch the on front plane draw a horizontal line of 1330mm
- now draw a line above thils line on right end after 50mm of 485mm connect with a line on right end of height 25mm and then after 505mm from right.draw another horizontal line at height of 30mm upto left end and connect both lines with vertical line
- Revolve it about 1330mm line
- Sketch on top face of 30mm radius of fork and sketch a circle of 75dia
Create the sketch to create triple clamp as shown in fig below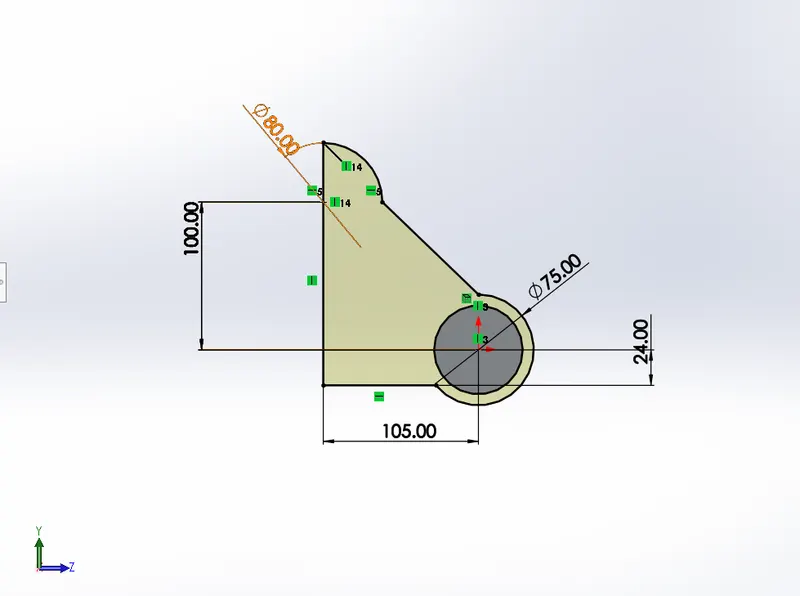
- Extrude boss the sketch from offset towards the fork 20mm and d=40mm , deselect merge results .
- Fillet all the edges 5mm
- Show temporary axis and use linear pattern for triple clap with 2 instances at 240mm distance
- Create a sketch for axle (circle) and extrude upto surface (triple clamp flat surface)
- Merge only with fork and then create a connection between tiple clamps by creating a semi circle with dia 50mm on triple clamp flat surface
- Extrude it upto upper triple clamp surface
- now to create headlight bucket sketch create a skech as shown in fig below
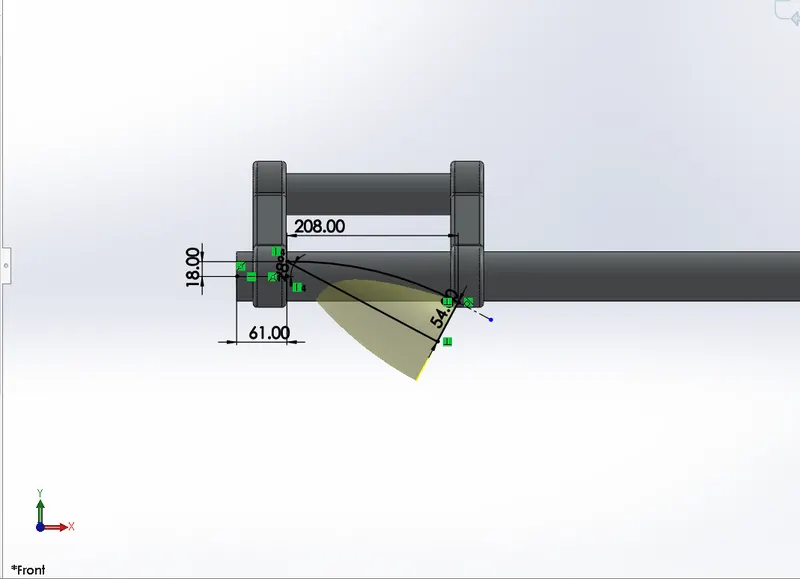
- Revolve it about the line and donot merge
- Move the bucket in z direction - 48mm
- Make headlight detailing by extrude cut 5mm on face
- Now create a dome on headlight lens of 7mm
- Now to create Handle bar sketch sketch a 35 dia circle on face of triple clamp
- Sketch on top plane as shown in fig below
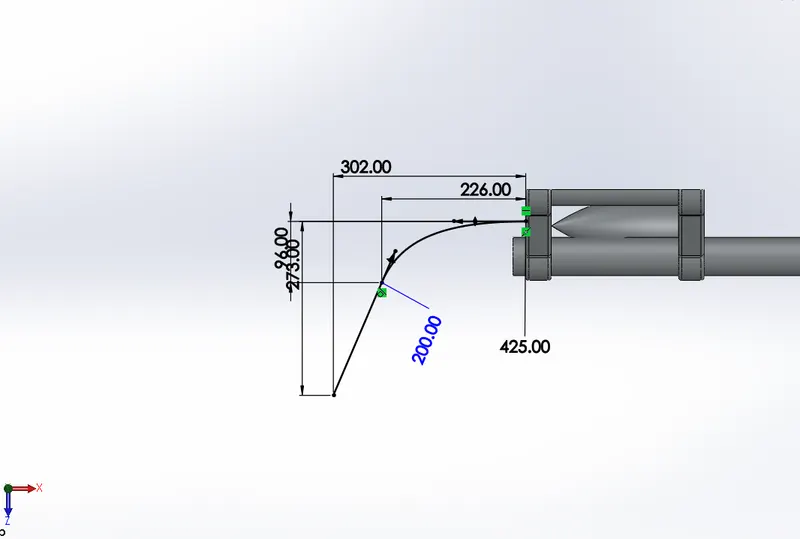
- then sketch on front plane as shown in fig below
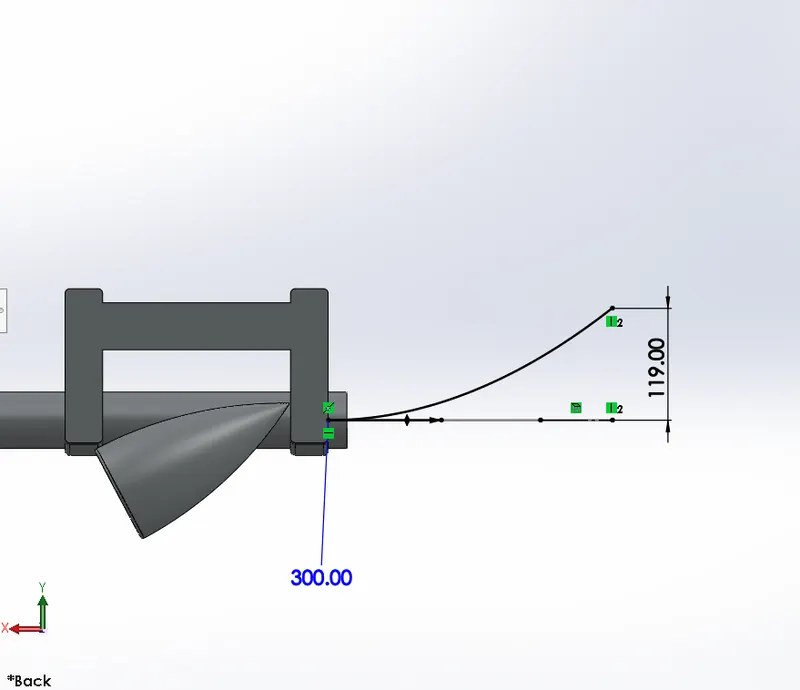
- By using projcted curve feature create a curve using aboth 2 sketches
- Sweep the circle on the curve path
- Create handle grip on reference plane at handle bar end as required shape
- Revolve the sketch about 154mm line and merge with clamps
- Brake lever sketch -Create anew plane with plane 1 as reference at an angle of 160mm
- sketch on this plane as shown in fig below
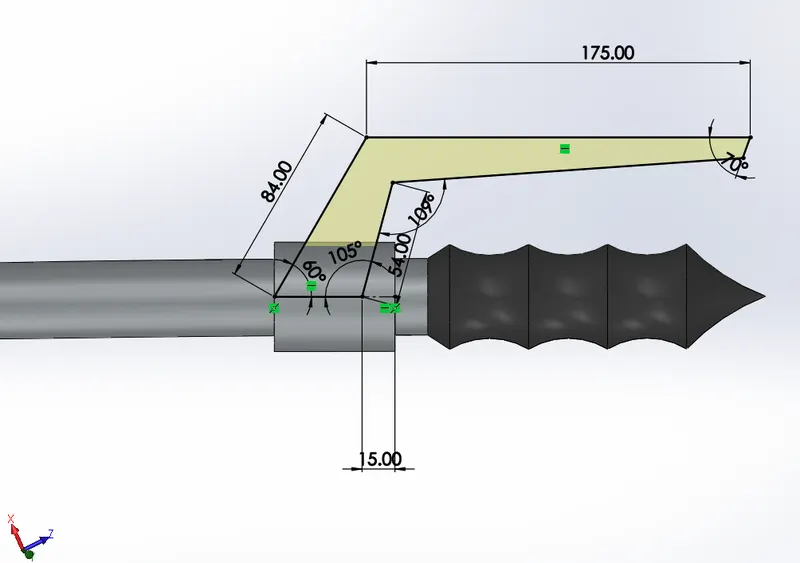
- Extrude the sketch midplane with d1= 15mm
- Fillet the edges appropiately
- Create 2 sketches for cable and use projected curves
- Mirror the whole front fork about a flat face of triple clamps and combine the bodies
- Apply suitable appearances seperately to headlight buckets , forks , triple clamp and handle bar, handle grips and cables.
11.Chassis :
Chassis or frame forms its skeleton. All the components of a motorcycle, like the suspension, wheels, fuel tank, seats, handlebars etc, are attached to this base structure which lends a motorcycle its strength and ability to handle well. Motorcycle frames come in a variety of materials and shapes, based on the budgetary and performance-related limits of the end product.
The chassis used in this chopper is a Rigd hardtail frame which excludes the rear suspension component
Commands used:
Extruded boss, Extrude cut,revolve ,Dome,projected curves,sweep,Split,Reference plane, mirror, combine,fillet, chamfer.
Procedure :
- Rename top plane and front plane to bottom plane chassis and midplane chassis respectively
- Sketch on mid plane Chassis and bring in the sketch picture of chopper
- Place sketch picture by applying coordinates as x=-930mm and y= -805mm use transprency as required
- sketch on mid plane chassis taking a reference of the sketch picture draw splinesand sweep the splines with hallow tubes of 40mm diaand offset 4mm inwards to create concentric circles
- Use projected Curves for chassis tubes in 3d sketch picture
- Create sketch for chassis back plate on right plane as shown below
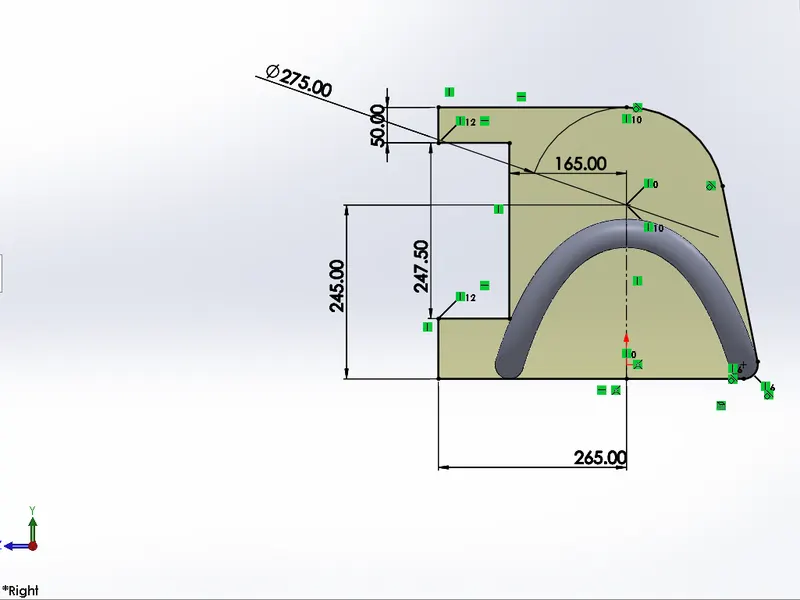
- Extrude boss the sketch 22mm away from tube section and merge results
- Extrude cut the portion on back plate as per chassis
- Sweep the swingarms on a new reference plane and create hub , axle and dome on hub.
- create a new reference plane and sketch as fig below for upper tube chassis
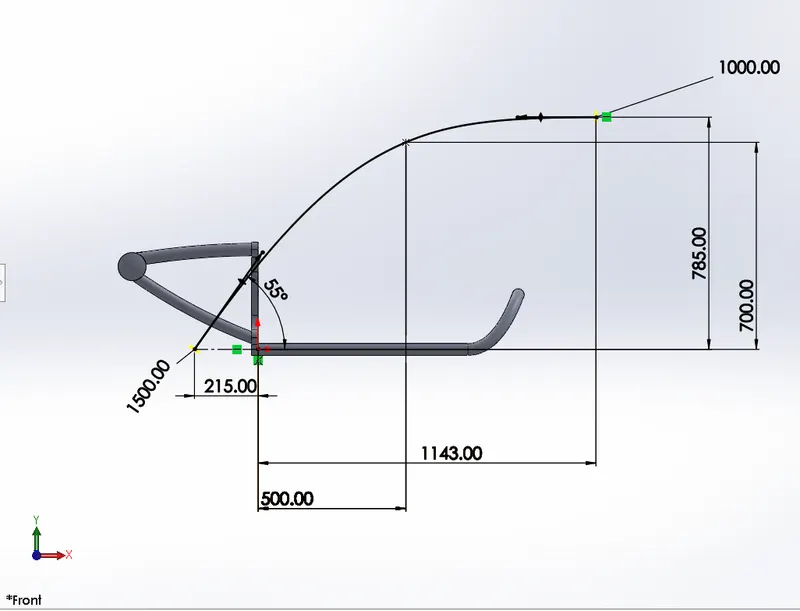
- Sweep the sketch with similar tube sections as before.
- Use split and consume the bodies after the back plate section.
- Create another reference plane for the downtube and create splines as per sketch picture and sweep the path using pierce relation.
- Use split at intersection of downtube to lower chassis and consume cut bodies
- Create the sketch as shown in fig below for steering stem
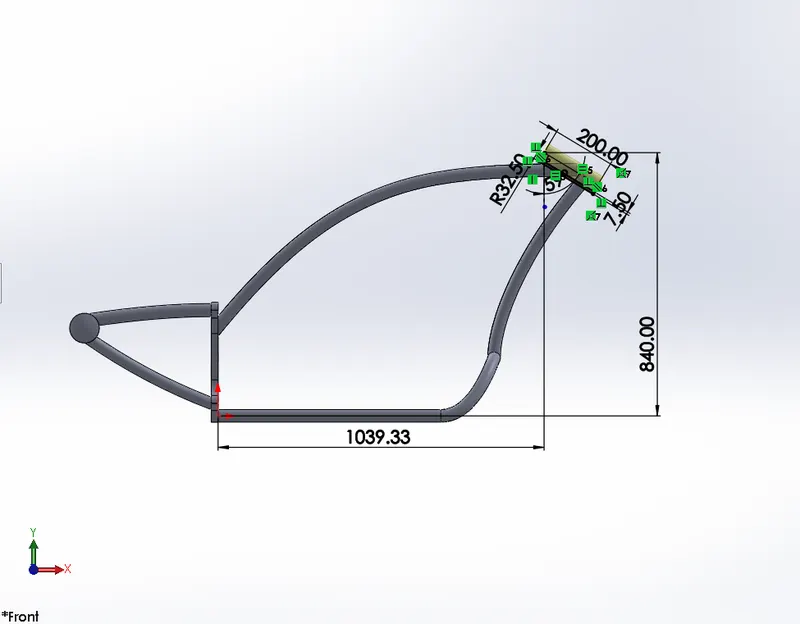
- Revolve about the construction line and use split to consume bodies at intersection
- Sketch as shown in fig below for creating the chassis base plates
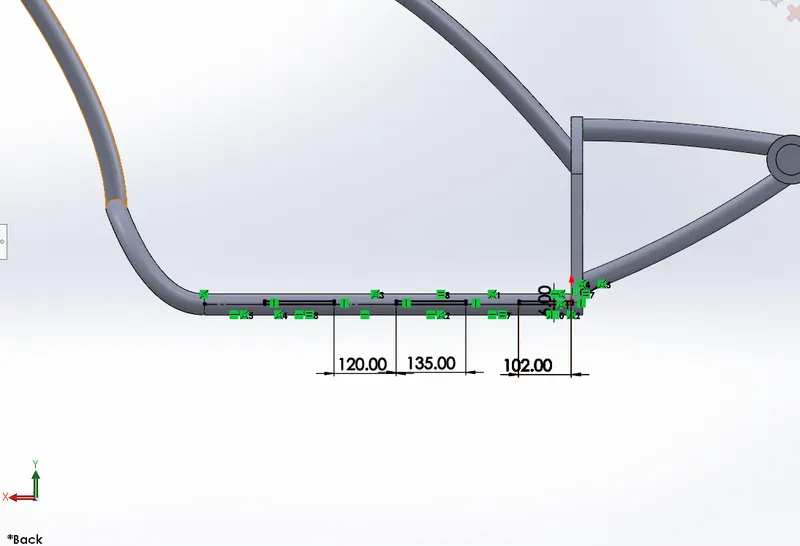
- Extrude the sketches up to next .
- Creating mounts for foot peg and kickstand and kickstand as figures shown below.
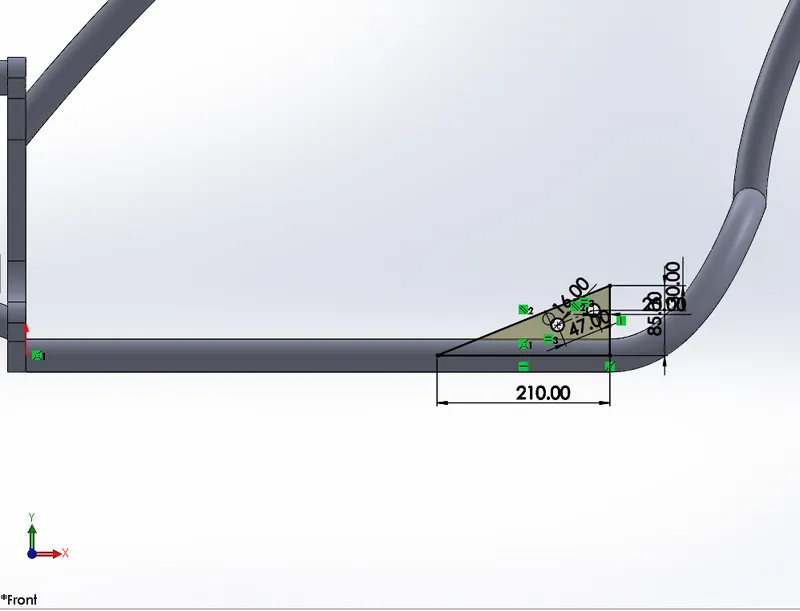
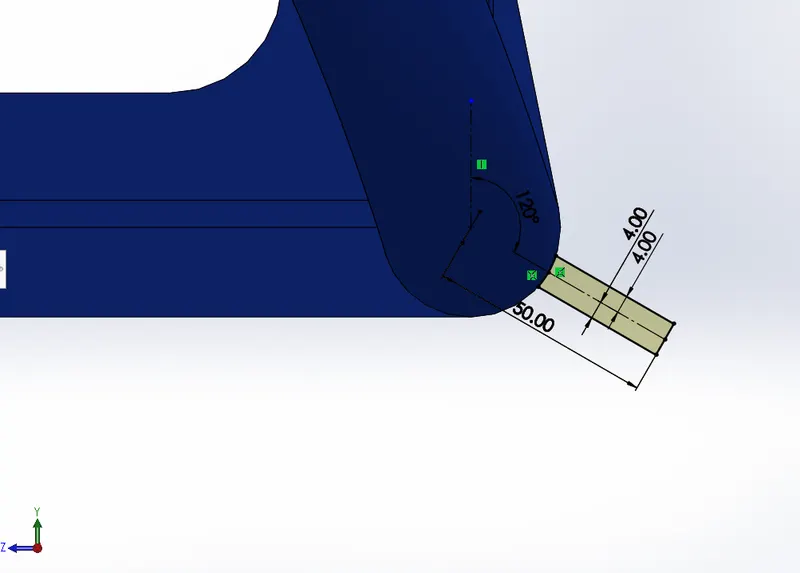
- Use extrude boss, Extrude cut and appropriate fillets for the mounts and mirror the foot peg mount about the mid plane chassis
- Combine all solids bodies into one as chassis
- Create a reference Plane as Bottom plane fuel tank 308mm above the bottom plane chassis .
12.Engine :
Engine is the main powerhouse of any automobile A motorcycle engine is an engine that powers a motorcycle .these engines are typically Twostroke or four stroke combustion engines, but other engine types, such as wankels and Electric motors have been used.
This chopper has a V-twin type engine consisting of external air filter, spark plugs 1 for each cyclinder, Transmission pulleys ,air cooling fins ,starter motor ,front sprocket fo chain drive ,exhaust pipes and casing for sump and gearbox.
It also consists of 4 mounting points to chassis
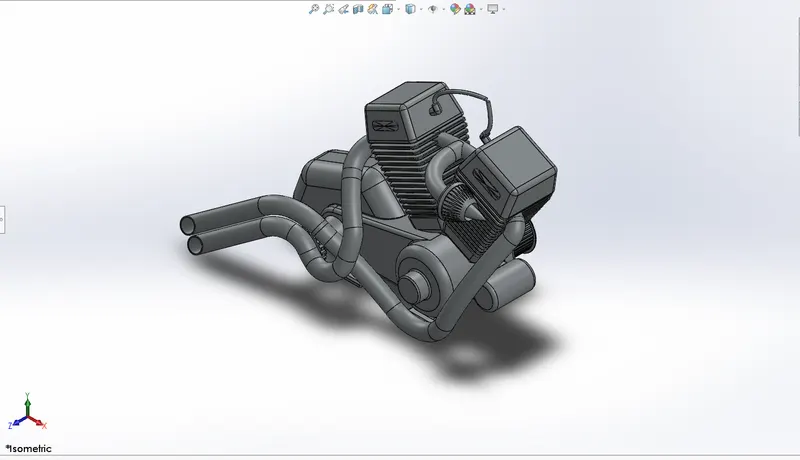
Commands used:
Extruded boss, extrude cut , Revolve,dome ,Projected curve,composite curve, sweep ,split, reference plane, circular pattern , linear pattern , mirror,Combine ,fillet, chamfer.
Procedure:
- Import the sketch picture of chopper and place on front plane with x=-1493mm and y=-965mm.Use appropriate transparency.
- Sketch using the picture reference on the front plane the base of engine.
- Extrude the base 200mm midplane and the gearbox section 150mm midplane.
- Use the fillet on sharp edges .
- Sketch the transmission belt pulleys on right plane as shown figure.
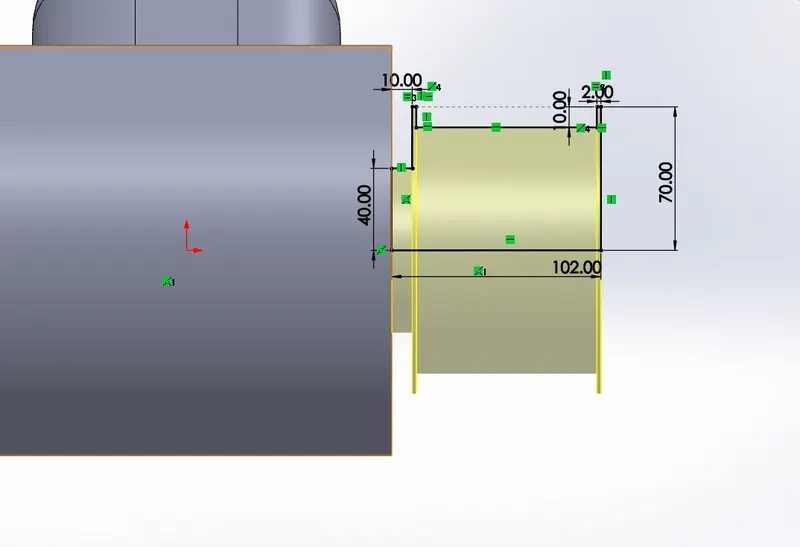
- Revolve the sketch and make extruded rectangles on the pulley for grip element for belt, use circular pattern.
- Make circular pattern holes on pulley face and apply dome.
- Do similar operations for rear pulley.
- Sketch for Starter motor with the picture reference and extrude it appropriately.
- Sketch for cyclinder casing using reference plane as shown in figure below.
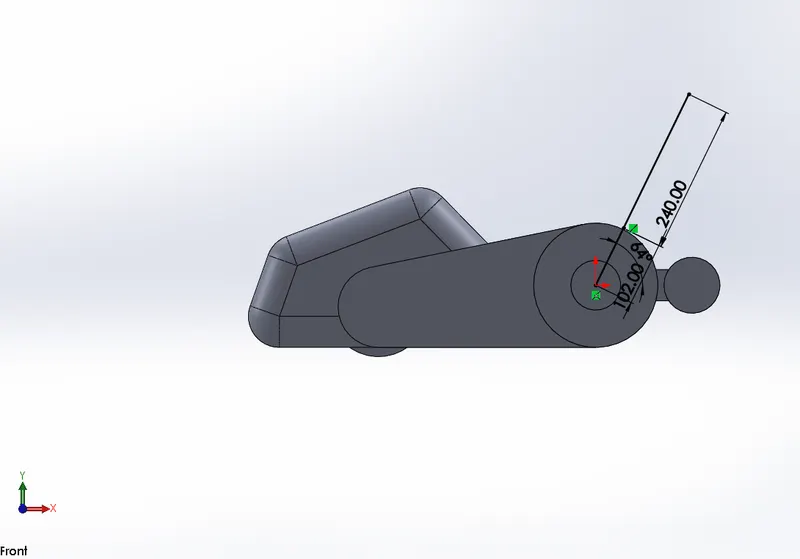
- Sketch a rectangle on the plane and extrude it as per sketch reference.
- Provide fins using linear pattern and fillet as required.
- Create spark plugs and provide fillets.
- Mirror across the right plane to create second cyclinder casing.
- Create mounts on bottom for the chassis mounts as in figure.
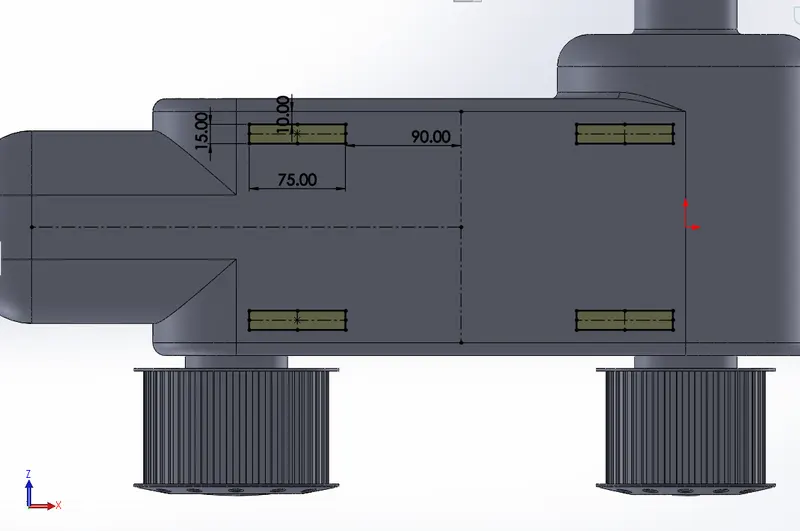
- front sprocket: Sketch 40mm dia at sprocket reference from the picture .
- Extrude the sketch 80mm and sketch sprocket circle and extrude further 15mm.
- Provide Chamfer, chain cuts as done with rear sprocket.
- Exhaust pipes : use spline following the sketch picture and use projected cuves.
- sketch a line to cut out the exhuast ends using split.
- Use splines and Sweep it wih circles for spark plug cables.
- Provide appearance which are suitable .
13.Fuel tank :
The fue tank is fuel storage component in motorcycle.it is made to store flamable fluids or gas in cool state away from engine heat .
The fuel tank of chopper is made to house a seat and fit to chassis centrally with the mount.
it is made upof surfaces and finally these surfacesare knit together to form a complete a solid body with hallow shell to store fuel.
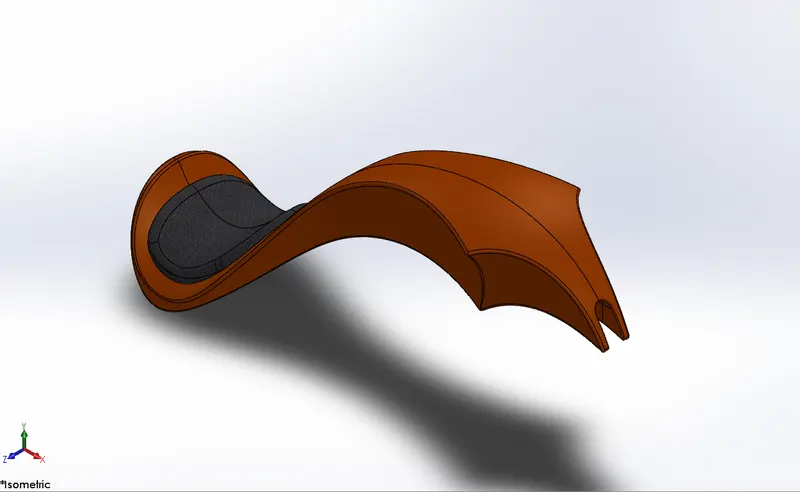
Commands used:
Surface sweep, Surface loft, Surface trim,Boundary surface,
Surface knit,Surface extrude, Projected curves ,Split line, Sweep cut, Refernce planes,Mirror, Shell, Fillet.
Procedure:
- Rename the front , top and right planes to Midplane FT, Bottom plane FT and Right plane FT respectively
- Bring in sketch picture to mid plane FT and place it x= -2096mm, y= -1096mm and use appropriate transparency.
- Sketch on midplane FT
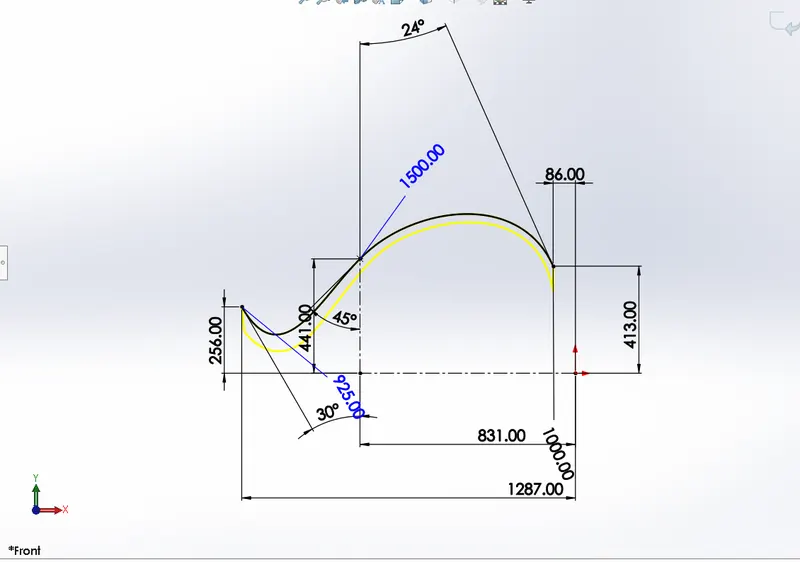
- Create new reference plane using front plane on the starting point of sketch.
- Create appropriate splines on new plane using he picture reference.
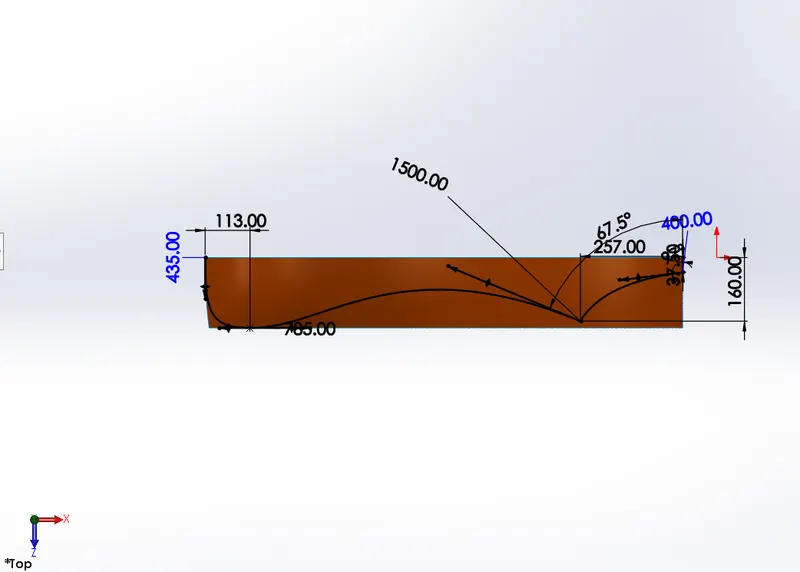
- Create projected curves , new planes and sketch as in reference picture .
- Use surface loft for new sketches.
- Use Boundary surfaces and appropriate relations to create the surface model of fuel tank.
- Create sketch for the seat on the bottom plane as shown in figure
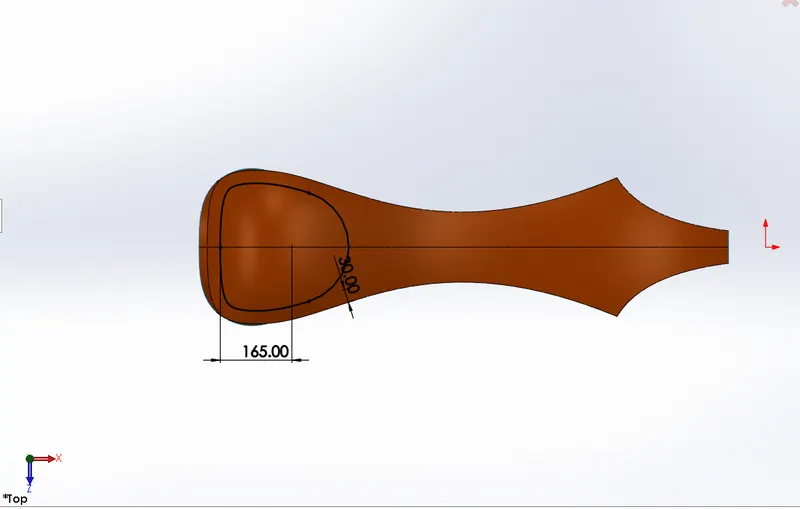
- Use surface extrusde for the seat and provide appropriate fillets.
- Knit all surfaces and make solid.
- Create a shell of 3mm without any selection.
- Give suitable appearances for fuel tank and seat
ASSEMBLY
the chopper consists of all the parts attached in appropriate manner with proper mates.the main component chassis is first fixed and other parts are mated with respect to its position.
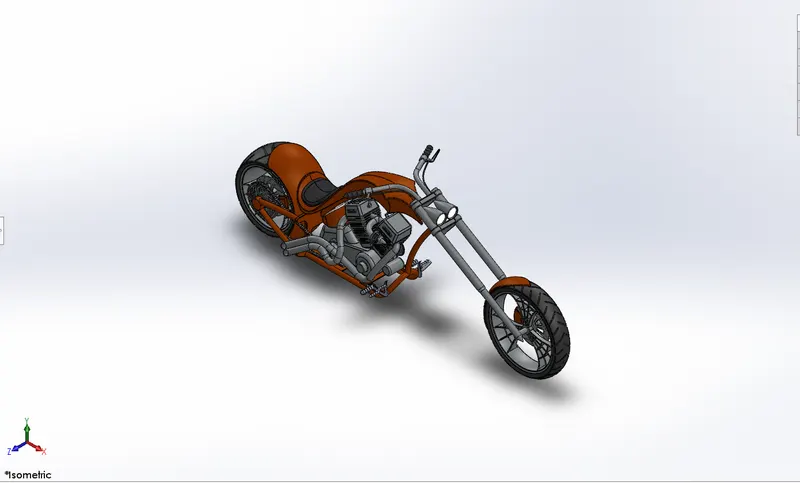
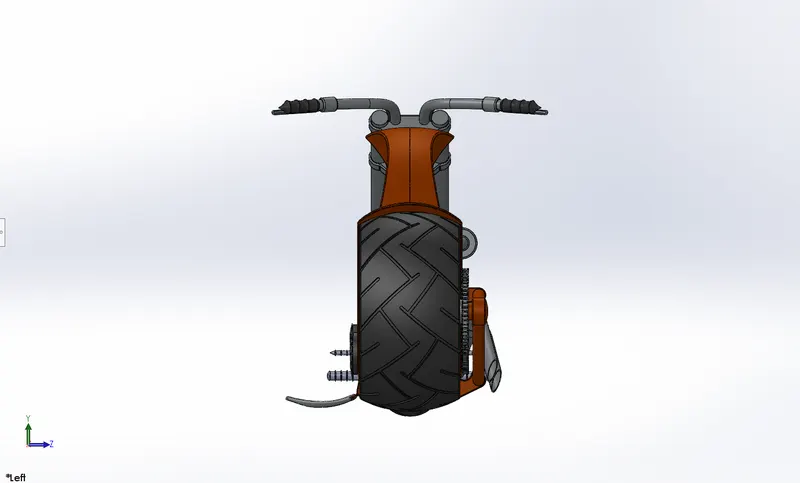
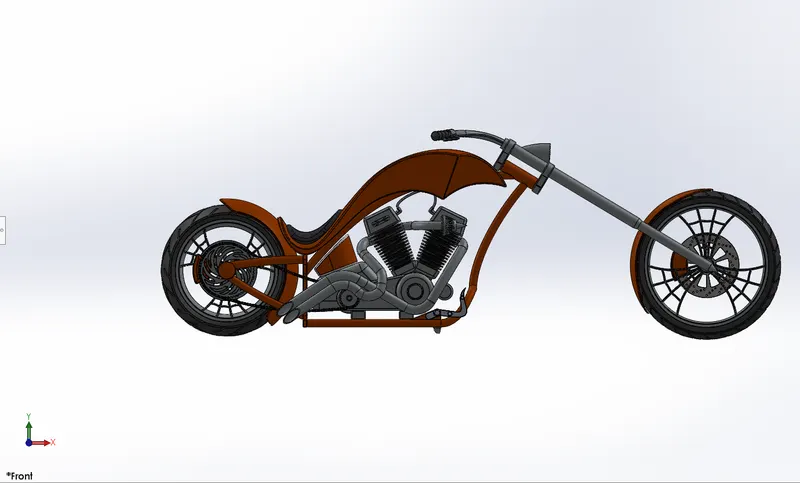
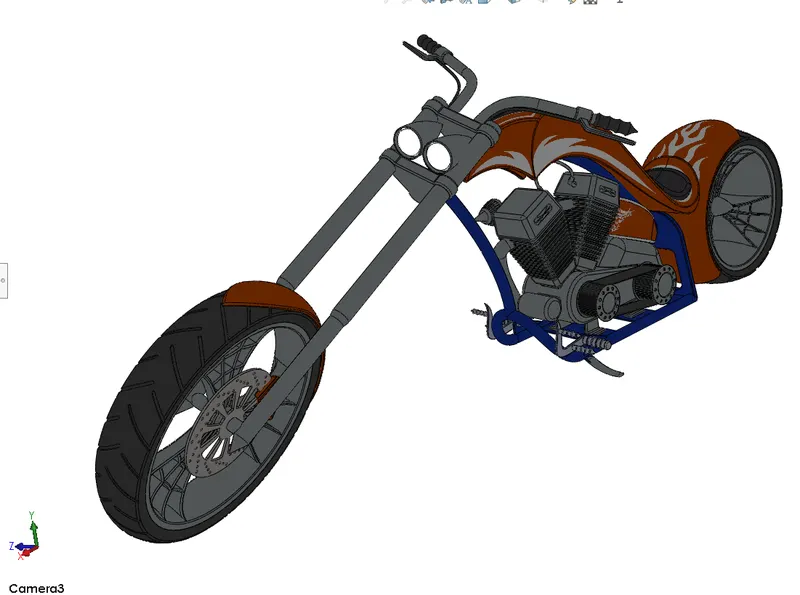
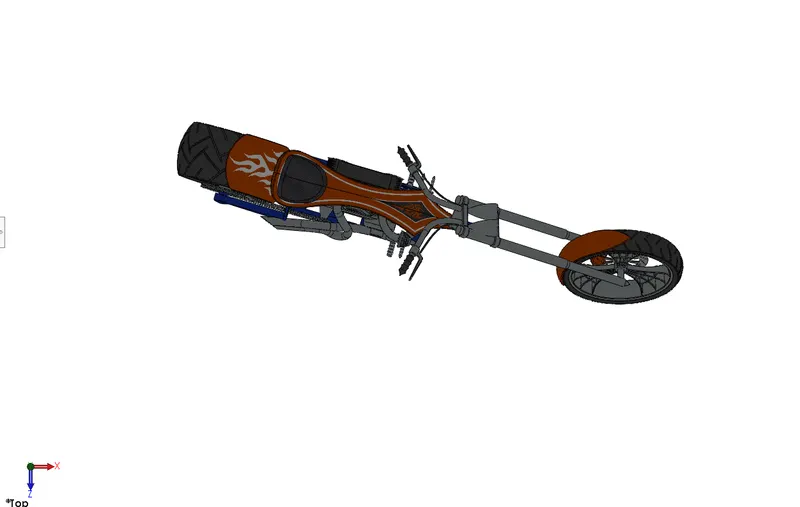
Procedure :
- Fix the chassis position on the front plane of the assembly coincident to mid plane chassis
- Give coincident relation to mid plane chasis and front plane engine .
- Make the engine mounts coincident to the base plate of chassis 20mm behind the vertical face of plate .
- Make the pedals coincentric and coincident to mounts and mirror the part
- Use concentric ,coincident and limit angle mates ith kickstand and mount
- Give coincident relation to mid plane chassis and right plane rear wheel and make axle hole concentric to hub on swingram.
- Give parallel relation to right plane chassis and fron plane of rear wheel .
- Make rear fender concentric to rear wheeland give parallel relation to vertical plane fender and right plane chassis.
- Give coincident relation to midplane chassis and mid plane rear fender.
- Give width mates,concentric and angles mates to transmission belt onto the pulley.
- Make oil tank coincident on geabox face and give coincident relation to midplane chassis and mid plan of oil tank.
- Back edge of oil tankcoincident to edge of gear box.
- Make front forks coincident to steering stem and give width mates on chassis and limit rotation to 30deg.
- Make a central position mate and suppress it.
- Use concentric and width mates for chain with rear wheel and make its front centre coincident to front sprocket sketch .
- Give parallel relation between midplane chain and midplane chassis.
- Make bottom plane Ft coincident to plane created in chassis.
- Make midplane Ft and midplane chassis coincident.
- Give a distance mate of 5mm for frontplane Ft from plane1 in chassis .
- Make the axle concentric to axle hole.
- Give coincident relation to midplane forks and right plane front wheel.
- Use coincident relations to straighten the front wheel with respect to front forks
- Make the front wheel rear wheel and the kickstand tangent to top plane of the assembly to give it a rest position .
- Thus assembly of chopper completed.
Rendering :
- Rendering is a process of creating realistic images of photo realistic model with environment.
- this can be done in two ways
- Photoview 360
- Solidworks visualize
here in this project we used both in different enviornments and rendered and images were taken