Modelling of 25 storey building with the specified properties using ETABS
1Q]
AIM: -
Model a 25-storey building on ETABS with structural properties as specified below.
Ground floor or plinth floor level can be taken at a height of 1.5 metres from the base
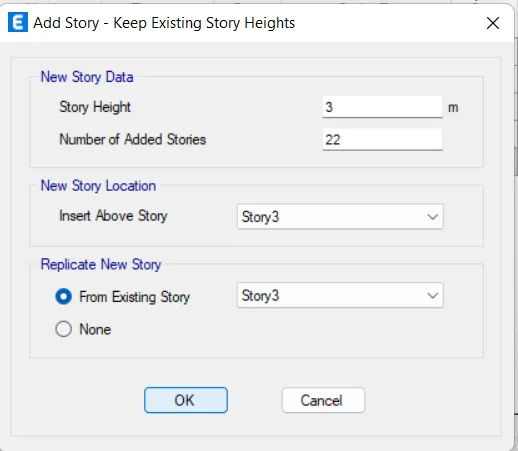
Each of the successive 25 storeys has a storey height of 3 metres.
Carry out the following exercises:
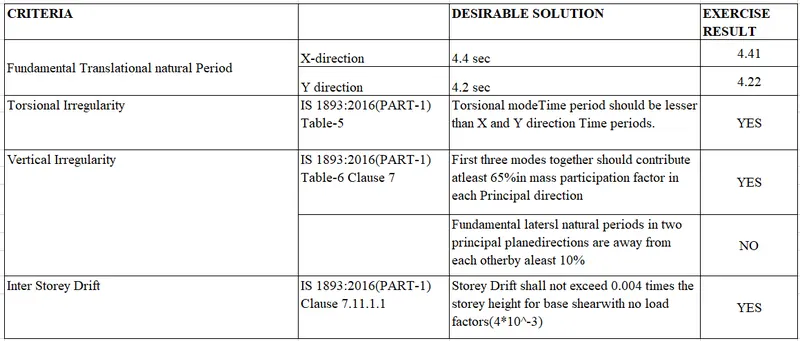
- Check if the translational fundamental natural period of vibration in both the x and y direction
- Check if the following provision in Table 5 of IS 1893 (part 1) – 2016, on torsional irregularity satisfied.
- Check if the two provisions of clause 7 in Table 6 (shown below) of IS 1893 (part 1) – 2016, regarding vertical irregularity is satisfied.
- Check if provision on inter-storey drift limitations in clause 7.11.1.1 satisfied. Please note that this check is for Serviceability Limit State and hence is for situation when structure is subjected to unfactored seismic base shear.
PROCEDURE: -
DATA GIVEN
Structural Element Sizes
- Beams: 300 × 400 mm
- Columns: 800 × 800 mm
- Slab: 150 mm thick
Material Properties
- Grade of Concrete: M30
- Grade of Steel Reinforcement Bars: Fe 415
Loading
- Dead Load on beams from infill wall: 10 kN/m (Let us assume the same for roof floor in view of parapet)
- Live load on floor: 3 kN/m2 (Let us assume the same for roof floor)
- a) Buildings are assumed to be pinned at the base
- b) All columns in all storey are of the same size
- c) All beams in all storeys are of the same size
- d) Building is located on Soil type-II and in Zone-III.
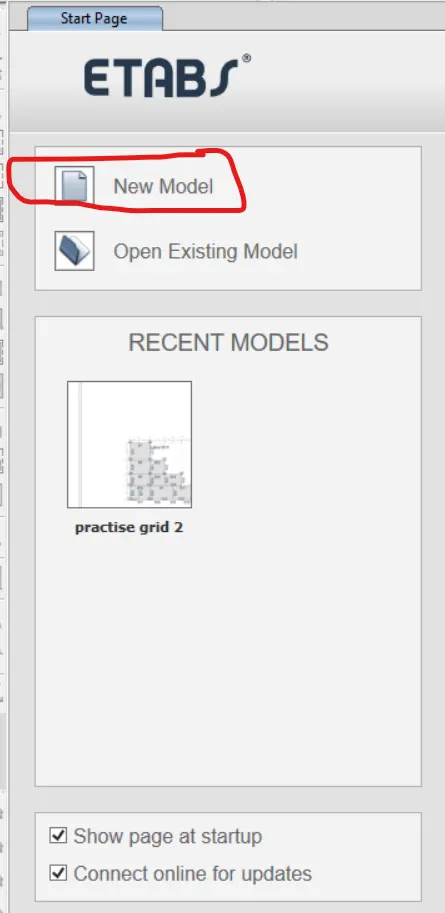
Open ETABS software.
Click on New
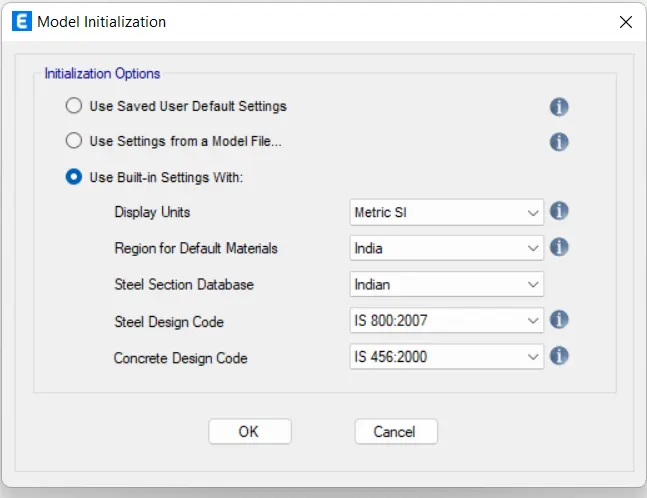
Model Initialization dialogue box opens
Select Use Built-in Settings with:
Display units: Metric SI
Region for Default materials: India
Steel Connection Database: Indian
Steel Design Code: IS 800: 2007
Concrete Design Code: IS 456:2000
Set these changes in the Model Initialization
After setting above changes Click OK
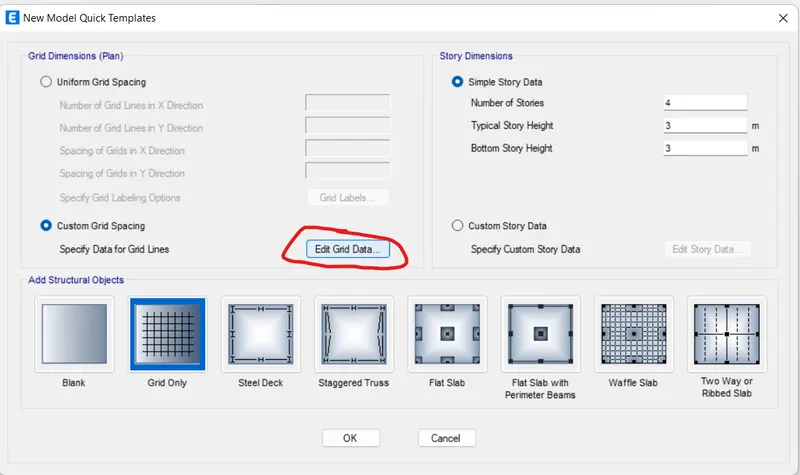
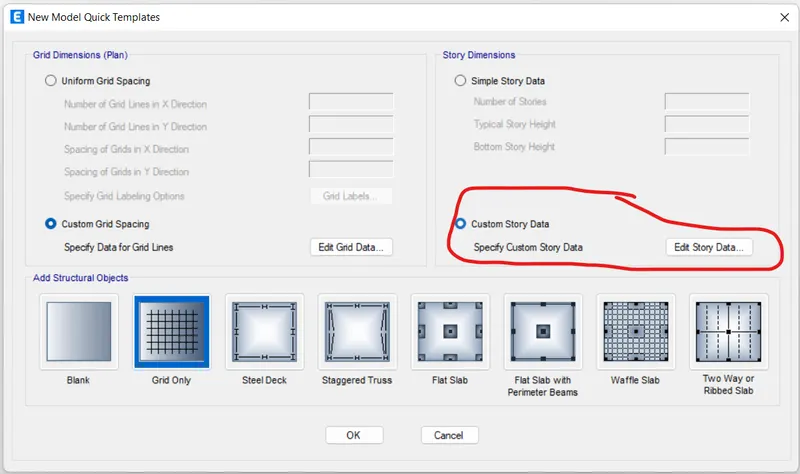
Now, New Model Quick Template dialogue box opens
Select Custom Grid Spacing
Click on Edit Grid Data
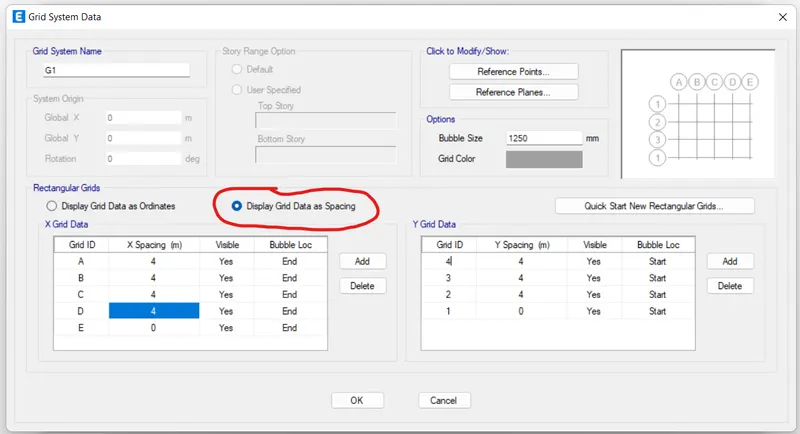
Grid System Data dialogue box opens
Under Rectangular Grids, Select Display grid Data as Spacing
Under X Grid Data column enter the data as per given data
Under Y Grid Data column enter the data as per given data
After entering the Grid Data press OK
Select Custom Story Data in New Model Quick Template dialogue box
Click on Edit Story Data
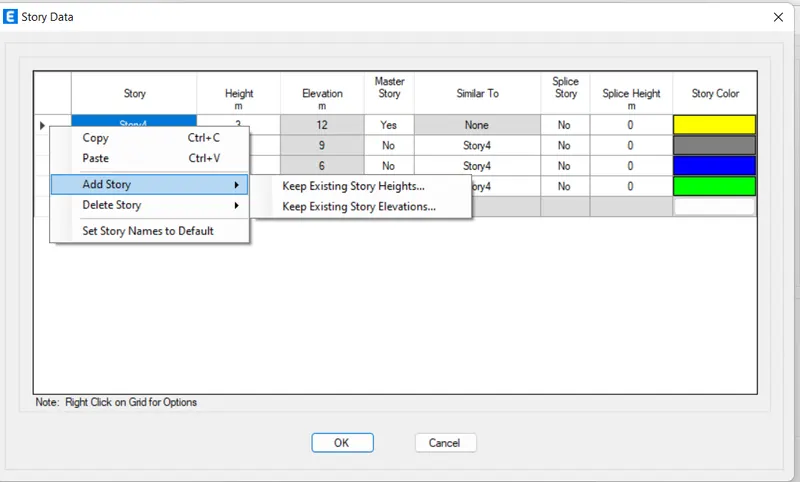
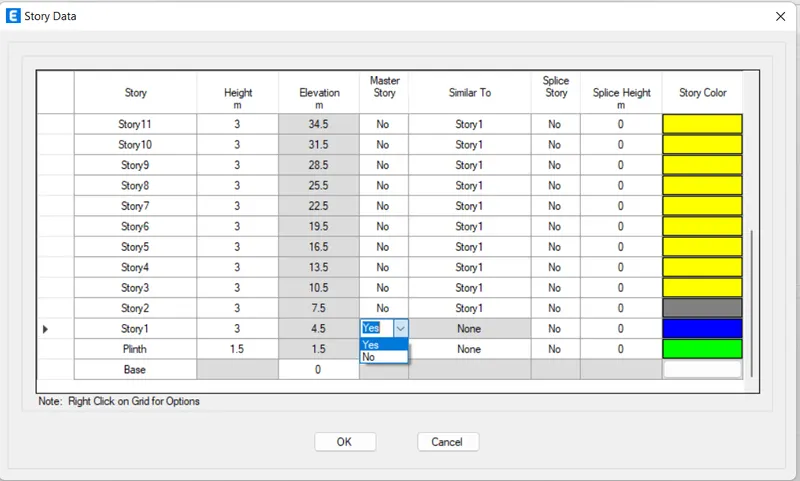
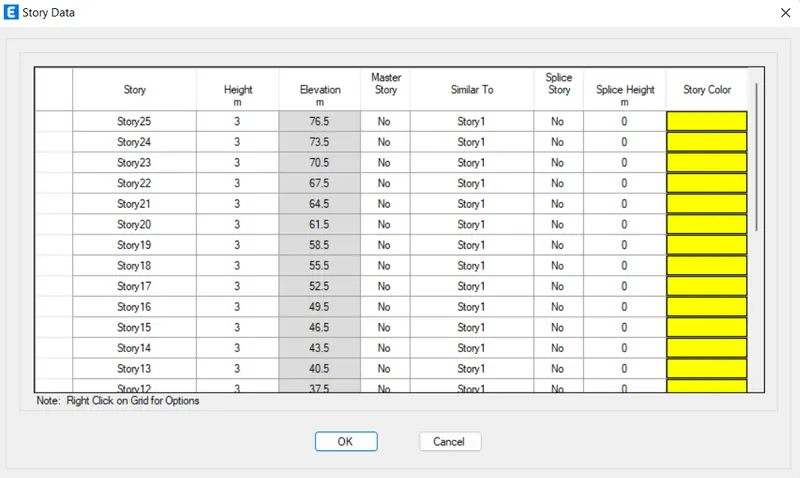
Story Data dialogue box opens
Edit the default storeys
Add Plinth in Story column and Height 1.5m in Height column.
Right click on the story 3 and click on Add Story
Select keep Existing Story Heights option
Add Story dialogue box opens
Enter the required data and press Ok
Select YES for the Story1 in Master Story column.
Select Story1 for the rest of the storeys in Similar To column
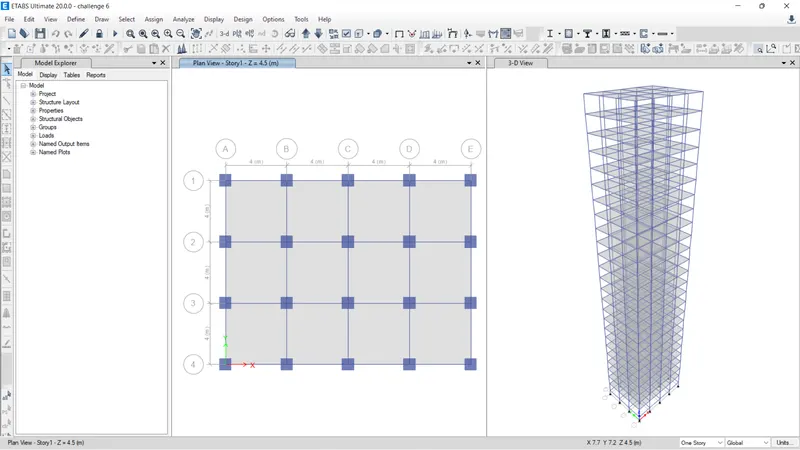
Model appears on the screen
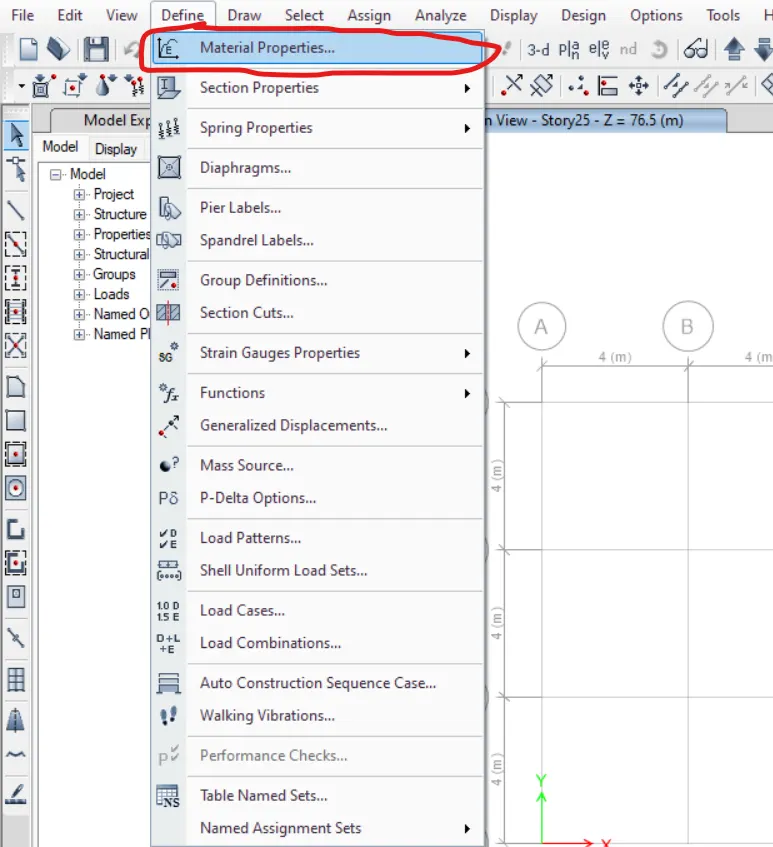
Click on the Define Tab
Select Material Properties
Define Materials dialogue box opens
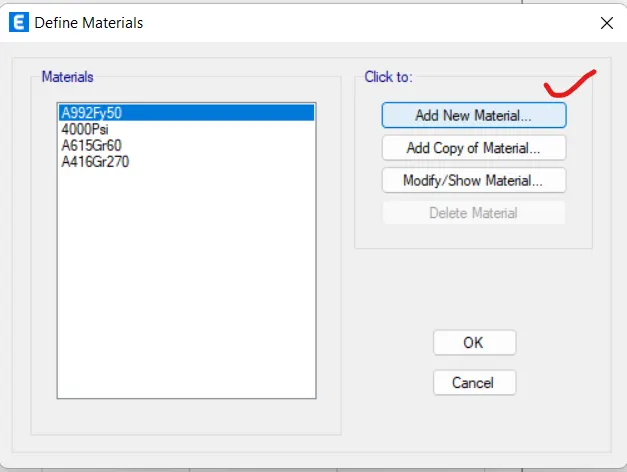
Click on Add New Material
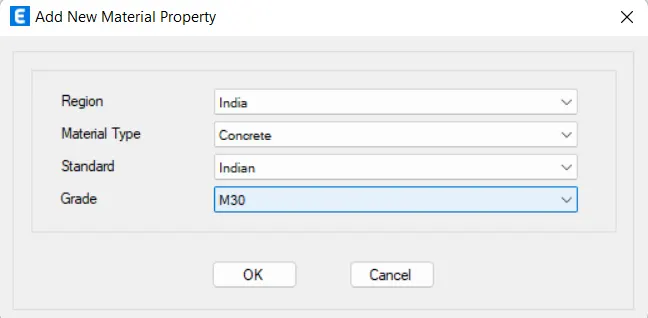
Add New Material Property dialogue box opens
Region: India
Material Type: Concrete
Standard: Indian
Grade: M30
After entering the data, press OK
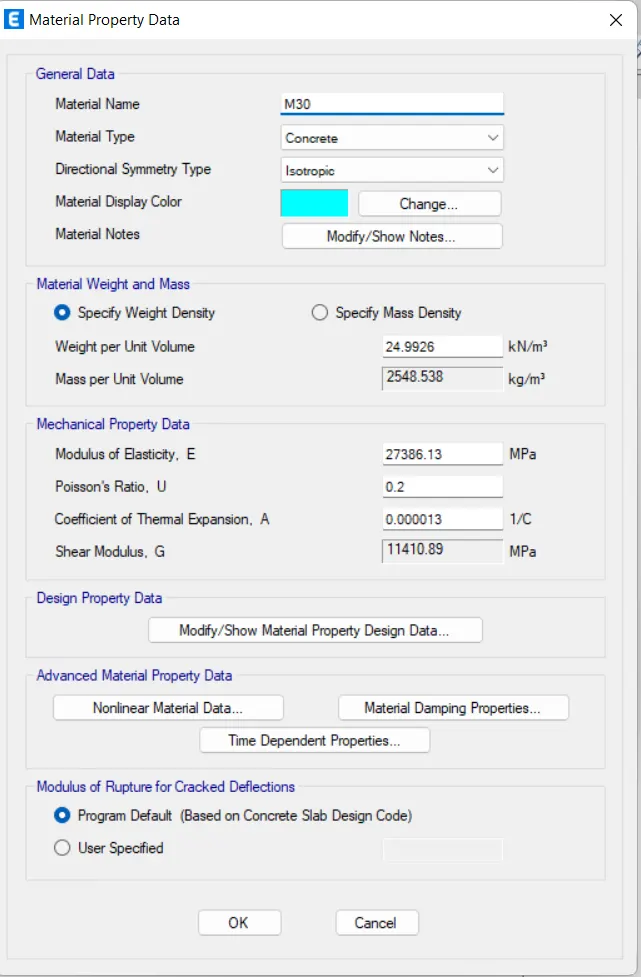
Material Property Data dialogue box opens
Press OK
Click on Add New Material
Add New Material Property dialogue box opens
Region: India
Material Type: Rebar
Standard: Indian
Grade: HYSD Grade 415
After entering the data, press OK
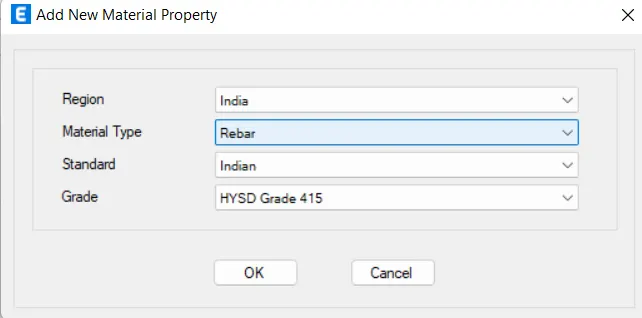
Material Property Data dialogue box opens
Press OK
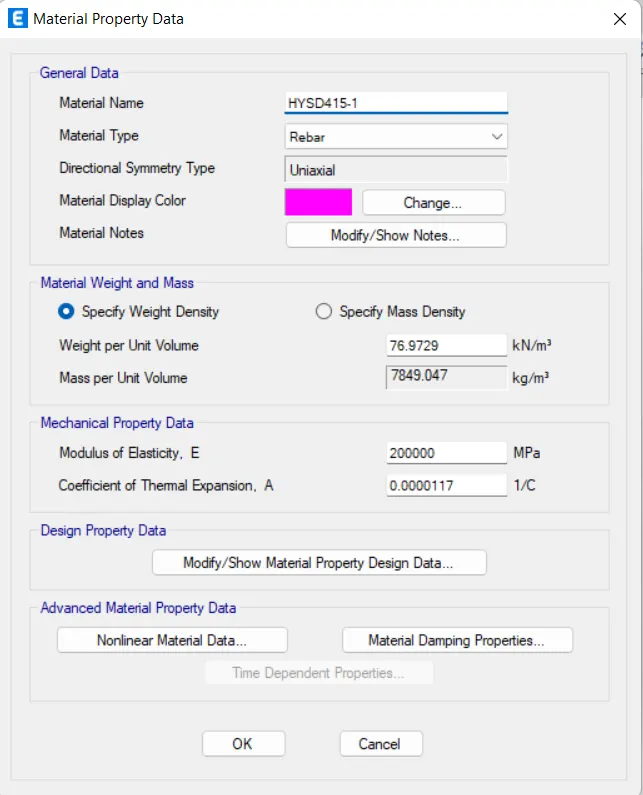
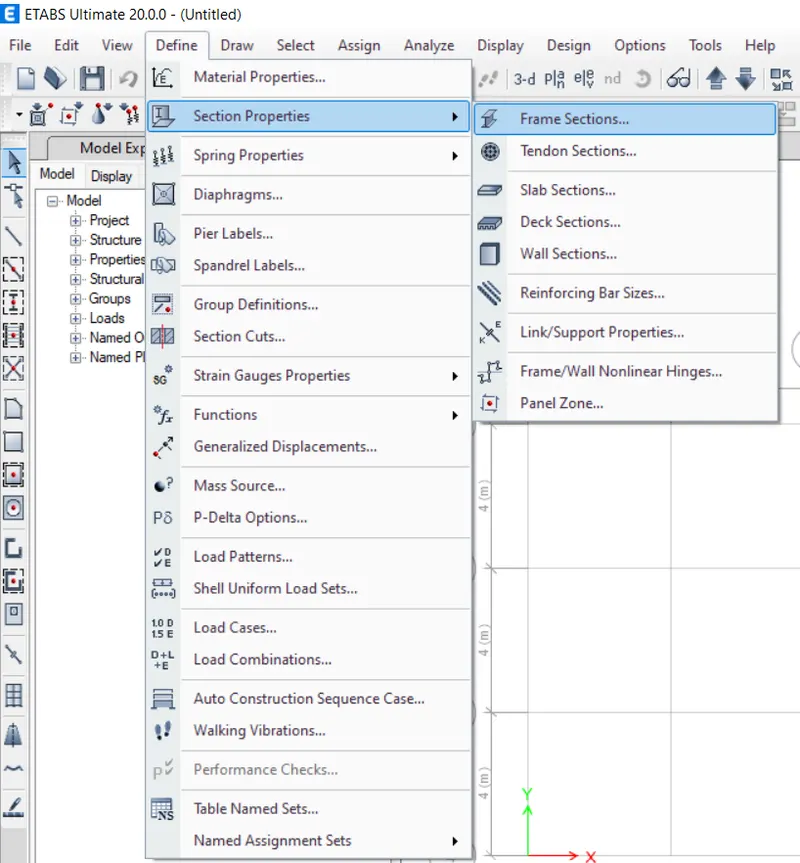
Click on the Define Tab
Click on Section Properties and select Frame Sections
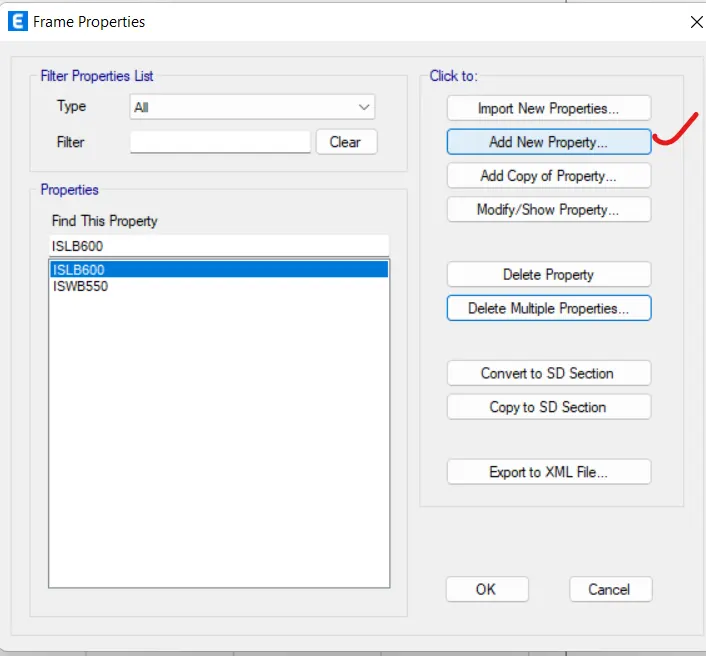
Frame Properties dialogue box opens
Click on Add New Property
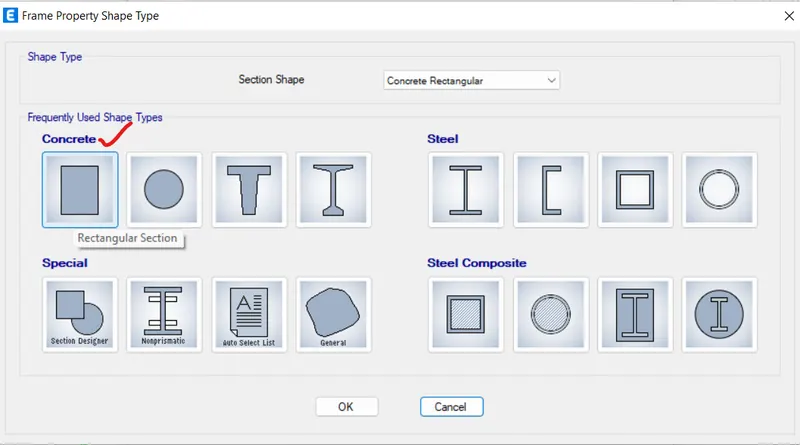
Frame Property Shape Type dialogue box opens
Section Shape: Concrete Rectangular
Click on Rectangle shape under Concrete
Frame Section Property data dialogue box opens
Enter the data
General Data
Propert Name: Beam 300x400
Material: M30
Section dimensions
Width: 300mm
Depth: 400mm
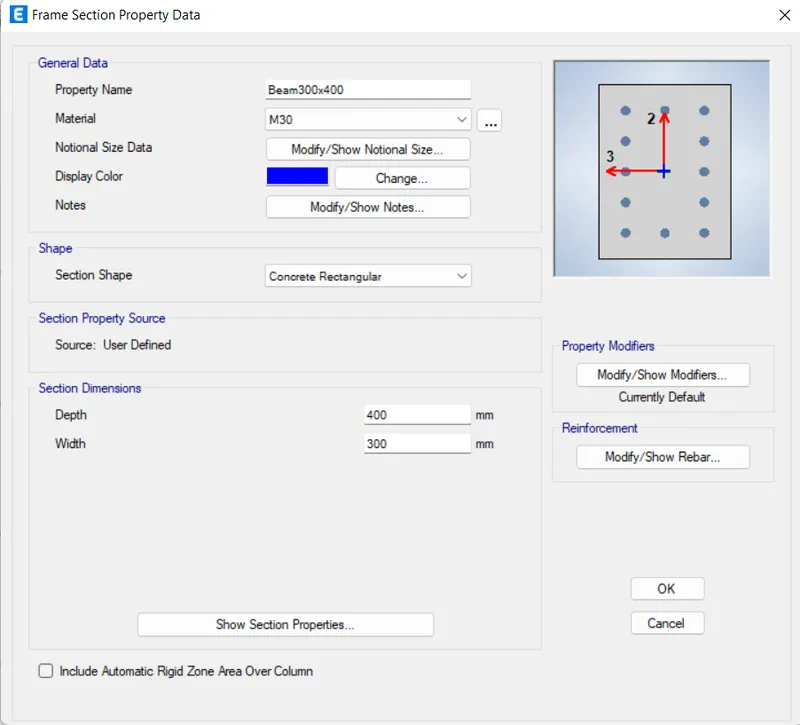
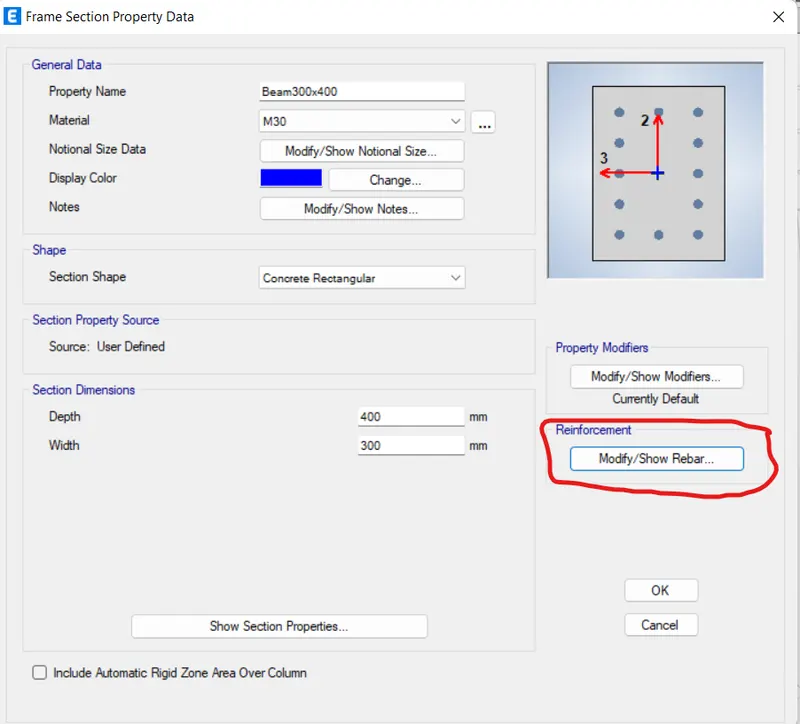
Click on Modify/Show Rebar option under Reinforcement
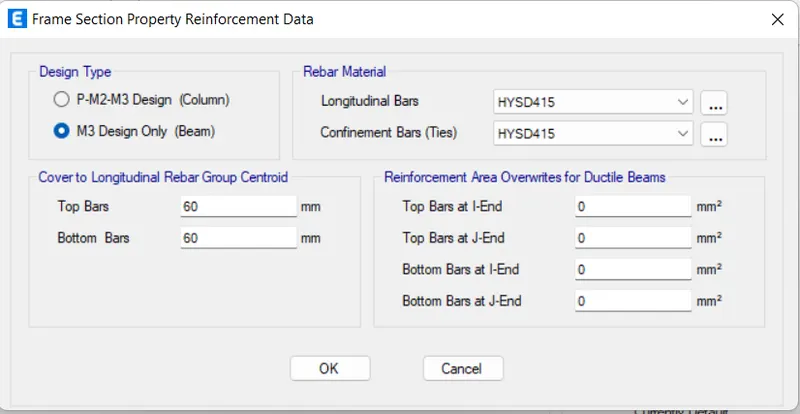
Frame Section Property Reinforcement data dialogue box opens
Design Type: M3 Design only(beams)
Rebar Material: HYSD415
Press Ok
Click on the Define Tab
Click on Section Properties and select Frame Sections
Frame Properties dialogue box opens
Click on Add New Property
Frame Property Shape Type dialogue box opens
Section Shape: Concrete Rectangular
Click on Rectangle shape under Concrete
Frame Section Property data dialogue box opens
Enter the data
General Data
Propert Name: Column800x800
Material: M30
Section dimensions
Width: 800mm
Depth: 800mm
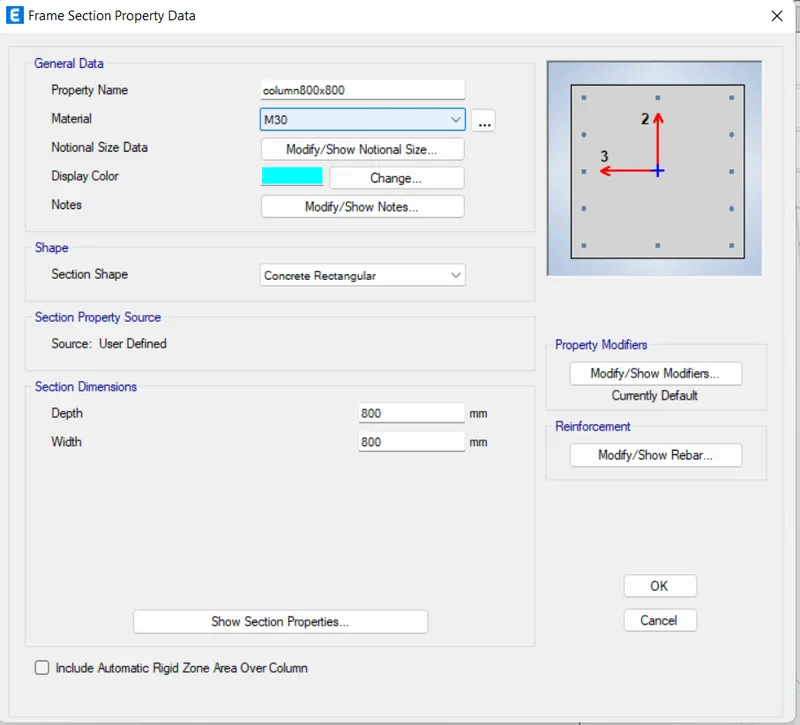
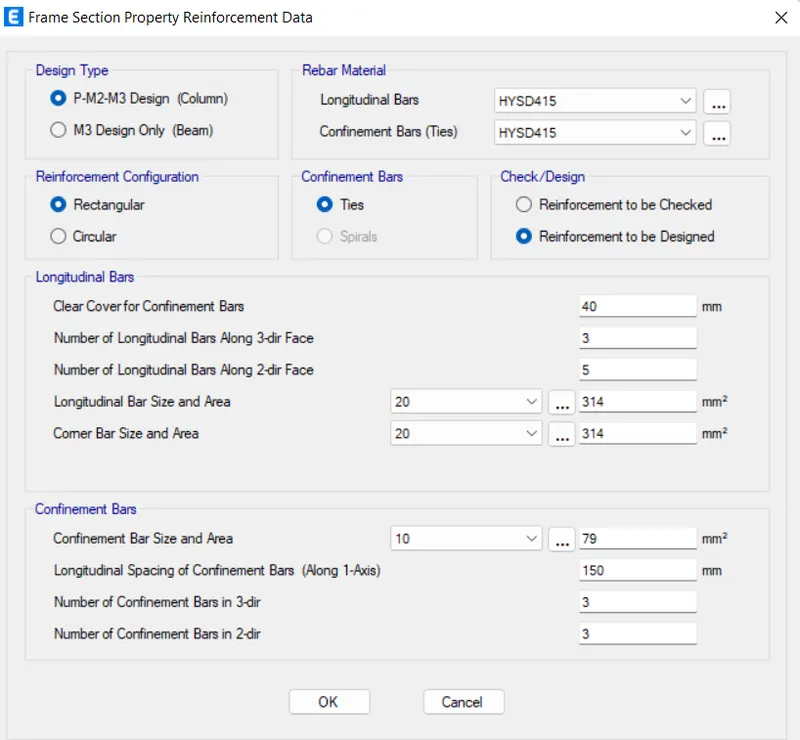
Click on Modify/Show Rebar option under Reinforcement
Frame Section Property Reinforcement data dialogue box opens
Design Type: P-M2-M3 Design(columns)
Rebar Material: HYSD415
Press Ok
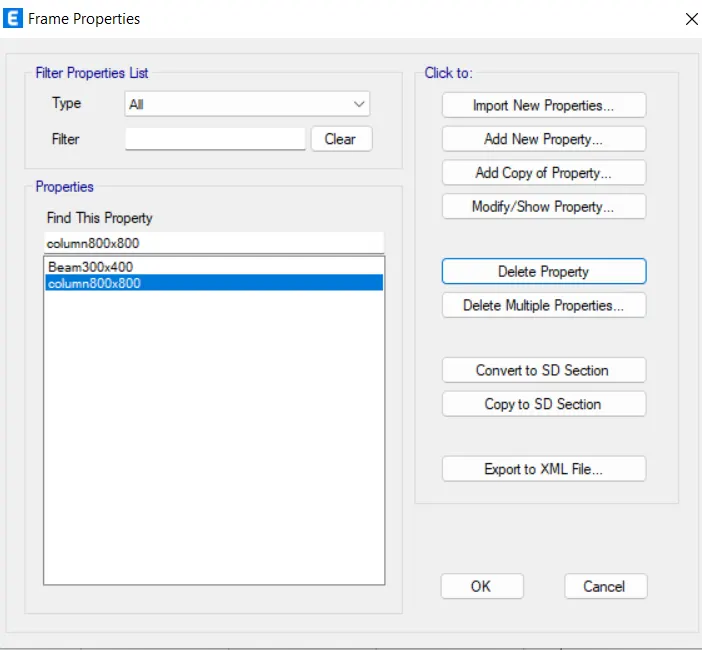
We can see the new created Frame properties in the properties table
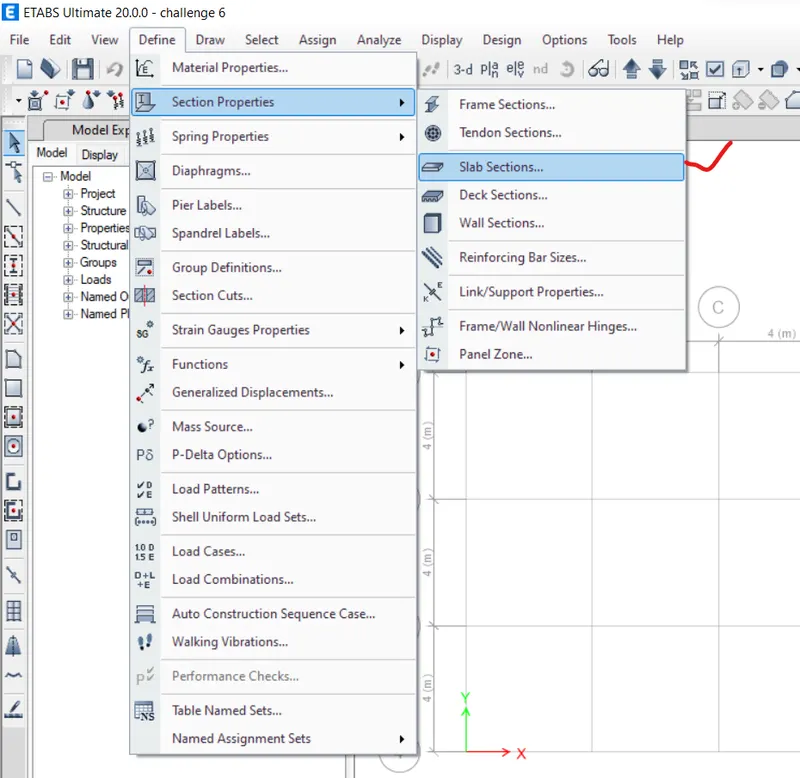
Click on the Define Tab
Click on Section Properties and select Slab Sections
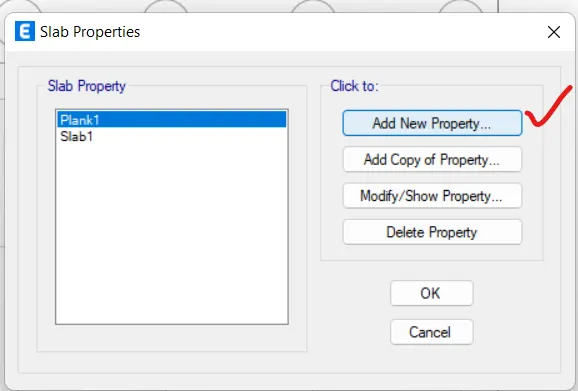
Slab Properties dialogue box opens
Click on Add New Property
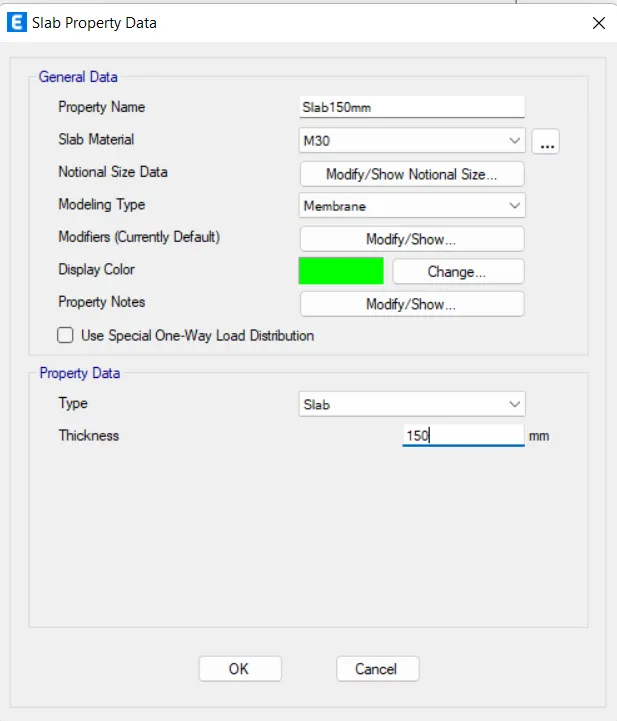
Slab Property Data dialogue box opens
General Data
Propert Name: Slab150mm
Modeling Type: membrane
Thickness: 150mm
Press Ok
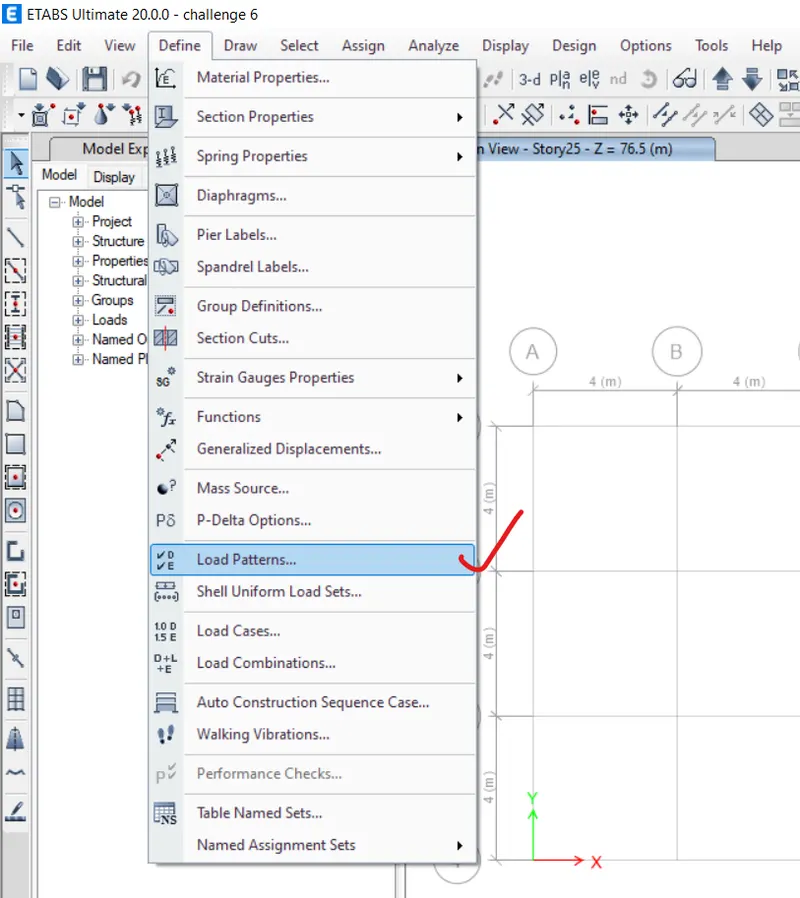
Click on the Define Tab
Select Load patterns
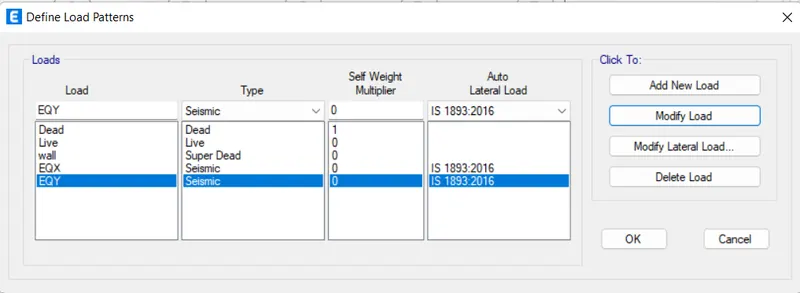
Define Load patterns dialogue box opens
Click on Add New Load option
Wall load under super dead Type
Live load under Live Type
EQX load under Seismic Type
EQY load under Seismic Type
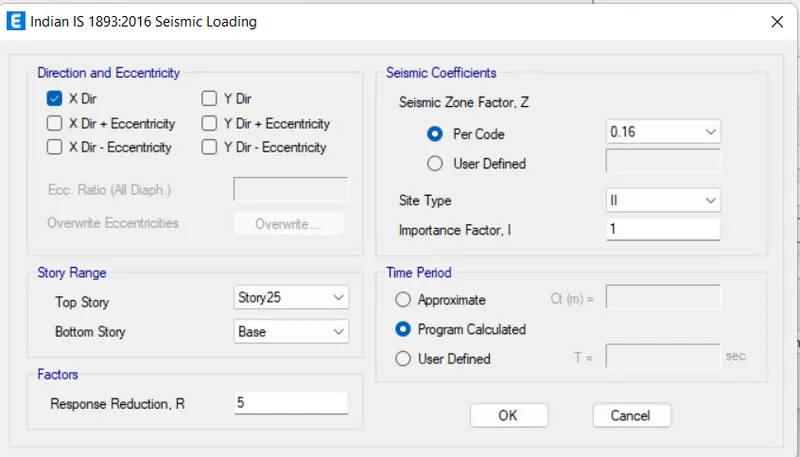
Select EQX load and click on modify lateral load option
Indian IS 1893:2016 Seismic loading dialogue box opens
Direction and Eccentricity: X dir
Seismic Co-eff: 0.16 (zone 3)
Site Type: 2
Press OK
Select EQY load and click on modify lateral load option
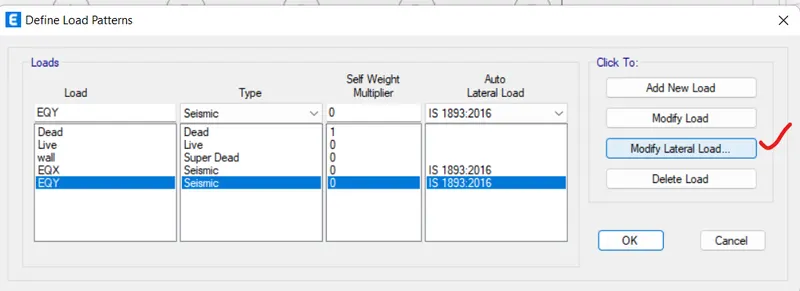
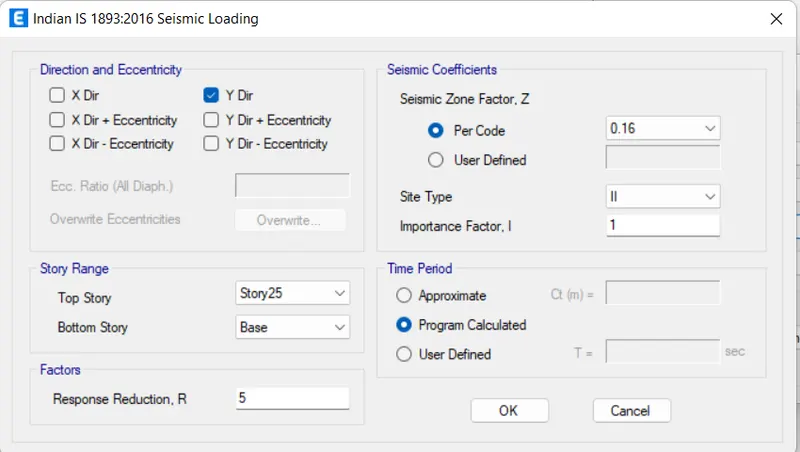
Indian IS 1893:2016 Seismic loading dialogue box opens
Direction and Eccentricity: Y dir
Seismic Co-eff: 0.16 (zone 3)
Site Type: 2
Press OK
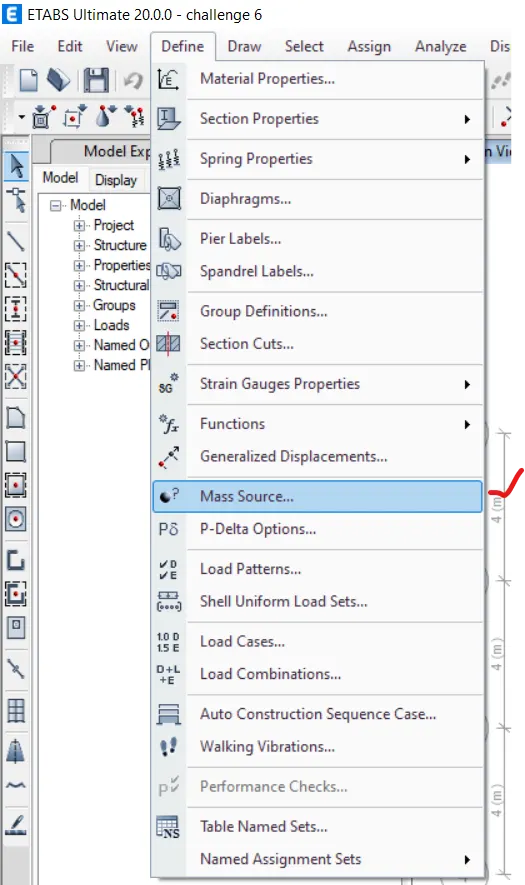
Click on the Define Tab
Select Mass Source
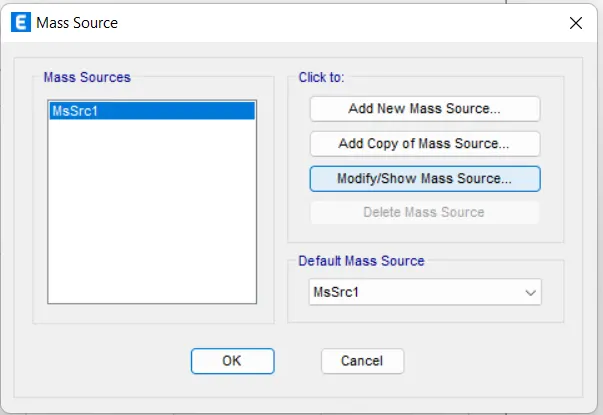
Mass Source dialogue box opens
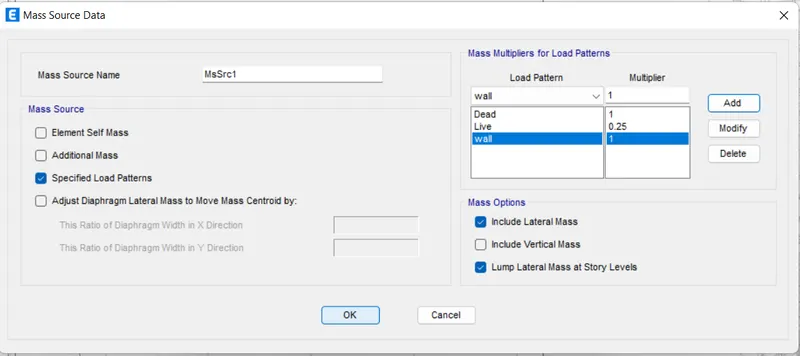
Click on modify/show Mass Source
Mass Source Data dialogue box opens
Load Pattern Multiplier
Dead 1
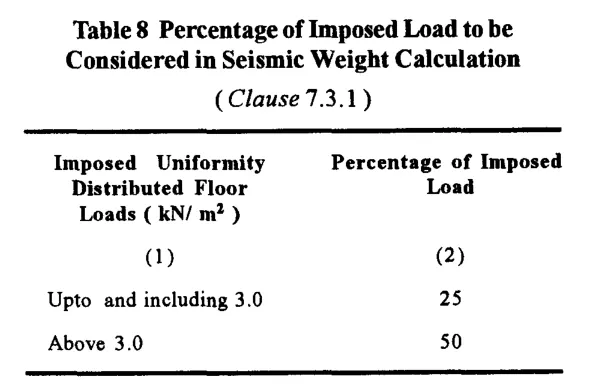
Live 0.25 (Given Live load is 3kN/m2, as per IS 1893 clause 7.3.1 table 8 consider 25% of imposed load)
Wall 1
Mass Source: Specified load patterns
Press Ok
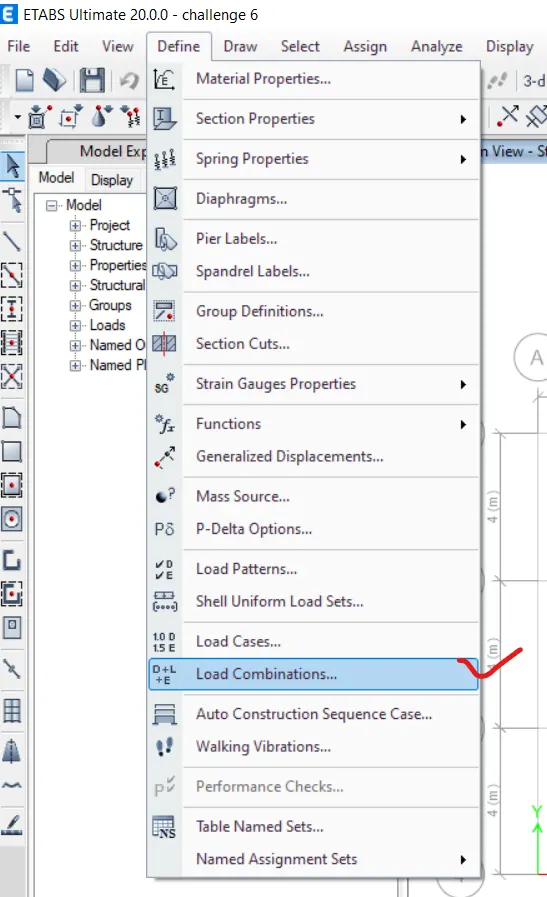
Click on the Define Tab
Select Load Combinations
Load Combinations dialogue box opens
Click on Add Default Design Combos
Add Default Design Combos dialogue box opens
Select Concrete Frame Design option from the available list.
Press OK
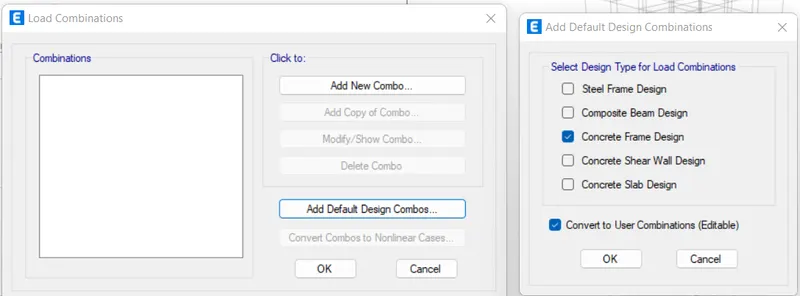
Combination list appears in the column.
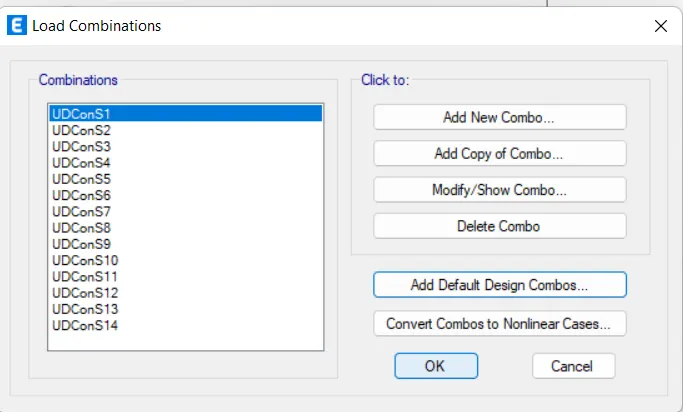
Now, we have to create beams, columns, and slabs.
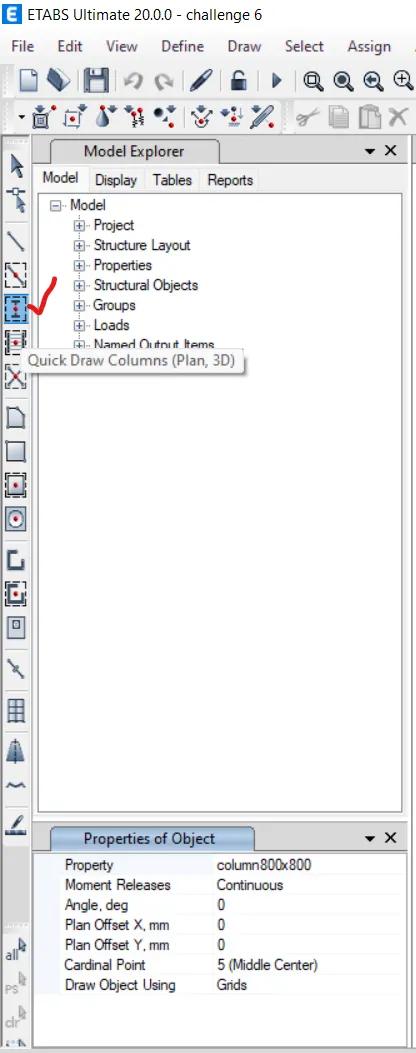
Select Quick Draw Column tool from the Draw panel
Under property browser
Property: Column 800x800
Apply the changes to All Stories
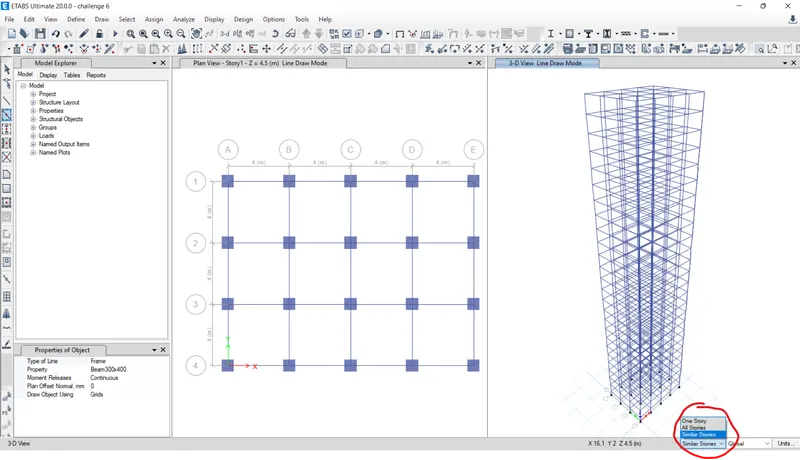
Click on the nodes of the Grids. - A1, A2, A3, A4
We placed 4 columns at the nodes.
Click on the Edit Tab
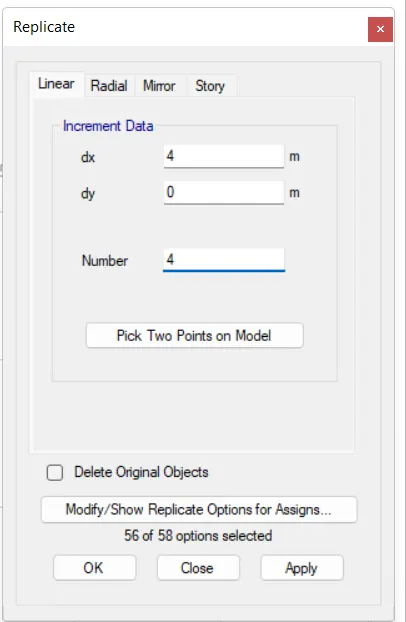
Select Replicate
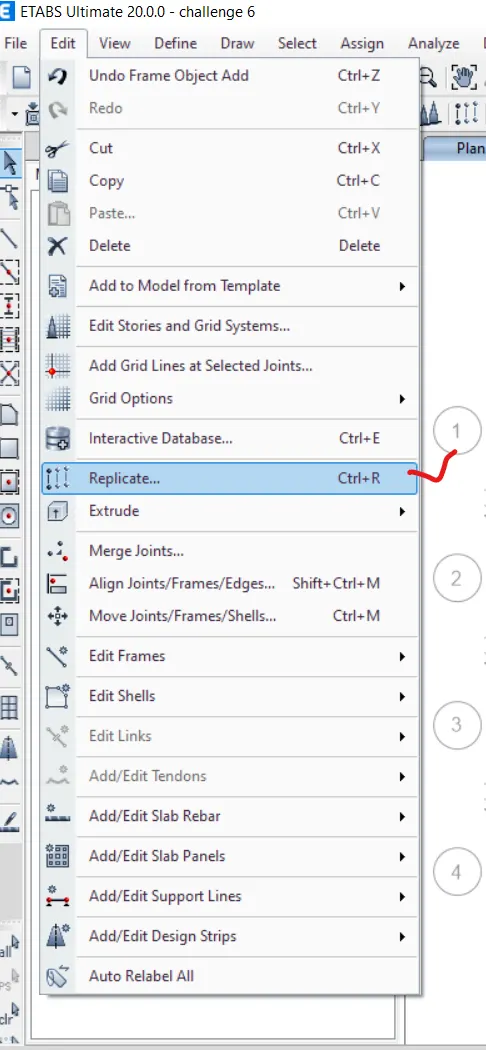
Replicate dialogue box opens
dx = 4
number = 4
Click on Apply and press OK
We placed columns at all grid points.
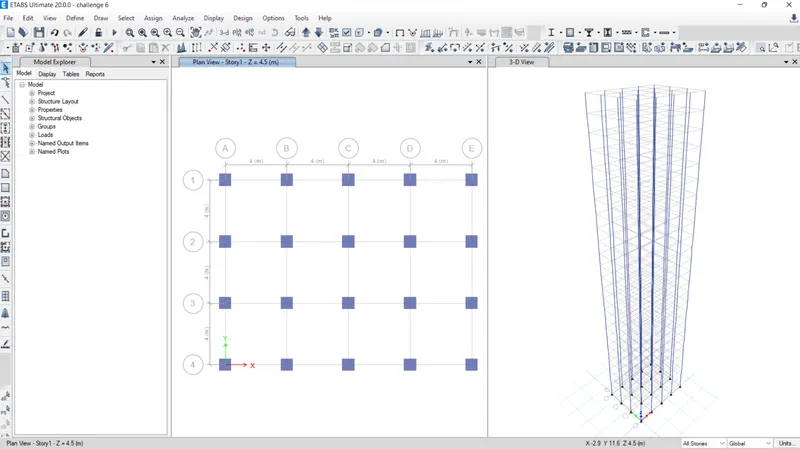
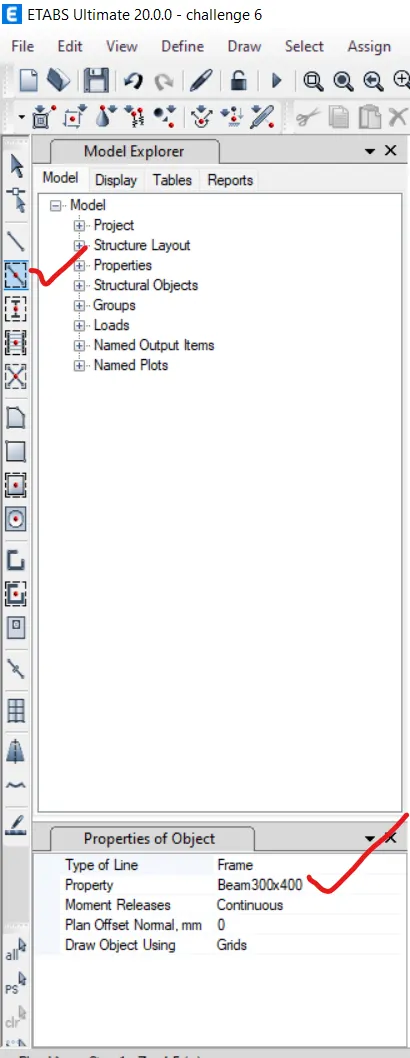
Select Quick Draw Beam/Column tool from the Draw panel
Under property browser
Property: Beam 300x400
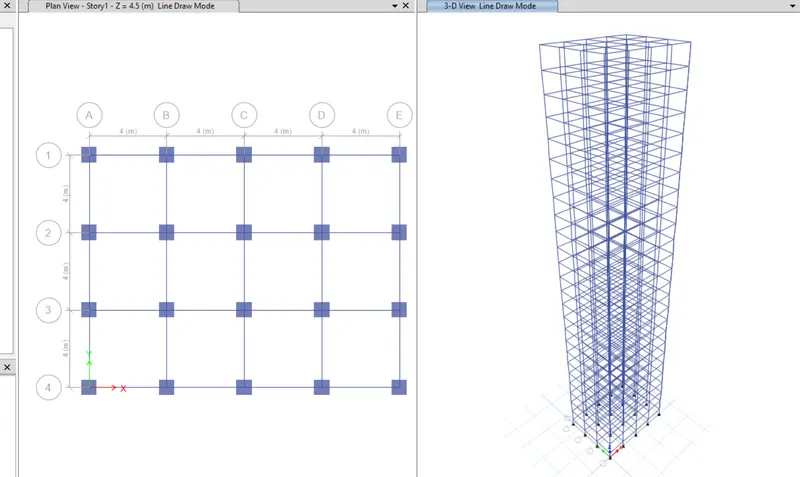
Click on all the Grids lines.
We placed beams at all grid lines.
Select Quick Draw Floor/wall tool from the Draw panel
Under property browser
Property: Slab150mm
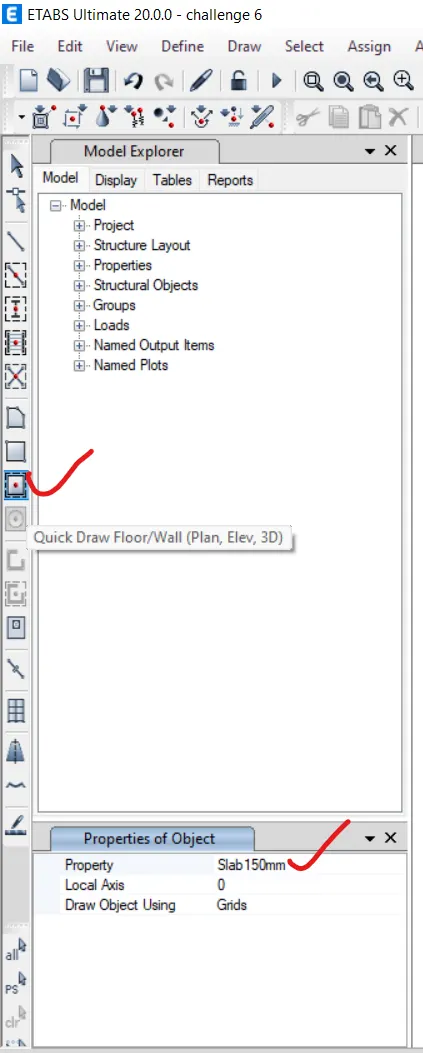
Select all the planes of the Grids
We placed slabs.
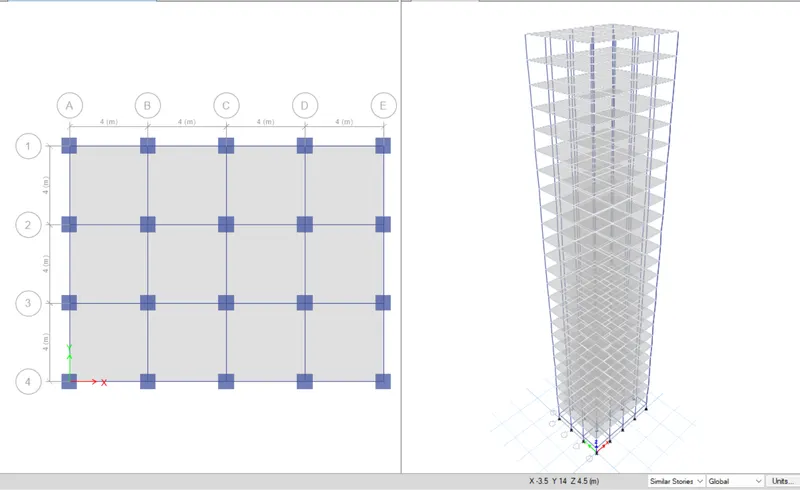
We have to apply Load on the Structure.
Click on Select Tab
Click on Select
Go to Properties from the list
Select Frame Sections
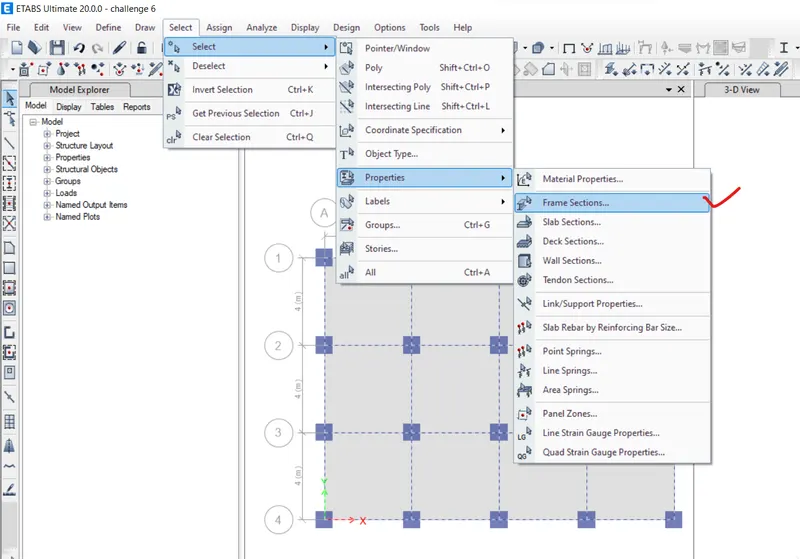
Select beam300x400 from the list
All the beams are selected
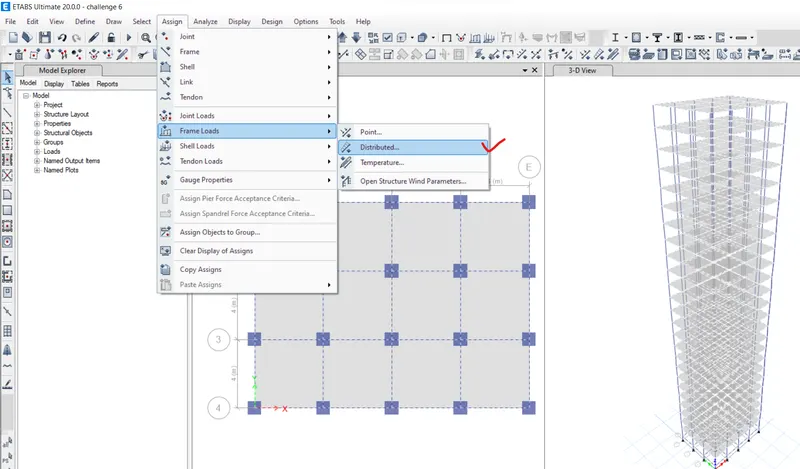
Click on Assign Tab
Click on Frame Loads
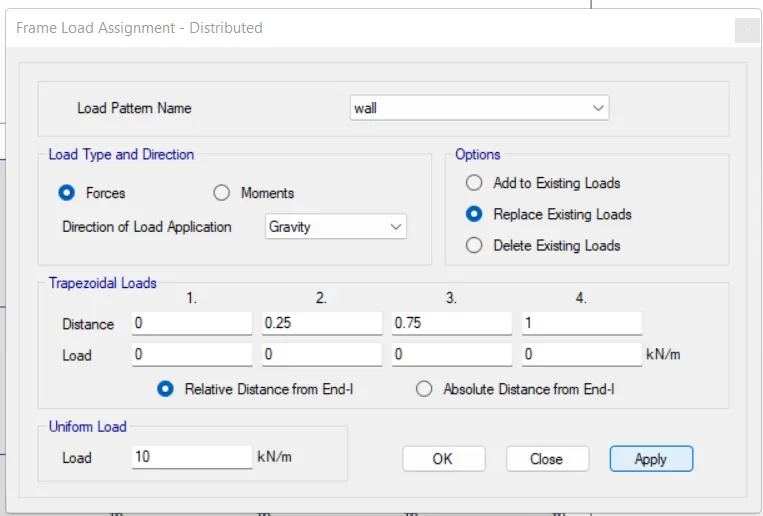
Select Distributed option.
Frame load Assignment-Distributed dialogue box opens
Load: 10 Kn/m
Click Apply and Press OK
Click on Select Tab
Click on Select
Go to Properties from the list
Select Slab Sections
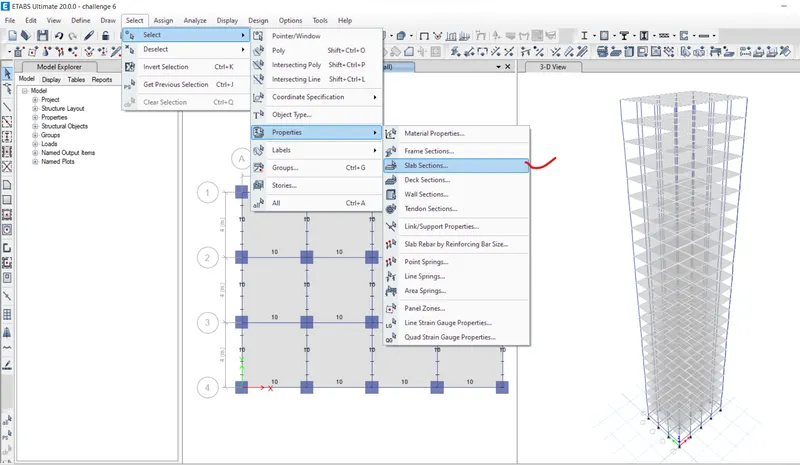
Select slab150mm from the list
All the slabs are selected
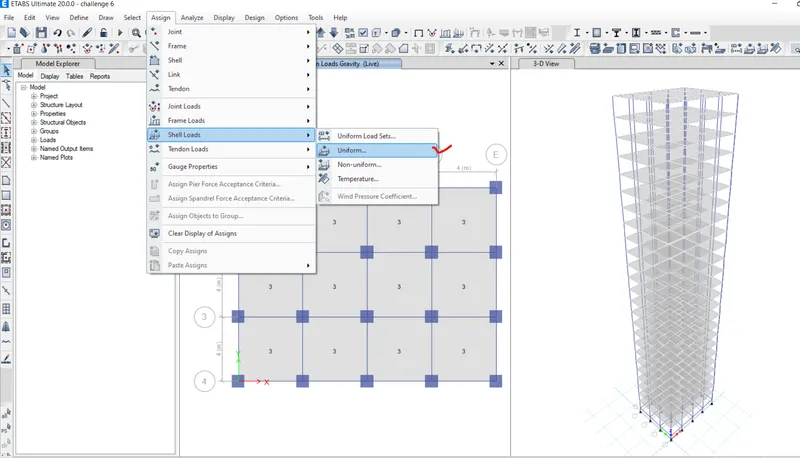
Click on Assign Tab
Click on shell Loads
Select Uniform option.
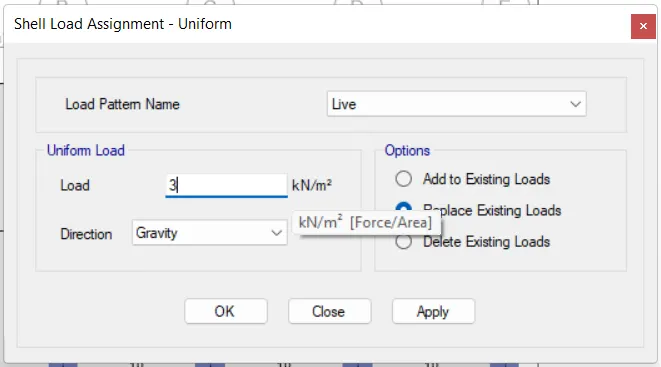
Shell load Assignment-Uniform dialogue box opens
Load Pattern: live load
Load: 3 Kn/m
Click Apply and Press OK
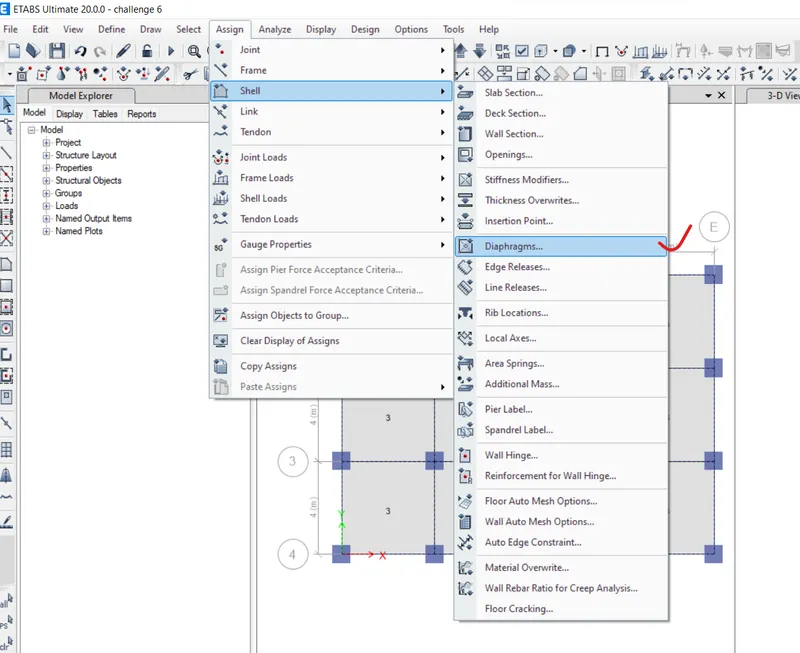
Click on Assign Tab
Click on shell tool
Select Diaphragms.
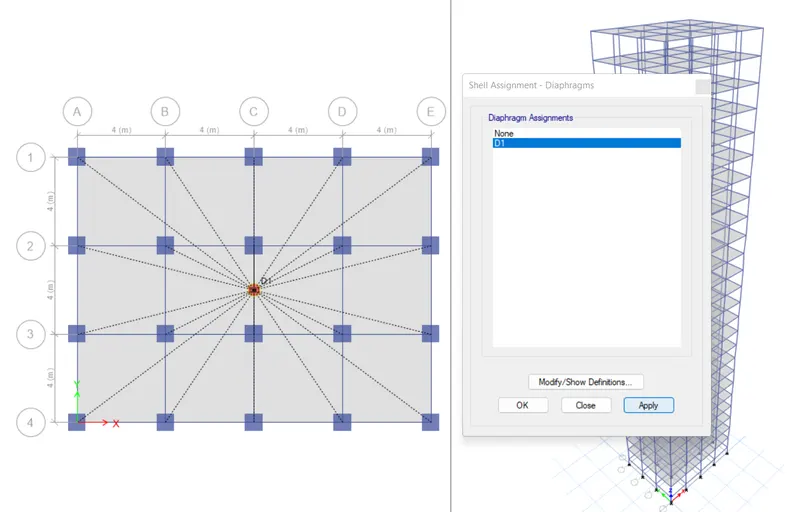
Shell Assignment- Diaphragms dialogue box opens
Select D1 in the list
Click on Apply and Press OK
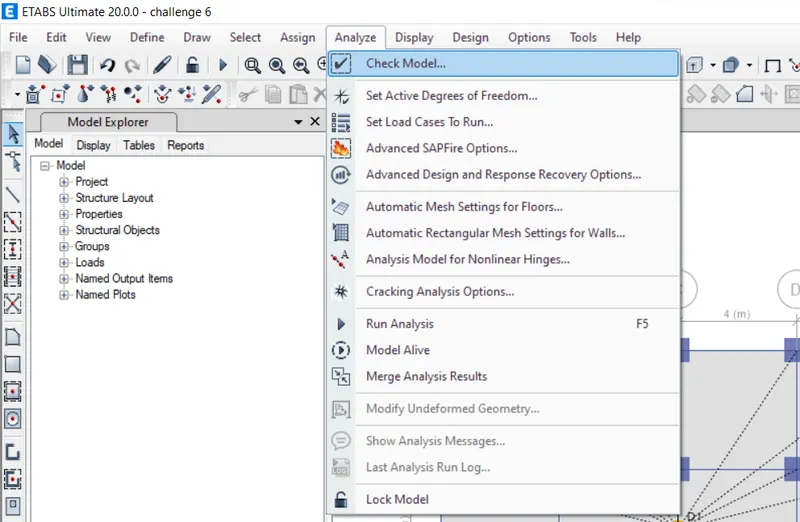
Click on Analyse Tab
Click on check Model
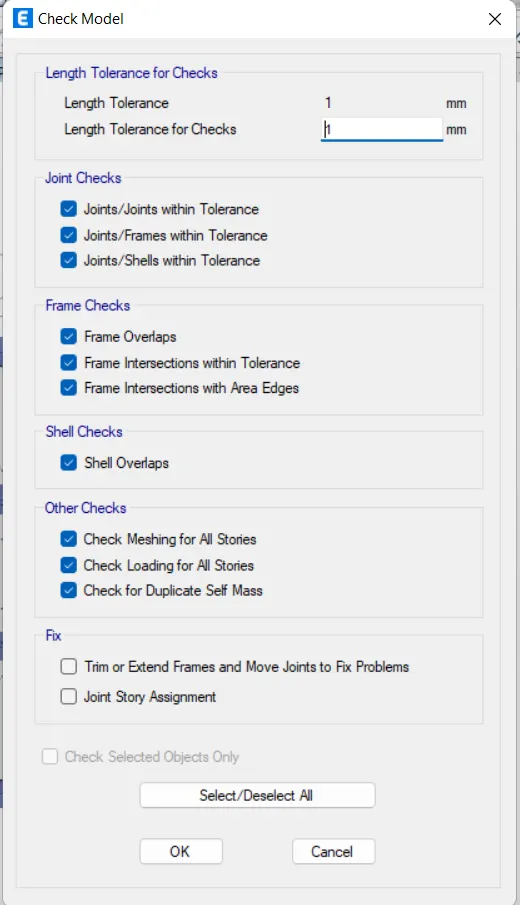
Check model dialogue box opens
Select All and press OK
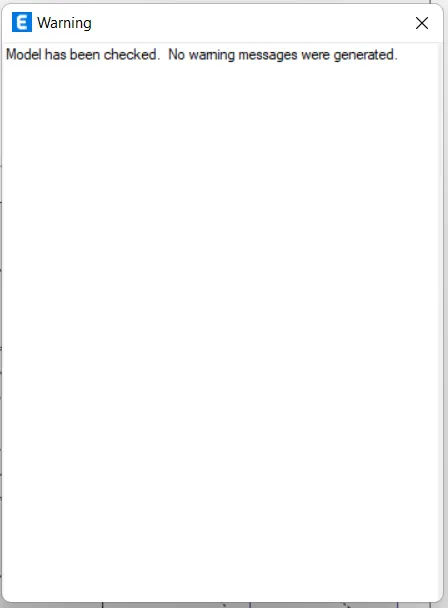
Warning dialogue box opens
No warnings have been generated.
Our model has no errors.
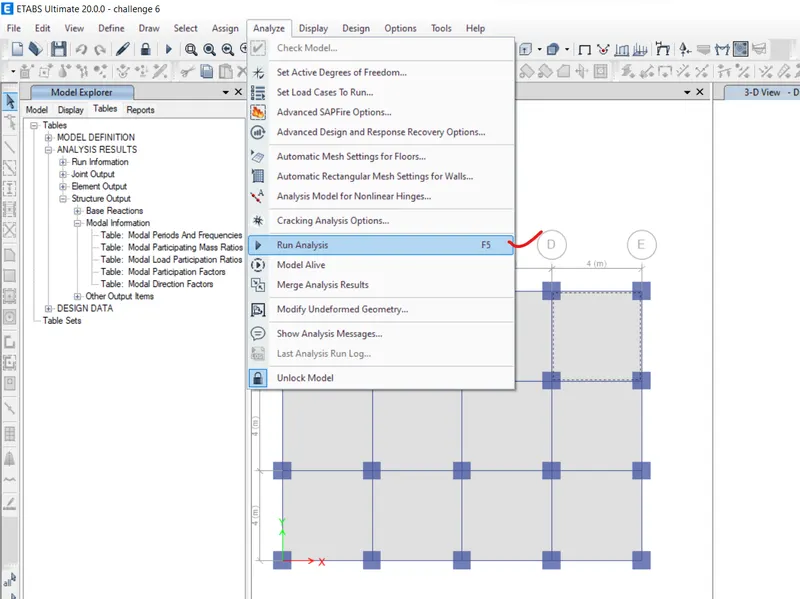
Click on Analyse Tab
Click on Run Analysis
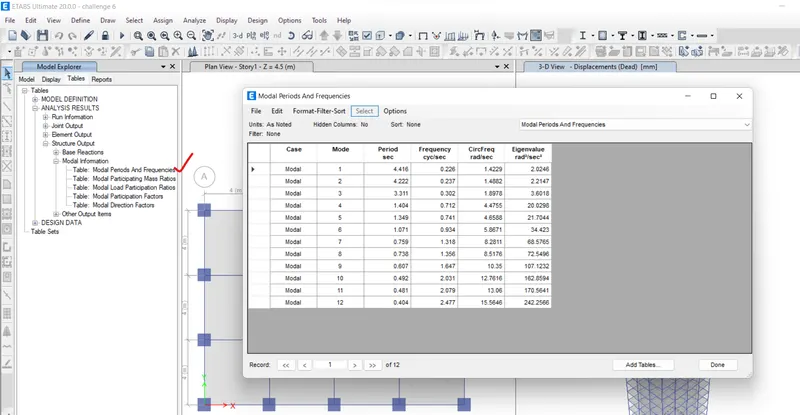
Go to Model Explorer on the screen
Click on Analysis Results
Click on Structure Output from the dropdown list
Click on modal information from the dropdown list
Select Table: Modal periods and Frequencies
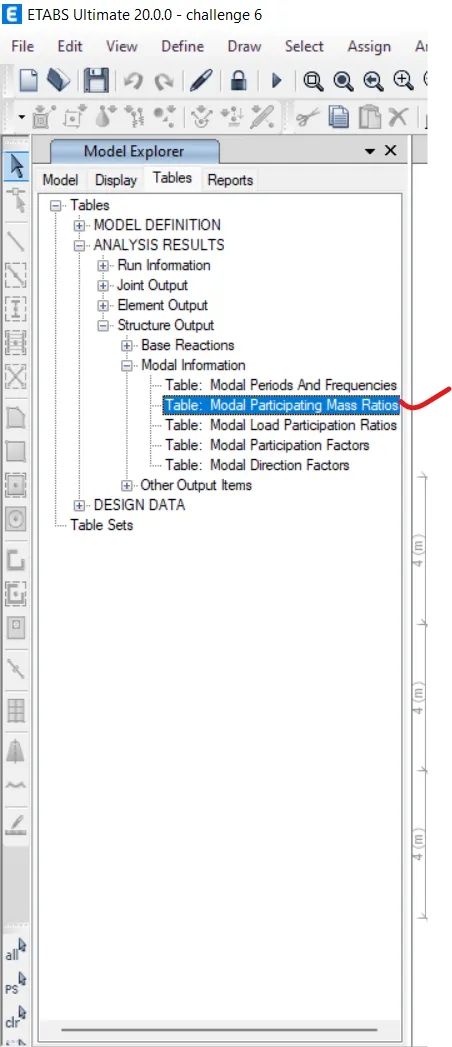
Go to Model Explorer on the screen
Click on Analysis Results
Click on Structure Output from the dropdown list
Click on modal information from the dropdown list
Select Table: Modal participating Mass Ratio
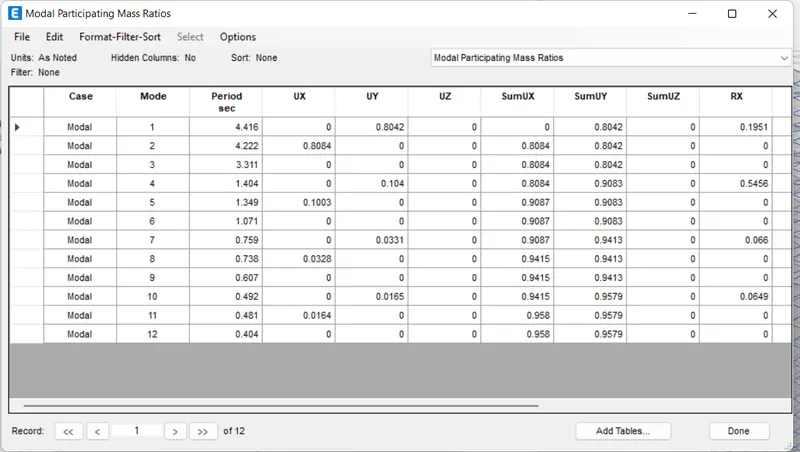
Click on Display Tab
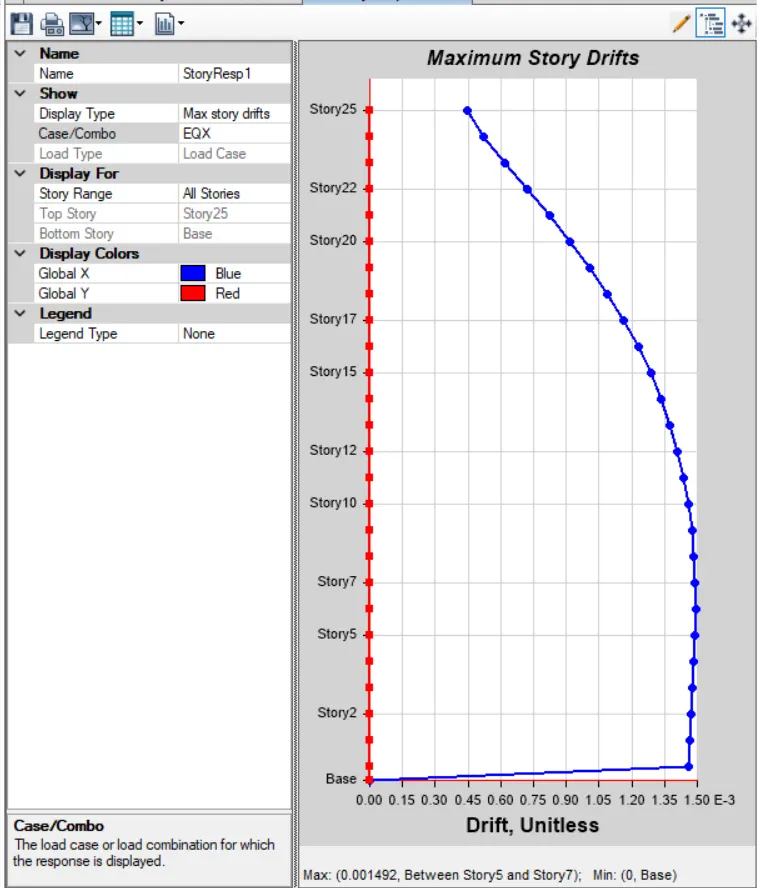
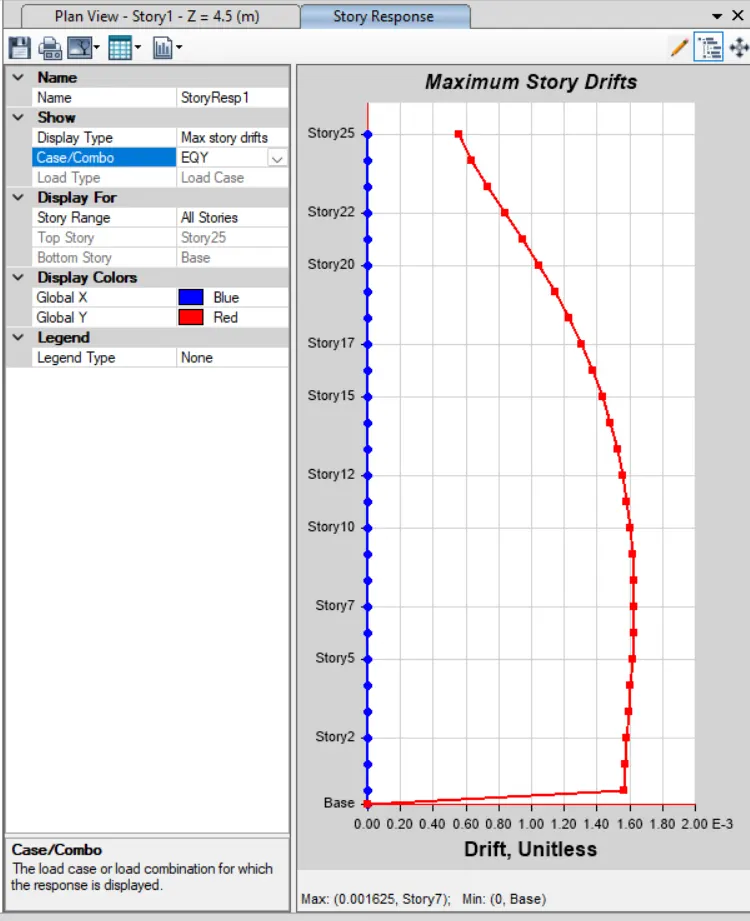
Select Story Response plots
Display Type: Max Story Drifts
Case/combo: EQY
Display Type: Max Story Drifts
Case/combo: EQX
RESULT: -
Modelled a 25-storey building on ETABS with structural properties as specified.
Carried out the following exercises:
- Checked if the translational fundamental natural period of vibration in both the x and y direction
- Checked if the following provision in Table 5 of IS 1893 (part 1) – 2016, on torsional irregularity satisfied.
- Checked if the two provisions of clause 7 in Table 6 (shown below) of IS 1893 (part 1) – 2016, regarding vertical irregularity is satisfied.
- Checked if provision on inter-storey drift limitations in clause 7.11.1.1 satisfied. Please note that this check is for Serviceability Limit State and hence is for situation when structure is subjected to unfactored seismic base shear.