Hood design-Week 2
HOOD(BONNET)
Aim:- Design Hood Outer Panel, Inner Panel, and the necessary reinforcements by following the Master Section mentioned with the Design parameters.
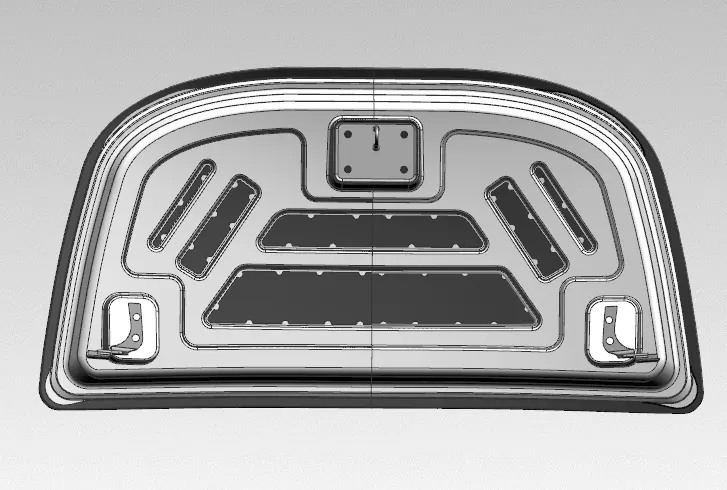
Introduction:-
-
In the automobile Hood or Bonnet plays a very major role.
-
The Hood is an opening body panel that covers the engine compartment in the front engine vehicle.
- Its purpose is to provide access to the engine for repair and maintenance.
-
It is considered as the closure sheet-metal component. A hood panel comprises two panels that are hemmed together to form the automotive hood assembly.
-
The inner panel of the hood is not visible to the customer but this is the engineering feature of the outer panel.
-
The outer panel has the aesthetic look to it but on its own is very weak and not capable of handling force during impact.
-
This puts the passenger’s life in danger, so we need to design the inner panel to provide strength to the outer panel.
- A hood may contain a hood ornament, hood scoop, and/or wiper jets. A portion of the hood may be raised in a power bulge, to fit a large engine or air filter.
Material:- Hoods are typically made out of the same material as the rest of the bodywork. This may include steel, aluminum, fiberglass, or carbon fiber. However, some aftermarket companies produce replacements for steel hoods in fiberglass or carbon fiber to make the vehicle lighter.
HOOD STAY
A hood stay is an apparatus for an engine room of a car, which can safely keep an engine hood in an open state even if an external force is abruptly generated due to vibration, and wind and can facilitate an opening/closing operation of the engine hood.
TYPES OF HOOD SUPPORT
- Gas stay
- Support Rod
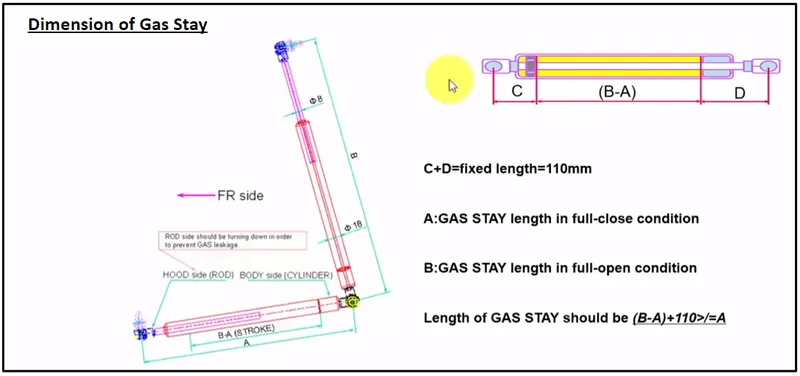
1. Gas Stay
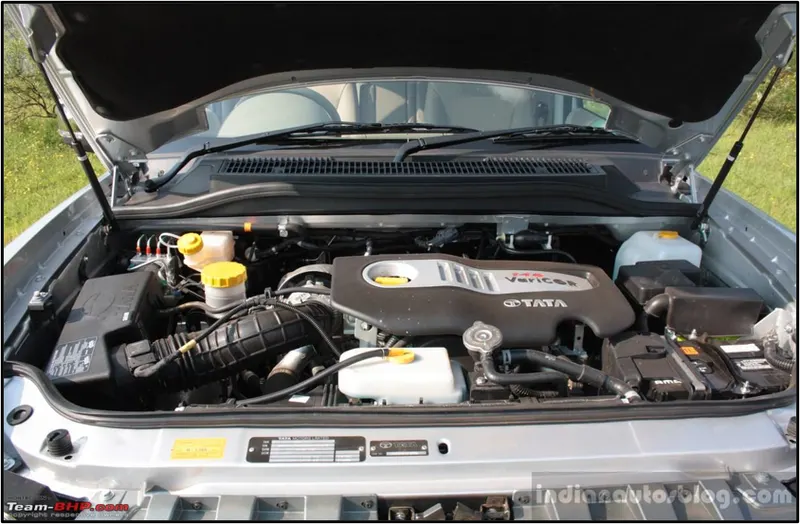
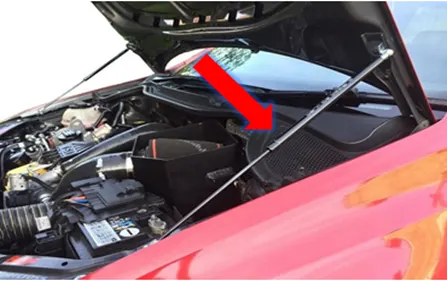
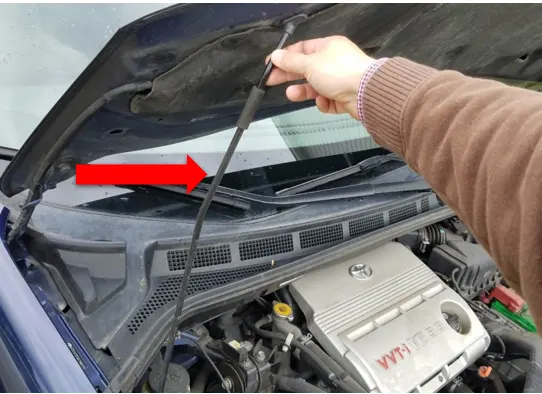
These are used to lift the car hood. Its purpose is just to give the lifting force to the hood, then it automatically opens the car hood using gas pressure.
Spring stays are designed to be used on upward-lifting doors, once you have opened the door slightly the spring will push the door to the fully open position, Euro fit stock various size springs depending on the door size requirements. This is mostly used where the car bonnet's weight is heavy. Struts contain nitrogen gas under pressure and some oil to dampen movement and lubricate the seals.
2. Support rod
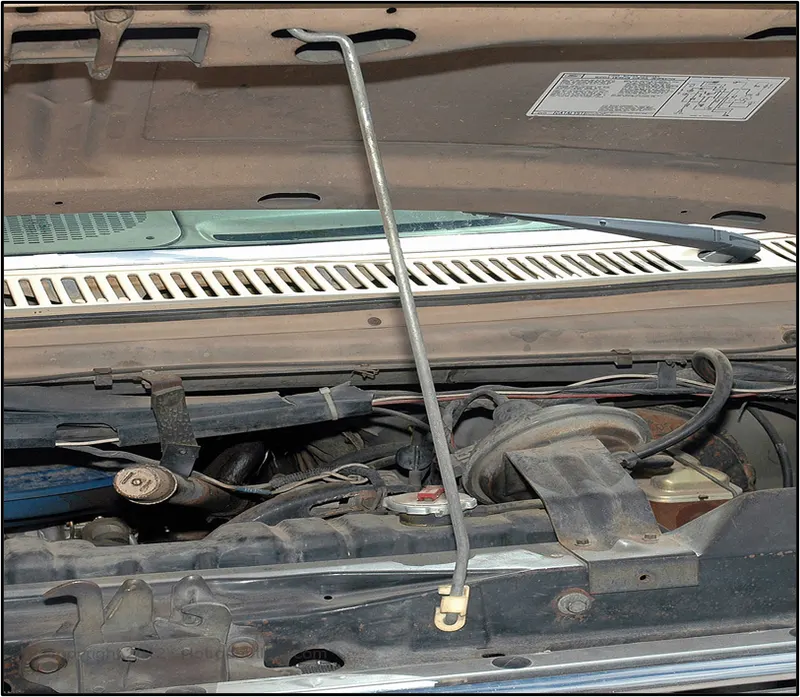
This is widely used in many cars. In this type, we have to lift the hood by ourselves and place the support rod in the space provided either in the hood or the engine component. This is mostly used where the car bonnet's weight is small.
1)Support Rod can be mounted with a grommet side on the engine compartment of the Body and a rod locking hole on the hood or vice versa.
2)Grommet and the clip of the rod are standard parts.
The support rod is used to increase the support force, automatic buffering, stable and reliable, strong load-bearing capacity, safe use, not easy to fall, avoid hot hands, support the engine more easily, and balance the force without shaking.
The following are some of the important purposes of the Hood or Bonnet
- Safety of the passenger.
- Covers all engine, radiator, and other necessary components.
- Reduce air effect due to its aerodynamic shape design.
- Reduce engine noise which helps for a quieter drive.
- Provide access to engine maintenance.
- Absorbs most of the impact forces when a frontal crash occurs.
Head Clearance criteria:
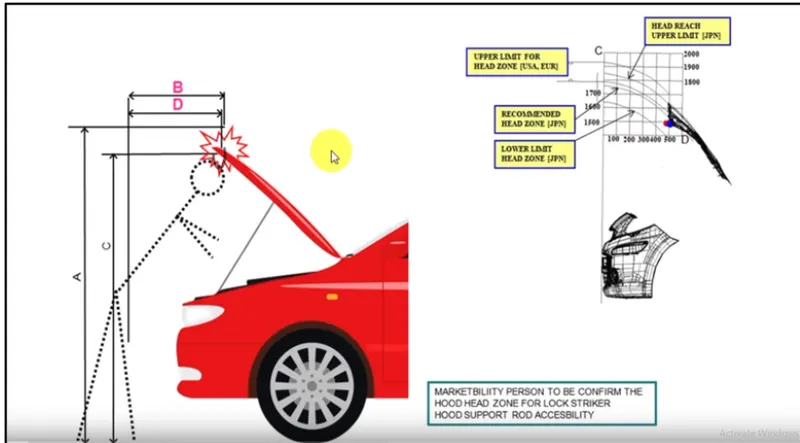
Head clearance is decided upon by the zone or country. So the same car if made for a different country will have different opening angles depending on the country or region.
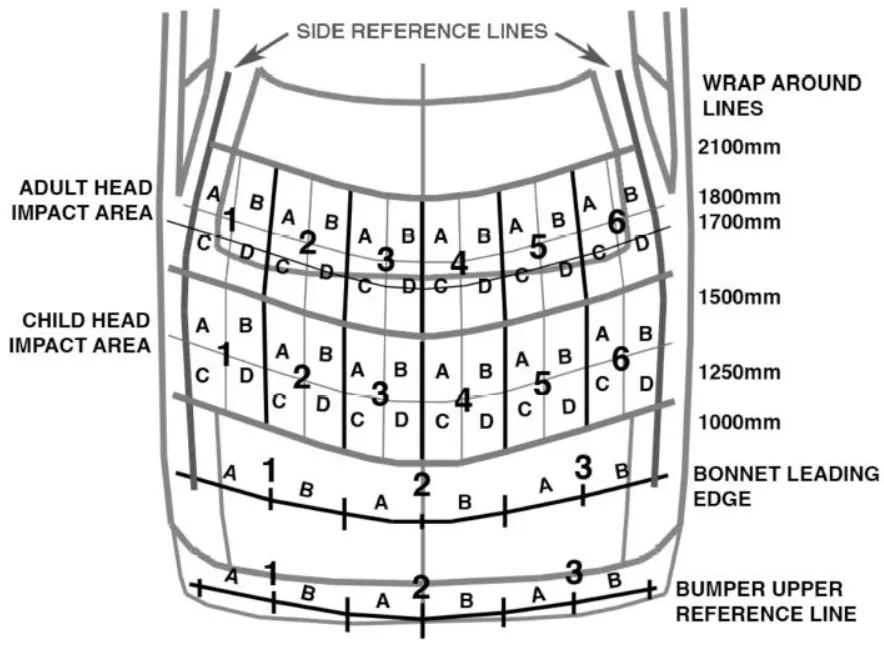
The distance between C and D showed in the image is represented as a graph in the upper right corner of the image. Choosing the right head zone position will decide upon the angle of the hood opening.
Product engineers will also get input from the marketing team for deciding on the head zone.
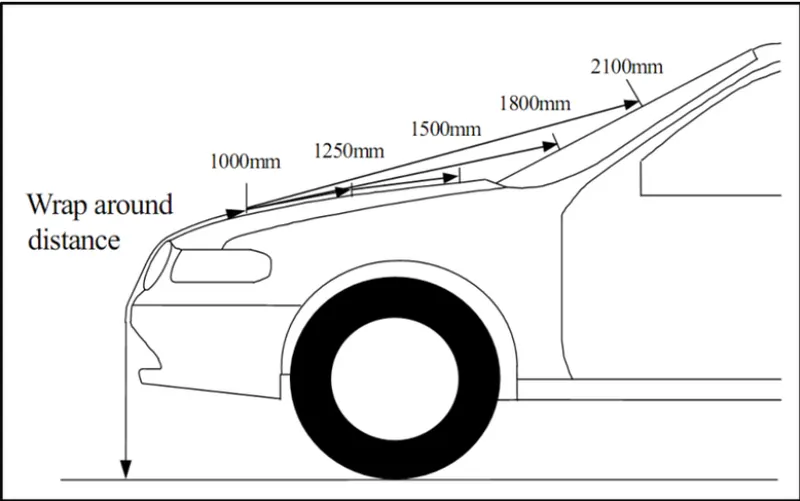
When a car crashes on a pedestrian, the whole human body wraps around the front shape of the car, and the head impacts the bonnet or the windscreen. The distance on which the head impacts the car from the ground is called the Wrap Around Distance (WAD).
To be specific the Wrap Around Distance is a measurement of the distance from the ground to the head impact zone over the outer surface of the car. The wrap-around distance is measured longitudinally in the center of the vehicle from the ground The severity of the injury caused by the frontal crash depends on the type and shape of the vehicle, the speed of the vehicle, and the movement of the pedestrian relative to the vehicle. In addition to these parameters, the wrap-around distance plays a major role in the safety measures of a pedestrian. During the crash analysis, based on the Wrap Around Distance(WAD), two test areas will be created namely the Child head impact zone and the Adult head impact zone. The child head impact zone is between 1000 to 1700 mm WAD and the adult head impact zone ranges between 1700 to 2100 mm WAD.
. 
Release/ safety and security mechanisms
The hood release system is common on most vehicles and usually consists of an interior hood latch handle, hood release cable, and hood latch assembly. The hood latch handle is usually located below the steering wheel, beside the driver's seat, or set into the door frame. On race cars or cars with aftermarket hoods (that do not use the factory latch system) the hood may be held down by hood pins. Some aftermarket hoods that have a latch system are still equipped with hood pins to hold the hood buttoned down if the latch fails.
Design Consideration:-
Design specifications for the automotive hood component
Master section data was already provided by the support instructors of the course.
Manufacturing Processes Involved in Hood Design
1. Embossing (Manufacturing)
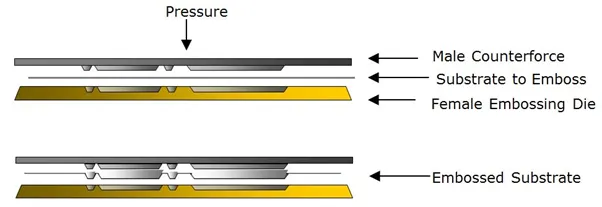
Sheet metal embossing is a stamping process for producing raised or sunken designs or reliefs in sheet metal. This process can be made using matched male and female roller dies, or by-passing sheet, or a strip of metal between rolls of the desired pattern. It is often combined with Foil Stamping to create a shiny, 3D effect
2. Deep Drawing
Deep drawing is a sheet metal forming process in which a sheet metal blank is radially drawn into a forming die by the mechanical action of a punch. It is thus a shape transformation process with material retention. The process is considered a "deep" drawing when the depth of the drawn part exceeds its diameter. This is achieved by redrawing the part through a series of dies. The flange region (sheet metal in the die shoulder area) experiences radial drawing stress and tangential compressive stress due to the material retention property. These compressive stresses (hoop stresses) result in flange wrinkles (wrinkles of the first order). Wrinkles can be prevented by using a blank holder, the function of which is to facilitate controlled
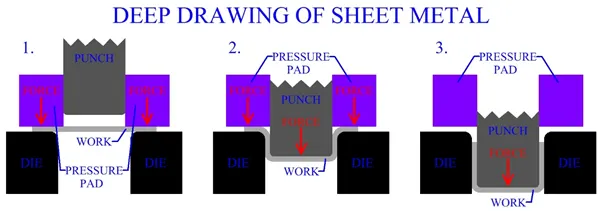 material flow into the die radius.
- Hemming Process
Sheet metal is metal, in sheets. It’s thinner than plate metal (.25 in and thicker) but thicker than foil (.006 in and thinner). It’s most commonly available in steel and aluminum, in various gauges (thicknesses). It’s available with various coatings for corrosion resistance or surface finish. Sheet metal is made by taking a large cast ingot and rolling it into a long ribbon of the desired thickness. This long, flat piece of metal is then rolled into a coil and sent directly or cut into sheets before being sent to a machine shop.
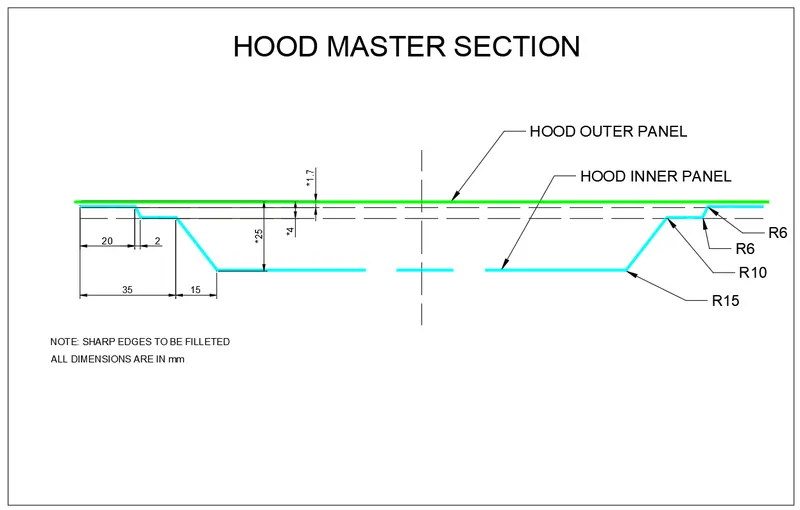
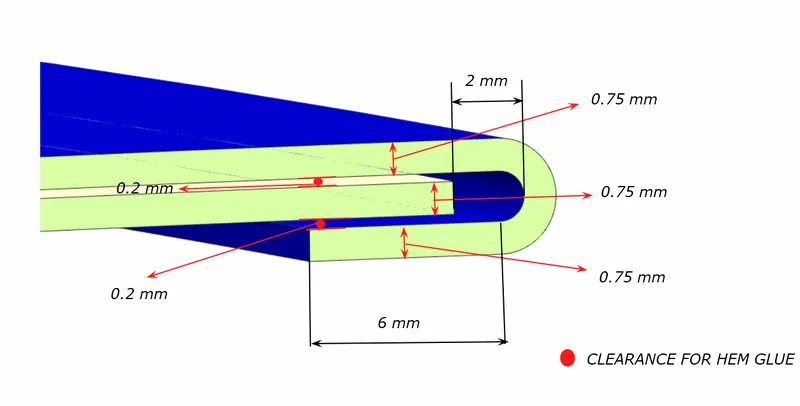
Hemming Data:
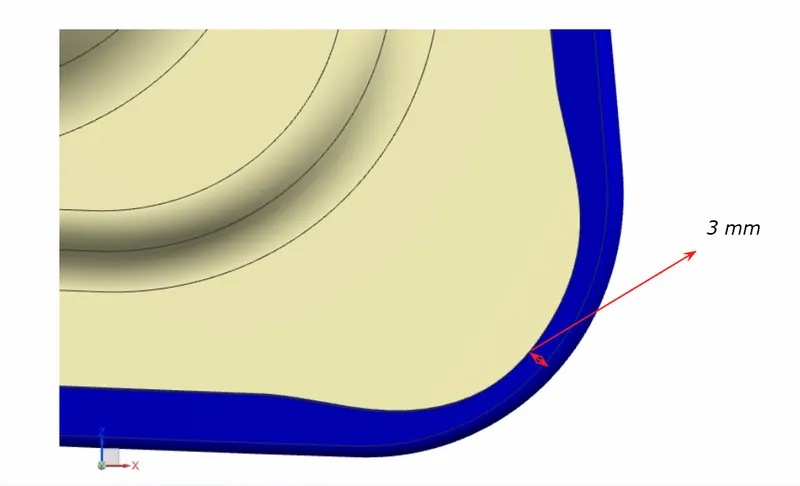
Relief rear section:
DESIGN CONSIDERATIONS FOR DESIGNING THE HOOD
1. Latch Trajectory
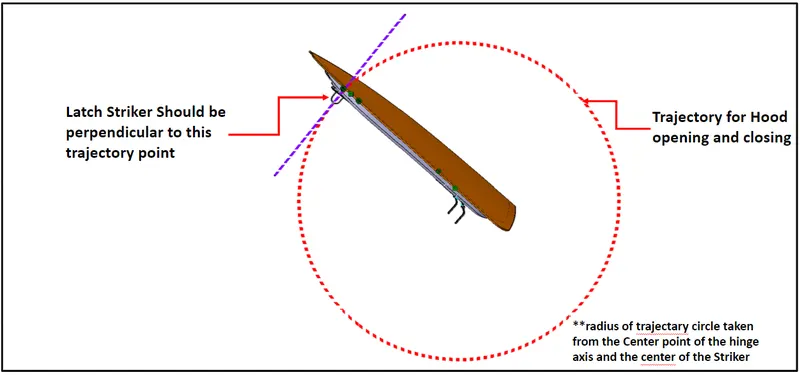
The latch trajectory shows the path of the striker when the hood is opened and closed on a vehicle. The radius of the circular trajectory is determined by the set standard based on the average height of a person. The radius is measured from the hinge axis up to the latch.
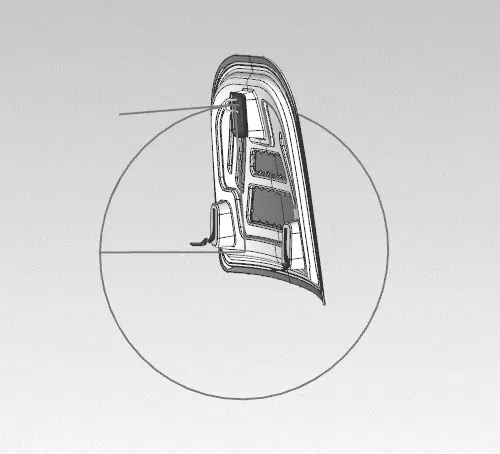
For the proper opening and closing of the hood, the striker should be positioned at the correct position. The striker should be perpendicular to the trajectory of the hood. The flanges are positioned at their respective positions. Then the line is drawn at a straight. Now the trajectory is derived from the hinge axis and the center distance from the striker. It is denoted using the circle.
2. Fixing the Hinge Axis
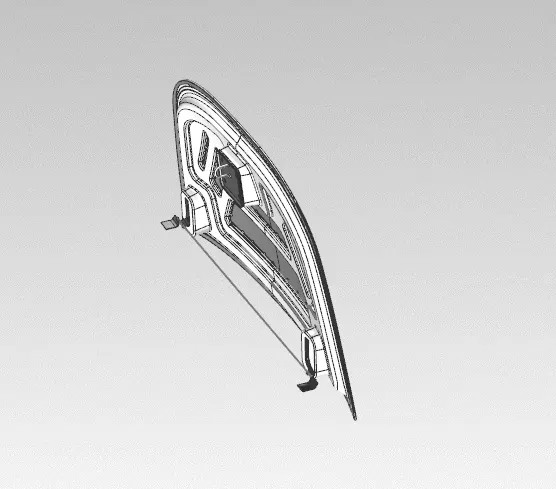
The hinge axis is positioned in such a way that the axis lies in the same line so that it is parallel to the “x” axis plane. This is done to position the latch and sticker trajectory motions exactly perpendicular to the hinge axis.
3. Mastic Points
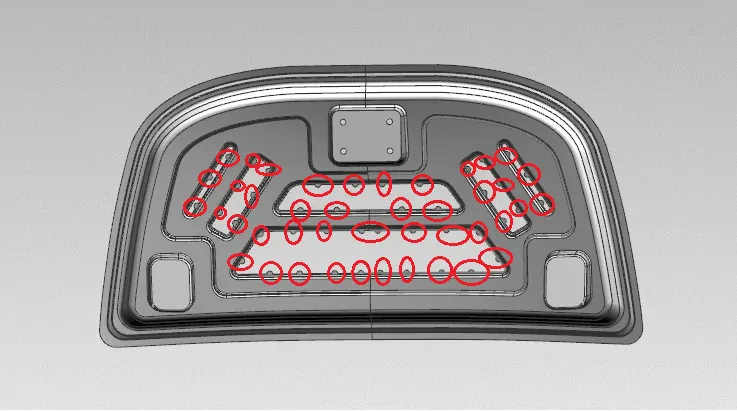
The mastic points are areas where the mastic is placed to attach the outer panel to the inner panel. We cannot use spot welding as it would give a less aesthetically pleasing result. Hence mastics are used to join the panels together as it does not melt the metal itself.
4. Emboss Definitions
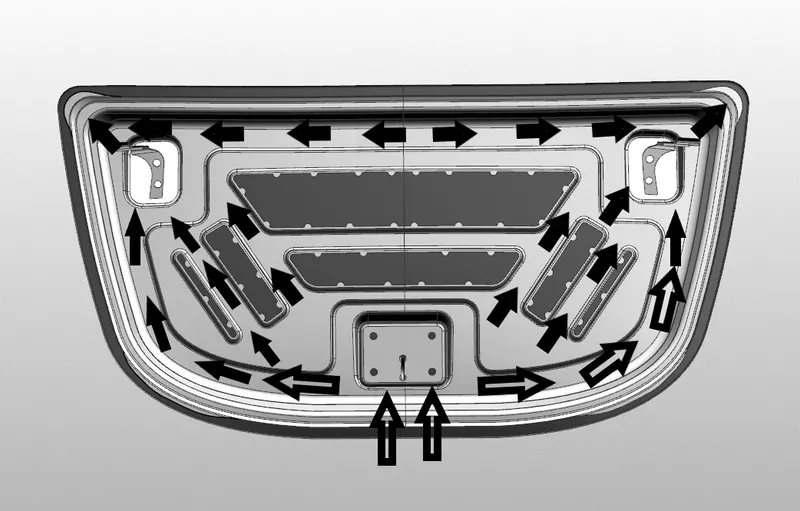
The inner panel consists of various embosses that help dissipates the force during impact. The width and depth of the emboss are determined by simulations and analysis to check for failure. These embossed definitions are created at an angle so that they point away from the center of the hood when viewed from the front of the vehicle.
5. Reinforcements
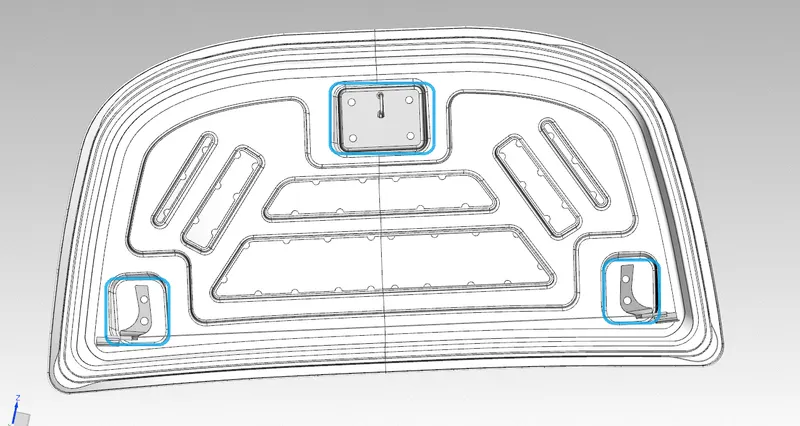
The area near the hinge and latch has more chances of failure in the hood panel. Hence to avoid any failure, the hinge and latch areas are reinforced with extra material whose thickness is usually determined by the type of vehicle.
6. Dissipating Shock Waves
To dissipate the shock waves onto the sides of the hood. This is a major reason for designing the hood in the shape of “Y” or “V” to dissipate the forces on the sides. This is one of the primary reasons for designing it in such a way that the force is not carried on to the passengers inside so that the passengers are saved from possible damage. In this design, it is found that the embosses are designed such that it forms the shape of a “Y”.
7. Relief on the Corners
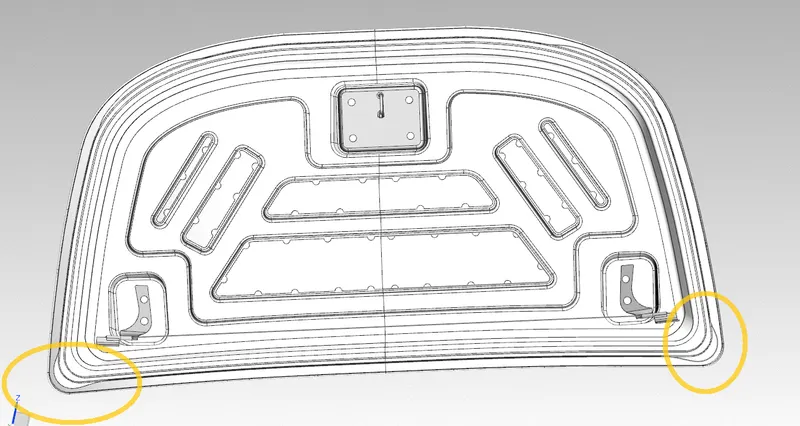
A relief on the corners is provided for the hemming process to avoid spring back issues. When the rollers are moving on the panels the force that is used to bend the sheet metal has to be maintained within the limit to avoid spring back issues. Due to this, relief is given on the corners to avoid the red zones on the hood.
8. Hemming In Sheet Metals
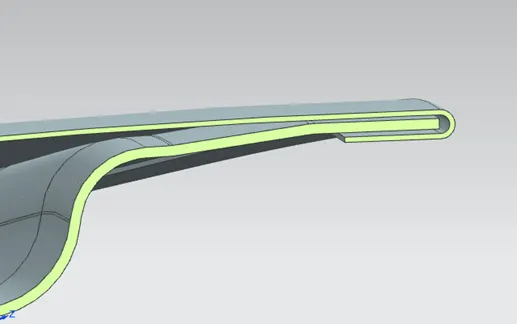
Sheet metal is metal, in sheets. It’s thinner than plate metal (.25 in and thicker) but thicker than foil (.006 in and thinner). It’s most commonly available in steel and aluminum, in various gauges (thicknesses). It’s available with various coatings for corrosion resistance or surface finish. Sheet metal is made by taking a large cast ingot and rolling it into a long ribbon of the desired thickness. This long, flat piece of metal is then rolled into a coil and sent directly or cut into sheets before being sent to a machine shop.
Hood Thickness Information
- Outer Panel Thickness = 0.75mm
- Inner Panel Thickness = 0.75mm
- Reinforcement Thickness = 1.5mm
Parts of a Hood
- Hood outer panel:-
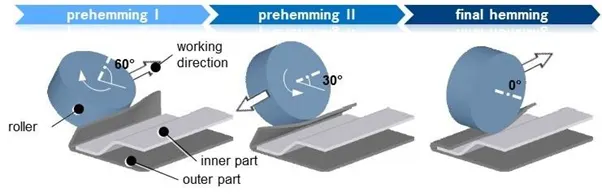
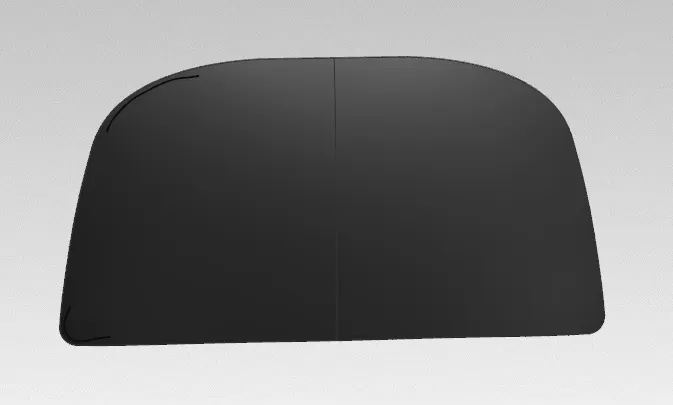
The design of the outer panel is mainly inspired by aesthetics but there is some engineering also to it. Here the main purpose of the outer panel is to cover the inner panel to provide an aesthetic look at the same time Panel must be curved & sleek so that it behaves aerodynamically and air hitting from the front reflects from it efficiently. So here rather than using seam and spot welding, we use the hemming method to join the outer and inner panels. Hemming is a type of folding or wrap-around process in which a roller bend and presses the extrapolated flange in a way that it holds the inner panel firmly, then a sealant is also provided in between them under folds to get water tightening.
While hemming we provide relief around the corner as it helps in easy hemming or undistorted hemming while the roller took a turn around any corner.
Its thickness is also 0.75 mm maximum
- Hood inner panel-
The hood's inner panel is required to have a high initial reaction force against the impact exerted on the hood to enhance the energy absorption capacity. The hood is further required to minimize a reduction of a reaction force by deformation in a collision.
It is an object of the present invention to provide a hood inner panel capable of reduction of the reaction force of the hood inner panel even if the level of deformation of a hood of a vehicle increases, and ensuring a sufficient energy absorption capacity.
In the inner panel only we can research and implement the safety of pedestrians and as well as the driver. In this panel only we can attach the reinforcement, embossed, mastic points, etc.
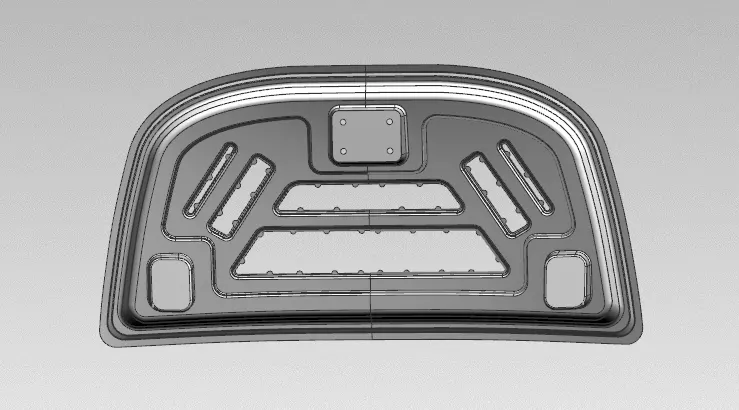
- Striker:-
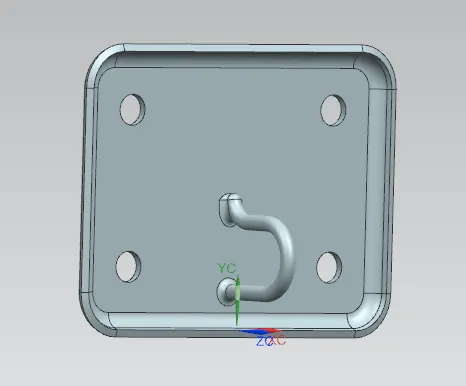
A hood latch is a very simple component. It's the fastener that keeps your hood closed shut. This latch ensures that your hood is securely connected to your vehicle and that it doesn't pop open unexpectedly
When tension is applied to the cable from the hood release handle, it pivots the secondary latch, which pulls away from a retaining seat located under the hood. By design, the secondary latch then releases the hood a few inches before a safety latch takes over.
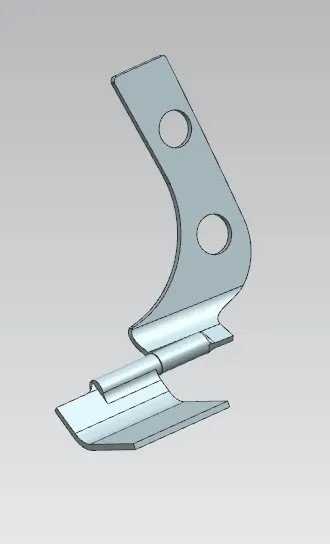
- Hinge assembly:-
A hinge is a mechanical bearing that connects two solid objects typically allowing only a limited angle of rotation between them it has one degree of freedom. So here hinge is providing rotation to the hood about its axis and also keeps it connected to the fender portion.
So while creating space for the hinge we need to provide embossing there, because of embossing and hole its strength got affected so to compensate for that we provide hinge reinforcement.
Hinge reinforcement has a thickness of around 1 to 1.5 mm to reinforce the hinge embossed region.
Features Used in NX Cad
Offset Surface:
The offset surface command is used to offset a surface or face. Selecting a surface to offset will generate an IntelliShape offset surface that is defined by the originating surface. This IntelliShape will update if the originating surface is modified
Offset in the face:
Use the Offset Face command to offset one or more faces along the face normals. You can offset faces either by positive or negative distances, provided the topology of the body does not change.
Trim sheet:
Use the Trimmed Sheet command to trim sheet bodies to intersecting faces and datums, and projected curves and edges.
Through curves:
through curves, the command is used to create a body through multiple sections where the shape changes to pass through each section. Sections are curves, points, solid edges, and solid faces.
Law Extension:
Use the Law Extension command to extend an existing surface or sheet based on the laws for distance and the angle of the extension. Law Extension creates flanges or extensions when a particular direction is important or when it is necessary to reference the existing face
Trim and extend:
This option lets you extend and trim one or more surfaces using a set of tool objects composed of edges or surfaces. 1 Two intersecting solid bodies. 2 Selected body on the right is the object to trim (the target).
Face Blend
Face Blend is enhanced to provide a dedicated type for blending along intersection edges of bodies combined with a Boolean feature. Face Blend is primarily used to blend between the faces of separate bodies. It can also be used to blend between the faces of a single body.
Edge blend
The edge blend command uses to round sharp edges between faces. The radius can be constant or variable.
Emboss
Emboss is mainly used on surfaces, you can use an intersecting solid as Michael shows, and you can also use a curve or sketch profile. create your sheet feature. select emboss, and select your face and sketch. Attached is an example of an embossed sheet.
Sketch:
Creates a sketch in the current application. Use the direct sketch tools to add curves, dimensions, constraints, etc.
Datum plane:
Creates a datum plane used to construct other features.
WAVE Geometry Linker:
Copies geometry from other parts in the assembly into the work part.
Extend sheet:
Extend a sheet body by distance or to the intersection with another body.
Mirror geometry:
Copies geometries and mirror them across a plane.
Sew:
sew command is used to combine sheet bodies by sewing common edges together, and combine solid bodies by sewing common faces. The selected sheet bodies must not have any gaps larger than the specified tolerance
Thicken:
Use the Thicken command to offset one or more connected faces or sheets into a solid body. Thickening occurs by offsetting the selected faces along their face normals and then creating sidewalls. The Thicken command is similar to the Offset Face command.
The curve on the surface:
Creates a surface spline features directly on the face.
Extract body:
Use the Extract Body command to create an associative body by extracting faces from another body.
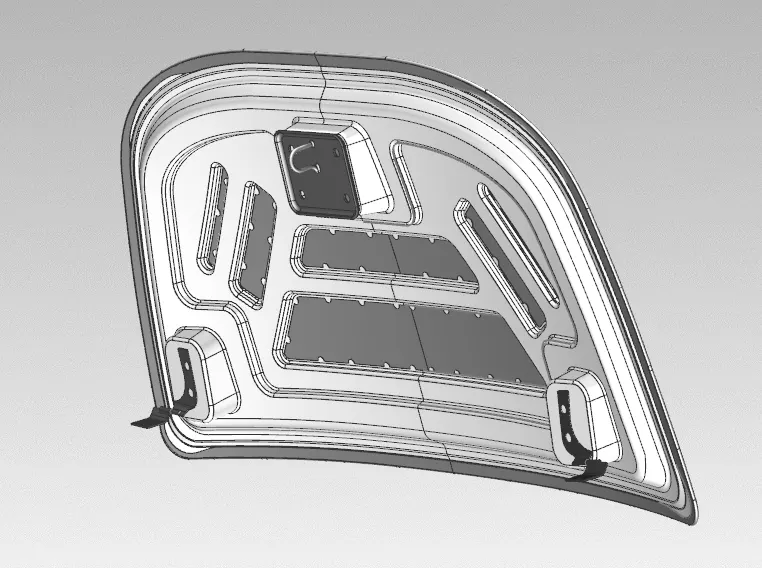
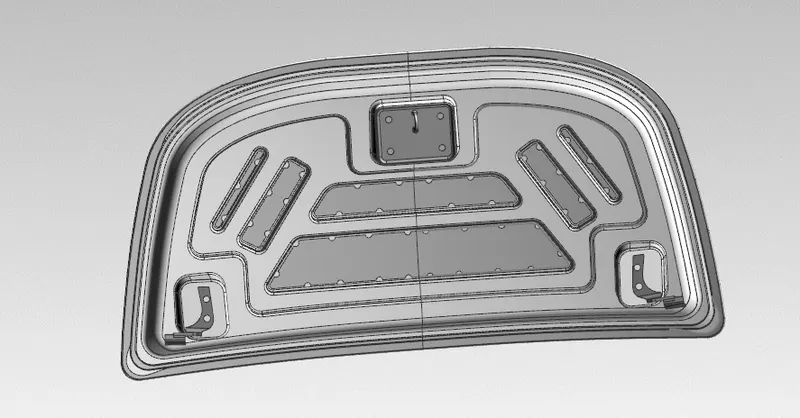
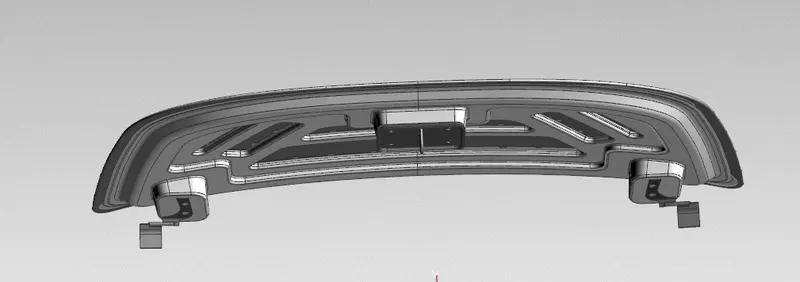
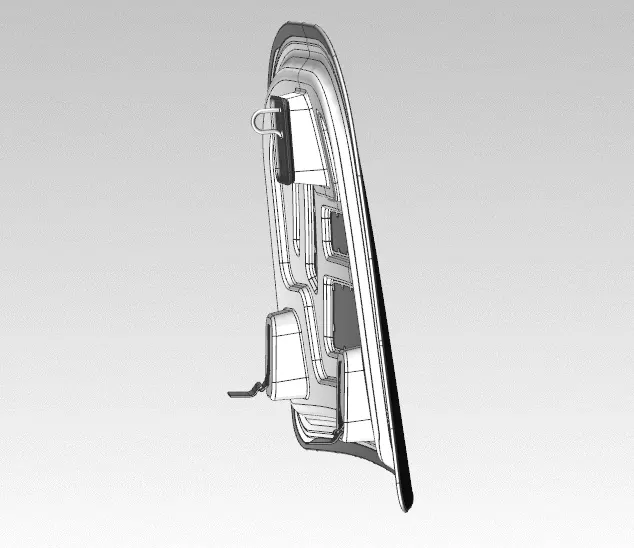
HOOD ASSEMBLY
Conclusion
The inner panel and the outer panel have been designed from the given styling surface according to the Euro-NCAP standards. The inner panel was checked for its manufacturing feasibility using draft analysis. The latch and striker positions were studied. Necessary reinforcements were developed for the inner panel.