Hood design-Week 2
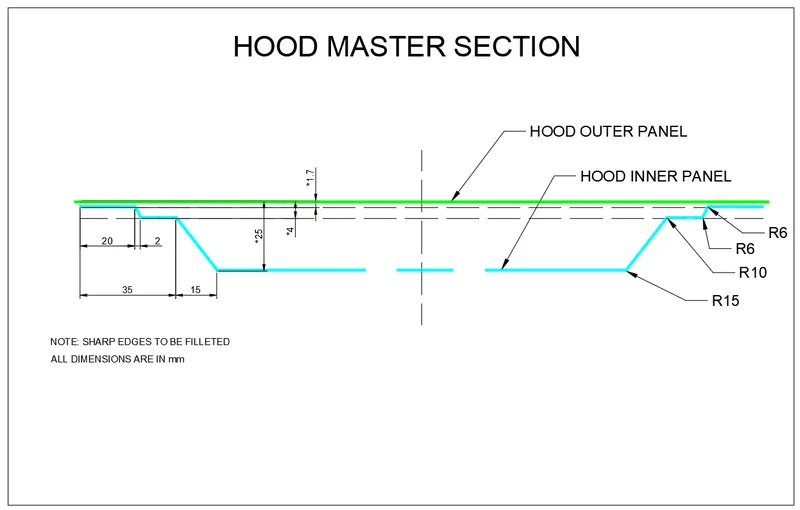
OBJECTIVE: Design Hood Outer Panel, Inner Panel and the necessary reinforcements by following the Master Section given.
Data Given:
Hood Thickness Information
- Outer Panel Thickness = 0.75mm
- Inner Panel Thickness = 0.75mm
- Reinforcement Thickness = 1.5mm
Master Section:
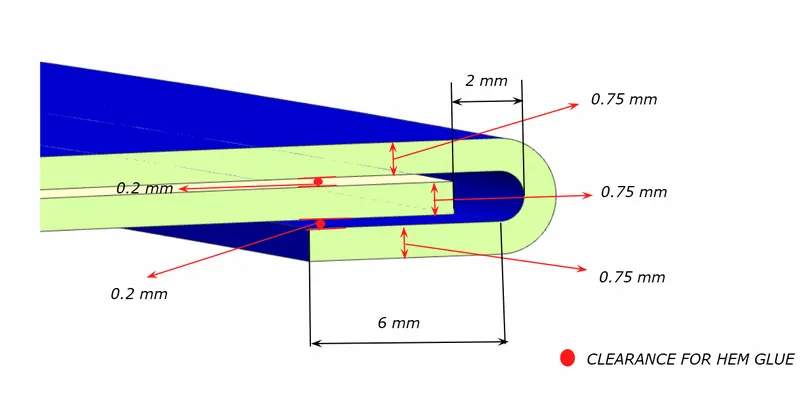
Hemming Data:
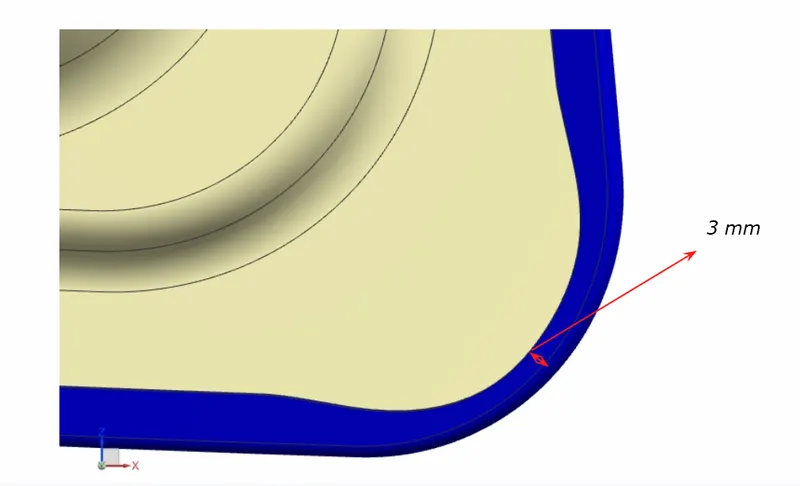
Relief rear section:
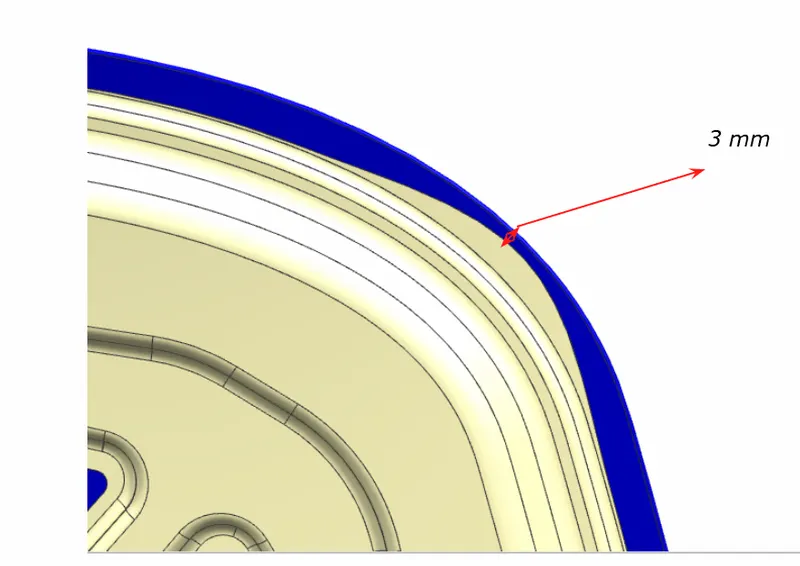
Front relief:
ABOUT HOOD :
The Hood which is also known as bonnet is explained as the opening body panel that covers the engine in a front-engine vehicle and in some cases in which the engine is placed at the rear side it works as the cover/opening panel for boot space.
The hood is also considered as a type of door in a vehicle as it is made up by consisting two panels which are inner panel and outer panel in which the inner panel provides strength while the outer panel functions as the metal cover.
Hood also plays an important role in the aerodynamics of the car, thereby reducing the drag and increasing the downforce of the car.
Hood also helps to decrease the direct impact of any head-on collisions away from the passenger cabin there-by reducing the damages to the passengers.
The hood is designed in such a way that less damage are caused to the pedestrians during accident as to make it more suitable according to the EURO-NCAP ratings. Therefore, calculating that where should the reinforcements should be placed the rating of a car can be increased.
Hoods can be manufactured by the use of metals like steel, aluminium , fiberglass or carbon fiber. Wherever some companies produce hoods with fiberglass or carbon fiber to make the vehicle lighter.
The properties that are desired in a hood material are as follows - High Strength, Lightweight, Good corrosion resistance, High modulus of Elasticity, Good hardness. Altogether, a material which makes the hood strong and long lasting with the ability to be easily fabricated as per the desire is considered a good material for hood manufacturing.
Hood is typically supported by rods, so that it stays at a suitable position that a person can lean onto it hassle free and work in the engine compartment. Basically, there are 2 types of rods are used which are
1. Support Rod
2. Gas Stay
1. Support Rod – A support rod is designed to hold your hood when it is open or whenever you need to do some work in your car’s engine bay. When we use support rod, it must be ensured it provides a stable hold on the hood. Meanwhile, when not in use it must be kept stable and in place. And it must be ensured that after closing of hood, the support rod not make any type of noise to, i.e, NVH(Noise, Vibration and Harshness) must be ensured. To maintain all the factors properly there is a part called “hood rod clip” which is fitted either at the hood or at the engine part which ensures a silent drive of the vehicle at the closing of the hood. Hood rod clip stops the rod from moving around under the hood and from causing any trouble or noise when we operate the car.
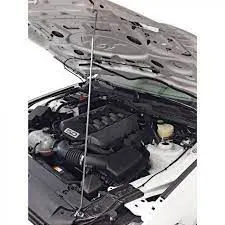
Fig: Support Rod
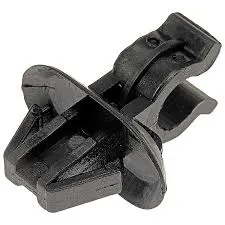
Fig: Rod Clip
2. Gas Stay – It is also used to provide support to the bonnet at the opening of the hood. It is mainly used in high end cars because their hood is heavier than the normal cars and it is more expensive than the support rod system. By the use of gas stay, we can open the hood by just a small amount of effort or by providing little lift force we can open the hood. In this the work is done by gas pressure.
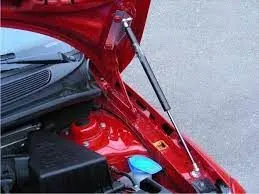
Fig: Gas Stay in a car bonet
DESIGNING OF A CAR HOOD:
DESIGN CONSIDERATIONS TO BE FOLLOWED:
- Passenger Safety
- Pedestrian Safety
- Manufacturing Feasibility
- Positioning the striker along the Trajectory of the Centre of Hinge axis
- Joining techniques of inner and outer panel.
- Pedestrian Safety:
- The most important safety requirement to be considered while designing the Bonnet is the Pedestrian Safety from a frontal collision
- The European New Car Assessment Program (Euro NCAP) is a European car safety performance assessment program which has developed test specifications and rating systems for assessing pedestrian injuries during impacts with the front of vehicles Such tests include a series of tests using impactors designed to mimic a collision at a speed of 40 km/h. They describe a situation in which a pedestrian is situated laterally and a car first hits one of his legs. Tests are conducted on the leg, upper leg, and most importantly, the head, as head trauma is most commonly responsible for casualties.
- Thus to avoid severe injuries to the head, the high impact area for adults and children is subjected to less thickness. Also, no reinforcement should be provided in that area as, during the head collision, the hood will absorb the head impact energy leading to the collapse of the hood and thus protecting the severe head injury.
- Another important criterion for the hood design is the protection of the occupants inside the car during the front collision. The design of the hood should be in such a way that during the collision, the force should travel in the upward direction through the embosses and directed towards the body of the car. Thus protecting the occupants inside.
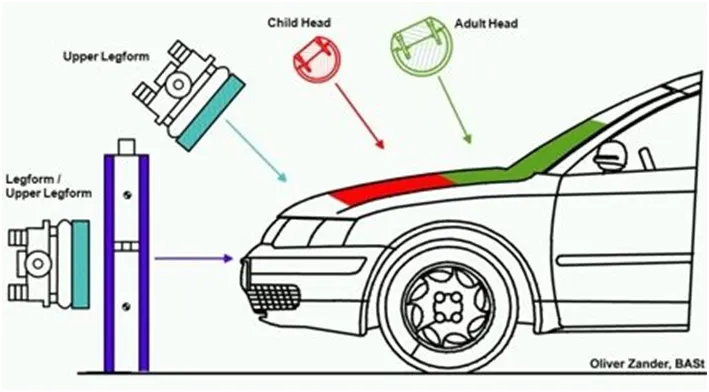
Fig - Pedestrian safety
Head impact - To estimate the potential risk of head injury in the eventuality of a vehicle colliding at front with an adult or a child, a series of impact tests are carried out a certain speed of the car. Impact sites are then assessed and the protection offered is rated as good, average, marginal, weak or poor. The procedure promotes energy absorbing structures, deformation clearance and deployable protection systems such as pop-up bonnets and external airbags.
Upper leg impact - The shape of the hood leading edge can play a critical role in the eventuality of a vehicle impact with a pedestrian and contribute to injuries to the pelvis and femur. Energy absorbing structures and a more forgiving geometry is envisioned to overcome the negatives of the test i.e mitigating the injury.
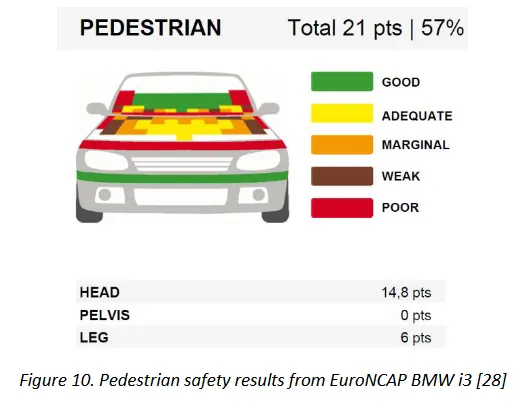
Areas on the hood are then classified as good, adequate, marginal, weak and poor based on the results. Green area in this case shows good safety to the pedestrian from head injury on the corresponding area. Similary, red areas indicate danger to pelvis. Based on such assesment the hood of a car is designed keeping in mind overall safety of occupiers of the car along with the pedestrians on the road.
- Manufacturing Feasibility:
- While designing a component a design engineer must make sure that the component can produced by any means of manufacturing methods with least amount of time, material, manpower and power. So that we can reduce the overall cost of car.
- When the hood is considered it is manufactured by deep drawing at most of the time Deep drawing is the process where the single sheet of metal is place over a die which has the desired shape of the final output and the sheet is pressed against it with a tool. For the tool to come out from the part usually pressing relief of 5° to 9° will be provided during modelling itself.
- In NX draft analysis can be done after modelling so that we can verify whether the product is manufactured by pressing or not. One side of the surface is highlighted by green and other side by Red colour means that the model can be manufactured.
- Positioning the striker along the Trajectory of the Centre of Hinge axis:
- The striker needs to be place on the trajectory of the centre point of the hinge axis to ensure that it fix perfectly on the latch if not locking will not be smooth and affects the comfort and also it will create NVH problems.
- The striker is aligned using following steps:
- Drawing the line along the axis of the hinge.
- Creating the point on the mid-point of the line.
- Drawing the circle from the mid-point of the line to the latch where the striker will be mounted.
- Drawing the line from centre point to the mid-point of the striker rod.
- Aligning the line's end point and the mid-point of the striker to the circle.
- Angle need to aligned so that the angle of the striker is perpendicular to the line drawn from mid-point of the axis line to the mid-point of the striker.
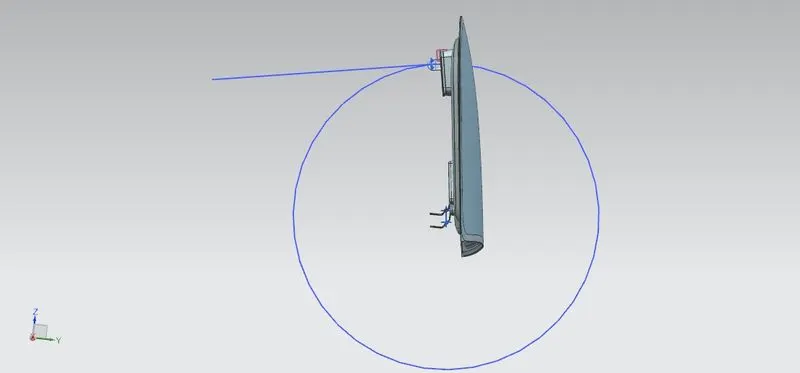
- The striker needs to be place on the trajectory of the centre point of the hinge axis to ensure that it fix perfectly on the latch if not locking will not be smooth and affects the comfort and also it will create NVH problems.
Fig - Trajectory of latch and striker in a hood.
- Joining techniques of inner and outer panel:
- Inner panel and outer panel of the hood should be joined rigidly without disturbing the styling surface of the hood which is the outer panel or aesthetic looks of the outer panel(hood). Here we use special joining methods known as Hemming and Mastics.
- Hemming:
- Hemming is the process of wrapping the flange of the outer panel to the flange of the inner panel so that they are fitted rigidly. After hemming process, the sealants were applied along the edge of the flange of outer panel so that water tightness is achieved. The below image shows the cross-section of the inner and outer panel joined by hemming process.
- Usually, the reliefs were provided at the corners of the hemming flange to avoid the Hemming relief to avoid stress developed while hemming. Stress developed during the hemming process.
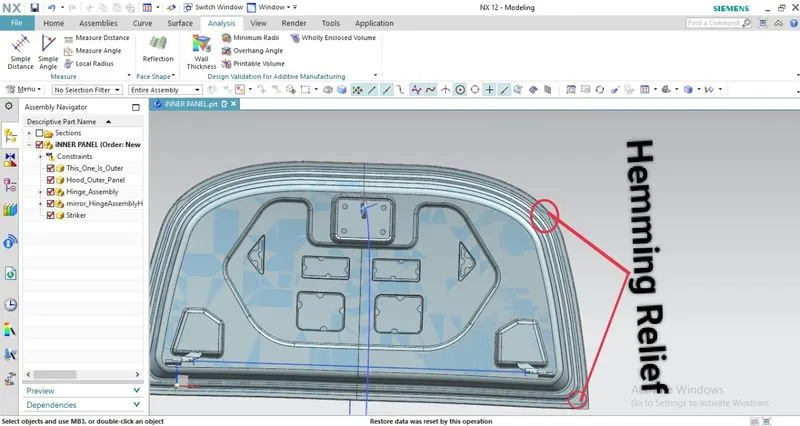
- Fig - Hemming Relieves in the design
- Mastic Points:
- Mastic points were the gluing points where the paste is applied between the inner and outer panel to join the panels. Each mastic point will stiffness up to 80mm surrounding. So mastics to be added in such a way that it covers entire surface of the hood. If the gap is less than 5mm between the outer and the inner panel without mastic points it will cause vibration resulting in NVH problem. Below image shows the mastic points where the paste is applied, and it will get hardened in further processes like passing through a furnace, etc. resulting in a rigid joint.
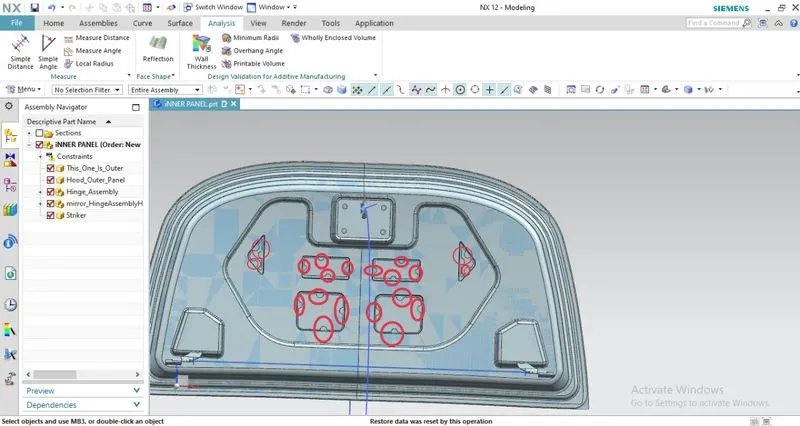
Fig - Mastic Cut-outs in the panel
- Pedestrian Safety:
Components of a Car hood –
The hood of a car generally includes –
1. Hood Inner panel,
- Hood outer panel,
- Striker and Latch,
- Hinge.
So, In order to design the hood we have given some design approach like master sketch of the panel by the use of which we can create the inner panel.
1. INNER PANEL DESIGN:
The inner panel master section was designed based on the master sketch. The inner panel is the critical part of the hood which acts as a force redirecting medium during frontal crash. Hence, it becomes very important to ensure that the inner panel is designed in such a way that the damage caused to the passenger as well as the pedestrian is minimum.
The inner panel consists of different contours known as Emboss & various cutouts made on the emboss which reduces the weight of the hood. It also consists of the mastic sealants extruded from the cutout edges.
The various commands & features that were used to design the inner panel are given as follows:
Offset Surface : This command is used to create a surface or a body by offsetting a set of faces.
Offset Curve in Face : Offsets curves along the faces on which they lie.
Trim Sheet : Trims off a portion from a sheet body.
Trim and Extend : Trims or extends a set of edges or faces to the intersection with another set of edges or faces.
Extend Sheet : Extends a sheet body by distance or to the intersection with another body.
Trim Body : This command is used to trim a portion of a body along a plane or a face.
Through Curves : Creates a body through multiple sections where the shape changes to pass through each section.
Law Extension : Creates a law-controlled extension from base sheet, dynamically or based on laws for distance and angle.
Face Blend : Adds tangent blend faces between selected set of faces based on the radius specified.
Edge Blend : Rounds sharp edges between faces based on the radius specified.
Projected Curve : Projects curves, edges, or points onto faces or planes.
Emboss : Modifies a body with faces made by projecting a section along a vector, with options for end cap location and shape.
Curve on Surface : Creates a surface spline feature directly on a face.
Mirror Geometry : Copies geometries and mirrors them across a plane.
Sew : Combines sheet bodies by sewing common edges together, or combines solid bodies by sewing common faces.
Thicken : Creates a solid body by adding thickness to a set of faces.
Hood outer panel - It is a sheet metal cover which has a streamline and smooth structure for minimsing the air resistance and for providing good aesthetics. Overall, it affects the performance of a car in the form of reduced air drag. Its aesthetic design can make the car have in its arsenal a cool selling feature.

Fig - Hood Outer Panel
- Striker and Hinge - A latch and striker is a mechanism which holds the hood in its closed position. For the hood to close properly it is necessary that the axis of the striker be perpendicular at every point on its circular trajectory. The rotation of hood is referenced at the axis of hinges. The trajectory of hood is shown in the form of circle on which the axis of striker is perpendicular at every point on the trajectory. Hinges are the points on the hood that connect the hood to the vehicular frame and are responsible for pivoting of the hood in the form of opening and closing of it.
Image - Trajectory of latch & striker
Striker and hinge reinforcements - Reinforcements as the name suggests are provided for reinforcing the area where striker and hinges are assembled on the inner hood panel. The need for reinforcements arises from the thinness of sheet metal used. Thus, they provide local strength to the panel.
Conclusion : We got to know about the designing of hood parts like its inner panel, outer panel, hinge, striker and important terms related to it.