Hood design-Week 2
DESIGNING OF HOOD ASSEMBLY
Objective
To understand and study the design methodology and mechanisms that goes under designing and developing an Automotive Hood to achieve maximum safety for everyone in and around vehicle.
Introduction
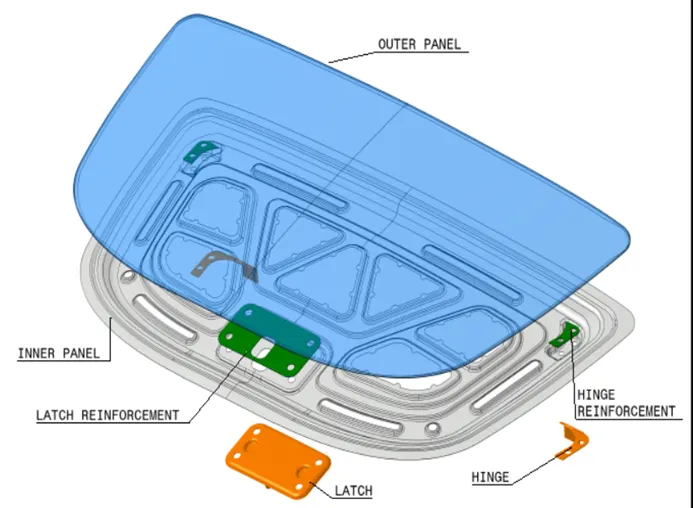
A car hood, also referred to as a bonnet in some other countries, is the hinged cover that rests over the engine of a front-engine vehicle. Its purpose is to provide access to the engine for repair and maintenance. A concealed latch is typically used to hold down the hood. Hood is one of the other major closure systems in a vehicle and is fundamentally a reinforced skin with many design considerations and safety regulations. The Hood Assembly has many components that are assembled within the car. They are
- Hood Outer Panel
- Hood Inner Panel
- Hinge Assembly
- Latch and Sticker
The inner panel serves as a structure for vehicle to dissipate and channel shock waves at the event of crash while the outer panel serves more as an aesthetic for the automobile overall presentation and to channel airflow over the vehicle. Hence both require critical precision as well as a dedicated strategy right from the design conceptualization to the production steps.
Once the design of the outer and the inner panel is finalized the manufacturing process begins. They are generally manufactured by deep drawing process. Once manufactured the outer and the inner panels are united to form one unit by one or combination of several types of joining methods like hemming, gluing, riveting and spot welding are done.
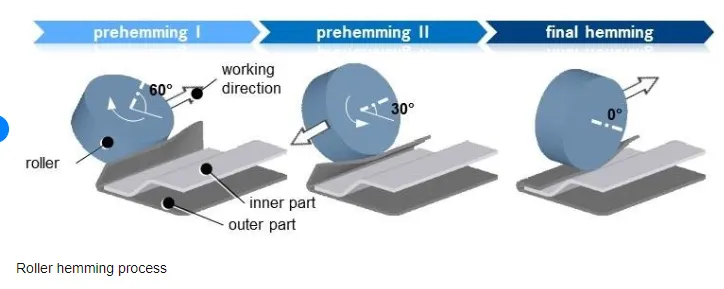
For joining the inner and the outer panel Hemming process is done by using rollers of different angle and force to completely form the sheet metal with a clearance of about 0.2mm on the either sides.
Process Involved in the Hood Manufacturing:
- Hemming Process
- Embossing
- Deep Drawing
Hemming Process
Hemming is widely used in the automotive manufacturing industry to assemble an outer sheet metal part to the inner one without using the welding process. This is performed by material suffered a plastic deformation. The neat and combination of these methods that do not show up to join the resistance welding. Sometimes used special adhesives to improve strength. The following diagram represent the hemming process done using three rollers. The image shows the image of the hemming of sheet metal using rollers of different angle and it is formed.
There are usually three stages in Hemming Process:
- Before Hemming
- Bonding Process
- Marriage Process
Hemming Methods:
- Die Hemming Method
- Table Top Hemming Method
- Robotic Roller Hemming Method
Emboss Process
Embossing is a metal forming process for producing raised and sunken design or relief in sheet material by means of matched male and female roller dies, theoretically with no change in metal thickness, or bypassing sheet or a strip of metal between rolls of the desired pattern. Embossing is generally used to increase the stiffness of the sheet metal part and to transfer the shock to towards the hinges using Embosses.
Deep Drawing
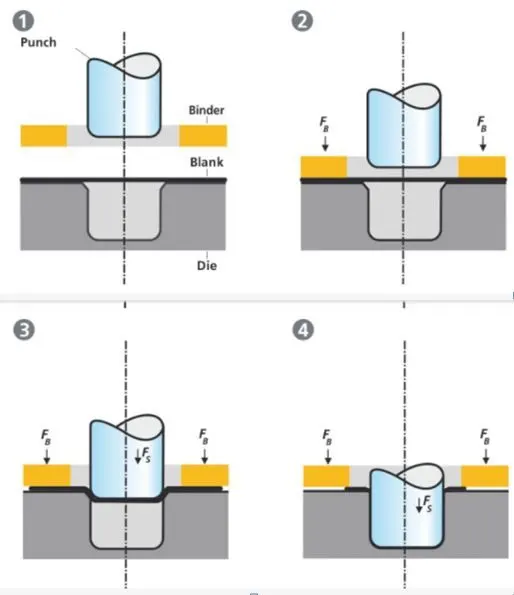
Deep Drawing is a forming process that occurs under a combination of both tensile and compressive conditions. A flat sheet metal blank is formed into a hollow body open on one side or a hollow body with smaller cross section.
Deep Drawing Processes are divided into three types:
- Deep drawing with tools
- Deep drawing with active means
- Deep drawing with active energy
Influence of a Bonnet (Hood):
- Overall vehicle mass
- Weight Distribution
- Height of vehicle centre of gravity (the bonnet and the boot lid are usually located above the C of G of the vehicle, hence weight reduction is beneficial).
- Vehicle drive by noise intensity
Design Data:
As per the standard data as given
Hood Thickness Information
- Outer Panel Thickness = 0.75 mm
- Inner Panel Thickness = 0.75 mm
- Reinforcement thickness = 1.5 mm
Master Section and Specifications:
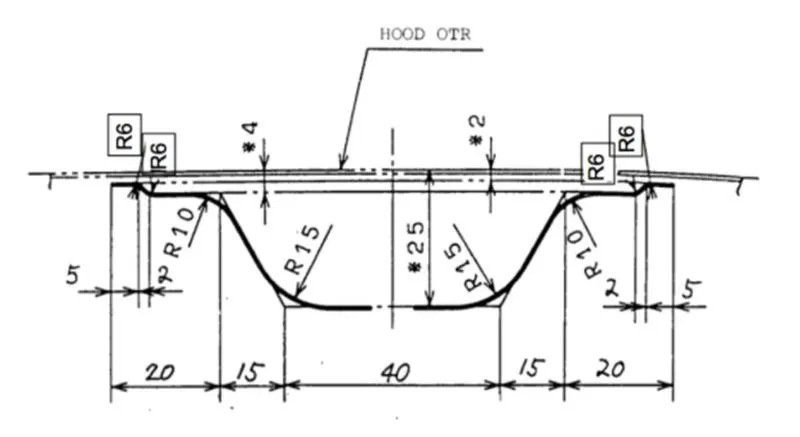
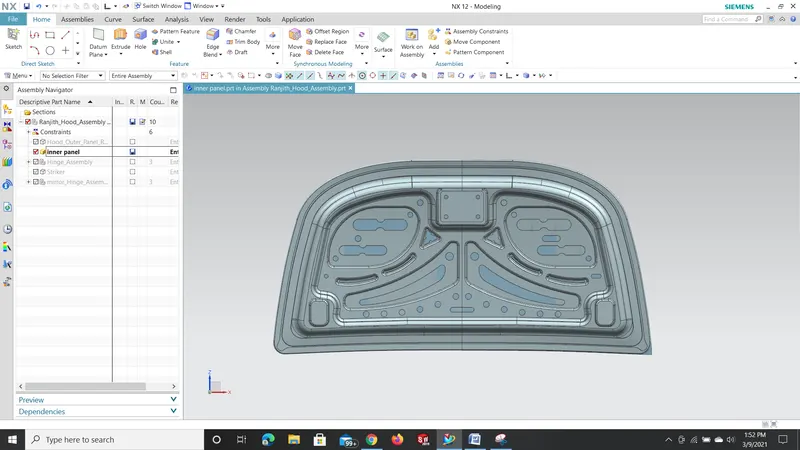
Upon designing the initial structure based on the master section, embossing was performed to strengthen the structure as well as to integrate channels to direct shock flow and dissipate maximum energy away from the cabin. With successful designing of these channels using the process of embossing, latch and hinge placements are designed for attachment of this structure of this structure to the vehicle.
Once the structure for the inner panel is prepared, reinforcement is provided to compensate for the strength drop which occurred due to the inclusion of latch and hinge placement. At this stage, the NVH team also contributes to implementing major design changes and the inclusion of components to reduce vehicle vibration and noise control.
Apart from hemming the centre region of the inner panel structure is kept in contact with the outer panel using mastic sealants. Mastic sealants are rubberized components placed between the outer and the inner panel to provide annexed contact. These sealants help maintain the outer panel aesthetically pleasing as well due to the absence of welds, nuts or bolts in the process of consolidation.
Design
Hood Assembly
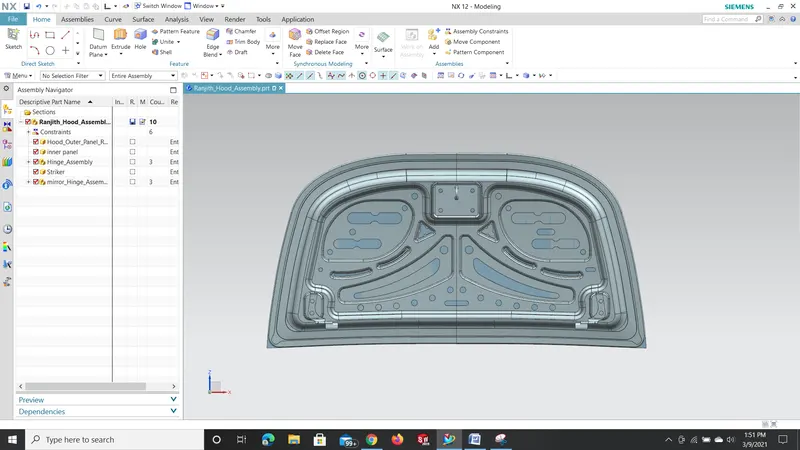
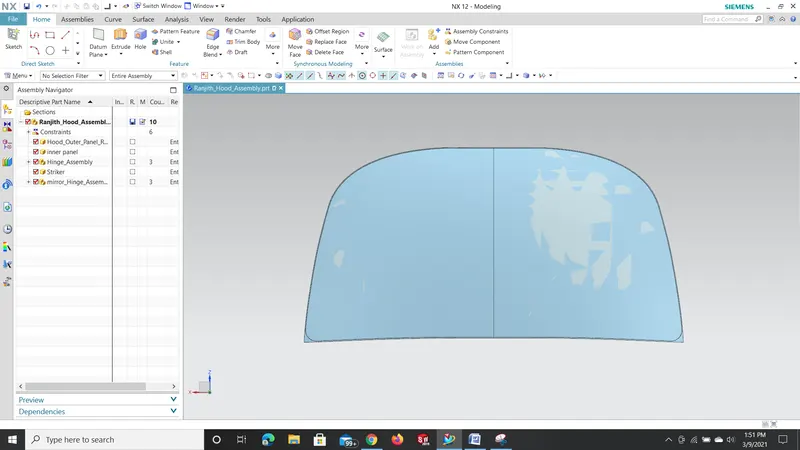
Outer Panel
Inner Panel
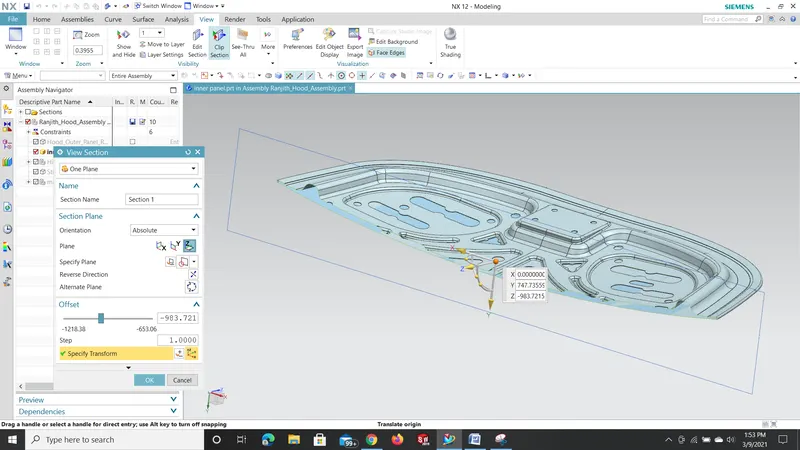
Cross Section
Design Considerations:
Dissipating Shock Waves:
To dissipate the shock waves on to the sides of the hood. This is a major reason for designing the hood in the shape of “Y” or “V” to dissipate the forces on the sides. This is one of the primary reasons for designing it in such a way that the force is not carried on to the passengers inside so that the passengers are saved from possible damage.
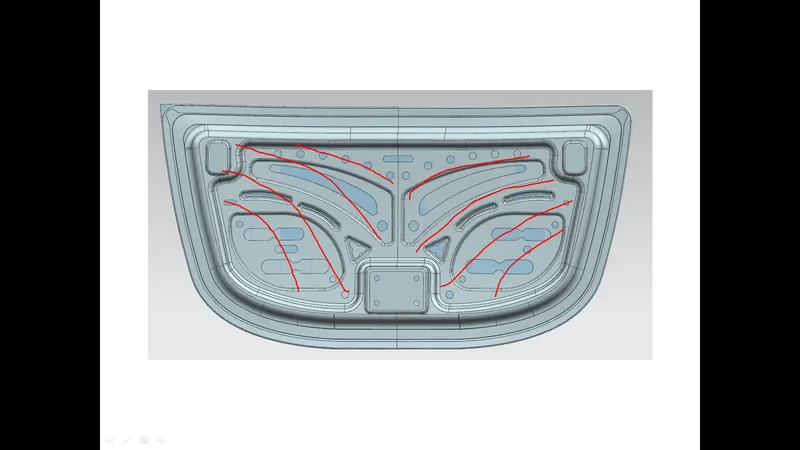
In this design it is found that the embosses are designed such that it forms the shape of “Y”.
Fixing the Hinge Axis:
The hinge axis are positioned in such a way that the axis lie in the same line so that it is parallel to the “x” axis plane. This is done in order to position the latch and sticker trajectory motions exactly perpendicular to the hinge axis.
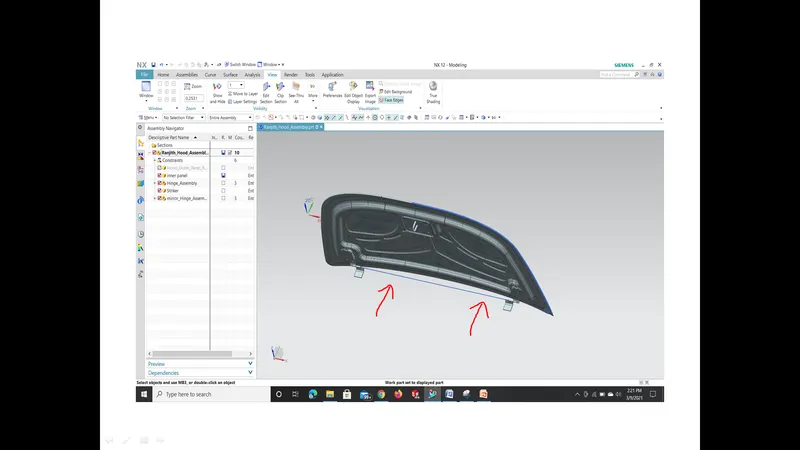
From the above design it is found that the hinge axis is exactly on the same line and parallel to the x axis.
Hood Trajectory position:
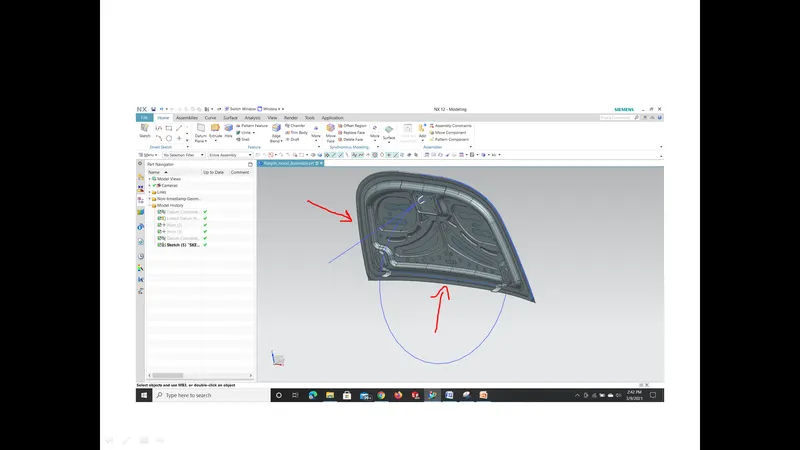
This is one of the important criteria in designing the hood of an automotive as this ensures the opening and closing of the hood in a car. This has to be ensured before manufacturing the hood of the car. Here is the design representing the trajectory of the hood. This is made by using the assembly constrains available in the CAD.
Secondly it has to be ensured that the sticker handle centre axis has to be exactly perpendicular to the circle tangent that is drawn so that the position of the sticker is altered by adjusting the angle of the line drawn from the hinge axis and the straight line. Here is the image of the hood trajectory position designed using the NX CAD.
Relief on the Corners:
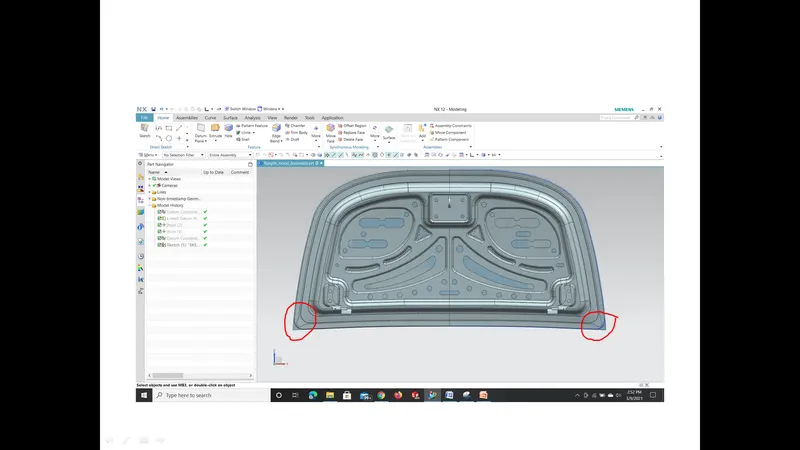
A relief on the corners is provided for the hemming process in order to avoid spring back issues. When the rollers are moving on the panels the force that is used to bend the sheet metal has to be maintained within the limit to avoid spring back issue. Due to which a relief is given on the corners to avoid the red zones on the hood.
Design Consideration in Hood for better Pedestrian Rating:
Hood is of two types:
- In laid hood: If the end point of the car lies on the fender.
- Wrap around Hood: If the end point of the car lies on the hood.
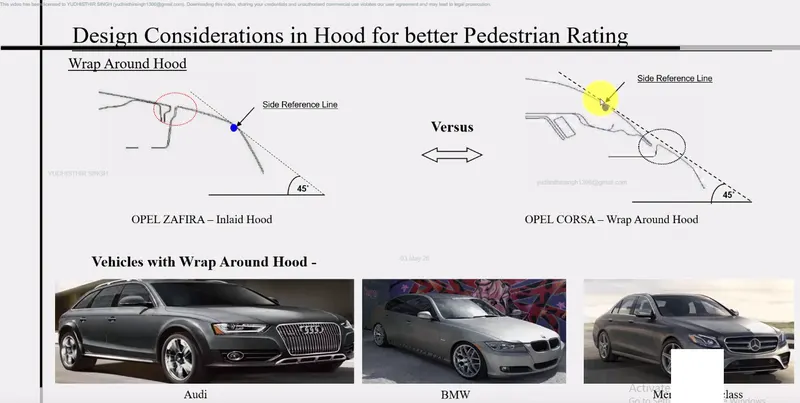
Pedestrian Head Impact Zone:
- Child Impact Zone: 1000-1500 mm
- Adult Impact Zone: 1500-2100 mm
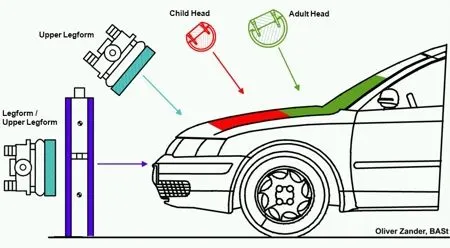
Thus this is the EURO-NCAP Assessment test that is done by the CAE team to validate the hood design and changes are done based on the results obtained from the CAE team in order to get better pedestrian safety rating. The EURO-NCAP is an organization that measures the safety rating of the hood.
The hood designed was designed based on considering this child and adult impact zones and their related concepts.
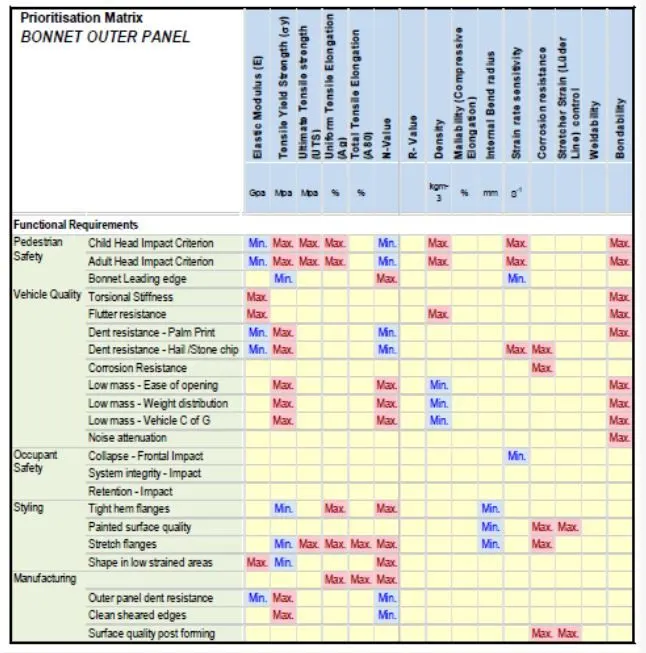
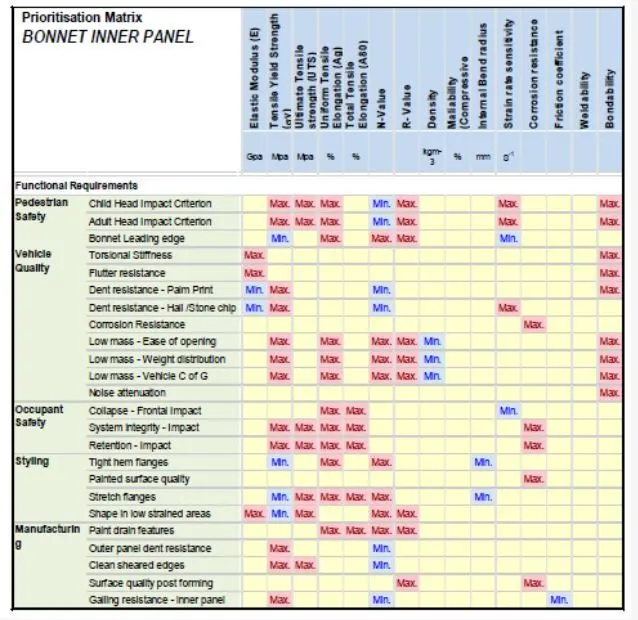
Priorities Matrix while Designing both Inner and Outer Panel:
Mastic Sealants:
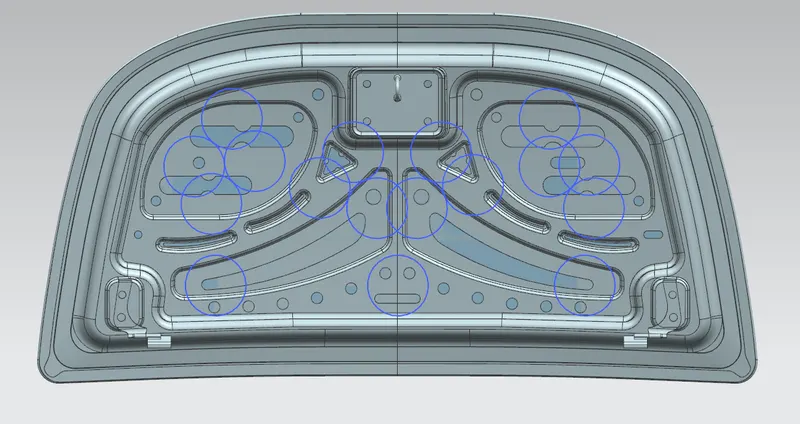
The Mastic sealants are used as a gluing agent to fix the outer and the inner panel. The sealants are generally effective for an diameter of about 80 mm. Here is the CAD image representing the mastic sealants points that are used on the hood.
Conclusion:
- Thus the following factors are considered while designing and manufacturing the hood inner and the outer panels per EURO NCAP safety standards.
- The main purpose of these designing standards is to ensure the safety and security of the pedestrians crossing and also to reduce the extent of injuries caused to them.
- These test results are factorized in the insurance ratings that are delivered for new vehicles.
Thus the designing of the Hood Assembly is drawn using NX CAD and the results are discussed above.
Google Drive Link:
https://drive.google.com/drive/folders/1xZ1sZT-QUeO55sfyfMLV9L5iC0tG3okX?usp=sharing