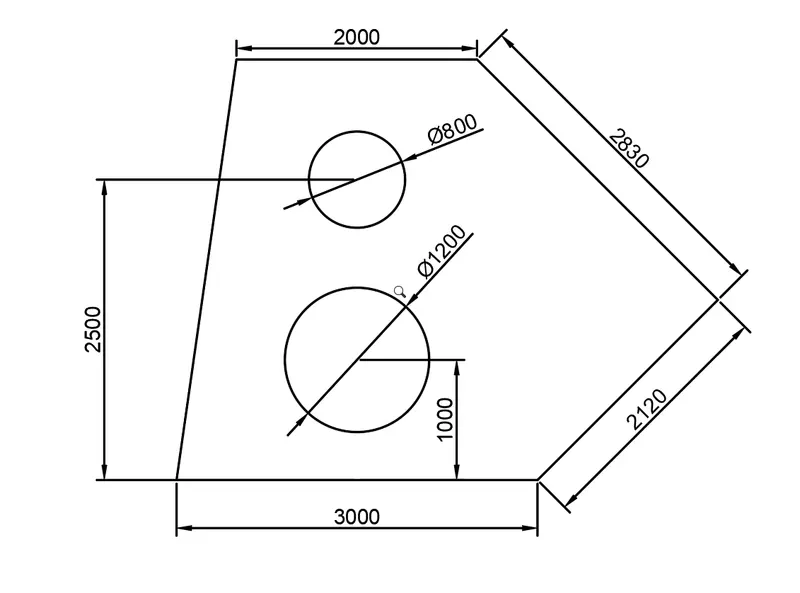
Drafting of various geometries using Chamfer, Fillet tool in AutoCad
1.
Aim: To draw a drawing with some different type of geomentry.
Introduction: In this project we are doing different type of geometric designs using relative polar coordinate method.
Procedure:
- Line command and give coordinates 0,0 hit enter
- Agine line command and give @3000<0 value in command line and give enter
- Next coordinate is @2120<45 and hit enter
- Next coordinate is @2830<135 and hit enter
- NextCoordinate is @2000<180 and hit enter
- Press Close from the command line
- From the mid point of 3000 line keep point @1000<90, keeping the point as center draw a ciricle with dia 1200
- From the same line 3000 keep another point at @2500<90, keeping the point as center draw a circle with dia 800
Conclusion: By entering this points we get the diagram
2.
Aim: To draw a drawing with some different type of geomentry.
Introduction: In this project we are doing different type of geometric designs using relative polar coordinate method.
procedure:
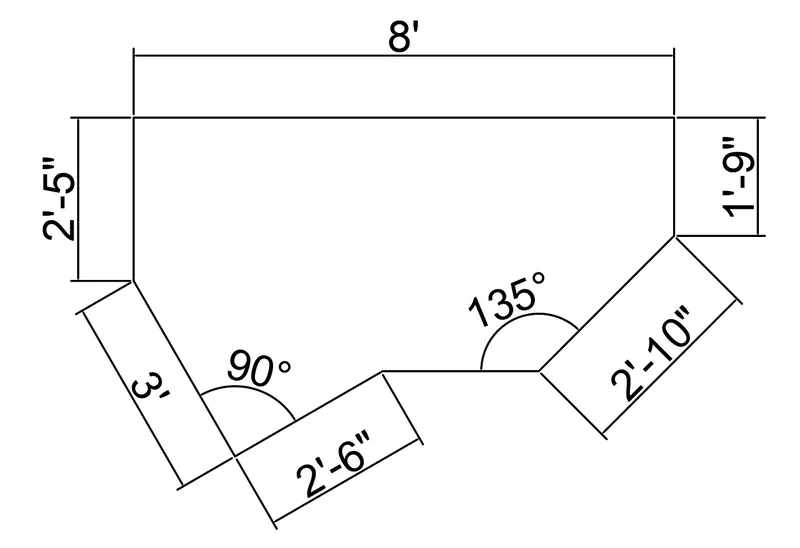
- Using line command draw a line with length od 8'
- From left side endpoint draw @2'5"<270.
- Then next coordinate is @3'<300
- Then next coordinate is @2'6"<60 and press Esc
- Now start from right side endpoint of 8' line @1'9"<270
- Then next coordinate @2'10"<225
- Now join the both end
Conclusion: By entering this points we get the diagram.
3.
Aim: To draw a drawing with some different type of geomentry.
Introduction: In this project we are doing different type of geometric designs using relative polar coordinate method.
Procedure:
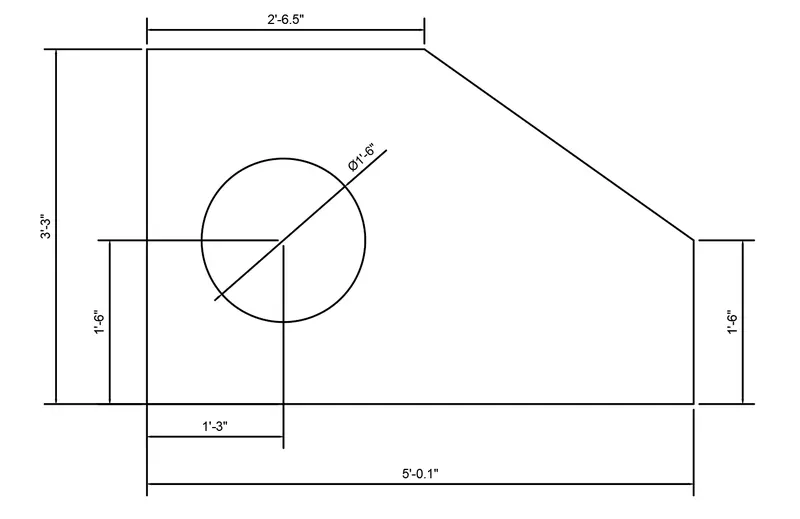
- Line command and give coordinates 0,0 hit enter
- Again give line command and give coordinate @3'3"<90 hit enter
- The next coordinates @2'6.5"<0 hit enter
- Again come to 0,0 and give coordinates 5'0.1"<0 hit enter
- The next coordinates @1'6" and now click close from command line
- For circle just offset 5'0.1" line 1'6" in 90 degree anf offset 3'3" line in 0 degree so thet we get ciricle center point draw the circle dia 1'6" and delete the unwanted offset lines.
Conclusion: By entering this points we get the diagram.
4.
Aim: To draw a drawing with some different type of geomentry.
Introduction: In this project we are doing different type of geometric designs using relative polar coordinate method.
Procedure:
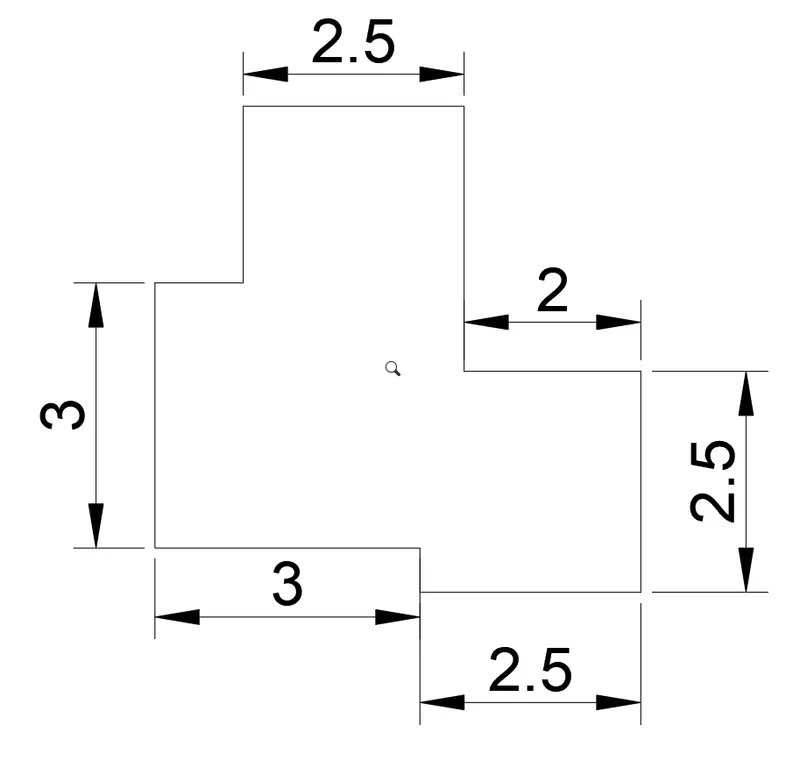
- Line command and give coordinates 0,0 and hit enter
- Again give line command and give coordinate @2.50<90 hit enter
- The next coordinates @2<180 hit enter
- The next coordinates @3<90 hit enter
- The next coordinates @2.50<180 hit enter
- The next coordinates @2<270 hit enter
- The next coordinates @1<180 hit enter
- The next coordinates @3<270 hit enter
- The next coordinates @3<0 hit enter
- The next coordinates @0.5<270
- Now click close from command line.
Conclusion: By entering this points we get the diagram
5.
Aim: To draw a drawing with some different type of geomentry.
Introduction: In this project we are doing different type of geometric designs using Direct Distance entry method.
Procedure:
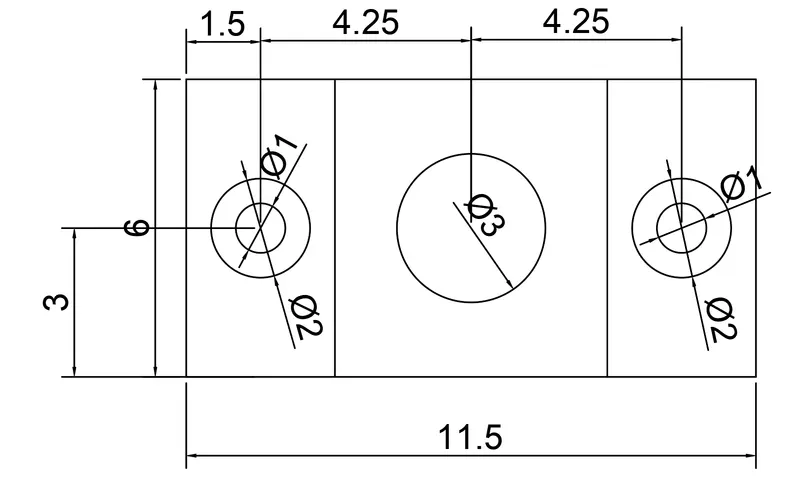
- Line command and give coordinates 0,0 and hit enter
- Using mouse curser move in 90 degree and give vale 6 hit enter
- Then move the curser in 0 degree and give value 11.5 hit enter
- Then move curser in 279 degree and give value 6 hit enter, then give close from command bar
- Then offset the first line which we drawn by 1.5 and draw 2 circle in midline of that with dia of 2 and 1 and move the line again wiyh 1.50
- Then offset the first line which we have drawn by 1.5 with 5.75 and draw a circle in the mid point of that line dia with 3
- Then move the same line with 4.25 and draw 2 circle in the midpoint 2 and 1 dia
- Then move the same line 1.50 in -x direction to complete the diagram.
Conclusion: By entering this points we get the diagram.
6.
Aim: To draw a drawing with some different type of geomentry.
Introduction: In this project we are doing different type of geometric designs using Direct Distance Entry method.
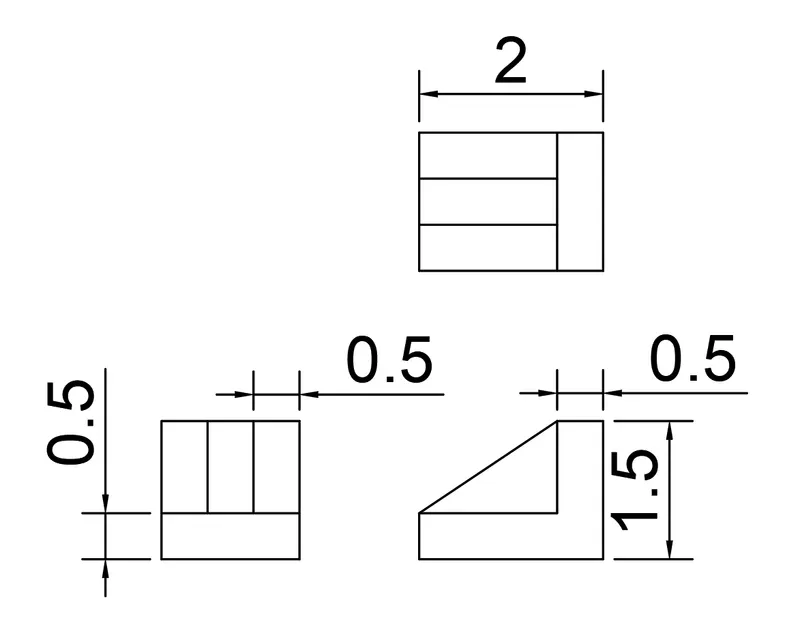
Procedure: In this Drawing there are 3 numbers of drawing so we are going to see it one by one
a.Drawing 1:
- Line command and give coordinates 0,0 and hit enter
- Move the curser in 90 degree and give value 1.5 hit enter
- Move the curser in 0 degree and give value 1.5 hit enter
- Mover the curser in 270 degree and give value 1.5 and press close from command bar
- Offset the bottom line in +y direction with 0.5
- Offset the left side line with 0.5 in +x direction and again offset in 0.5 and again offset 0.5
- Now trim the unwanted lines and move the drawing little away from point 0,0
b.Drawing 2:
- Line command and give coordinates 0,0 and hit enter
- Move the curser in 0 degree with value of 2 hit enter
- Move the curser in 90 degree with value of 1.5 hit enter
- Move the curser in 180 degree with value of 0.5 hit enter
- Move the curser in 270 degree with value of 1 hit enter
- Move the curser in 180 degree with value of 1.5 hit enter
- Move the curser in 270 degree with value of 270 with value of 0.5 hit enter
- Now connect the both end line like shown in diagram using line command and move the diagram little away from 0,0 point
c.Drawing 3:
- Line command and give coordinates 0,0 and hit enter
- Move the curser in 0 degree with vale of 2 hit enter
- Move the curser in 90 degree with value of 1.5 hit enter
- Move the curser in 180 degree with value of 2 and cpress close the line from command bar
- Now offset the bottom line with 0.5 and again 0.5 and again 0.5 the right right side line 0.5 and trim the unwanted line
Colclusion: By entering this points we get the diagram
7.
Aim: To draw a drawing with some different type of geomentry.
Introduction: In this project we are doing different type of geometric designs using Direct Distance Entry method.
Procedure:
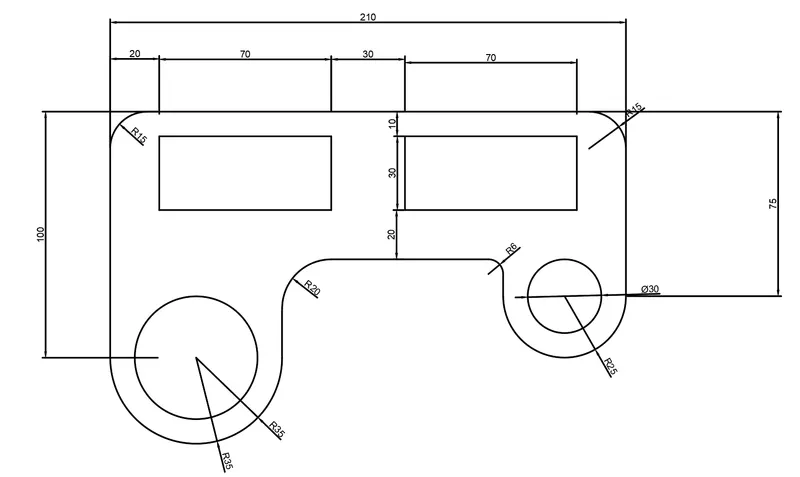
- Line command and give coordinates 0,0 and hit enter
- Move the curser in 90 degree and give value 100 hit enter
- Move the curser in 0 degree and give value 210 hit enter
- Move the curser in 270 and give value 75 hit enter
- Mover the curser in 180 degree and give value 50 hit enter and Esc and draw a circle of dia 30 in mid point
- Offset the top line 210 dwonwards with value 60
- Now from 0,0 L enter mover the curser in o degree and give valuye 70 and Esc draw a circle of dia 50 from the mid point of 70 line
- Join the both end point with starting and end point
- Using Fillet command and radius in that make the yop corners to radius 15.
- The bottom line of 70 using Arc ( start, end and radius) option draw a Arc of radius 35
- The bottom line of 50 using Arc (start, end and radius) option draw Arc of radius 25
Conclusion: By entering this points we get the diagram
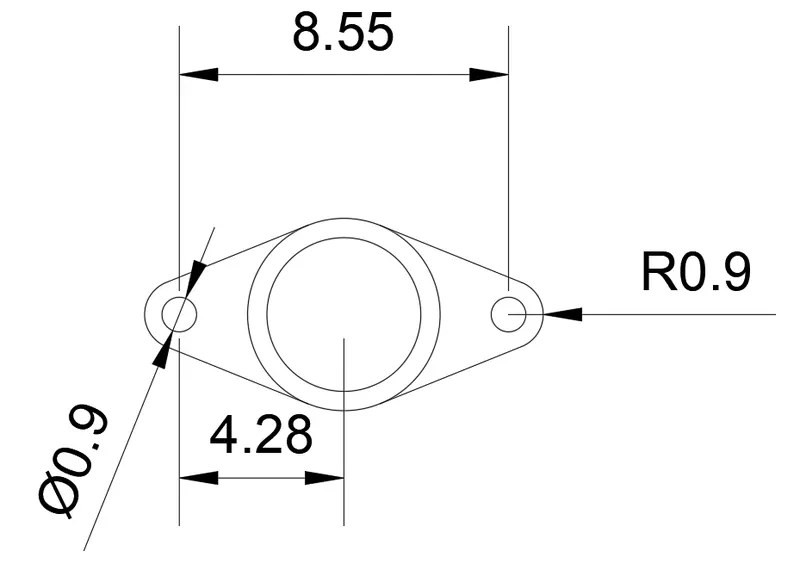
8.
Aim: To draw a drawing with some different type of geomentry.
Introductions: In this project we are doing different type of geometric designs using Direct Distance Entry method.
Procedure:
- Use circle command draw two circle in dia of 5 and 4
- From the center of circlr dram line using line command value of line is 4.275
- Again draw circle give ciricle command and click on the left side of the line draw ciricle with dia of 90 and 180
- Now using L command draw tangent from dia 5 and dia 1.8 again draw a tangent at bootom of circle nw trim to grt the diagram as showen in fig.
- Do the same same stp again to right side
COnclusion:By entering this points we get the diagram
9.
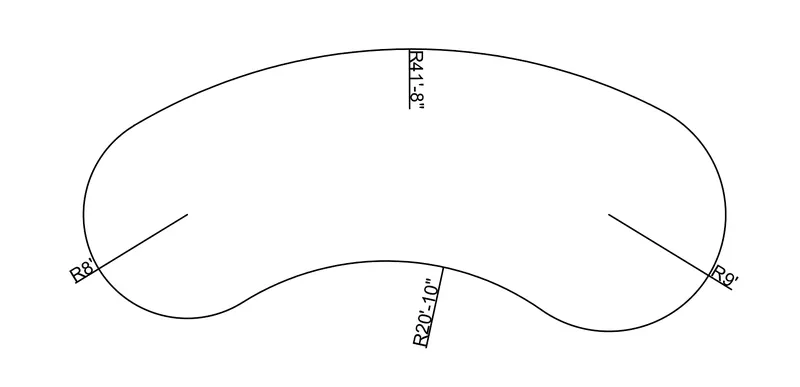
Aim: To draw a drawing with some different type of geomentry.
Introductions: In this project we are doing different type of geometric designs using Direct Distance Entry method.
Procedure:
- Draw a line using line command
- In left endpoint draw a ciricle of radius 8'
- In right endpoint draw a circle of radius 9'
- Now using tangent, tangent and radius command from circle draw two tangent one in bottom and another one outer side circle
- Now trim the circles as shown in fig
Conclusion: By entering this points we get the diagram
10.
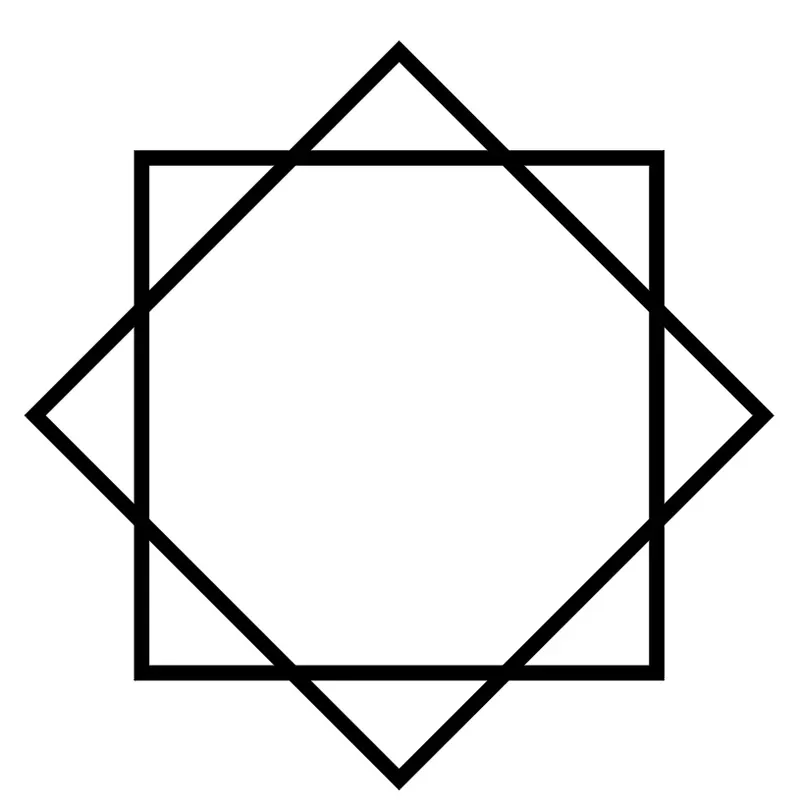
Aim: To draw a drawing with some different type of geomentry.
Introduction: In this project we are doing with only using rectangular command.
Procedure:
- Draw two square using Rectangle command and with the width of 2"
- Rotate one with 45 degree
- Using line command draw lines connecting midpoint so we can get a center of square
- Now move the one rectangle with center point and place it on another square center point
Conclusion: By entering this points we get the diagram
11.
Aim: To draw a drawing with some different type of geomentry.
Introduction: In this project we are doing different type of geometric designs using Direct Distance Entry method.
Procedure:
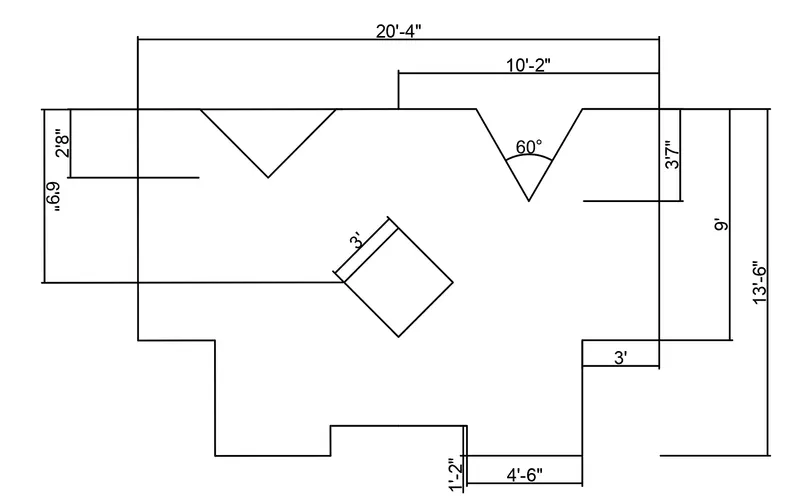
- Using Line command clickon some whre and give value 10'2" by moving curser on right side
- Again line command right click on mouse move the curser downward and give value 9'
- Again line command right click on mouse move the curser towards 180 degree and give value 3'
- Again line command right click on mouse move the curser downwards give value 4'6"
- Again line command right click on mouse move the curser 180 degree give value 4'6"
- Again line command right click on mouse move the curser 90 degree give value 1'2"
- Again line command right click on mouse move the curser 180 degree give value 5.67'
- Now mirror the diagram to complete it
- Now the top line 10'2" midpoint draw a line downwards with value of 3'7" on right and 2'6" on left
- Now using rotate command select that 3'7" line and click on down end pont and give value 30 degree and again roate that the left site with 60 degree and complete the line by extending it
- Now using rotate command select that 2'6" line and click on down end pont and give value 45 degree and again roate that the left site with 90 degree and complete the line by extending it
Conclusion: By entering this points we get the diagram