Drafting of various geometries using Chamfer, Fillet tool in AutoCad
AIM :- To draw the given diagrams using autocad and describe each and every step of the procedure for the complition of diagram.
PROCEDURE :-
(1)
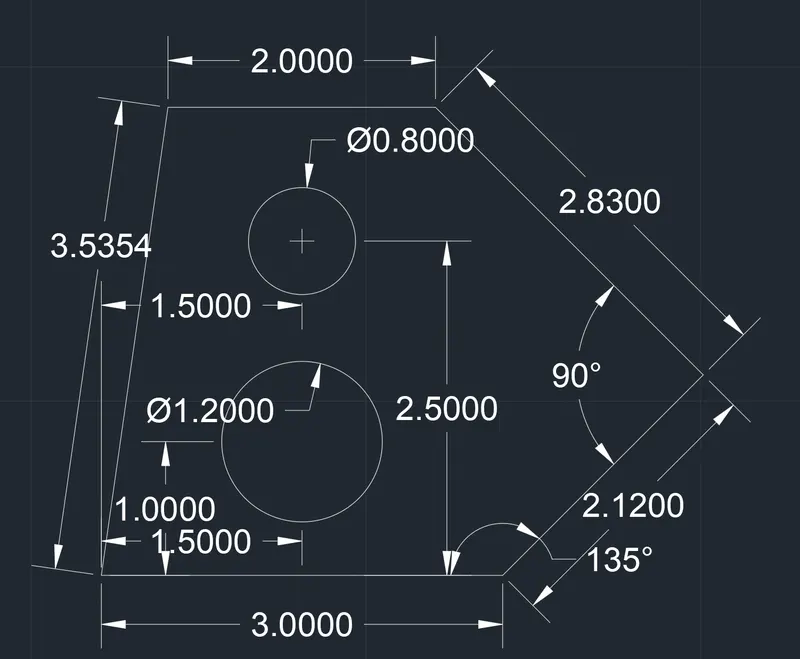
- Enter line command and assume start point as (0,0)
- Now put cursor in the positive X direction and enter the value (3.00)
- Now enter (@2.21 < 45)
- Now enter (@2.83 < 135)
- Now put the cursor in the negative X direction and enter the value (2.00)
- Now close the shape.
- For, first circle enter the center point (1.5, 1.0) and enter diameter (1.2)
- For, first circle enter the center point (1.5, 2.5) and enter diameter (0.8)
(2)
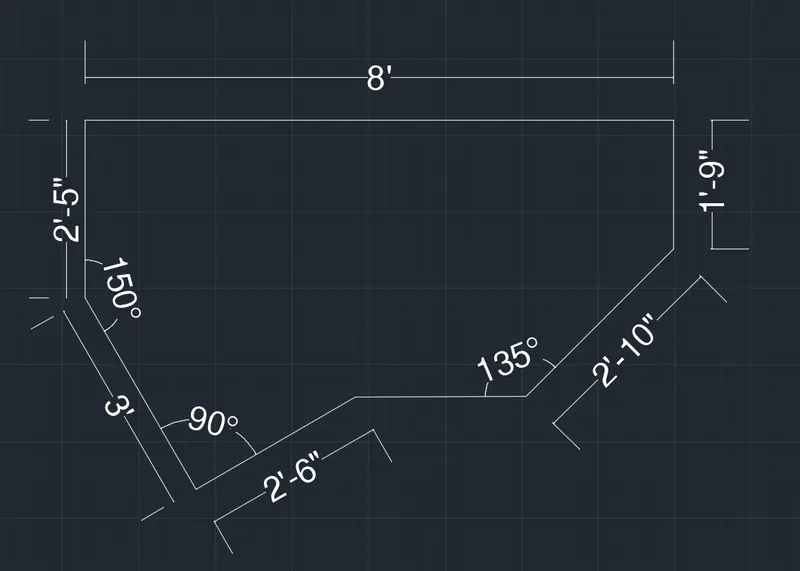
- Enter line command and assume start point as (0,0)
- Now put cursor in the positive X direction and enter the value (8')
- Now put cursor in the negative Y direction and enter the value (1'9")
- Now enter (@2'10", -135)
- Now enter the origin point (0,0) and put cursor in the negative Y direction and enter the value (2'5")
- Now enter (@3', -60)
- Now enter (@2'6", 30)
- Now join both the end points and close the shape.
(3)
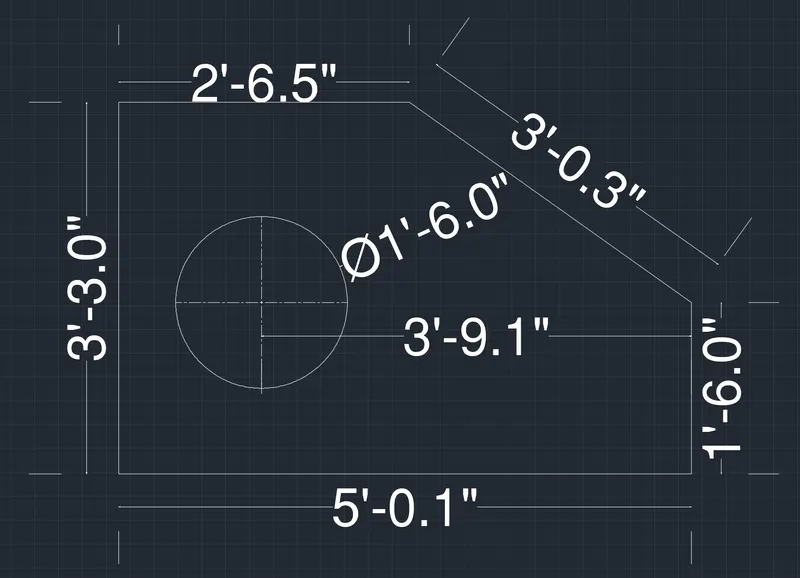
- Enter line command and assume start point as (0,0)
- Now put cursor in the negative Y direction and enter the value (1'6")
- Now put cursor in the negative X direction and enter the value (5'0.1")
- Now put cursor in the positive Y direction and enter the value (3'3")
- Now put cursor in the positive X direction and enter the value (2'6.5")
- Now close the shape.
- For circle enter the center point (3'9.1", 0) and enter the diameter (1'6")
(4)
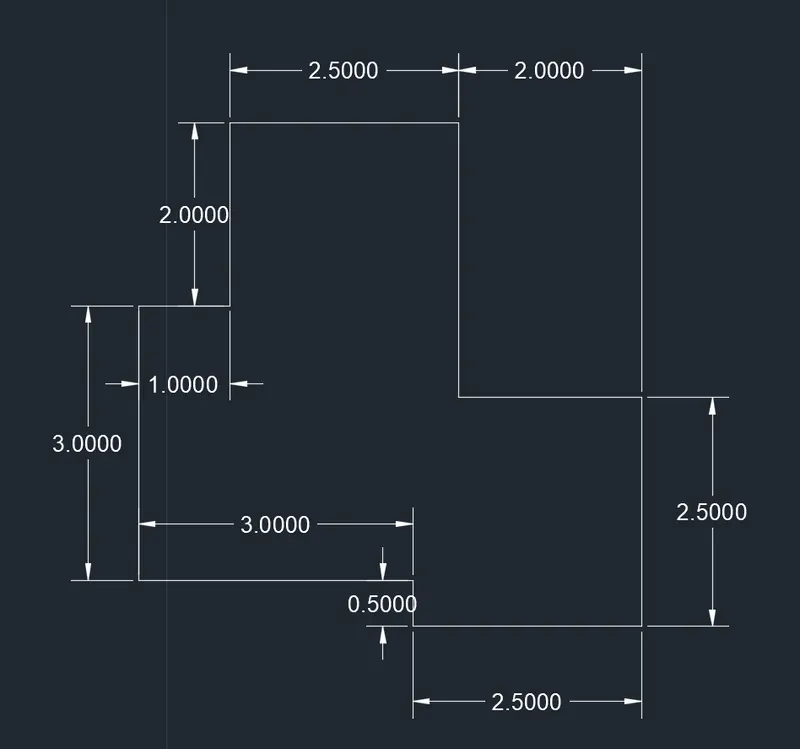
- Enter line command and assume start point as (0,0)
- Now put cursor in the negative Y direction and enter the value (2.00)
- Now put cursor in the negative X direction and enter the value (1.00)
- Now put cursor in the negative Y direction and enter the value (3.00)
- Now put cursor in the positive X direction and enter the value (3.00)
- Now put cursor in the negative Y direction and enter the value (0.5)
- Now put cursor in the positive X direction and enter the value (2.5)
- Now put cursor in the positive Y direction and enter the value (2.5)
- Now put cursor in the negative X direction and enter the value (2.00)
- Now put cursor in the positive Y direction and enter the value (3.00)
- Now close the shape.
(5)
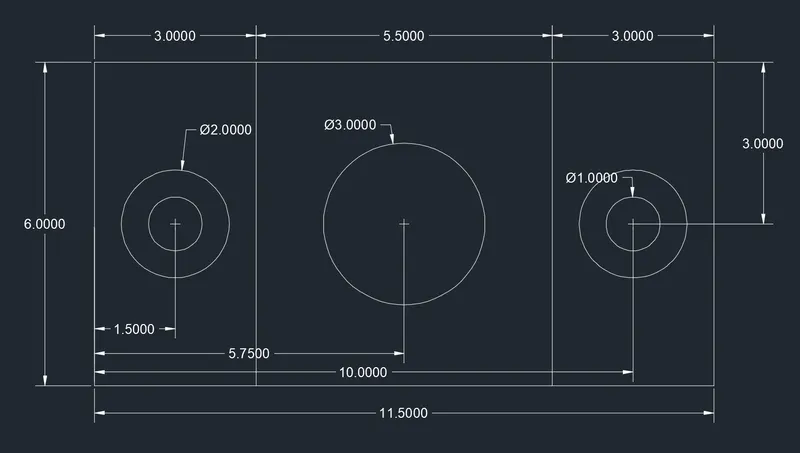
- Enter line command and assume start point as (0,0)
- Now put cursor in the positive Y direction and enter the value (6.00)
- Now put cursor in the positive X direction and enter the value (11.5)
- Now put cursor in the negative Y direction and enter the value (6.00)
- Now close the shape.
- Now give offset of (3.00) to the origin line.
- Now give offset of (8.5) to the origin line.
- Now take (1.5, 3) as the centre of the circle and draw a circle of diameter (1.00)
- Now take (1.5, 3) as the centre of the circle and draw a circle of diameter (2.00)
- Now take (5.75, 3) as the centre of the circle and draw a circle of diameter (3.00)
- Now take (10, 3) as the centre of the circle and draw a circle of diameter (1.00)
- Now take (10, 3) as the centre of the circle and draw a circle of diameter (2.00)
(6)
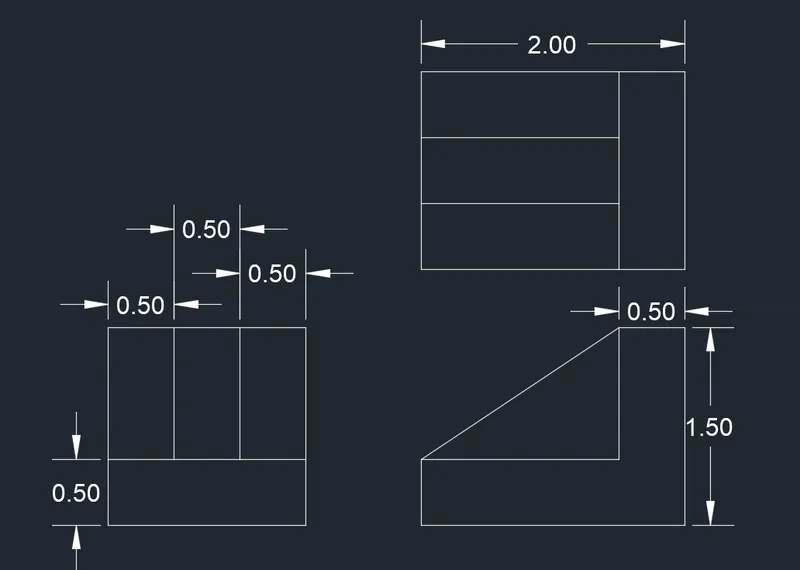
- Enter line command and assume start point as (0,0)
- Now put cursor in the positive Y direction and enter the value (1.5)
- Now put cursor in the positive X direction and enter the value (1.5)
- Now put cursor in the negative Y direction and enter the value (1.5)
- Now close the shape.
- Now give the offset of (0.5) one time to the horizontal line and two times to the vertical lines.
- Now trim the excess lines.
- Enter line command and assume start point as (5,0)
- Now put cursor in the positive Y direction and enter the value (0.5)
- Now put cursor in the positive X direction and enter the value (1.5)
- Now put cursor in the positive Y direction and enter the value (1.00)
- Now put cursor in the positive X direction and enter the value (0.5)
- Now put cursor in the negative y direction and enter the value (1.5)
- Now close the shape.
- Enter line command and assume start point as (5,5)
- Now put cursor in the positive Y direction and enter the value (1.5)
- Now put cursor in the positive X direction and enter the value (2.00)
- Now put cursor in the negative Y direction and enter the value (1.5)
- Now close the shape.
- Now give the offset of (0.5) two time to the horizontal line and one times to the vertical lines.
- Now trim the excess lines.
(7)
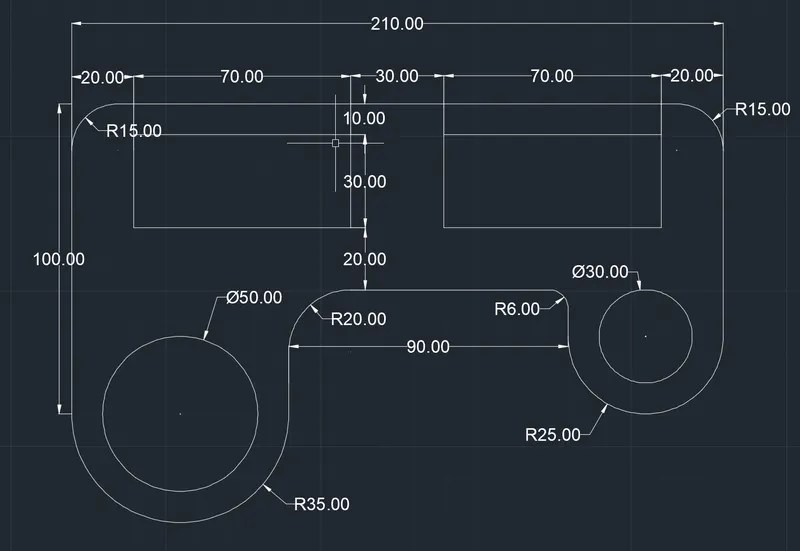
- Enter line command and assume start point as (0,0)
- Now put cursor in the positive Y direction and enter the value (100.00)
- Now put cursor in the positive X direction and enter the value (210.00)
- Now put cursor in the negative Y direction and enter the value (75.00)
- Now take (35, 0) as the centre of the circle and draw circle of diameter (50) and a semi-circle of radius (35)
- Now draw a line of (40.00) from the other end of the semi-circle towards positive Y direction
- Now draw a line of (90.00) in the positive X direction.
- Now draw a line of (30.00) in the negative Y direction.
- Now take (185, 10) as the center point and draw a circle of (30.00) diameter and the semi-circle of (25.00) radius
- Now enter the fillet comand and give the radius of (15.00), (20.00) and (6.00) respectively.
(8)
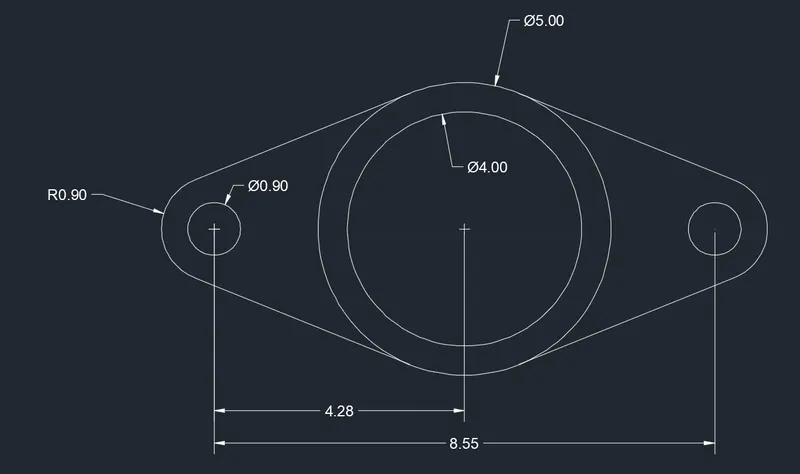
- Enter (0,0) as the center point of circle and draw the circles of diameter (0.9) & (1.8)
- Now, enter (4.28, 0) as the center point and draw the circles of diameter (4.00) & (5.00)
- Now, enter (8.55, 0) as the center point and draw the circles of diameter (0.9) & (1.8)
- Now draw the line from the tangent points of the circle to join the circles and form the closed shape
- Now trim all the excess lines
(9)
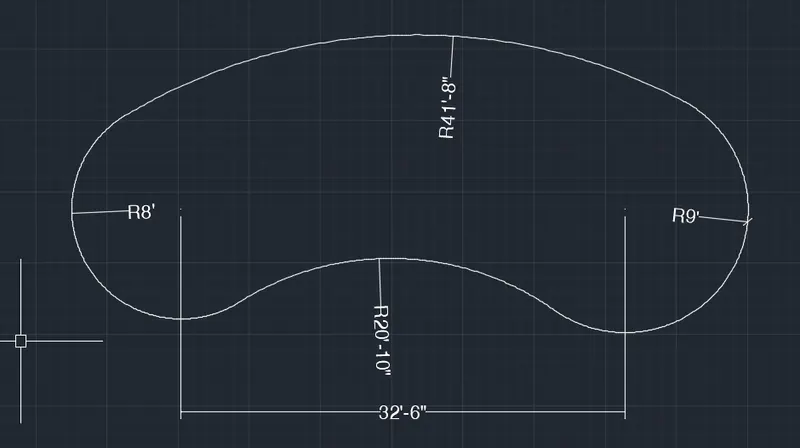
- Draw a circle with the centre at (0,0) of radius (8')
- Now, draw a circle with the centre at (32'6", 0) of radius (9')
- Now, draw a circle with (Tangent, Tangent, radius) with the radius of (41'8") & (20'10")
- Now trim the extra sides of the circles to form a given shape.
(10)
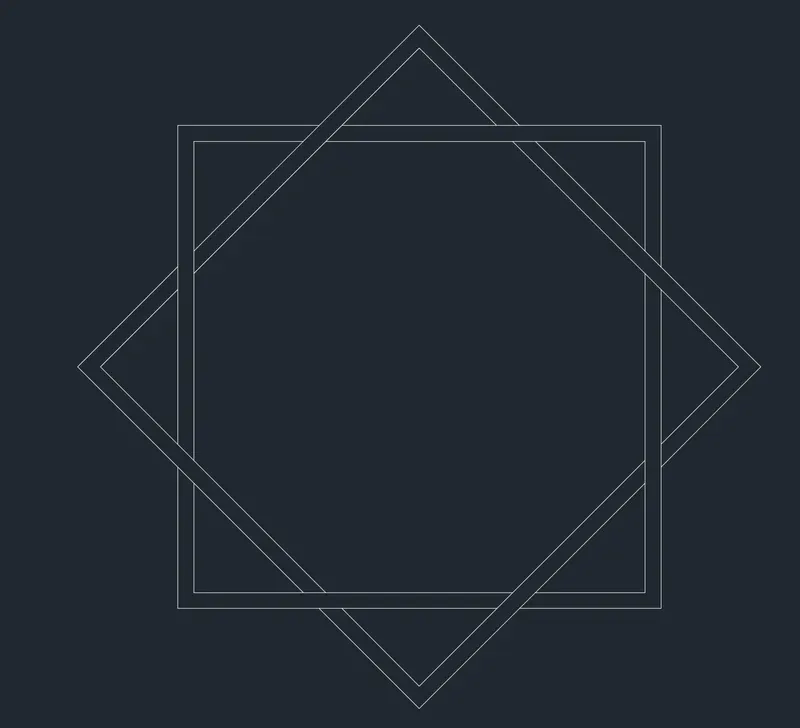
- Draw a square inscribed in the circle.
- Now join all the quardent points with each other to form a 4 sided closed shape
- Now give the equal offset to both the squares
- Now trim the extra lines.