Creating a Floor plan, Footing detail and Isometric view using AutoCad
AIM :-
- To create a floor plan, footing detail and isometric view using autocad with their complete procedure step by step.
PROCEDURE :-
(1) For load bearing wall foundation details are as follows :
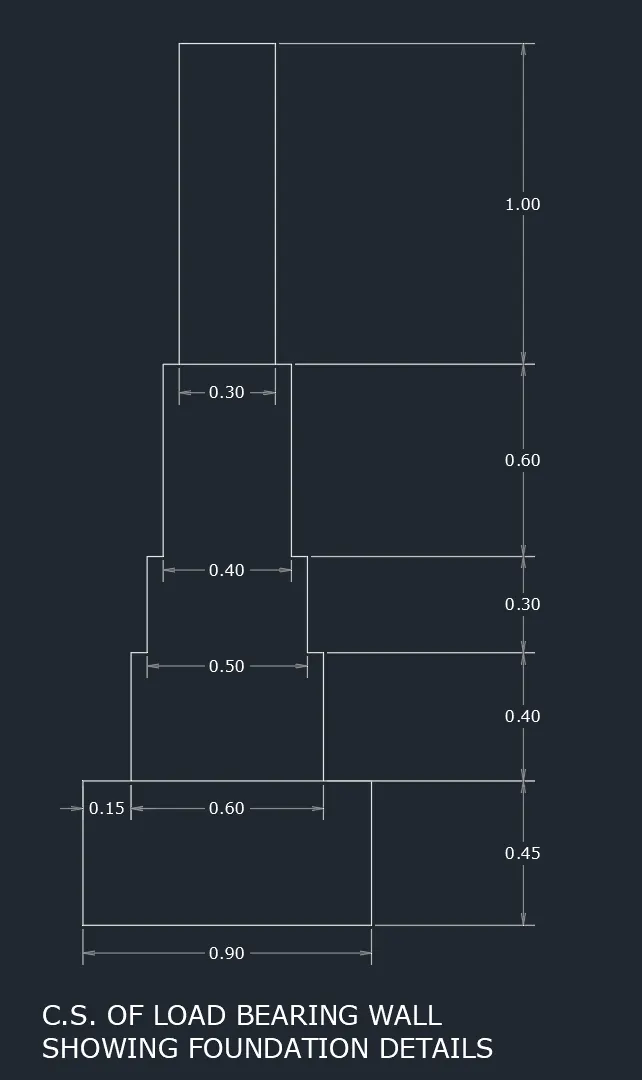
- Enter line command and put the cursor in the positive X direction and enter the value (0.9)
- Now put the cursor in the positive Y direction and enter the value (0.45)
- Now put the cursor in the negative X direction and enter the value (0.15)
- Now put the cursor in the positive Y direction and enter the value (0.4)
- Now put the cursor in the negative X direction and enter the value (0.05)
- Now put the cursor in the positive Y direction and enter the value (0.3)
- Now put the cursor in the negative X direction and enter the value (0.05)
- Now put the cursor in the positive Y direction and enter the value (0.6)
- Now put the cursor in the negative X direction and enter the value (0.05)
- Now put the cursor in the positive Y direction and enter the value (0.6)
- Now put the cursor in the negative X direction and enter the value (0.05)
- Now put the cursor in the positive Y direction and enter the value (1.00)
- Now put the cursor in the negative X direction and enter the value (0.3)
- Now put the cursor in the negative Y direction and enter the value (1.00)
- Now put the cursor in the negative X direction and enter the value (0.05)
- Now put the cursor in the negative Y direction and enter the value (0.6)
- Now put the cursor in the negative X direction and enter the value (0.05)
- Now put the cursor in the negative Y direction and enter the value (0.3)
- Now put the cursor in the negative X direction and enter the value (0.05)
- Now put the cursor in the negative Y direction and enter the value (0.4)
- Now put the cursor in the negative X direction and enter the value (0.15)
- Now put the cursor in the negative Y direction and enter the value (0.45)
(2) For load bearing wall over spread footing :
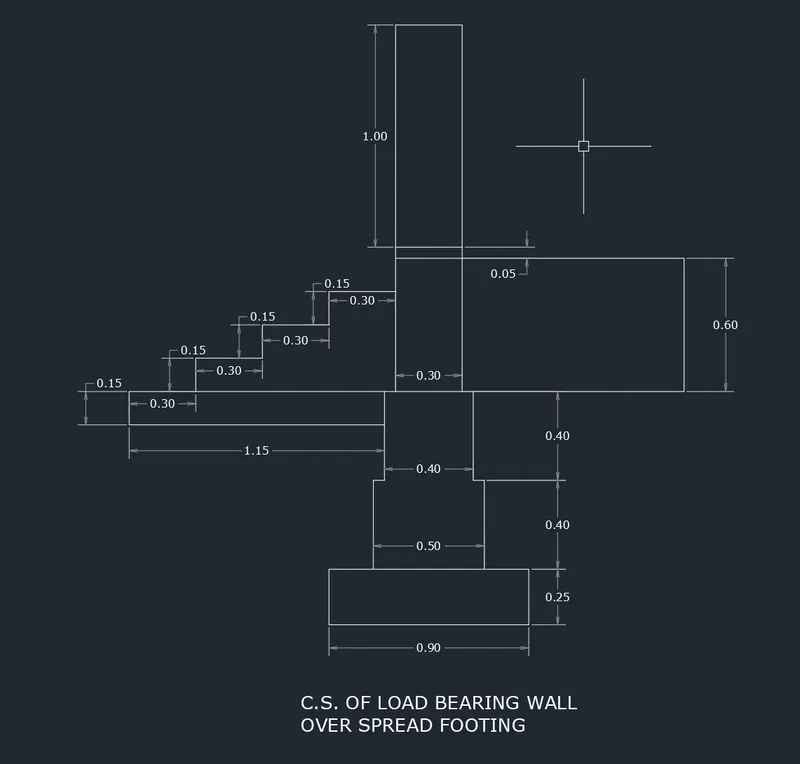
- Assume start point as (0,0)
- Enter line command and put the cursor in the positive X direction and enter the value (0.9)
- Now put the cursor in the positive Y direction and enter the value (0.25)
- Now put the cursor in the negative X direction and enter the value (0.2)
- Now put the cursor in the positive Y direction and enter the value (0.4)
- Now put the cursor in the negative X direction and enter the value (0.05)
- Now put the cursor in the positive Y direction and enter the value (0.4)
- Now put the cursor in the negative X direction and enter the value (0.05)
- Now put the cursor in the positive Y direction and enter the value (1.65)
- Now put the cursor in the negative X direction and enter the value (0.3)
- Now put the cursor in the negative Y direction and enter the value (1.65)
- Now put the cursor in the negative X direction and enter the value (0.05)
- Now put the cursor in the negative Y direction and enter the value (0.4)
- Now put the cursor in the negative X direction and enter the value (0.05)
- Now put the cursor in the negative Y direction and enter the value (0.4)
- Now put the cursor in the negative X direction and enter the value (0.2)
- Close the shape
- Now start the line from (0.25, 1.05) point.
- Now put the cursor in the negative X direction and enter the value (1.15)
- Now put the cursor in the positive Y direction and enter the value (0.15)
- Now put the cursor in the positive X direction and enter the value (0.3)
- Now put the cursor in the positive Y direction and enter the value (0.15)
- Now put the cursor in the positive X direction and enter the value (0.3)
- Now put the cursor in the positive Y direction and enter the value (0.15)
- Now put the cursor in the positive X direction and enter the value (0.3)
- Now put the cursor in the positive Y direction and enter the value (0.15)
- Now put the cursor in the positive X direction and enter the value (0.3)
- Now start the line from (0.65, 1.05) point
- Now put the cursor in the positive X direction and enter the value (0.95)
- Now put the cursor in the positive Y direction and enter the value (0.6)
- Now put the cursor in the negative X direction and enter the value (1.3)
- Now give a offset to the line and then trim the excess part.
(3) For load bearing wall over spread footing :
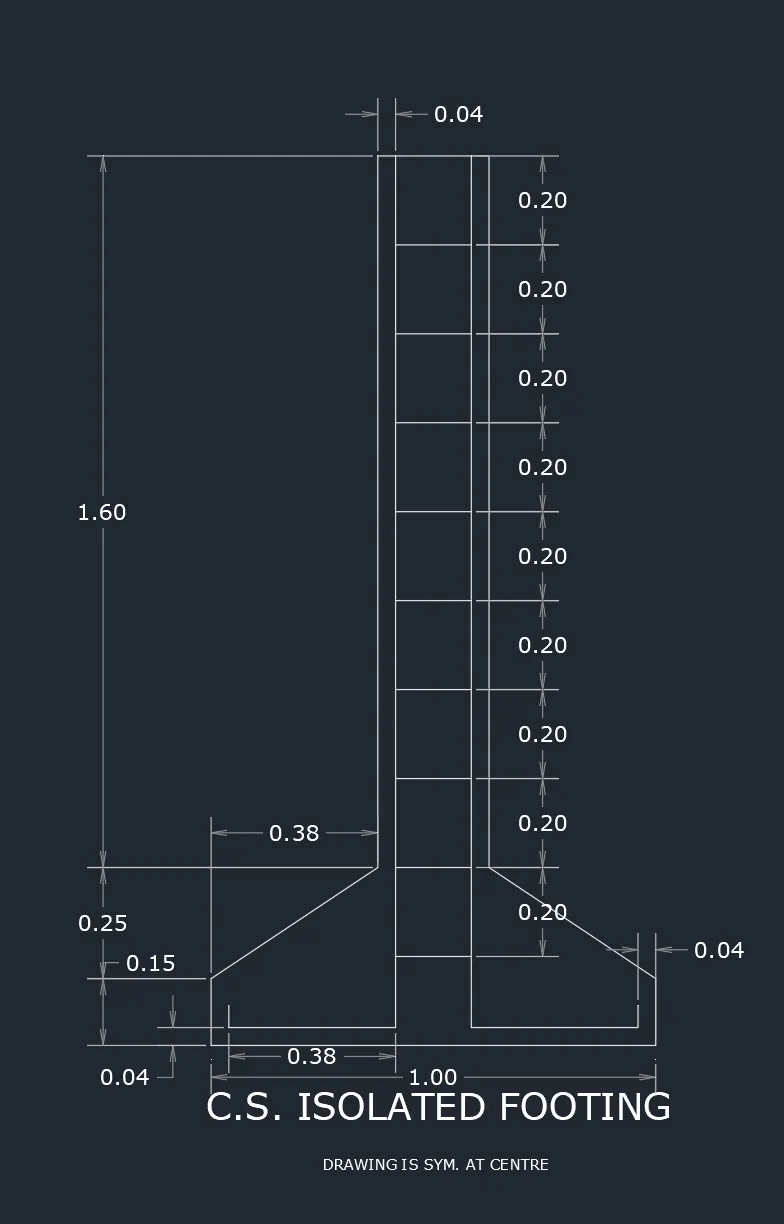
- Assume start point as (0,0)
- Enter line command and put the cursor in the positive Y direction and enter the value (0.15)
- Now, enter line command and enter the value (@0.38, 0.25)
- Enter line command and put the cursor in the positive Y direction and enter the value (1.6)
- Enter line command and put the cursor in the positive X direction and enter the value (0.25)
- Enter line command and put the cursor in the negative Y direction and enter the value (1.6)
- Now, enter line command and enter the value (@0.38, -0.25)
- Enter line command and put the cursor in the negative Y direction and enter the value (0.15)
- Now close the shape.
- Now start the line from (0.04, 0.09) point.
- Enter line command and put the cursor in the negative Y direction and enter the value (0.05)
- Enter line command and put the cursor in the positive X direction and enter the value (0.38)
- Enter line command and put the cursor in the positive Y direction and enter the value (1.96)
- Now start the line from (0.96, 0.09) point.
- Enter line command and put the cursor in the negative Y direction and enter the value (0.05)
- Enter line command and put the cursor in the negative X direction and enter the value (0.38)
- Enter line command and put the cursor in the positive Y direction and enter the value (1.96)
- Now start the line from (0.42, 0.2) point.
- Enter line command and put the cursor in the positive X direction and enter the value (0.17)
- Now select the line and enter the command for copy.
- Then (Copy -> Select the point -> Array ->No. of copies 10 -> Fit -> select the last line for the boundary of array)
(4) Line diagram of a bedroom building :
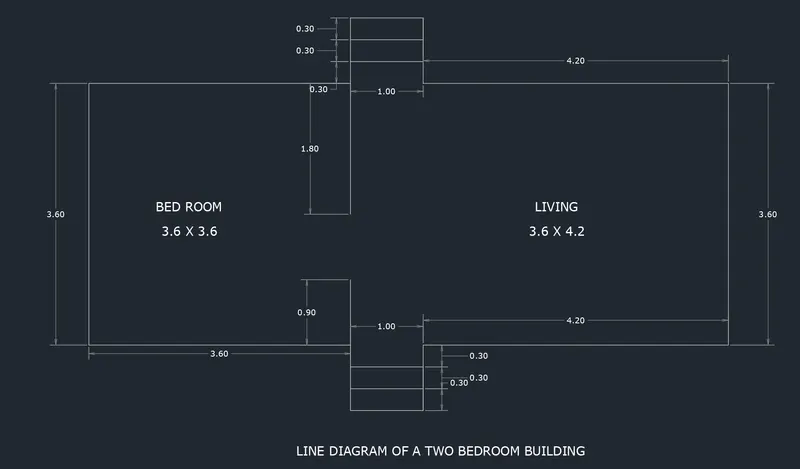
- Assume start point as (0,0)
- Enter line command and put the cursor in the positive X direction and enter the value (3.60)
- Now put the cursor in the negative Y direction and enter the value (0.9)
- Now put the cursor in the positive X direction and enter the value (1.00)
- Now put the cursor in the positive Y direction and enter the value (0.9)
- Now put the cursor in the positive X direction and enter the value (4.2)
- Now put the cursor in the positive Y direction and enter the value (3.6)
- Now put the cursor in the negative X direction and enter the value (4.2)
- Now put the cursor in the positive Y direction and enter the value (0.9)
- Now put the cursor in the negative X direction and enter the value (1.00)
- Now put the cursor in the negative Y direction and enter the value (0.9)
- Now put the cursor in the negative X direction and enter the value (3.6)
- Now put the cursor in the negative Y direction and enter the value (3.6)
- Now set origin at (3.6, 0) and put cursor in positive Y direction and enter the value (0.9)
- Now set origin at (3.6, 3.6) and put cursor in negative Y direction and enter the value (1.8)
- Now set origin at (3.6, -0.6) and put cursor in positive X direction and enter the value (1.0) and then give this line offset of (0.3) in the positive Y direction .
- Now set origin at (3.6, 4.2) and put cursor in positive X direction and enter the value (1.0) and then give this line offset of (0.3) in the negative Y direction .
(5) Isometric view of stairs :
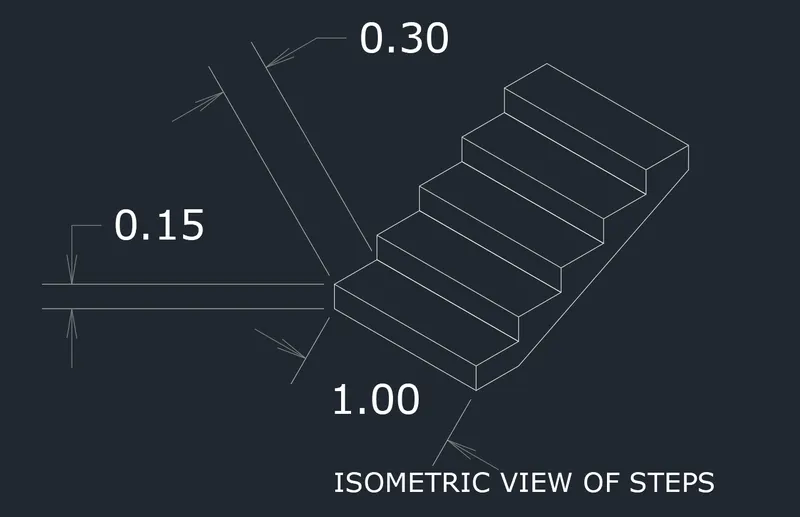
- Turn on the Isometric drafting tool and then select isoplane left
- Assume start point as (0,0)
- Enter line command and put the cursor in the negative X direction and enter the value (1.00)
- Enter line command and put the cursor in the positive Y direction and enter the value (0.15)
- Enter line command and put the cursor in the positive X direction and enter the value (1.00)
- Now close the shape.
- Now change the Isometric drafting tool to the isoplane top.
- Now enter the line command and specify the first point as (0.87, 0.65)
- Enter line command and put the cursor in the positive Y direction and enter the value (0.3)
- Enter line command and put the cursor in the positive X direction and enter the value (1.00)
- Enter line command and put the cursor in the negative Y direction and enter the value (0.3)
- Now select the whole shape and enter the command for copy and then select the point of copy from (0,0).
- Now put the point of copy on the top of the present drawing to complete the stair like structure
- Now draw a line using isometric drafting tool and isoplane top in the positive Y direction and enter the value (0.3)
- Now draw a negative Y line with isoplane left from top and enter the value (0.15)
- Now join the end points of both the lines.
(6) Isometric view of gable wall :
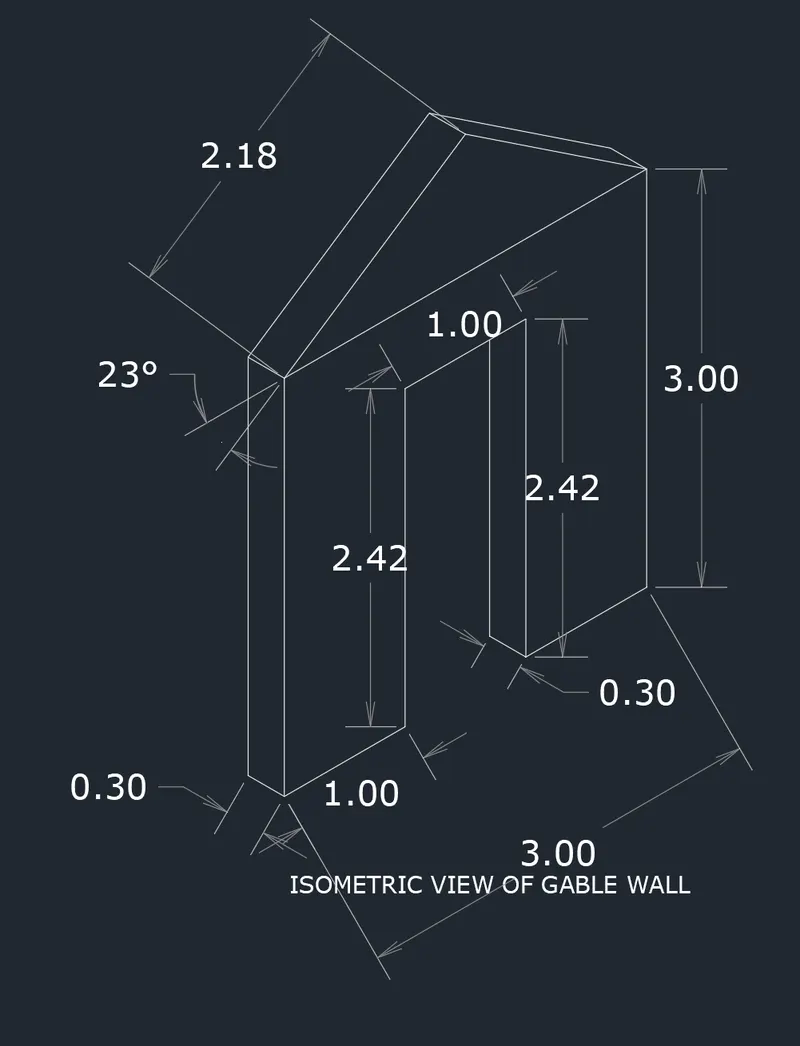
- Turn on the isometric drafting tool and select isoplane left.
- Assume start point as (0,0).
- Enter line command and put the cursor in the negative X direction and enter the value (0.3)
- Enter line command and put the cursor in the positive Y direction and enter the value (3.00)
- Enter line command and put the cursor in the positive X direction and enter the value (0.3)
- Enter line command and put the cursor in the negative Y direction and enter the value (3.00)
- Now, Turn on the isometric drafting tool and select isoplane right.
- Enter line command and put the cursor in the positive X direction and enter the value (1.00)
- Enter line command and put the cursor in the positive Y direction and enter the value (2.42)
- Enter line command and put the cursor in the positive X direction and enter the value (1.00)
- Enter line command and put the cursor in the negative Y direction and enter the value (2.42)
- Enter line command and put the cursor in the positive X direction and enter the value (1.00)
- Enter line command and put the cursor in the negative Y direction and enter the value (3.00)
- Now, put the value (@1.31 < 169)
- Now join the line to the point.