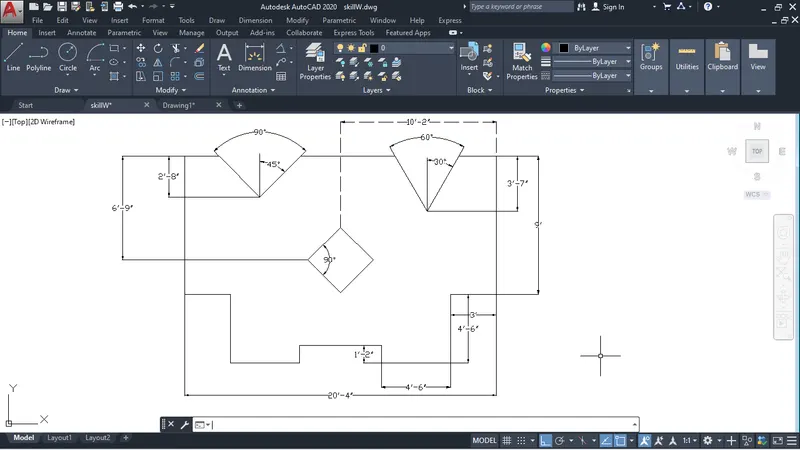
Drafting of various geometries using Chamfer, Fillet tool in AutoCad
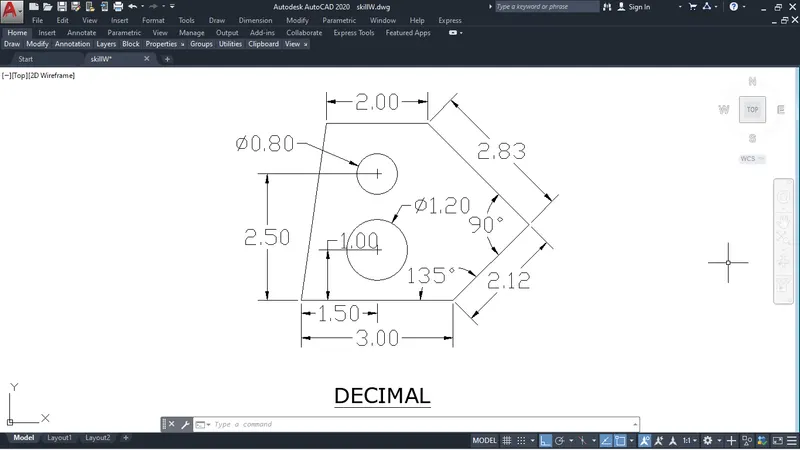
AIM: Using AutoCad to draw below drawing.
- I am using template imperial
- Set the unit to decimal by command- UN
- All the dimension can be measured with dimension tool in the ribbon.
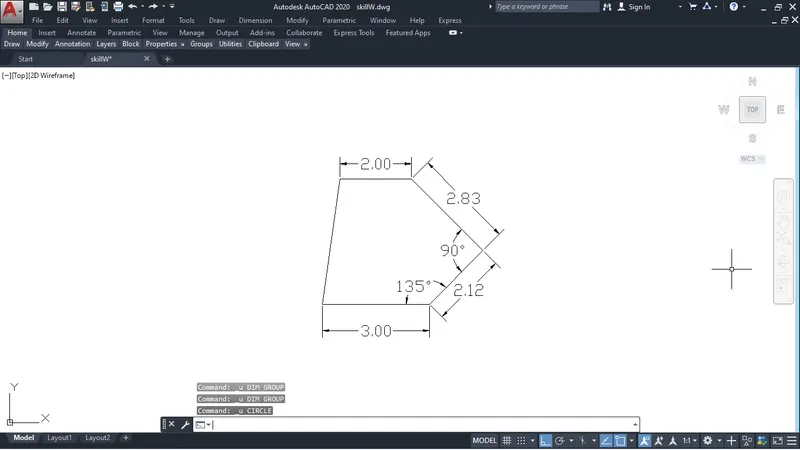
Lets Draw
- Choose the line tool by command- L
- Line specify the first point: click any where to start
- Specify the next point: @3,0
- Specify the next point: @2.12<45
- Specify the next point: @2.83<135
- Specify the next point: @-2,0
- Specify the next point: close
Now after drawing above line it will be look like fig. below.
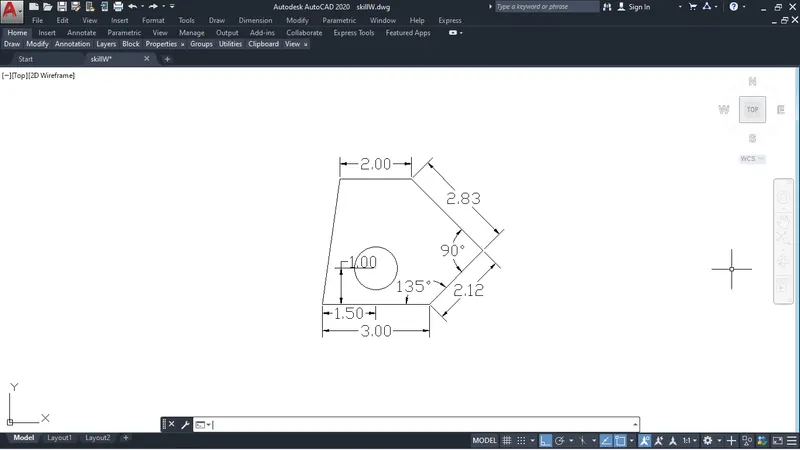
To draw inside circle
- Choose circle by command-C
- Specify the centre point of circle: half of line 3 aboove 1 height with help of apperent line
- Specify the radius of circle or : D
- Specify the diametre of circle: 1.20
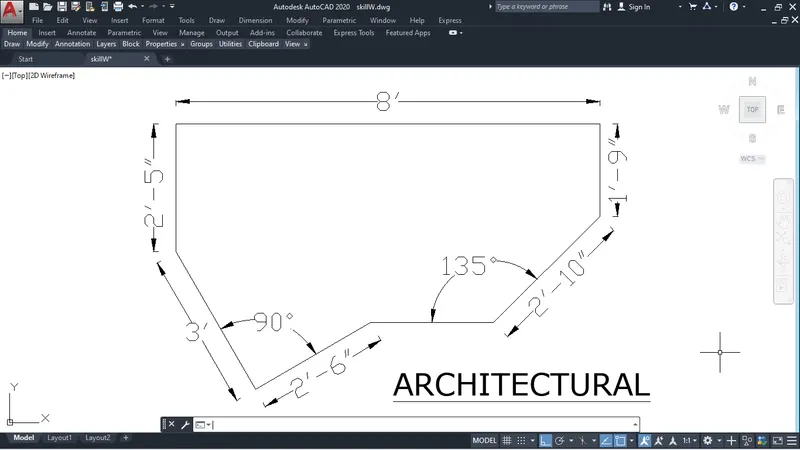
AIM: Using AutoCad to Draw Architectural Drawing Below.
- using template imperial
- Set the unit to Architectural by command- UN
- All the dimension can be measured with dimension tool in the ribbon.
Lets Draw
- Choose the line tool by Command- L
- Line Specify the first point: Click any where
- Specify the next point: @0, 2'5"
- Specify the next point: @8', 0
- Specify the next point: @0, -1'9"
- Specify the next point: @2'10"<225
- ESC
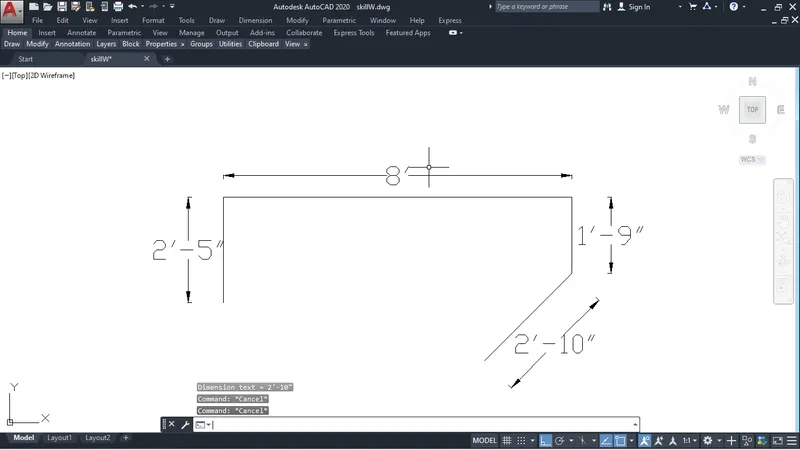
To draw further
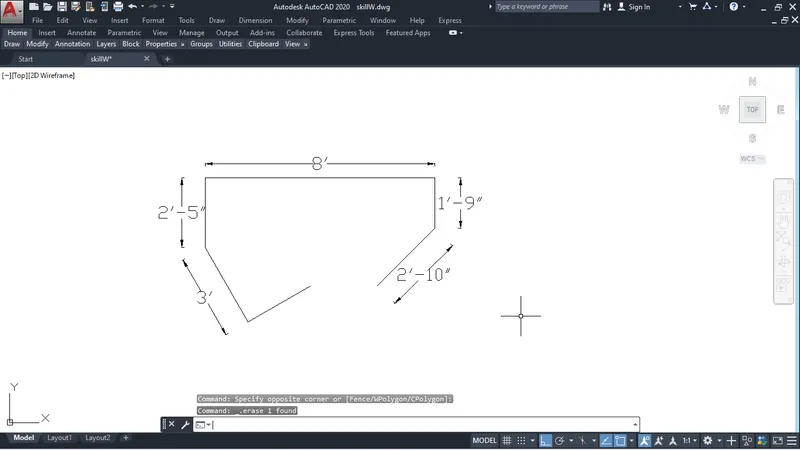
- Choose the line tool
- Line specify the first point: start where the above line initial point
- Specify next point:@3'<300
- Specify the next point: @ 2'6"<30
- Specify the next point: above line last point
- Esc
AIM: Using AutoCad to draw Engineering drawing below.
- using template imperial
- Set the unit to Engineering by command- UN
- All the dimension can be measured with dimension tool in the ribbon.
Lets Draw
- Choose the line tool
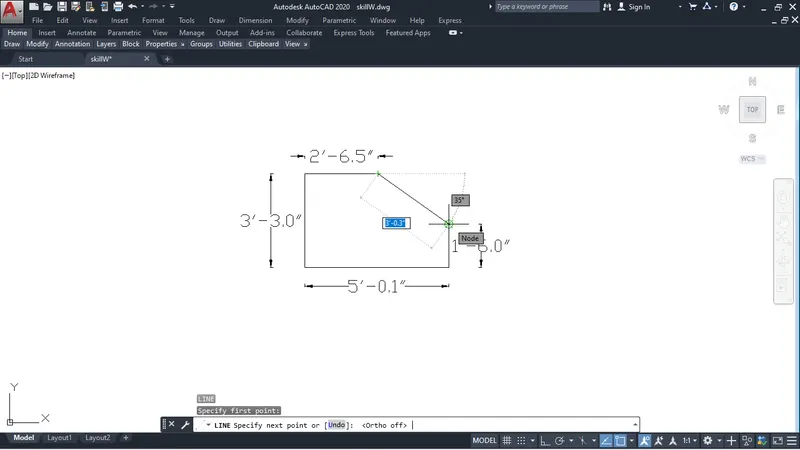
- Line Specify the first point: click any where
- Specify next point: @0, -1'6"
- Specify next point: @-5'0.1", 0
- Specify next point: @0, 3'3"
- Specify next point: @2'6.5", 0
- Specify the next point: close
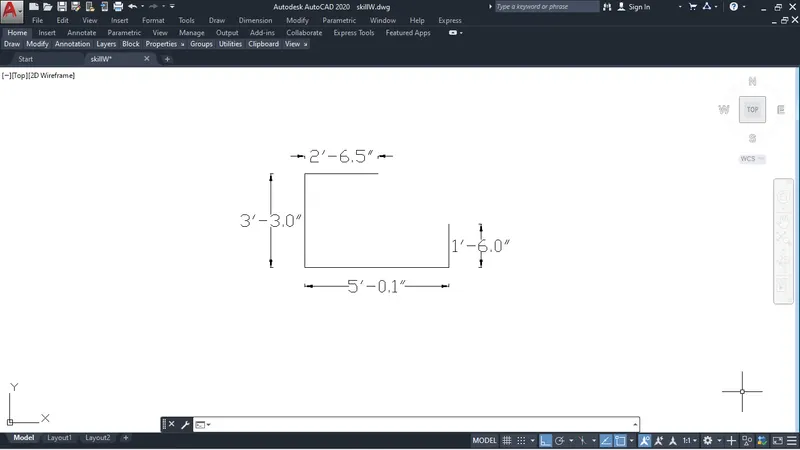
Choose the line tool again
- Specify the first point: you can see right side in fig.
- Specify the next point: @1'3", 0
- Specify the next point: @0 , 1'6"
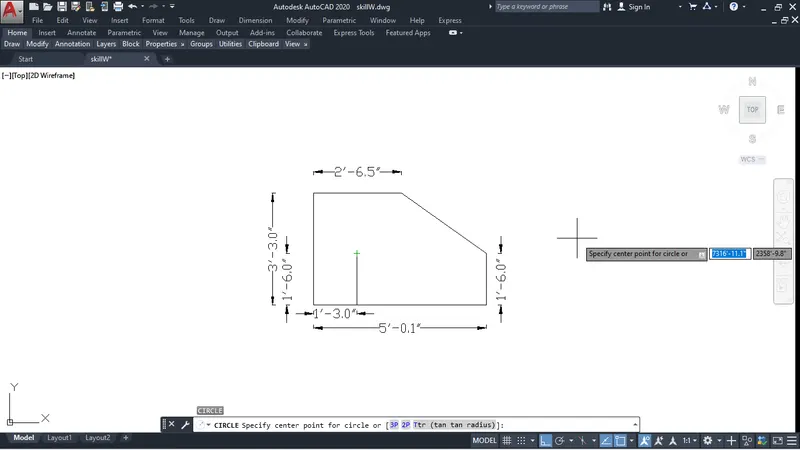
To draw circle inside
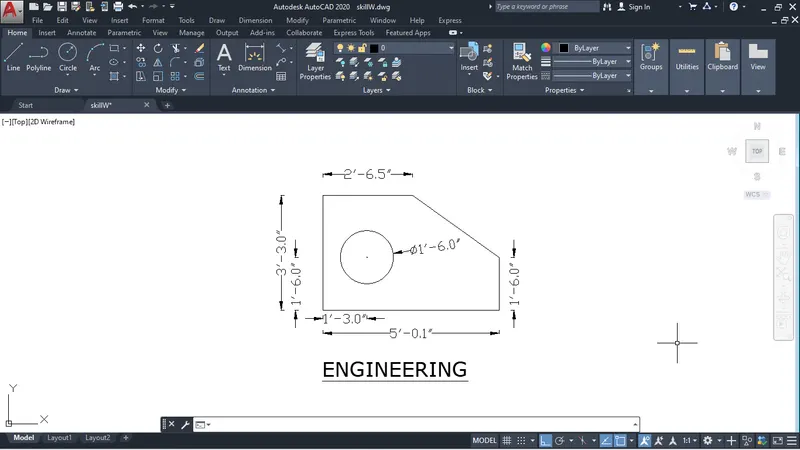
Choose the circle by command-C
Specify the circle centre point: above in Right side fig. where inside line finished choose that circle centre
Specify the diametre of circle:1'6'
AIM: Using AutoCad to draw below drawing.
- I am using template imperial
- Set the unit to decimal by command- UN
- All the dimension can be measured with dimension tool in the ribbon.
Lets Draw
- Choose the line tool by command- L
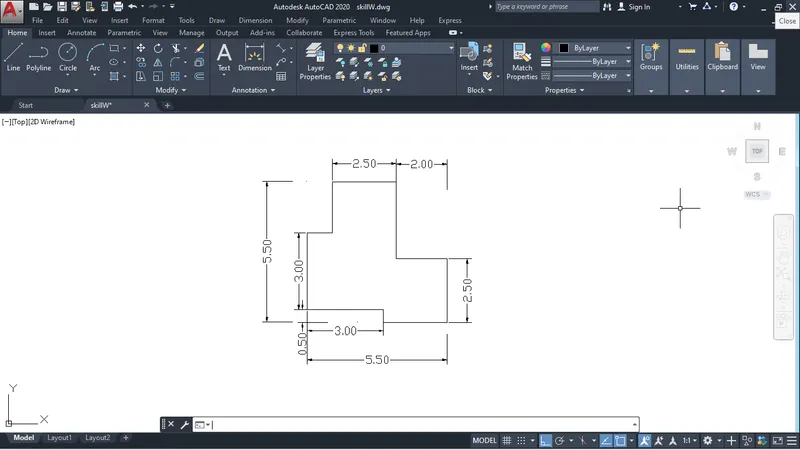
- Line specify the first point: click any where to start
- Specify the next point:@3,0
- Specify the next point:@0,-0.5
- Specify the next point:@2.50,0
- Specify the next point:@0, 2.50
- Specify the next point:@-2,0
- Specify the next point:@0,3
- Specify the next point:@-2.50,0
- Specify the next point:@0, -2.50
- Specify the next point:@-0.50, 0
- Specify the next point: close
AIM: Using AutoCad to draw below drawing.
- I am using template imperial
- Set the unit to decimal by command- UN
- All the dimension can be measured with dimension tool in the ribbon.
Lets Draw
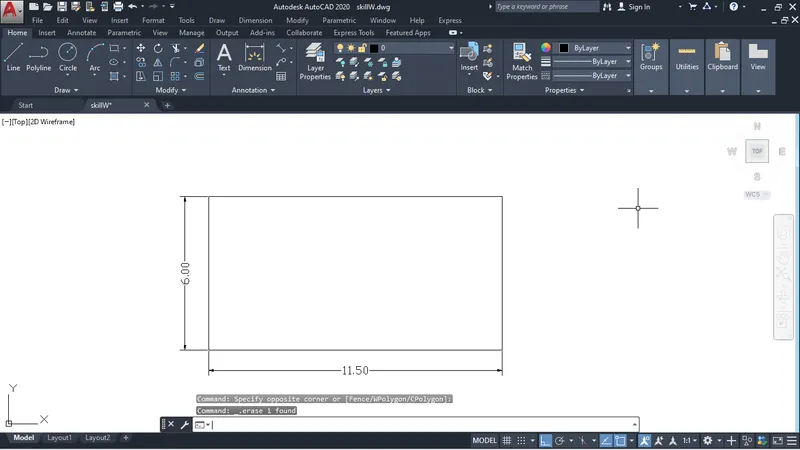
- Choose the rectangle by command- REC
- Specify the first corner point: Click any where
- Specify the other corner point: 11.50,6
- Rectangle you can see the right side fig.
Take offset of 3 right-left side of rectangle line as you can in right side fig.
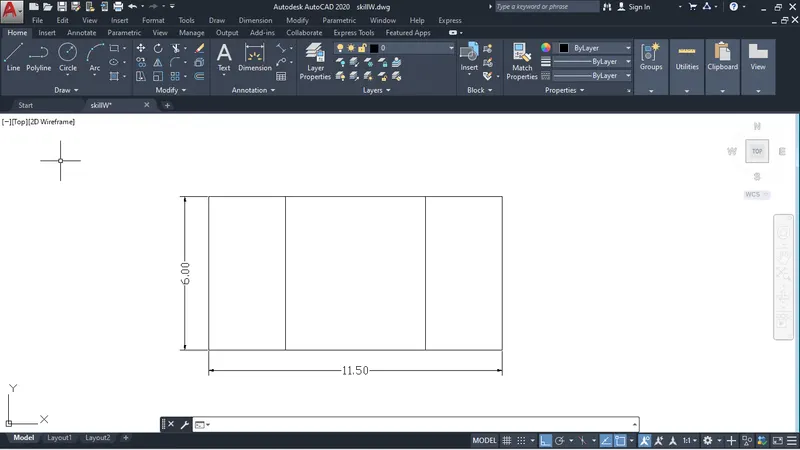
Draw the inside the rectangle
Choose the circle by command-C
Specify the centre of the circle: for middle circle choose the centre or midpoint of rectangle
Specify the diametre of the circle: 3
for other two circle centre point, mid point of left line rectangle at distance 1.50 as you can see fig below
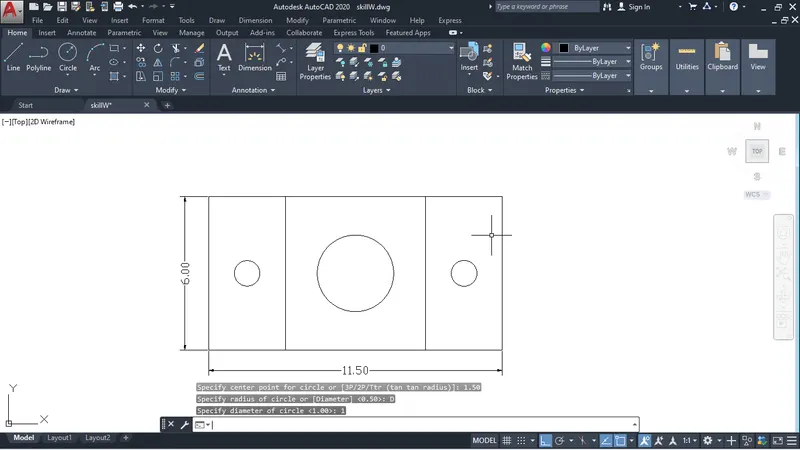
To draw further
Choose circle
To draw circle of 2 diametre both side of rectangle on 1 diametre of circle in belw fig.
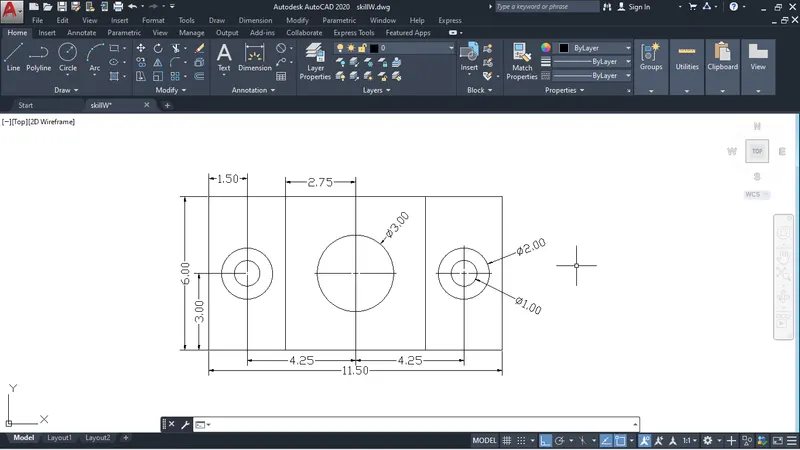
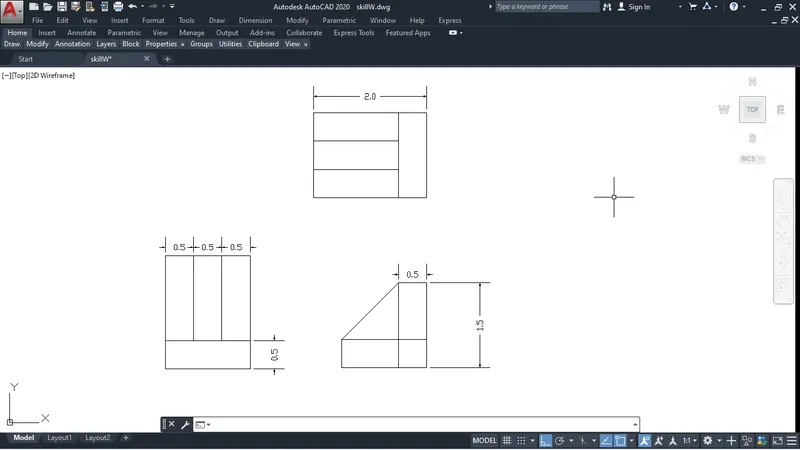
AIM: Using AutoCad to draw below drawing.
- Using template imperial
- Set the unit to decimal by command- UN
- All the dimension can be measured with dimension tool in the ribbon.
Lets Draw
Choose the line tool
- Line specify the first point: click any where
- Specify the next point:@2,0
- Specify the next point:@0,1.5
- Specify the next point:@-2,0
- Specify the next point: close
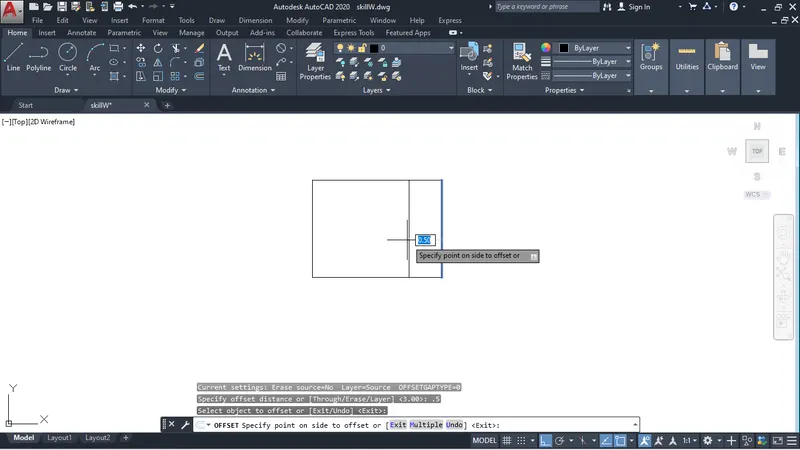
take offset 0.5 to draw further as you in right side fig.
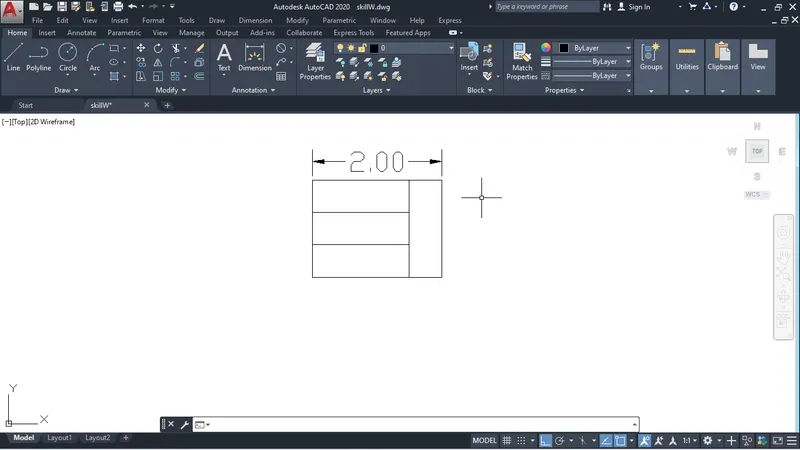
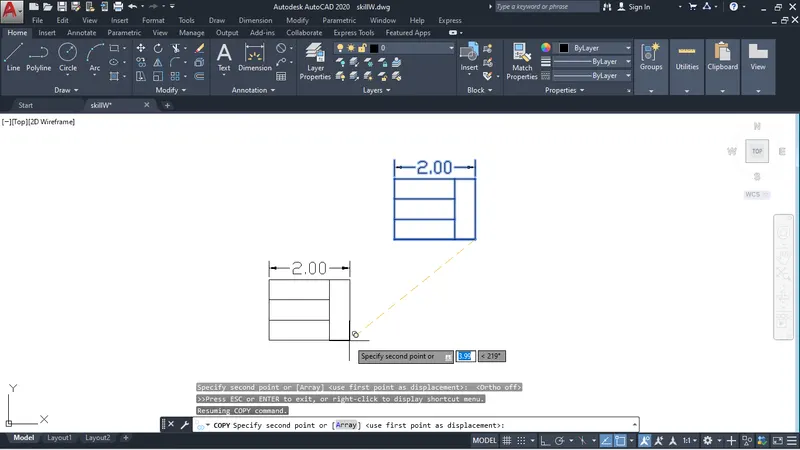
Make the copy with command- CO
AIM: Using AutoCad to draw below drawing.
- Using template imperial
- Set the unit to decimal by command- UN
- All the dimension can be measured with dimension tool in the ribbon.
Lets Draw
Choose the line tool
- Line specify the first point: click any where
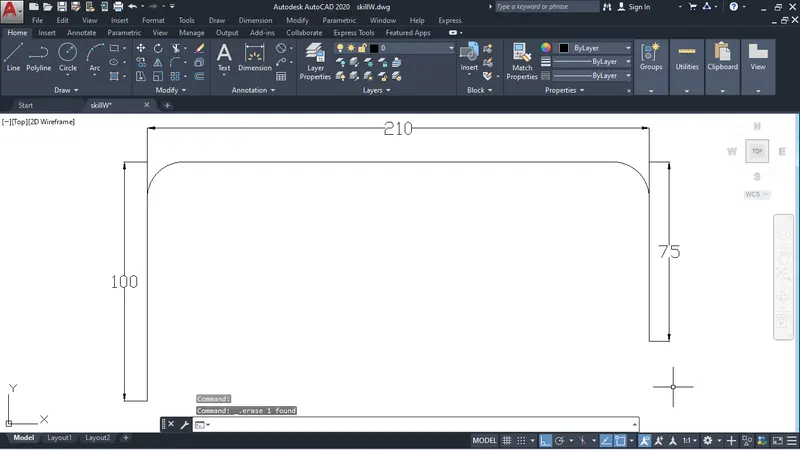
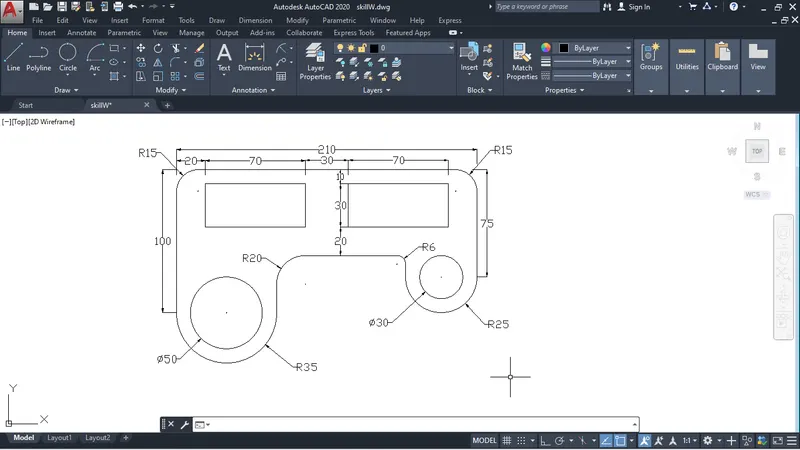
- Specify the next point: @0,100
- Specify the next point: @210,0
- Specify the next point: @0,-75
- Esc
To make round around the corner use fillet
Command-F
Select the object: R
Specify the radius:15
Select the first:choose any line first let take i choose 100
Select the second line: choose the second line 210
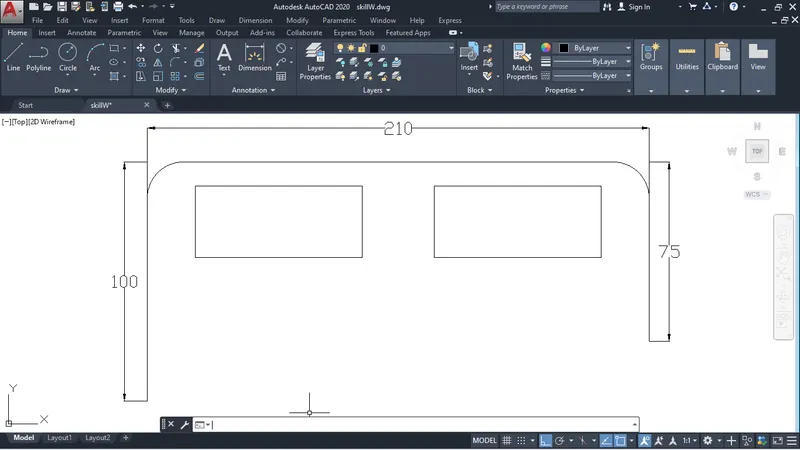
Draw rectangle inside
command-REC
Specify the first corner: 10 below top line (210), 20 distance from the line 100
Specify the second corner: 70,30
similarly we can draw other rectangle as you can see below fig.
to draw further
use circle 2P
and draw the circle inside with diametre 50.
take fillet with radius 20
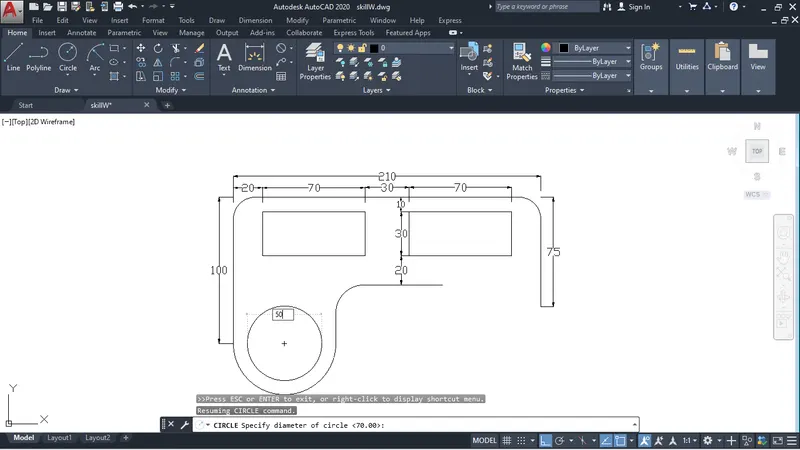
make the fillet as you can see fig below with 20 radius fillet.
after that take 2P circle first point will be finishing of 75 line.
second point: 50
trim it to the half circle
as you can see in fig below there is gap
To fill that gap use fillet with radius 6.
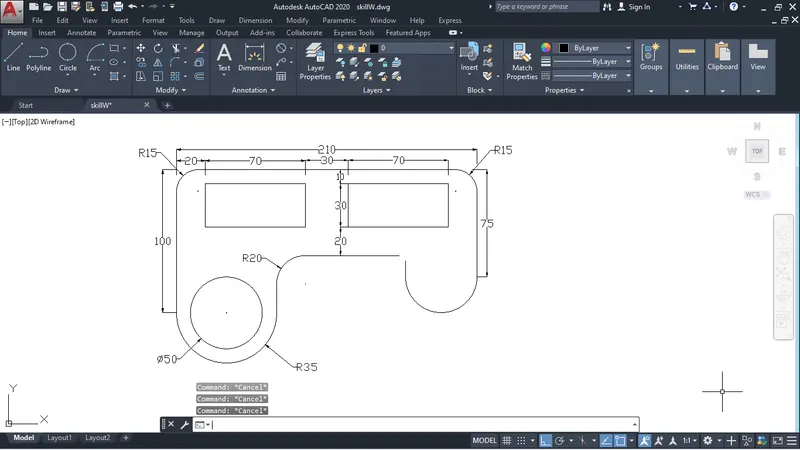
after filliting draw the circle of diametre 30 you can see below fig.
AIM: Using AutoCad to draw below drawing.
- Using template imperial
- Set the unit to decimal by command- UN
- All the dimension can be measured with dimension tool in the ribbon.
Lets Draw
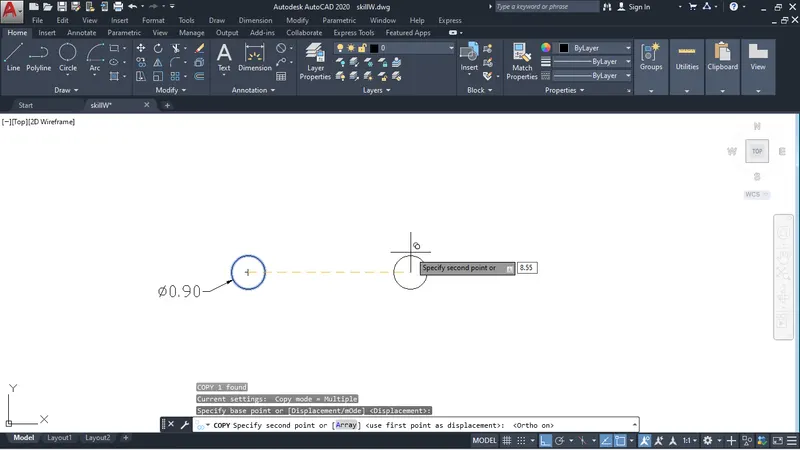
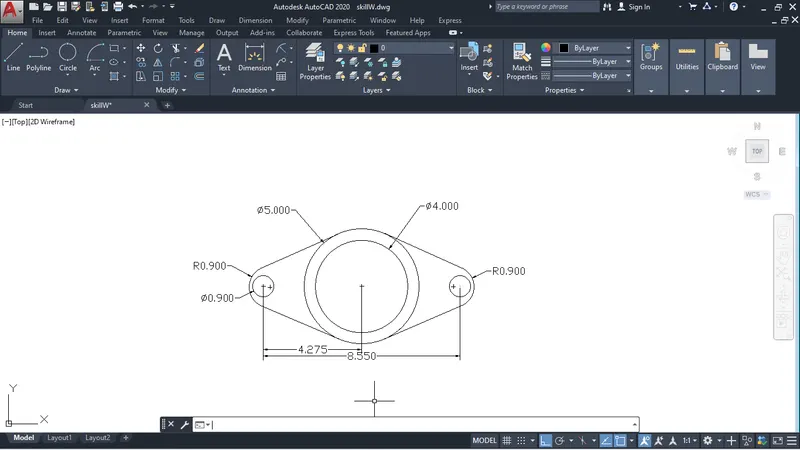
take the circle with commond-C
draw the circle with diameter 0.90
copy the circle give the distance 8.5 from first circle as you can see below
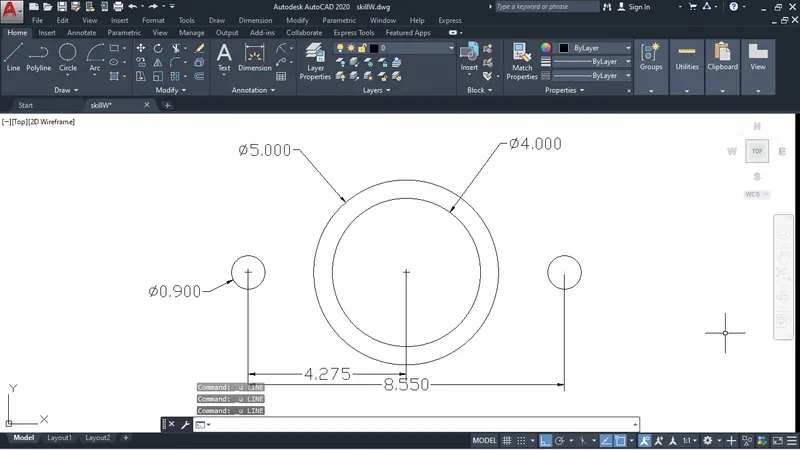
Choose the circle again
draw two circle dia 4 and 5 in the middle of circle which dia 0.90
use object snap for tangent to draw the line on the circle as you can see below
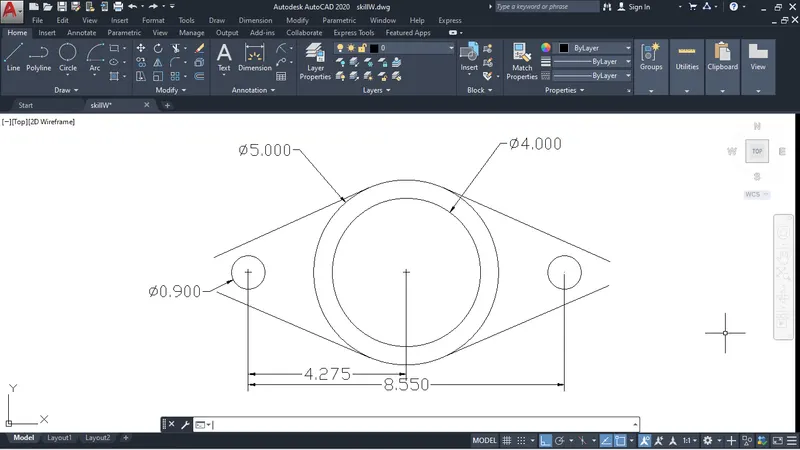
Take the fillet with radius 0.90 take fill the gap.
AIM: Using AutoCad to draw below drawing.
- using template imperial
- Set the unit to Engineering by command- UN
- All the dimension can be measured with dimension tool in the ribbon.
Lets Draw
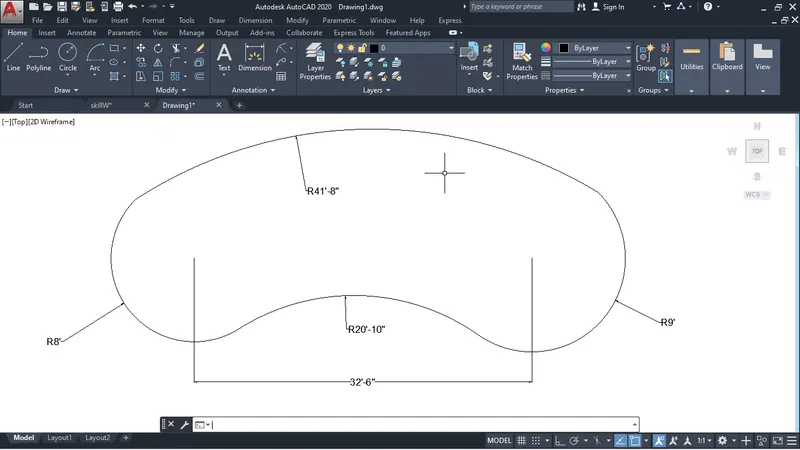
choose circle by command-C
Specify the centre of the circle: click any where
Specify the radius of the circle: 8'
Similarly we can draw circle with radius 9' from centre distance at 32'6" of first circle as you can see below fig.
take the fillet 20'10" and 41'8" radius as you can see fig below.
AIM: Using AutoCad to draw below drawing.
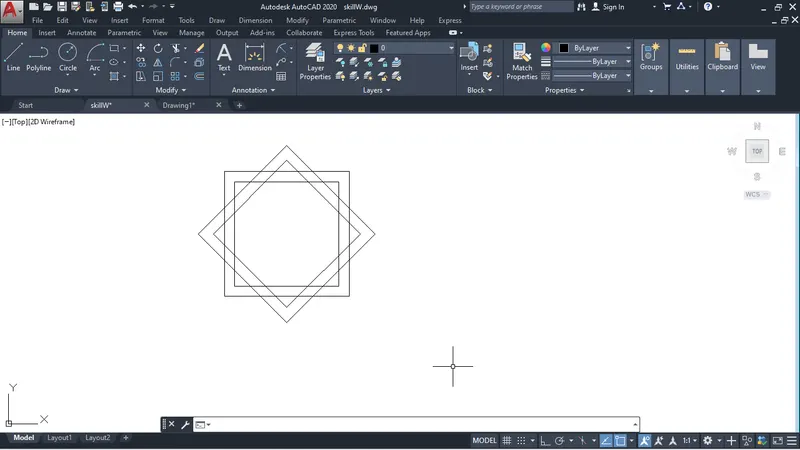
draw a square rectangle with command-C
take the offset of the at some distance
After that make copy of the rectangle and rotate it at angle 45
again move the rotated rectangle from centre base point and put it on the original rectangle at centre point.
AIM: Using AutoCad to draw below drawing.
- using template imperial
- Set the unit to Engineering by command- UN
- All the dimension can be measured with dimension tool in the ribbon.
Lets Draw
we can choose the line to draw as you see below fig.
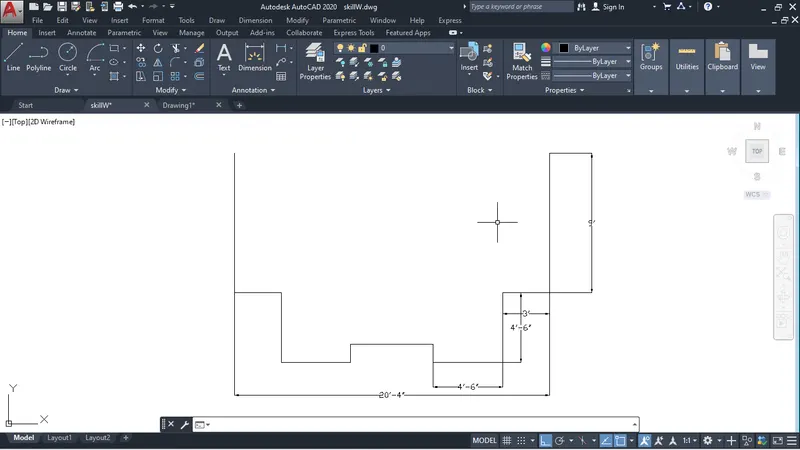
after above the drawing I choose line randomly to draw the in below fig.
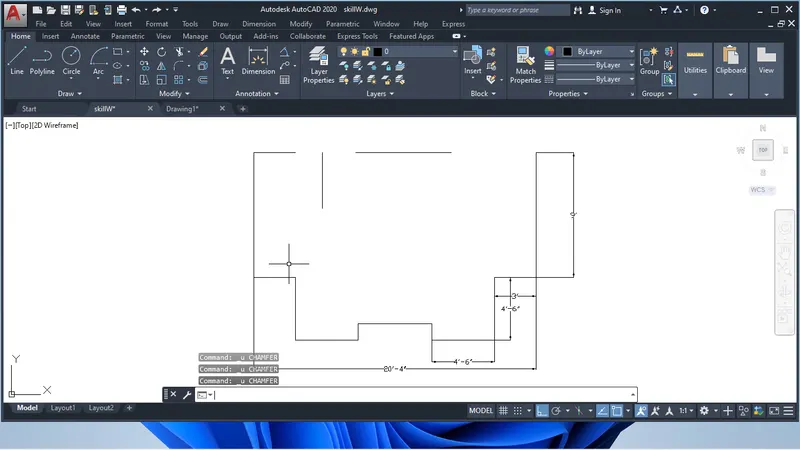
after that I choose fillet
command-F
select the first line:A
Specify the first line distance:2'8"
Specify angle from the first line:45
select the first line: select the vertical line above in fig.
select the second line: line attach to left 9' line
Similary we can draw fillet for right side in below fig.
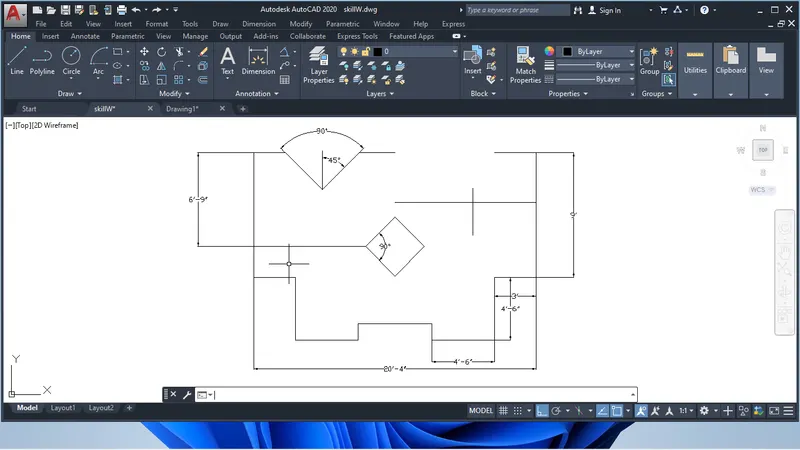
after that draw inside rectangle.