Creation of geometries by Coordinate system methods using AutoCad
- Using Imperial template with decimal unit
- I am using absolute coordinate system so to use absolute coordinate we have to go in draft setting via command- ds and then go to option dynamic input and then go to pointer input setting and choose absolute coordinate.
- After that we have to grid x and y- spacing to 1 and major line 10.
- Now we draw.
- choose the line tool from draw or give commad- L, Line
- LINE specify first point: 2,1
where, (X= 2 and Y= 1)
- As you can see in drawing I have given serial no. to every corner. so below next point will be according to serial no.
- Specify next point : 8,1
- Specify next point : 8,2
- Specify next point : 3,2
- Specify next point : 3,6
- Specify next point : 8,6
- Specify next point : 8,7
- Specify next point : 2,7
- Specify next point : 2,1 or c, close
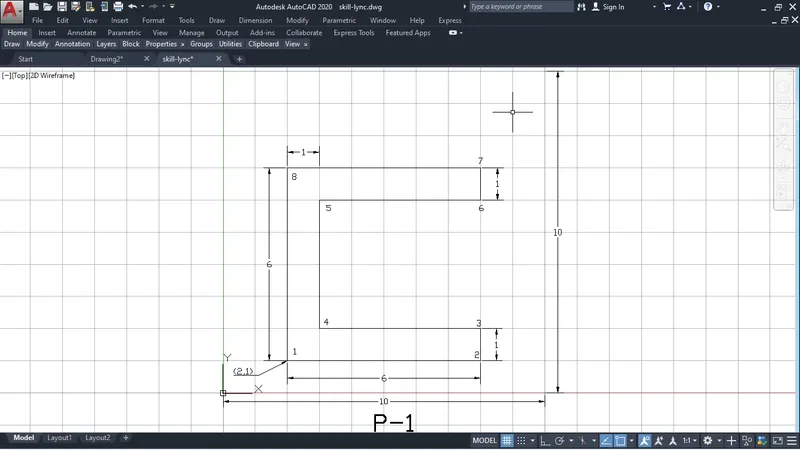
All the dimensios can be measured by dimensions tool from ribbon or by command DIMLINEAR OR for angular dimension DIMANGULAR.
This is the drawing of P-2
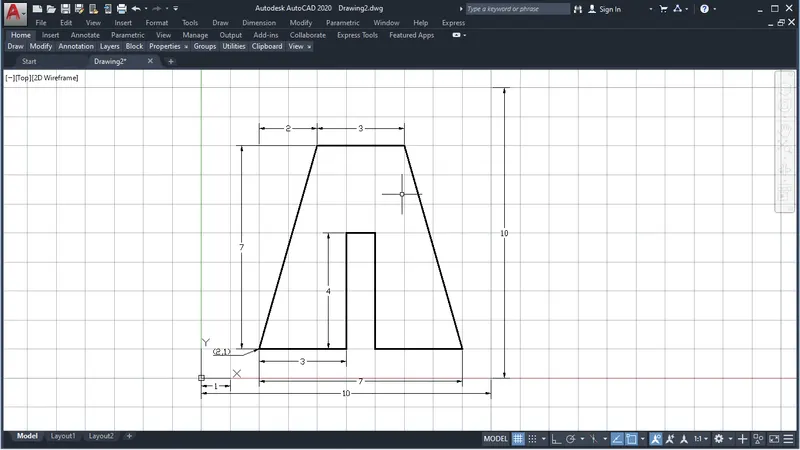
- In this drawing I am using Relative coordinate system
- choose the line tool
- LINE Specify first point: 2,1 (start point)
- Specify next point: @3,0
- Specify next point: @0,4
- Specify next point: @1,0
- Specify next point: @-4,0
- Specify next point: @3,0
- Specify next point: @-2,7
- Specify next point: @-3,0
- Specify next point: @-2,-7 or close
-
P-3
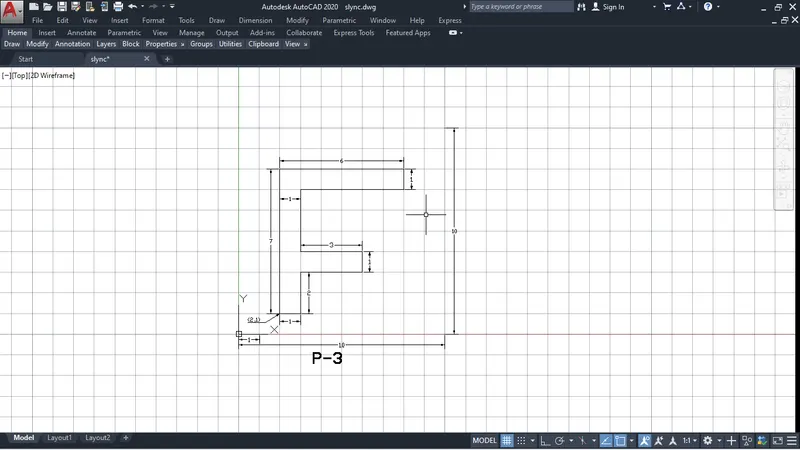
- choose the line tool
- LINE Specify first point: 2,1 (start point)
- Specify next point: @1,0
- Specify next point: @0,2
- Specify next point: @3,0
- Specify next point: @0,1
- Specify next point: @-3,0
- Specify next point: @0,3
- Specify next point: @5,0
- Specify next point: @0,1
- Specify next point: @-6,0
- Specify next point: c or close
P-4
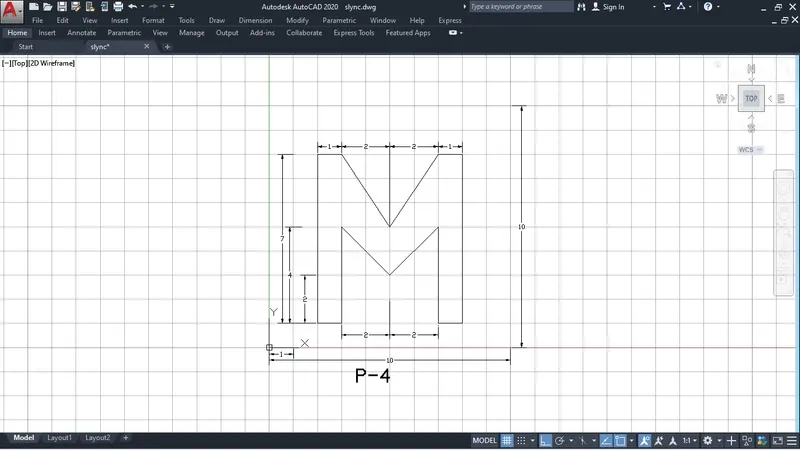
- Choose the line tool
- LINE Specify first point: 2,1 (start point)
- Specify next point: @1,0
- Specify next point: @0,4
- Specify next point: @2,-2
- Specify next point: @2,2
- Specify next point: @0,-4
- Specify next point: @1,0
- Specify next point: @0,7
- Specify next point: @-1,0
- Specify next point: @-2.-3
- Specify next point: @-2,3
- Specify next point: @-1,0
- Specify next point: @0,-7 or close
P-5
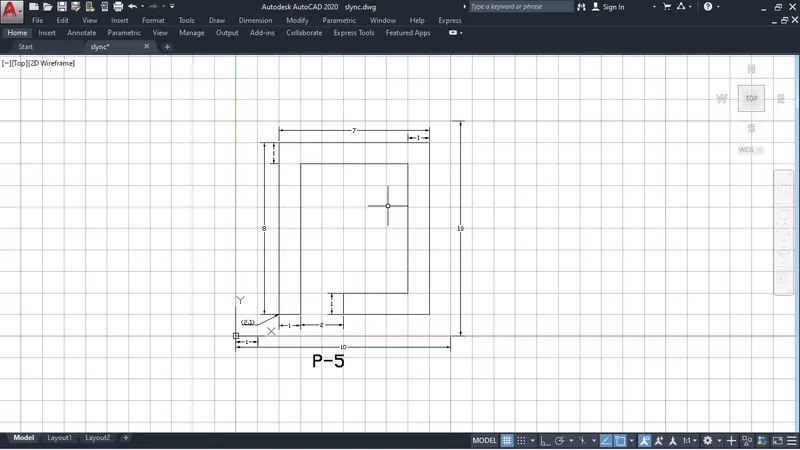
- choose the line tool
- LINE Specify first point: 2,1 (start point)
- Specify next point: @1,0
- Specify next point: @0,7
- Specify next point: @5,0
- Specify next point: @0,-6
- Specify next point: @-3,0
- Specify next point: @0,1
- Specify next point: @4,0
- Specify next point: @0,8
- Specify next point: @-7,0
- Specify next point: c or close
P-6
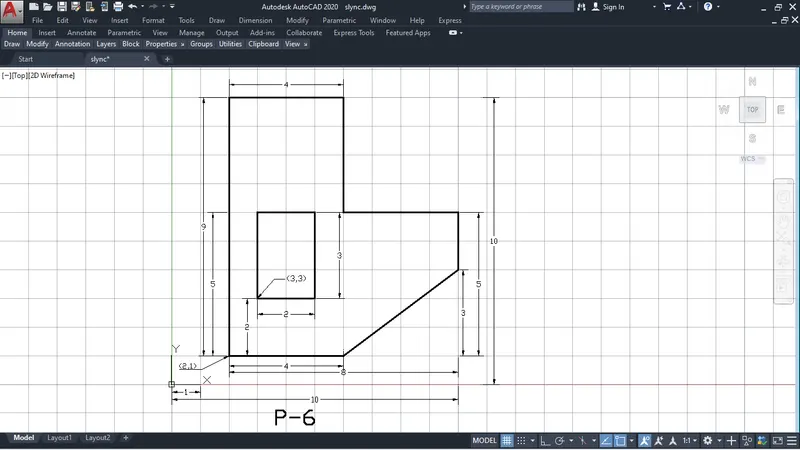
- choose the line tool
- LINE Specify first point: 2,1 (start point)
- Specify next point: @4,0
- Specify next point: @4,3
- Specify next point: @0,2
- Specify next point: @-4,0
- Specify next point: @0,4
- Specify next point: @-4,0
- Specify next point: @-9,0 or close
After closing the point we only get outer line not the rectangle inside that so to draw rectangle we have choose the line tool again so lets draw
first we find out the what would be first point so from the grid first point is (3,3)
- LINE Specify first point: 3,3 (start point)
- Specify next point: @2,0
- Specify next point: @0,3
- Specify next point: @-2,0
- Specify next point: @0,-3 or close
P-7
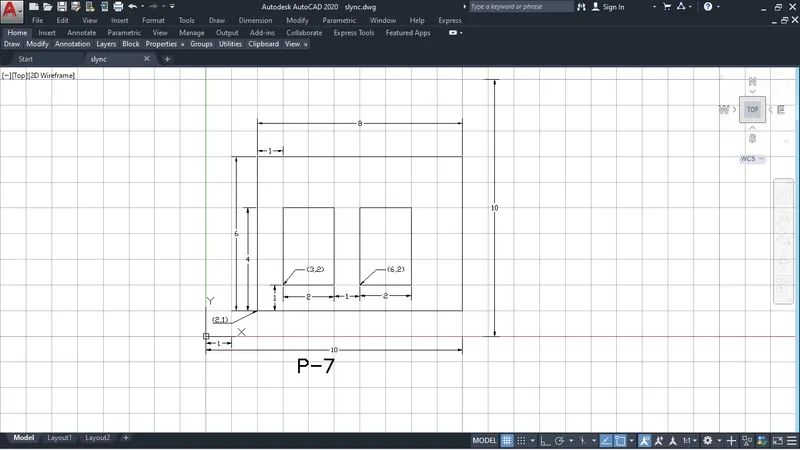
- choose the line tool
- LINE Specify first point: 2,1 (start point)
- Specify next point: @8,0
- Specify next point: @0,6
- Specify next point: @-8,0
- Specify next point: @0,-6 or close
Above the point only for outer rectangle
So to draw inside of the rectangle
- choose the line tool
- LINE Specify first point: 3,2 (start point)
- Specify next point: @2,0
- Specify next point: @0,3
- Specify next point: @-3,0
- Specify next point: @0,-3 or close
To draw 2 rectangle
- choose the line tool
- LINE Specify first point: 6,2 (start point)
- Specify next point: @2,0
- Specify next point: @0,3
- Specify next point: @-3,0
- Specify next point: @0,-3 or close
P-8
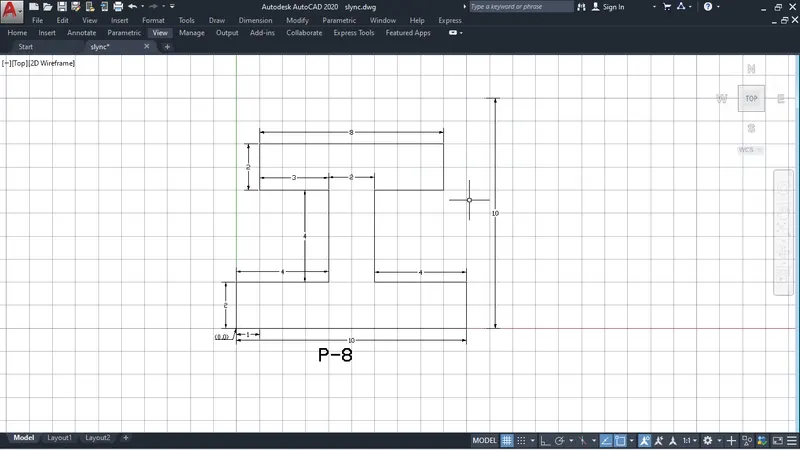
- choose the line tool
- LINE Specify first point: 0,0 (start point)
- Specify next point: @10,0
- Specify next point: @0,2
- Specify next point: @-4,0
- Specify next point: @0,4
- Specify next point: @3,0
- Specify next point: @0,2
- Specify next point: @-8,0
- Specify next point: @0,-2
- Specify next point: @3,0
- Specify next point: @0,-4
- Specify next point: @-4,0
- Specify next point: @0,-2 or close
P-9
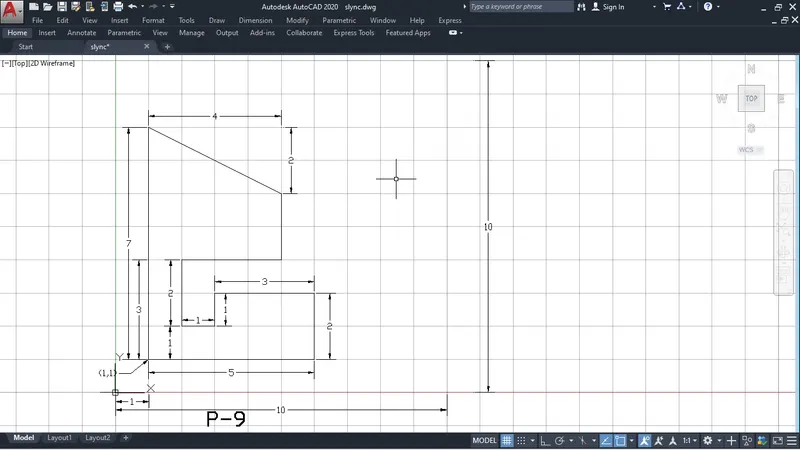
- choose the line tool
- LINE Specify first point: 1,1 (start point)
- Specify next point: @5,0
- Specify next point: @0,2
- Specify next point: @-3,0
- Specify next point: @0,-1
- Specify next point: @-1,0
- Specify next point: @0,2
- Specify next point: @3,0
- Specify next point: @0,2
- Specify next point: @-4,2
- Specify next point: @0,-7 or close
P-10
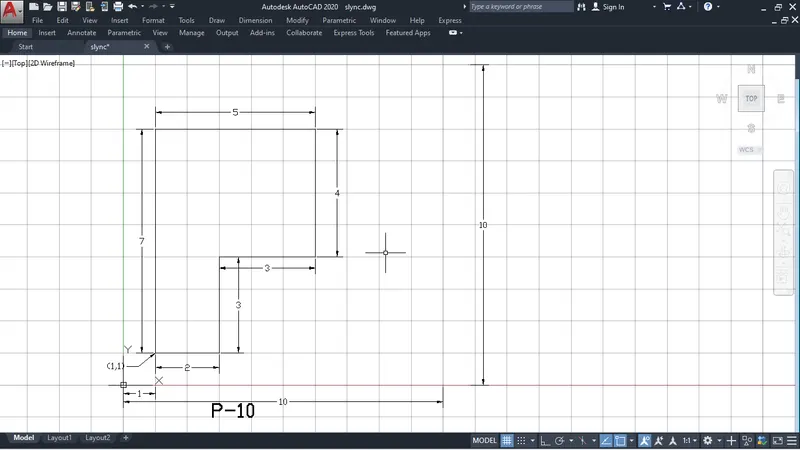
- choose the line tool
- LINE Specify first point: 1,1 (start point)
- Specify next point: @2,0
- Specify next point: @0,3
- Specify next point: @3,0
- Specify next point: @0,4
- Specify next point: @-5,0
- Specify next point: @0,-7 or close
after this, to draw inside rectangle as show below fig.
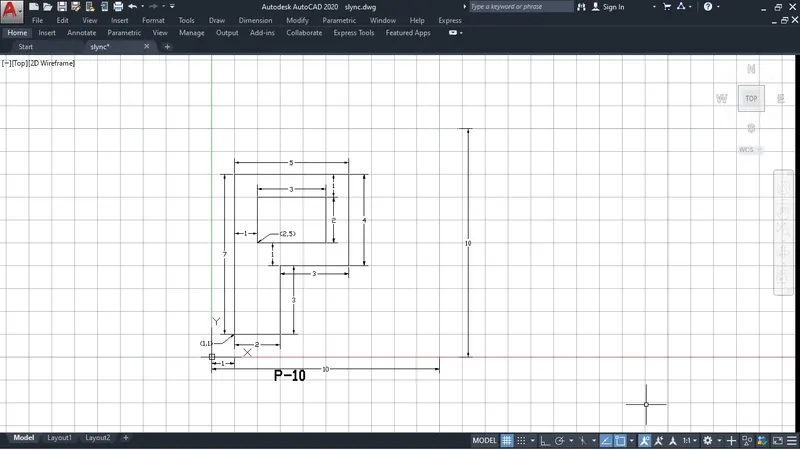
- choose the line tool
- LINE Specify first point: 2,5 (start point)
- Specify next point: @3,0
- Specify next point: @0,2
- Specify next point: @-3,0
- Specify next point: @0,-2 or close
CIVIL RELATED PROBLEMS:
Profile wood
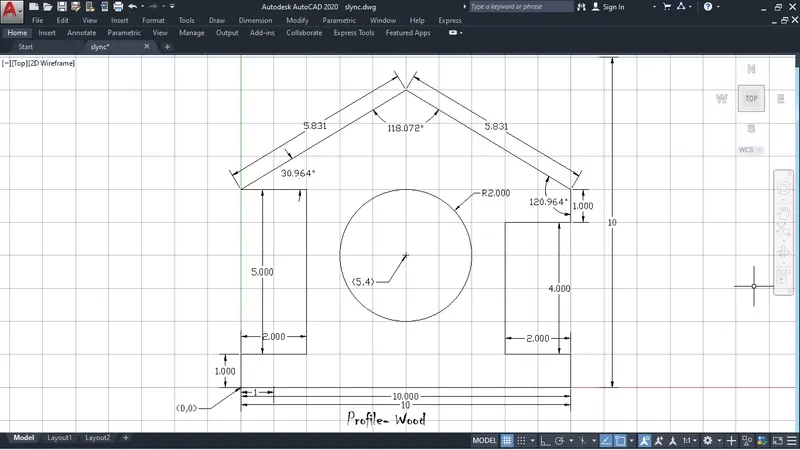
- choose the line tool
- LINE Specify first point: 0,0 (start point)
- Specify next point: @10,0
- Specify next point: @0,1
- Specify next point: @-2,0
- Specify next point: @0,4
- Specify next point: @2,0
- Specify next point: @0,1
- Specify next point: @-5,3
- Specify next point: @-5,-3
- Specify next point: @2,0
- Specify next point: @0,-5
- Specify next point: @-2,0
- Specify next point: @0,-1 OR close
So to draw a circle
choose the circle tool by command = c or from menu bar> draw
- Specify the centre point of circle: 5,4
- specify the radius : 2
Queen Post Truss
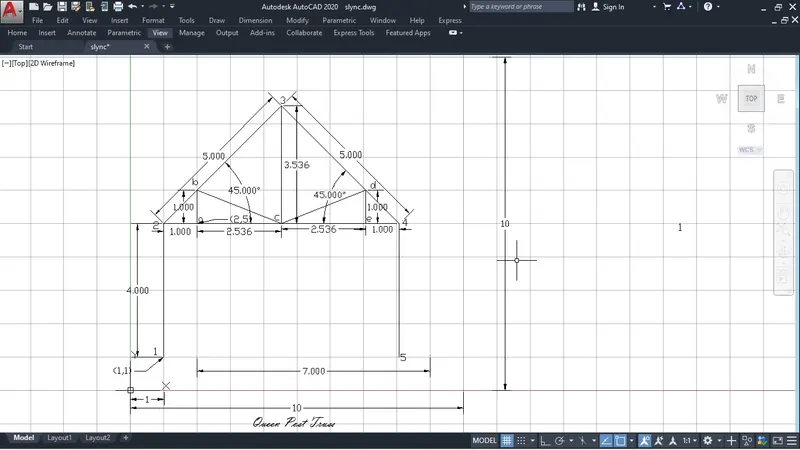
- choose the line tool
- LINE Specify first point: 1,1 (start point)
- Specify next point: @0,4
- Specify next point: @3.536,3.536
- Specify next point: @3.536,-3.536
- Specify next point: @0,-4
- esc
As you can see I have serial no. in drawing that's how serial wise above line point will be goes.
Now from point 2 to 4 draw straight line
- Choose the line tool
- LINE specify the first point: 1,4
- specify the next point: 7,0
- esc
Now to draw inner triangle I have given alphabetic word as point like for start point a, for 2nd point b and so on.
Lets draw
- Choose the line tool
- LINE specify the first point: 2,5 (start point or point,a)
- Specify next point: @0,1
- Specify next point: @2.536,-1
- Specify next point: @2.536,1
- Specify next point: @0,1
- esc
MONO PATCH
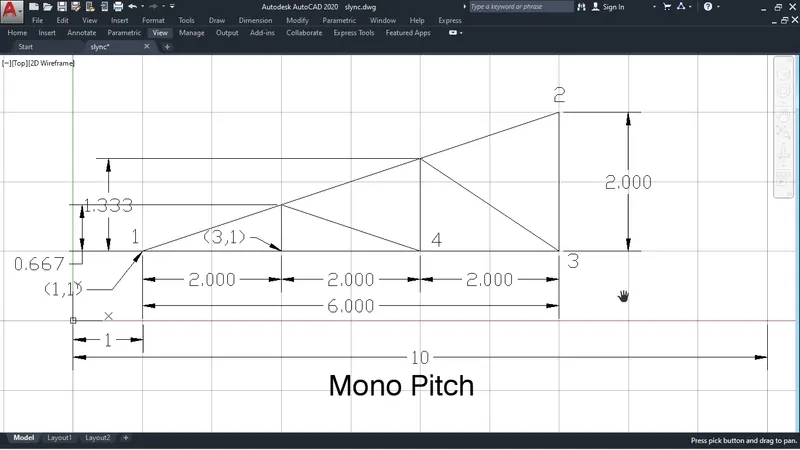
- Choose the line tool
- LINE specify the first point: 1,1 (start point)
- Specify next point: @6,2
- Specify next point: @0,-2
- Specify next point: @-2,0
- esc
Now Choose the line tool again to draw inner triangular line
- Line Specify the first point: 3,1 (as you can see in the drawing)
- Specify the next point: @0, 0.667
- Specify the next point: @2, -0.667
- Specify the next point: @0, 1.333
- Specify the next point: @2, -1.333
- esc
Grid
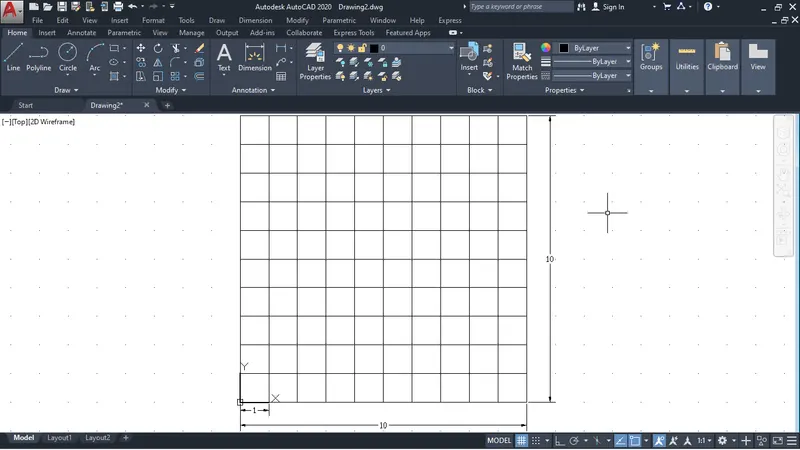
To draw grid use snap and grid from draft setting
In grid use x and y spacing 1 and major line 10.