Creation of Multiple viewports, Scaling the drawing and setting in Template in AutoCad
AIM : 1. Creation of Multiple viewports, Scaling the drawing and setting in Template in AutoCad.
Introduction: In this challenge i have draft the above meationed drawing i.e, Multiple viewports, Scaling the drawing and setting in Template, using AutoCad. here in this challange i have attached all the drawings in a image format and with the proper procedure as possible.
The comman commands which are used in this challange are discussed below
Selecting of Tools:
- Line: Ribbon< Home< Line, Command: Line or L, Home< Draw< Line.
- Polyline: Ribbon< Home< Polyine, Command: polyline or pl, Home< Draw< polyline.
- Rectangle: Ribbon< Home< rectangle, Command: rectangle or rec, Home< Draw< rectangle.
- Ploygon: Ribbon< Home< Ploygon, Command: Ploygon or pol, Home< Draw< Ploygon.
- Circle: Ribbon< Home< Circle, Command: Circle or C, Home< Draw< Circle.
- Fillet: Ribbon< Home< Fillet, Command: Fillet or F, Home< modify< Fillet.
- Chamfer: Ribbon< Home< Chamfer, Command: Chamfer or cha, Home< modify<Chamfer.
- Move: Ribbon< Home< move, Command: move or M, Home< modify<Move.
- Copy: Ribbon< Home< Copy, Command: Copy or co, Home< modify<Copy.
- TRIM: Ribbon< Home< trim, Command: TRIM or TR, Home< modify
Question 1:
Create a layout of the Plan and Section A of the project in Challenges 7, using the template Tutorial-mArch.dwt in a scale as given in the Figure. Use the MV command to create the viewport of the size as shown in Figure. Also, use ATTEDIT command to edit the information in the title block. Use A1 size for the layout. Take a plot.
ANS: Here i have attached the image which i have made in autocad 2019,
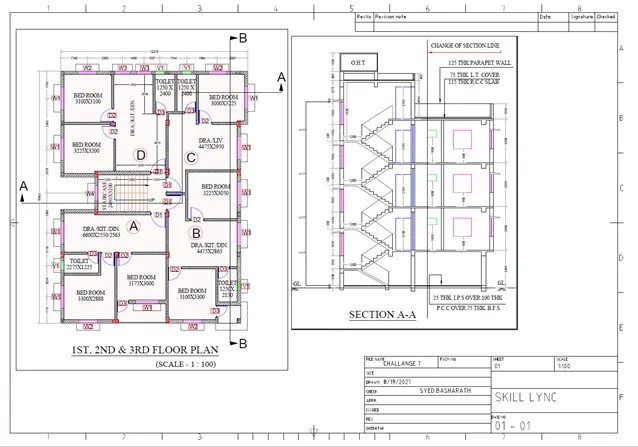
Procedure:
- Open challenge 7 DWG file in which there is a plan and section of an apartment of 4 flats.
- Go to the command tab and type layout further select template option.
- Now select sheets option in which select ISO A3 template press apply and then ok.
- These will create a new layout which shows a name table which consist of date, drawing title, reference, consultant etc…
- Type attedit and press enter and select the title block.
- In these block go on change the title the date, reference no, consultant info etc…
- These completes the setup of a layout sheet.
- Now go to the model in which zoom the plan which is already created.
- Now go the view option available in the ribbon tab and add the view as v1 and apply
- Now select the section zoom the section at particular limits so that whole section will be visible.
- Now go the view option available in the ribbon tab and add the view as v2 and apply.
- Now go to layout which is ISO A3 go to the layout menu and select rectangular view port option and drag in the layout page of assumed size.
- Select the layout box and type ms in the command tab press enter.
- Now select view as V1 which is already created press enter.
- Now type Z enter and give the scale as 1/100xp which means 1 in model space and 100in page space.
- Now adjust the report size and copy this report and place it just beside with the original.
- Now type ms and select view v2 which is of section.
- Similarly set the section in the scale of 1:100 similarly as view v1.
- Now press control + P select dwg to pdf and select the paper size of ISO A3.
- Go to the preview option and see the drawing if it is ok press enter and save this pdf to skill lync folder named challenge 10.
Question 2:
Create a layout of the Kitchen drawn in Challenge 9 as shown in Figure. Use the scale as shown in the Figure. Use A4 Size page for the layout. Take a plot.
ANS: Here i have attached the image which i have made in autocad 2019,
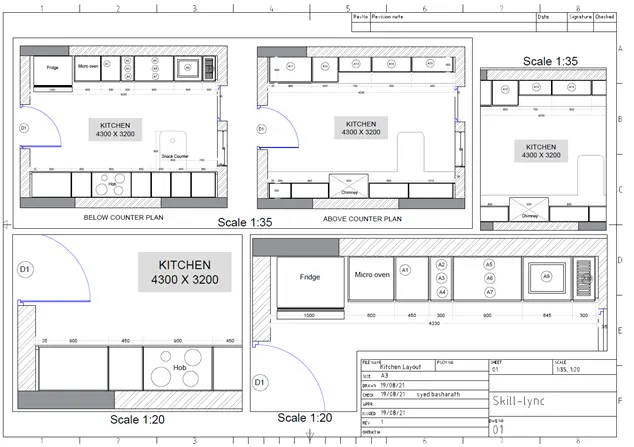
Procedure:
- Open challenge 10 DWG file in which there is a plan and section of an kitchen layout.
- Go to the command tab and type layout further select template option.
- Now select sheets option in which select ISO A3 template press apply and then ok.
- These will create a new layout which shows a name table which consist of date, drawing title, reference, consultant etc…
- Type attedit and press enter and select the title block.
- In these block go on change the title the date, reference no, consultant info etc…
- These completes the setup of a layout sheet.
- Now go to the model in which zoom the plan which is already created.
- Now go the view option available in the ribbon tab and add the view as v1 and apply
- Now select the section zoom the section at particular limits so that whole section will be visible.
- Now go the view option available in the ribbon tab and add the view as v2 and apply.
- Now go to layout which is ISO A3 go to the layout menu and select rectangular view port option and drag in the layout page of assumed size.
- Select the layout box and type ms in the command tab press enter.
- Now select view as V1 which is already created press enter.
- Now type Z enter and give the scale as 1/100xp which means 1 in model space and 100in page space.
- Now adjust the report size and copy this report and place it just beside with the original.
- Now type ms and select view v2 which is of section.
- Similarly set the section in the scale of 1:100 similarly as view v1.
- Now press control + P select dwg to pdf and select the paper size of ISO A3.
- Go to the preview option and see the drawing if it is ok press enter and save this pdf to skill lync folder named challenge 10.
Question 3:
Create a layout of the section created in Challenges 9.Use scale as mentioned in the Figure. Use MV command create multiple viewports. Take a plot.
ANS: Here i have attached the image which i have made in autocad 2019,
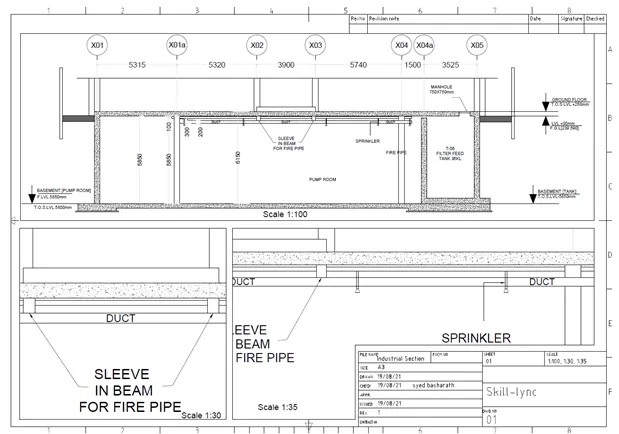
Procedure:
- Open challenge 10 DWG file in which there is a plan and section of an industrial building.
- Go to the command tab and type layout further select template option.
- Now select sheets option in which select ISO A3 template press apply and then ok.
- These will create a new layout which shows a name table which consist of date, drawing title, reference, consultant etc…
- Type attedit and press enter and select the title block.
- In these block go on change the title the date, reference no, consultant info etc…
- These completes the setup of a layout sheet.
- Now go to the model in which zoom the plan which is already created.
- Now go the view option available in the ribbon tab and add the view as v1 and apply
- Now select the section zoom the section at particular limits so that whole section will be visible.
- Now go the view option available in the ribbon tab and add the view as v2 and apply.
- Now go to layout which is ISO A3 go to the layout menu and select rectangular view port option and drag in the layout page of assumed size.
- Select the layout box and type ms in the command tab press enter.
- Now select view as V1 which is already created press enter.
- Now type Z enter and give the scale as 1/100xp which means 1 in model space and 100in page space.
- Now adjust the report size and copy this report and place it just beside with the original.
- Now type ms and select view v2 which is of section.
- Similarly set the section in the scale of 1:100 similarly as view v1.
- Now press control + P select dwg to pdf and select the paper size of ISO A3.
- Go to the preview option and see the drawing if it is ok press enter and save this pdf to skill lync folder named challenge 10.
Result:
- The above shown diagram is of Creating Challange 7 Plan and Section Layout ,Kitchen layout, sectional view of an Industrial Building in layout in AutoCad.
- A complete plan with proper section and Elevation is discussed above.
- And the Pdf of all three layout is attached in this file.