Creation of geometries by Coordinate system methods using AutoCad
AIM & Introduction: Creating the different geometries using coordinates system with the help of line tool and circle tool in Autocad.
Explanation: Autocad is a most commonly used drafting software, presently it is used in almost every field, in this project iam using using autocad to draft given geometries with the help of different tools and by using coordinate system,
Steps Which are required to starting a new drawing sheet in autocad:
- Start the Autocad application by selecting the App icon (Iam using Autocad 2019).
- Then window open which contain start drawing option select it.
- A drawing sheet will open as drawing 1 now go to commond tab and type startup and entre. and further type 1.
- After then go to app icon and select new drawing option (or directle ctrl N) it well open a tab in which it contains two option i.e., start from scrach in that imperial and metric is shown select imperial or metric any how i selected imperial.
- and dont worry about templete file just select use wizzard in which go for Advance setup.
- in which select the unit as u want, angle, angle measurement, and finally area that is 12x9 by default.
- Now your drawing sheet is opened as drawing 2 or other as per ur input and save the file where ever you want in app icon using save option.
There are different methods to create or draft geometries in autocad that are,
Coordinate System:
There are 3 types in coordinate system,
1. Absolute coordinates
2. Relative coordinates,
further Relative coordinates have two methods i.e.,
a. Relative rectangular coordinates.
b. Relative polar coordinates
3. Direct distance entry.
1. Absolute coordinates :
It is a type of coordinate system in which we use magnitude as well as direction of X and Y axis as require.
Procedure for drawing using absolute coordinate is listed below.
- Choose the line tool from ribbon > home> draw>line, or directly from tool bar, or by typing line in command tab.
- Specify the first point be (0,0) which is 0 in X and 0 in Y
- For next point type (2,0) which is 2 in X and 0 in Y (ensure that dynamic input button is not chosen)
- Example let as consider 10x10 unit sheet if you want to draw a square of side 3 unit and starting point will be (2,2)
- Then our first point be (2,2), next point be (5,2), (5,5), (2,5), C (closing the object)
2.a. Relative rectangular coordinates:
It is a type of coordinate system in which we use magnitude as well as direction of X and Y axis as require.
Procedure for drawing using Relative rectangular coordinate is listed below.
- Choose the line tool from ribbon > home> draw>line, or directly from tool bar, or by typing line in command tab.
- Specify the first point be (0,0) which is 0 in X and 0 in Y
- For next point the coordinate be (@3,0) which means @3 means magnitude of line in X direction and 0 represent Y.
- Example let as consider 10x10 unit sheet if you want to draw a square of side 3 unit and starting point will be (2,2)
- Then our first point be (2,2), next point be (@3,0), (@3,3), (@-3,0), C (closing the object)
2.b. Relative polar coordinates.
It is a type of coordinate system in which we use magnitude of X and direction of Y axis as require.
Procedure for drawing using Relative polar coordinate is listed below.
- Choose the line tool from ribbon > home> draw>line, or directly from tool bar, or by typing line in command tab.
- In this system if we select east as starting point in angle measurement while setuping a drawing sheet then 0 means positive X 180 means negitive X 90 means positive Y and 270 means negitive Y.
- Specify the first point be (0,0) which is 0 in X and 0 in Y
- For next point the coordinate be (@3<30) which means @3 means magnitude of line in X direction and 30 represent direction of Y.
- Example let as consider 10x10 unit sheet if you want to draw a square of side 3 unit and starting point will be (2,2)
- Then our first point be (2,2), next point be (@3<0), (@3<90), (@3<180), C (closing the object)
3. Direct distance entry:
It is a common method to draw, in this method using a line tool selecting a starting point further for the next point we need to drag the line directly with the help of mouse in desired direction by putting required magnitude.
Challenge examples
Question P1.
Steps to be followed:
- Absolute coordinates: Type L in command, type starting point (2,1), next point (8,1), next point (8,2), next point (3,2), next point (3,6), next point (8,6), next point (8,7), next point (2,7), C (closing the object).
- Relative rectangular coordinates:Type L in command, type starting point (2,1), next point (@6,0), next point (@1,1), next point (@-5,0), next point (@4,4), next point (@5,0), next point (@1,1), next point (@-6,0), C (closing the object).
- Relative polar coordinates:Type L in command, type starting point (2,1), next point (@6,0), next point (@1,90), next point (@5,180), next point (@4,90), next point (@5,0), next point (@1,90), next point (@6,180), C (closing the object).
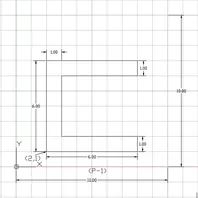
Question P2.
Steps to be followed:
- Absolute coordinates: Type L in command, type starting point (2,1), next point (5,1), next point (5,5), next point (6,5), next point (6,1), next point (9,1), next point (7,8), next point (4,8), C (closing the object).
- Relative rectangular coordinates:Type L in command, type starting point (2,1), next point (@3,0), next point (@4,4), next point (@1,0), next point (@4,-4), next point (@3,0), next point (7,8), next point (@-3,0), C (closing the object).
- Relative polar coordinates:Type L in command, type starting point (2,1), next point (@3,0), next point (@4,90), next point (@1,0), next point (@4,270), next point (@3,0), next point (7,8), next point (@3,180), C (closing the object).
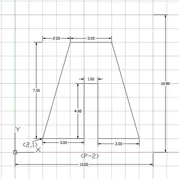
Question P4.
Steps to be followed:
- Absolute coordinates: Type L in command, type starting point (2,1), next point (3,1), next point (3,5), next point (5,3), next point (7,5), next point (7,1), next point (8,1), next point (8,8), next point (7,8), next point (5,5), next point (3,8), next point (2,8), C (closing the object).
- Relative rectangular coordinates:Type L in command, type starting point (2,1), next point (@1,0), next point (@4,4), next point(5,3), next point (7,5), next point (@4,-4), next point (@1,0), next point (@7,7), next point (@-1,0), next point (5,5), next point (3,8), next point (@-1,0), C (closing the object).
- Relative polar coordinates:Type L in command, type starting point (2,1), next point (@1,0), next point (@4,90), next point (@2.828,315), next point (@2.828,45), next point (@4,270), next point (@1,0), next point (@7,90), next point (@1,180), next point (@4.24,225), next point (@4.24,135), next point (@1,180), C (closing the object).
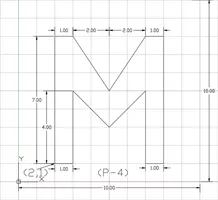
Question P5.
Steps to be followed:
- Absolute coordinates: Type L in command, type starting point (2,1), next point (3,1), next point (3,8), next point (8,8), next point (8,2), next point (5,2), next point (5,1), next point (9,1), next point (9,9), next point (2,9), C (closing the object).
- Relative rectangular coordinates:Type L in command, type starting point (2,1), next point (@1,0), next point (@7,7), next point(@5,0), next point (@6,-6), next point (@-3,0), next point (@1,-1), next point (@4,0), next point (@8,8), next point (@-7,0), C (closing the object).
- Relative polar coordinates:Type L in command, type starting point (2,1), next point (@1,0), next point (@7,90), next point (@5,0), next point (@6,270), next point (@3,180), next point (@1,270), next point (@4,0), next point (@8,90), next point (@7,180), C (closing the object)
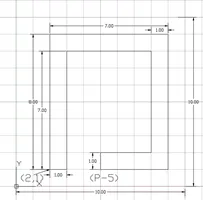
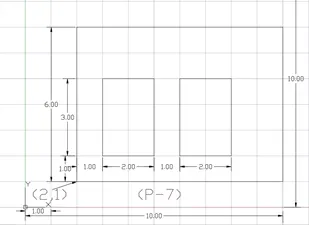
Question P7.
Steps to be followed:
- Absolute coordinates: Type L in command, type starting point (2,1), next point (10,1), next point (10,7), next point (2,7), next point (2,1), next point (3,2), next point (5,2), next point (5,5), next point (3,5), next point (3,2), next point (6,2), next point (8,2), next point (8,5), next point (6,5), C (closing the object).
- Relative rectangular coordinates:Type L in command, type starting point (2,1), next point (@10,0), next point (@6,6), next point(@-10,0), next point (@6,-6), next point (3,2), next point (@2,0), next point (@3,3), next point (@-2,0), next point (@3,-3), next point (6,2), next point (@2,0), next point (@3,3), next point (@-2,0), C (closing the object).
- Relative polar coordinates:Type L in command, type starting point (2,1), next point (@10,0), next point (@6,90), next point(@10,180), next point (@6,270), next point (3,2), next point (@2,0), next point (@3,90), next point (@2,180), next point (@3,270), next point (6,2), next point (@2,0), next point (@3,90), next point (@2,180), C (closing the object).
Question P8.
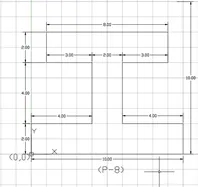
Steps to be followed:
- Absolute coordinates: Type L in command, type starting point (0,0), next point (10,0), next point (10,2), next point (6,2), next point (6,6), next point (9,6), next point (9,8), next point (1,8), next point (1,6), next point (4,6), next point (4,2), next point (0,2), C (closing the object).
- Relative rectangular coordinates:Type L in command, type starting point (0,0), next point (@10,0), next point (@2,2), next point(@-4,0), next point (@4,4), next point (@3,0), next point (@2,2), next point (@-8,0), next point (@2,-2), next point (3,0), next point (@4,-4), next point (@-4,0), C (closing the object).
- Relative polar coordinates:Type L in command, type starting point (0,0), next point (@10,0), next point (@2,90), next point (@4,180), next point (@4,90), next point (@3,0), next point (@2,90), next point (@8,180), next point (@2,270), next point (@3,0), next point (@4,270), next point (@4,180), C (closing the object).
Question P10.
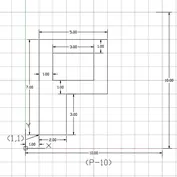
Steps to be followed:
- Absolute coordinates: Type L in command, type starting point (1,1), next point (3,1), next point (3,4), next point (6,4), next point (6,8), next point (1,8), next point (1,1), next point (2,5), next point (5,5), next point (5,7), next point (2,7), C (closing the object).
- Relative rectangular coordinates:Type L in command, type starting point (1,1), next point (@2,0), next point (@3,3), next point(@3,0), next point (@4,4), next point (@-5,0), next point (@7,-7), next point (2,5), next point (@3,0), next point (@2,2), next point (@-3,0), C (closing the object).
- Relative polar coordinates:Type L in command, type starting point (1,1), next point (@2,0), next point (@3,90), next point (@3,0), next point (@4,90), next point (@5,180), next point (@7,270), next point (2,5), next point (@3,0), next point (@2,90), next point (@3,180), C (closing the object).
Similarly P-9, profile wood, Queen post truss and mono pitch are attached below,
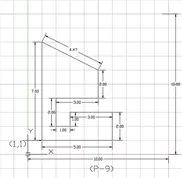
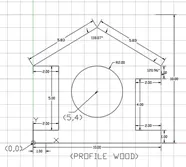
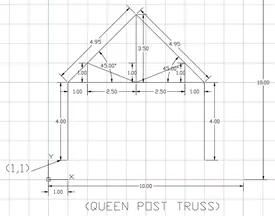
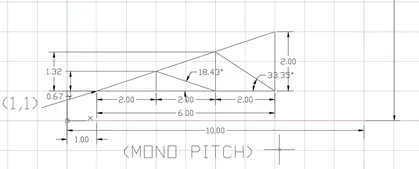
This is how we actually created the geometris by using coordinates system.
-------------------------------------------------------------------------------------------------------------------------------------------------------------
END