Creation of geometries by Coordinate system methods using AutoCad
Aim:
By using the all-co-ordinate system to create the geometry with the help of line command in AutoCAD.
Introduction:
AutoCAD is a software which is commercial Computer-Aided Design (CAD) and drafting tool application. Co-ordinate system, there are 4 coordinate systems which are used in AutoCAD.
- Absolute Coordinate System- This system used when you know the precise X and Y values of the point. Absolute coordinates refer to a Cartesian System that uses x-axis, y-axis to establish the location of points. The value always counts form origin.
- Relative Rectangular Coordinate System- A relative rectangular coordinate allows you to specify a position along the X- axis and Y-axis, to locate a point relative to the last point you specified.
- Relative Polar Coordinate System- Polar coordinates are used when you need to draw the next points at a specific angle. Polar coordinates system in AutoCAD specifies distance length at which angle.
- Direct Distance Entry- This system is used when you know all the distances between all the points. i.e., by entering the distance of the second point from first point and so on.
- For imperial template type in command bar STARTUP then press enter and give the value 1 then press enter.
- For decimal unit type in command bar UN then press enter select decimal with precision 0.0 and feet.
Procedure:
Absolute Coordinate System for P1&P2-
For absolute coordinate system keep dynamic input off.
|
P1 |
P2 |
|
Type L for line command by pressing enter then type coordinate 2,1 enter |
Type L for line command by pressing enter then type coordinate 2,1 enter |
|
specify next coordinate 8,1 |
specify next coordinate 5,1 |
|
specify next coordinate 8,2 |
specify next coordinate 5,5 |
|
specify next coordinate 3,2 |
specify next coordinate 6,5 |
|
specify next coordinate 3,6 |
specify next coordinate 6,1 |
|
specify next coordinate 8,6 |
specify next coordinate 9,1 |
|
specify next coordinate 8,7 |
specify next coordinate 7,8 |
|
specify next coordinate 2,7 |
specify next coordinate 4,8 |
|
specify next coordinate 2,1 or C enter for close |
specify next coordinate 2,1 or C enter for close |
Relative Rectangular Coordinate System for P1&P2-
For relative rectangular coordinate system keep dynamic input on.
|
P1 |
P2 |
|
Type L for line command by pressing enter then type coordinate 2,1 enter |
Type L for line command by pressing enter then type coordinate 2,1 enter |
|
specify next coordinate @6,0 |
specify next coordinate @3,0 |
|
specify next coordinate @0,1 |
specify next coordinate @0,4 |
|
specify next coordinate @-5,0 |
specify next coordinate @1,0 |
|
specify next coordinate @0,4 |
specify next coordinate @0, -4 |
|
specify next coordinate @5,0 |
specify next coordinate @3,0 |
|
specify next coordinate @0,1 |
specify next coordinate @-2,7 |
|
specify next coordinate @-6,0 |
specify next coordinate @-3,0 |
|
specify next coordinate @0, -6 or C enter for close |
specify next coordinate @-2, -7 or C enter for close |
Relative Polar Coordinate System for P1&P2-
Keep dynamic input on
|
P1 |
P2 |
|
Type L for line command by pressing enter then type coordinate 2,1 enter |
Type L for line command by pressing enter then type coordinate 2,1 enter |
|
specify next coordinate @6<0 |
specify next coordinate @3<0 |
|
specify next coordinate @1<90 |
specify next coordinate @4<90 |
|
specify next coordinate @5<180 |
specify next coordinate @1<0 |
|
specify next coordinate @4<90 |
specify next coordinate @4<270 |
|
specify next coordinate @5<0 |
specify next coordinate @3<0 |
|
specify next coordinate @1<90 |
specify next coordinate @7<106 |
|
specify next coordinate @6<180 |
specify next coordinate @3<180 |
|
specify next coordinate @6<270 or C enter for close |
specify next C enter for close |
Direct Distance Entry for P1&P2-
|
P1 |
P2 |
|
Type L for line command by pressing enter then type coordinate 2,1 enter |
Type L for line command by pressing enter then type coordinate 2,1 enter |
|
Move cursor right side 6 enter |
Move cursor right side 3 enter |
|
Move cursor upside 1 enter |
Move cursor upside 4 enter |
|
Move cursor left side 5 enter |
Move cursor right side 1 enter |
|
Move cursor upside 4 enter |
Move cursor downside 4 enter |
|
Move cursor right side 5 enter |
Move cursor right side 3 enter |
|
Move cursor upside 1 enter |
Move cursor upside 7<106 enter |
|
Move cursor left side 6 enter |
Move cursor left side 3 enter |
|
Move cursor downside 6 enter or C enter for close |
Move cursor down side, pick start point or C enter for close |
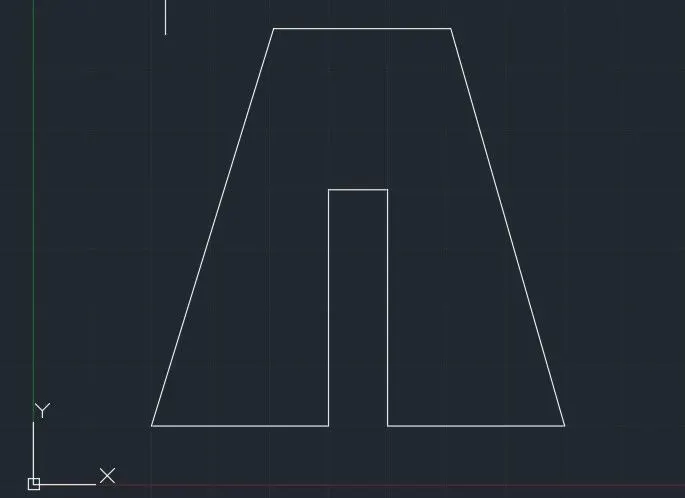
Result-
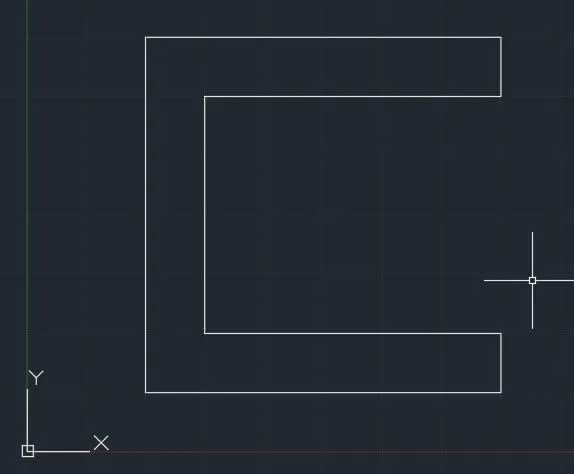 .
. 
P4-
Procedure-
Activate line command by pressing L then enter
Type coordinate 2,1 enter
Specify next point @1,0
Specify next point @0,4
Specify next point @2, -2
Specify next point @2,2
Specify next point @0, -4
Specify next point @1,0
Specify next point @0,7
Specify next point @-1,0
Specify next point @-2, -3
Specify next point @-2,3
Specify next point @-1,0
Specify next point @0, -7
Result-
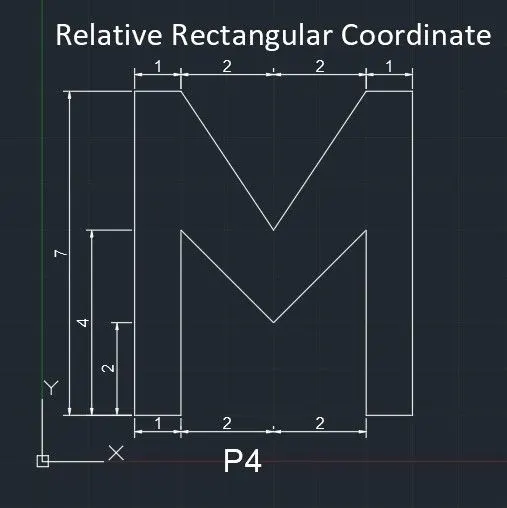
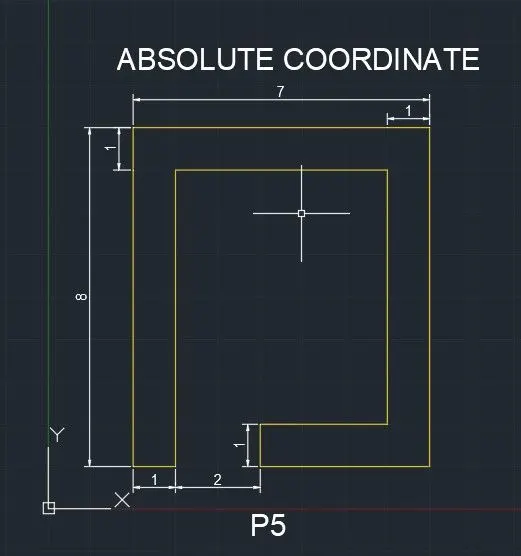
P5-
Procedure-
Activate line command by pressing L then enter
Type coordinate 2,1 enter
Specify next point 2,1
Specify next point 3,1
Specify next point 3,8
Specify next point 8,8
Specify next point 8,2
Specify next point 5,2
Specify next point 5,1
Specify next point 9,1
Specify next point 9,9
Specify next point 2,9
Specify next point 2,1 or C enter close
Result-
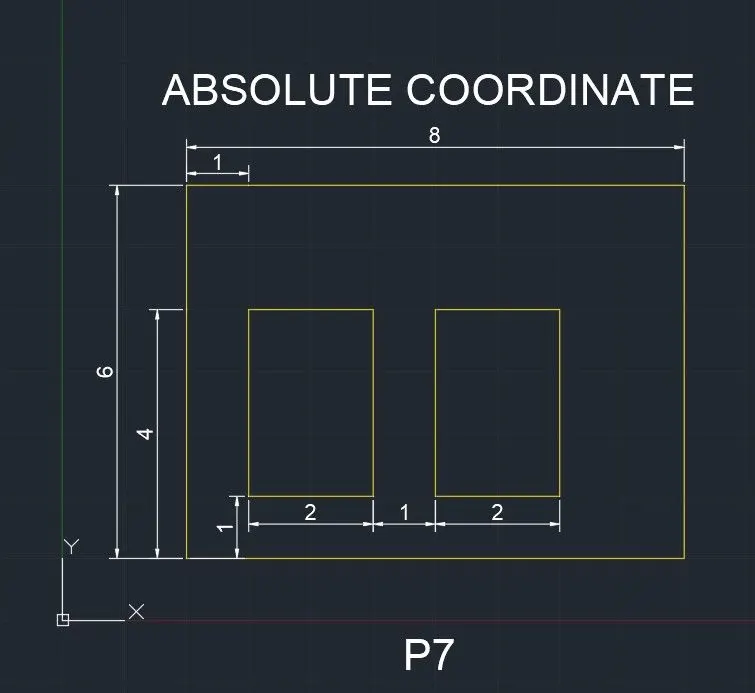
P7-
Procedure-
Activate line command by pressing L then enter
Type coordinate 2,1 enter
Specify next point 10,1
Specify next point 10,7
Specify next point 2,7
Specify next point C for close
L enter specify first point 3,2
Specify next point 5,2
Specify next point 5,5
Specify next point 3,5
Specify next point C for close
L enter specify first point 6,2
Specify next point 8,2
Specify next point 8,5
Specify next point 6,5
Specify next point C enter close
Result-
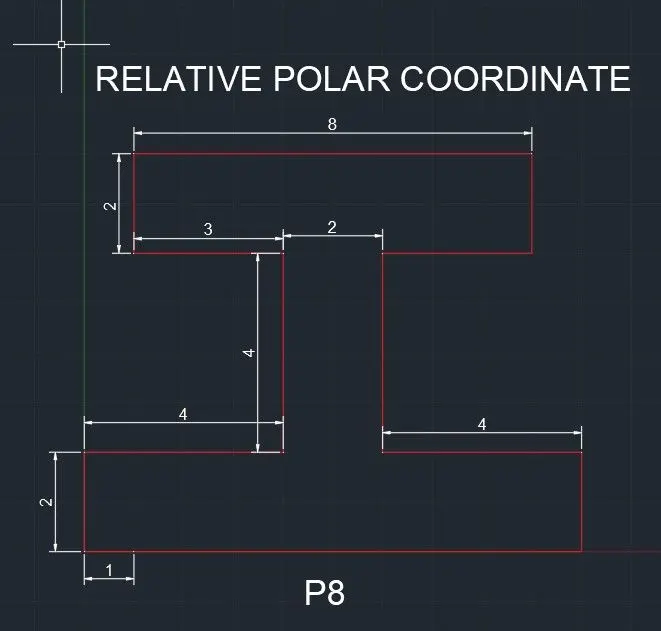
P7-
Procedure-
Activate line command by pressing L then enter
Type coordinate 0,0 enter
specify next coordinate @2<90
specify next coordinate @4<0
specify next coordinate @4<90
specify next coordinate @3<180
specify next coordinate @2<90
specify next coordinate @8<0
specify next coordinate @2<270
specify next coordinate @3<180
specify next coordinate @4<270
specify next coordinate @4<0
specify next coordinate @2<270
specify next coordinate @10<180 or C enter close.
Result-
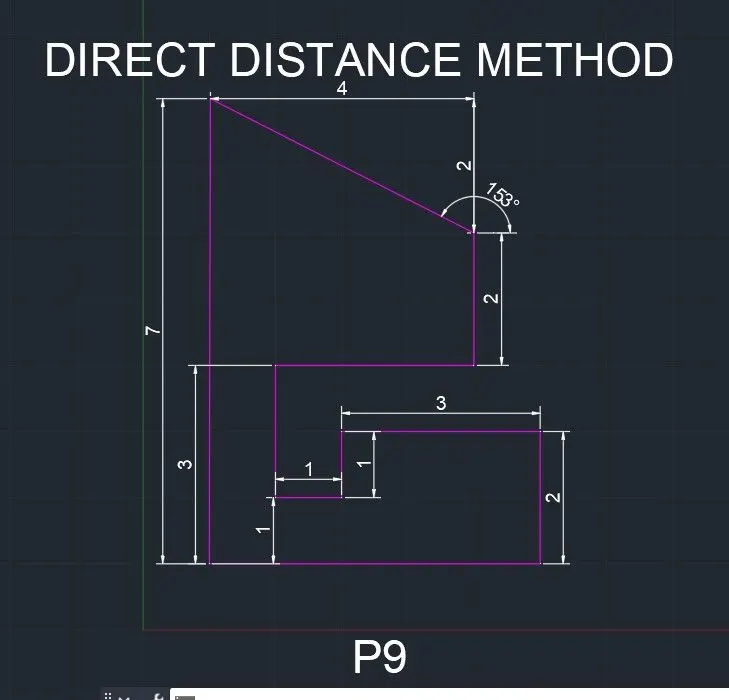
P9-
Procedure-
Activate line command by pressing L then enter
Type coordinate 1,1 enter
Move cursor right side 5 enter
Move cursor upside 2 enter
Move cursor left side 3 enter
Move cursor down side 1 enter
Move cursor left side 1 enter
Move cursor upside 2 enter
Move cursor right side 3 enter
Move cursor upside 2 enter
Move cursor left side 4.47<153 enter
Move cursor down side 7 enter or C enter close
Result-
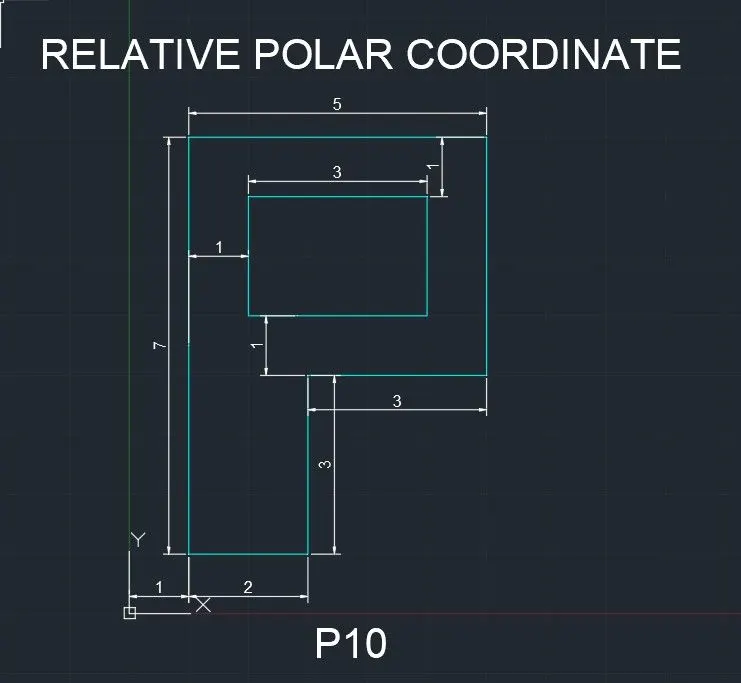
P10-
Procedure-
Activate line command by pressing L then enter
Type coordinate 1,1 enter
specify next coordinate @2<0
specify next coordinate @3<90
specify next coordinate @3<0
specify next coordinate @4<90
specify next coordinate @5<180
specify next coordinate @7<270 or C enter close
L enter specify first point 2,5 enter
specify next coordinate @3<0
specify next coordinate @2<90
specify next coordinate @3<180
specify next coordinate @2<270 or C enter close.
Result-
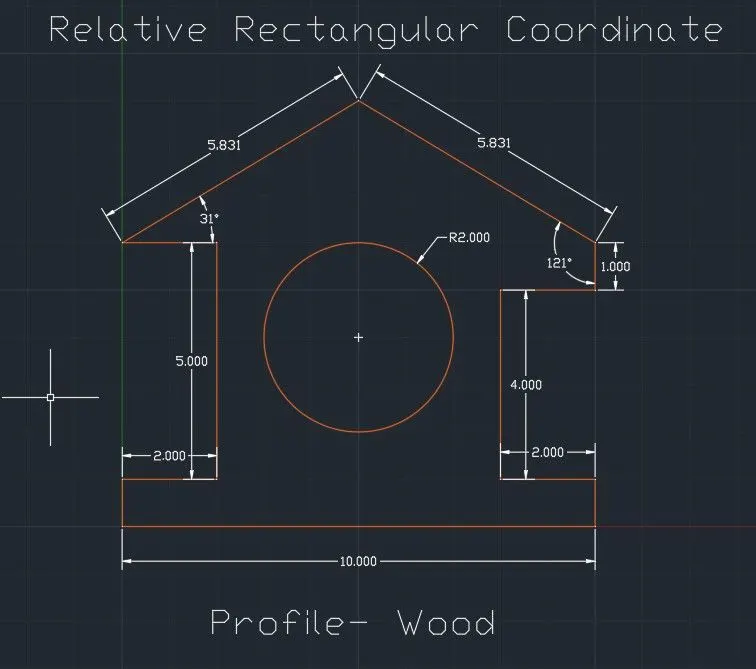
WOOD-
Procedure-
Activate line command by pressing L then enter
Type coordinate 0,0 enter
Specify next point @10,0
Specify next point @0,1
Specify next point @-2,0
Specify next point @0,4
Specify next point @2,0
Specify next point @0,1
Specify next point @5.831<149
Specify next point @5.831<211
Specify next point @2,0
Specify next point @0, -5
Specify next point @-2,0
Specify next point @0, -1 or C enter for close
C enter for circle put coordinate 5,4 enter and give circle radius 2 enter
Result-
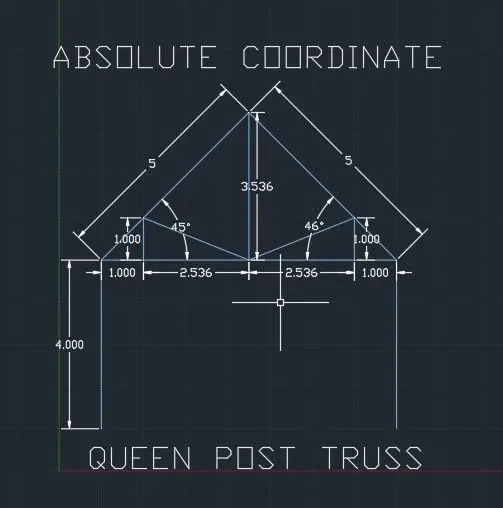
QUEEN POST TRUSS-
Procedure-
Take line command by pressing L then enter
Type coordinate 1,1 enter
Specify next point 1,5
Specify next point 4.536,8.536
Specify next point 8,5
Specify next point 8,1
Press Esc key to exit line command
Take line command give coordinate 1,5 enter
Specify next point 8,5
Press Esc key to exit line command
Take again line command give coordinate 2,5 enter
Specify next point 2,6
Specify next point 4.536,5
Specify next point 7,6
Specify next point 7,5 enter enter
Take new line their coordinate 4.536,5
Specify next point 4.536,8.536 enter
Esc key to exit
Result-
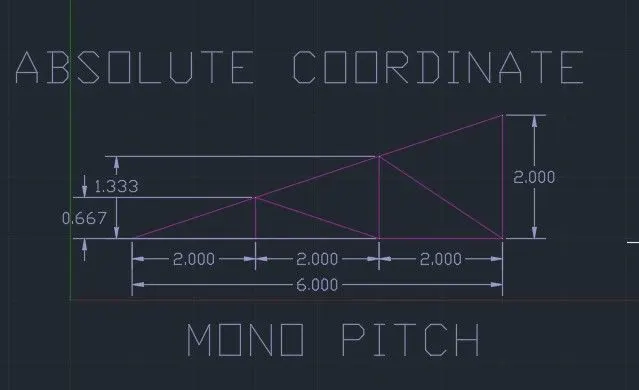
MONO PITCH-
Procedure-
Take line command by pressing L then enter
Type coordinate 1,1 enter
Specify next point 7,1
Specify next point 7,3
Press Esc key to exit line command
Take line command give coordinate 3,1 enter
Specify next point 3,1.667
Specify next point 5,1
Specify next point 5,2.333
Specify next point 7,1
Result-