Creation of geometries by Coordinate system methods using AutoCad
Aim:- Creation of geometries by Coordinate system methods using AutoCad
Objective:-
- To learn basic geometric designs used in building drawings.
- To get proficient in AutoCAD.
- Learn to read structural drawings, units and dimensions.
- To learn different co-ordinate systems in AutoCAD.
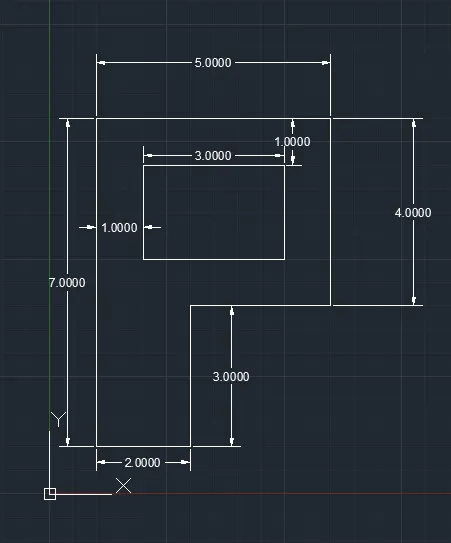
Steps for P-1 :-
- Using Absolute Co-ordinate System
- Select the line tool by entering LINE command.
- Specify the starting co-ordinate of point-1 as 2,1 in the command line.
- Specify the next co-ordinate of point-2 as 8,1 in the command line.
- Specify the next co-ordinate of point-3 as 8,2 in the command line.
- Specify the next co-ordinate of point-4 as 3,2 in the command line.
- Specify the next co-ordinate of point-5 as 3,6 in the command line.
- Specify the next co-ordinate of point-6 as 8,6 in the command line.
- Specify the next co-ordinate of point-7 as 8,7 in the command line.
- Specify the next co-ordinate of point-8 as 2,7 in the command line.
- Click Close on the command line to finish the figure.
- Select DIMLINEAR on the command line and mark the dimensions.
Results:-
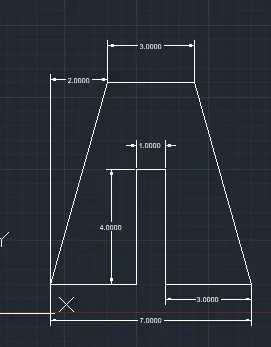
Steps for P-2 :-
- Using Absolute Co-ordinate System
- Select the line tool by entering LINE command.
- Specify the starting co-ordinate of point-1 as 2,1 in the command line.
- Specify the next co-ordinate of point-2 as 5,1 in the command line.
- Specify the next co-ordinate of point-3 as 5,5 in the command line.
- Specify the next co-ordinate of point-4 as 6,5 in the command line.
- Specify the next co-ordinate of point-5 as 6,1 in the command line.
- Specify the next co-ordinate of point-6 as 9,1 in the command line.
- Specify the next co-ordinate of point-7 as 7,8 in the command line.
- Specify the next co-ordinate of point-8 as 4,8 in the command line.
- Click Close on the command line to finish the figure.
- Select DIMLINEAR on the command line and mark the dimensions.
Results:-
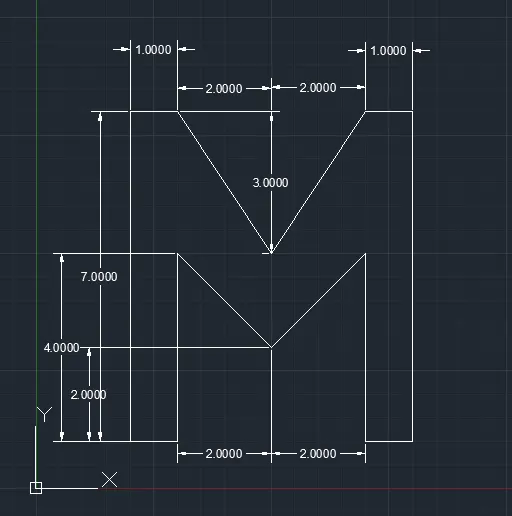
Steps for P-3 :-
- Using Absolute Co-ordinate System
- Select the line tool by entering LINE command.
- Specify the starting co-ordinate of point-1 as 2,1 in the command line.
- Specify the next co-ordinate of point-2 as 3,1 in the command line.
- Specify the next co-ordinate of point-3 as 3,5 in the command line.
- Specify the next co-ordinate of point-4 as 5,3 in the command line.
- Specify the next co-ordinate of point-5 as 7,5 in the command line.
- Specify the next co-ordinate of point-6 as 8,1 in the command line.
- Specify the next co-ordinate of point-7 as 8,8 in the command line.
- Specify the next co-ordinate of point-8 as 7,8 in the command line.
- Specify the next co-ordinate of point-9 as 5,5 in the command line.
- Specify the next co-ordinate of point-10 as 3,8 in the command line.
- Specify the next co-ordinate of point-11 as 2,8 in the command line.
- Click Close on the command line to finish the figure.
- Select DIMLINEAR on the command line and mark the dimensions.
Results:-
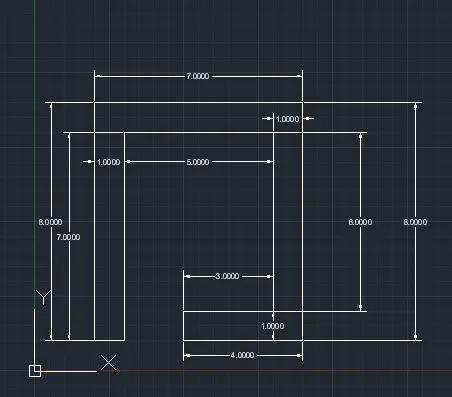
Steps for P-4 :-
- Using Absolute Co-ordinate System
- Select the line tool by entering LINE command.
- Specify the starting co-ordinate of point-1 as 2,1 in the command line.
- Specify the next co-ordinate of point-2 as 3,1 in the command line.
- Specify the next co-ordinate of point-3 as 3,8 in the command line.
- Specify the next co-ordinate of point-4 as 8,8 in the command line.
- Specify the next co-ordinate of point-5 as 8,2 in the command line.
- Specify the next co-ordinate of point-6 as 5,2 in the command line.
- Specify the next co-ordinate of point-7 as 5,1 in the command line.
- Specify the next co-ordinate of point-8 as 9,1 in the command line.
- Specify the next co-ordinate of point-9 as 9,9 in the command line.
- Specify the next co-ordinate of point-10 as 2,9 in the command line.
- Click Close on the command line to finish the figure.
- Select DIMLINEAR on the command line and mark the dimensions.
Results:-
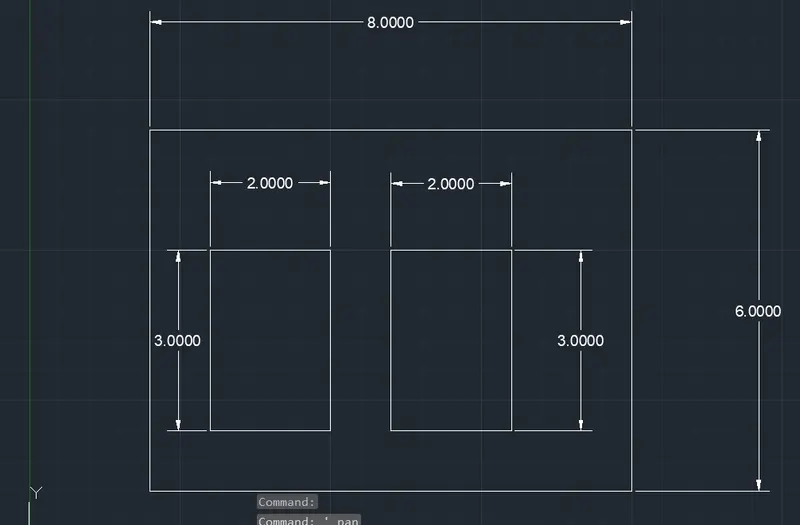
Steps for P-5 :-
- Using Absolute Co-ordinate System
- Select the line tool by entering LINE command.
- Specify the starting co-ordinate of point-1 as 2,1 in the command line.
- Specify the next co-ordinate of point-2 as 10,1 in the command line.
- Specify the next co-ordinate of point-3 as 10,7 in the command line.
- Specify the next co-ordinate of point-4 as 2,7 in the command line.
- Click Close on the command line to finish the figure.
- Then, specify the next co-ordinate of point-5 as 3,2 in the command line.
- Specify the next co-ordinate of point-6 as 5,2 in the command line.
- Specify the next co-ordinate of point-7 as 5,5 in the command line.
- Specify the next co-ordinate of point-8 as 3,5 in the command line.
- Click Close on the command line to finish the figure.
- Then, specify the next co-ordinate of point-9 as 6,2 in the command line.
- Specify the next co-ordinate of point-10 as 8,2 in the command line.
- Specify the next co-ordinate of point-11 as 8,5 in the command line.
- Specify the next co-ordinate of point-12 as 6,5 in the command line.
- Click Close on the command line to finish the figure.
- Select DIMLINEAR on the command line and mark the dimensions.
Results:-
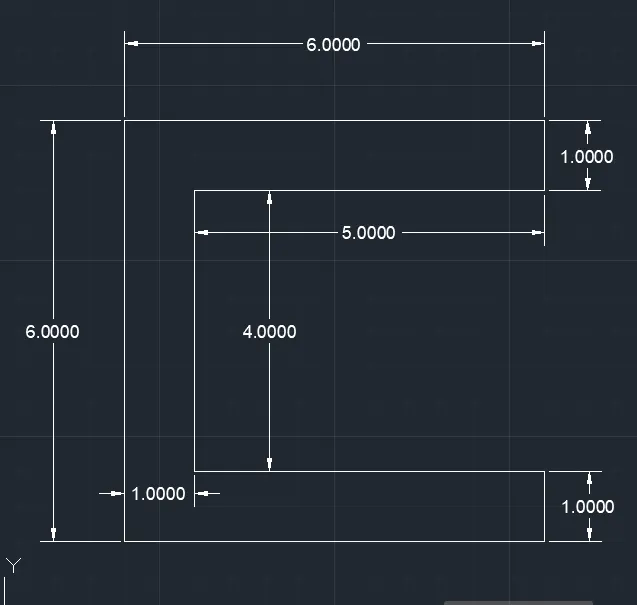
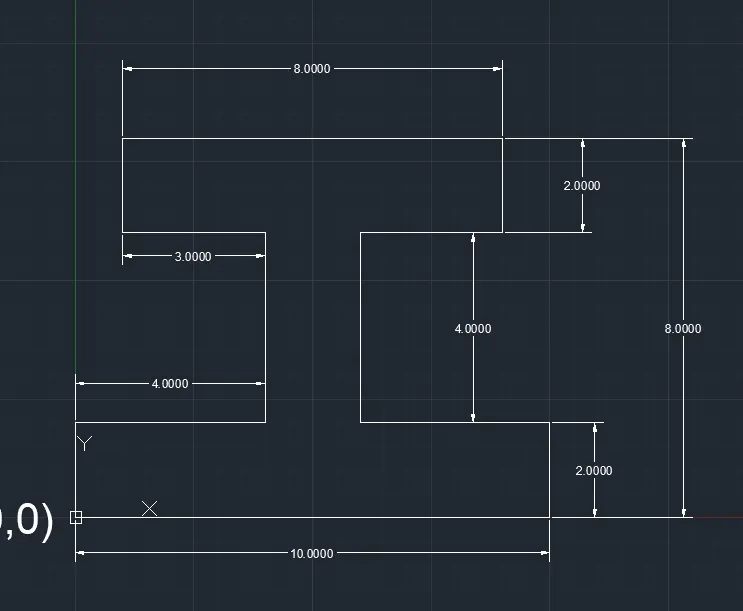
Steps for P-6 :-
- Using Absolute Co-ordinate System
- Select the line tool by entering LINE command.
- Specify the starting co-ordinate of point-1 as 0,0 in the command line.
- Specify the next co-ordinate of point-2 as 10,0 in the command line.
- Specify the next co-ordinate of point-3 as 10,2 in the command line.
- Specify the next co-ordinate of point-4 as 6,2 in the command line.
- Specify the next co-ordinate of point-5 as 6,6 in the command line.
- Specify the next co-ordinate of point-6 as 9,6 in the command line.
- Specify the next co-ordinate of point-7 as 9,8 in the command line.
- Specify the next co-ordinate of point-8 as 1,8 in the command line.
- Specify the next co-ordinate of point-9 as 1,6 in the command line.
- Specify the next co-ordinate of point-10 as 4,6 in the command line.
- Specify the next co-ordinate of point-11 as 4,4 in the command line.
- Specify the next co-ordinate of point-12 as 0,2 in the command line.
- Click Close on the command line to finish the figure.
- Select DIMLINEAR on the command line and mark the dimensions.
Results:-
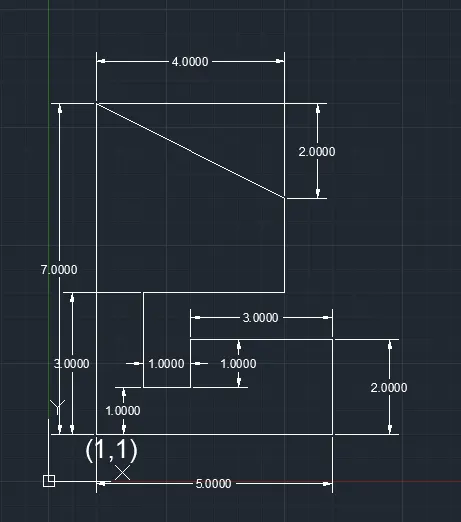
Steps for P-7 :-
- Using Absolute Co-ordinate System
- Select the line tool by entering LINE command.
- Specify the starting co-ordinate of point-1 as 1,1 in the command line.
- Specify the next co-ordinate of point-2 as 6,1 in the command line.
- Specify the next co-ordinate of point-3 as 6,3 in the command line.
- Specify the next co-ordinate of point-4 as 3,3 in the command line.
- Specify the next co-ordinate of point-5 as 3,2 in the command line.
- Specify the next co-ordinate of point-6 as 2,2 in the command line.
- Specify the next co-ordinate of point-7 as 2,4 in the command line.
- Specify the next co-ordinate of point-8 as 5,4 in the command line.
- Specify the next co-ordinate of point-9 as 5,6 in the command line.
- Specify the next co-ordinate of point-10 as 1,8 in the command line.
- Click Close on the command line to finish the figure.
- Select DIMLINEAR on the command line and mark the dimensions.
Results:-
Steps for P-8 :-
- Using Absolute Co-ordinate System
- Select the line tool by entering LINE command.
- Specify the starting co-ordinate of point-1 as 1,1 in the command line.
- Specify the next co-ordinate of point-2 as 3,1 in the command line.
- Specify the next co-ordinate of point-3 as 3,4 in the command line.
- Specify the next co-ordinate of point-4 as 6,4 in the command line.
- Specify the next co-ordinate of point-5 as 6,8 in the command line.
- Specify the next co-ordinate of point-6 as 1,8 in the command line.
- Specify the next co-ordinate of point-7 as 2,4 in the command line.
- Click Close on the command line to finish the figure.
- Then, specify the next co-ordinate of point-8 as 2,5 in the command line.
- Specify the next co-ordinate of point-9 as 5,5 in the command line.
- Specify the next co-ordinate of point-10 as 5,7 in the command line.
- Specify the next co-ordinate of point-10 as 2,7 in the command line.
- Click Close on the command line to finish the figure.
- Select DIMLINEAR on the command line and mark the dimensions.
Results:-
Steps for Profile-Wood :-
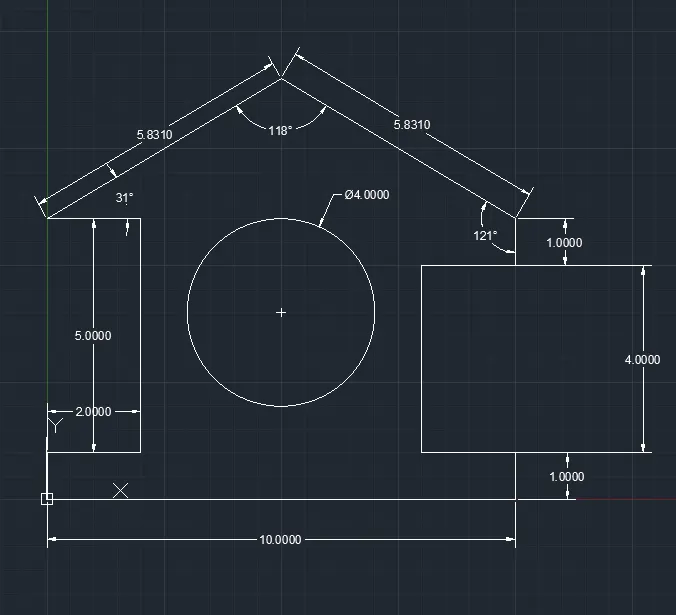
- Using Absolute Co-ordinate System
- Select the line tool by entering LINE command.
- Specify the starting co-ordinate of point-1 as 0,0 in the command line.
- Specify the next co-ordinate of point-2 as 10,0 in the command line.
- Specify the next co-ordinate of point-3 as 10,1 in the command line.
- Specify the next co-ordinate of point-4 as 8,1 in the command line.
- Specify the next co-ordinate of point-5 as 8,5 in the command line.
- Specify the next co-ordinate of point-6 as 10,5 in the command line.
- Specify the next co-ordinate of point-7 as 10,6 in the command line.
- Specify the next co-ordinate of point-8 as 5,9 in the command line.
- Specify the next co-ordinate of point-9 as 0,6 in the command line.
- Specify the next co-ordinate of point-10 as 2,6 in the command line.
- Specify the next co-ordinate of point-11 as 2,1 in the command line.
- Specify the next co-ordinate of point-12 as 0,1 in the command line.
- Click Close on the command line to finish the figure.
- Then, select the circle tool by entering CIRCLE command.
- Specify the center co-ordinate of point-9 as 5,4 in the command line.
- Then, select 2P from the command line.
- Specify the next co-ordinate of point-13 as 3,4 in the command line.
- Specify the next co-ordinate of point-14 as 7,4 in the command line.
- Press Enter
- Select DIMLINEAR on the command line and mark the dimensions.
Results:-
Steps for Queen-Post Truss :-
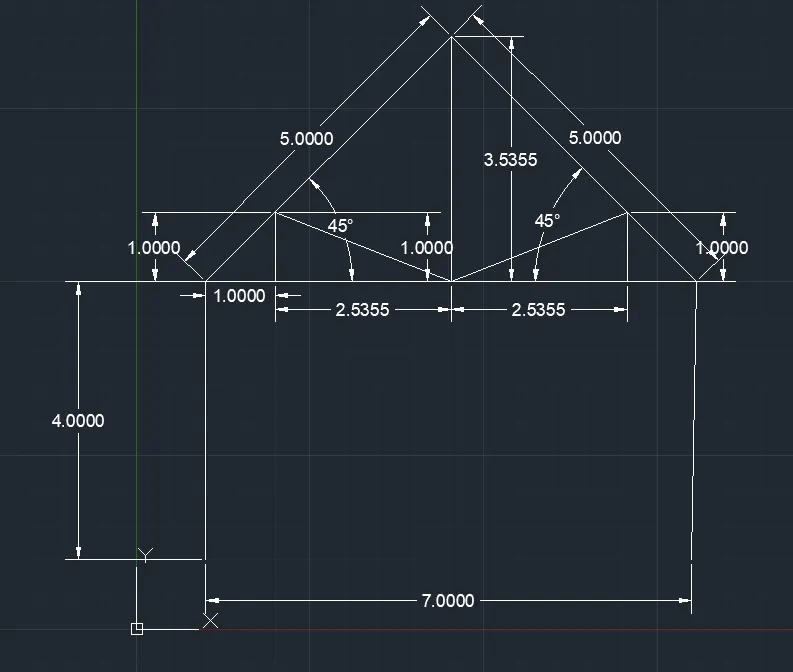
- Using Relative Polar Co-ordinate System
- Select the line tool by entering LINE command.
- Specify the starting co-ordinate of point-1 as 1,1 in the command line.
- Specify the next co-ordinate of point-2 as 1,5 in the command line.
- Specify the next co-ordinate of line @5<45 degrees in the command line.
- Specify the next co-ordinate of line @5<315 degrees in the command line.
- Specify the next co-ordinate of point-3 as 8,1 in the command line.
- Escape.
- Select the line tool by entering LINE command
- Click on point-2.
- Specify the next co-ordinate of point-4 as 1,5 in the command line.
- Specify the next co-ordinate of point-5 as 2,5 in the command line.
- Specify the next co-ordinate of point-6 as 2,6 in the command line.
- Escape
- Select the line tool by entering LINE command.
- Click on point-3.
- Specify the next co-ordinate of point-7 as 8,5 in the command line.
- Specify the next co-ordinate of point-8 as 7,5 in the command line.
- Specify the next co-ordinate of point-9 as 7,6 in the command line.
- Select the line tool by entering LINE command.
- Click on point-5 and extend it to point-8.
- Again select the line tool and click at the top-edge of the figure, then extend it vertically downwards to join the line at midpoint. Escape.
- Again select the line tool and click on point-6 and join the midpoint diagonally.
- Again Select the line tool and click on point-9 and join the midpoint diagonally.
- Select DIMLINEAR, DIMALIGN and DIMANGULAR on the command line and mark the dimensions.
Results:-
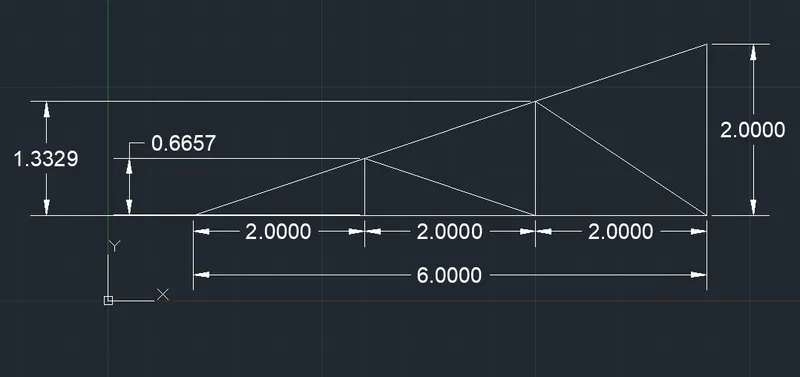
Steps for Mono Pitch :-
- Using Absolute Co-ordinate System
- Select the line tool by entering LINE command.
- Specify the starting co-ordinate of point-1 as 1,1 in the command line.
- Specify the next co-ordinate of point-2 as 3,1 in the command line.
- Specify the next co-ordinate of point-3 as 5,1 in the command line.
- Specify the next co-ordinate of point-4 as 7,1 in the command line.
- Specify the next co-ordinate of point-5 as 7,3 in the command line.
- Click on Close.
- Select the line tool by entering LINE command.
- Specify the next co-ordinate of point-6 as 3,1- in the command line.
- Then extend the line vertically upwards and left click where the line intersects the hypotenuse of the bigger triangle.
- Specify the next co-ordinate of point-7 as 5,1 in the command line.
- Then extend the line vertically upwards and left click where the line intersects the hypotenuse of the bigger triangle.
- Specify the next co-ordinate of point-8 as 7,1 in the command line.
- Escape.
- Select DIMLINEAR on the command line and mark the dimensions.
Results:-