Creation of geometries by Coordinate system methods using AutoCad
Aim :- To create the geometries from P1 to P10 using line tool and all the coordinates system methods.
Introduction :-
Line Tool : The line in AutoCAD is drawn by specifying the starting and ending point through the cursor.
To invoke a line tool
1. Command : L or Line
2. From Ribbon : Line
Cordinate System : There are two coordinate systems in AutoCAD.
1. World Coordinate System (WCS)
2. User Coordinate System (UCS)
• User Cordinate System :- which define the angle of the XY plane you are working in.
• World Cordinate System :- The WCS should always be used to reference geometry to ensure everything aligns to the centre of a file in real-world location.
Erase Tool :- The erase command is used to remove or delete objects from the drawing.
To invoke a erase tool
1. Command : E or Erase
2. Ribbon : Erase tool.
Arc Tool : To create an arc, you can specify combinations of center, endpoint, start point, radius, angle, chord length, and direction values. Arcs are drawn in a counterclockwise direction by default.
To invoke a arc tool
1. Tool Set: Drafting tab > Draw panel > Arc drop-down.
2. Menu: Draw > Arc
3. Command : Arc
Procedure :-
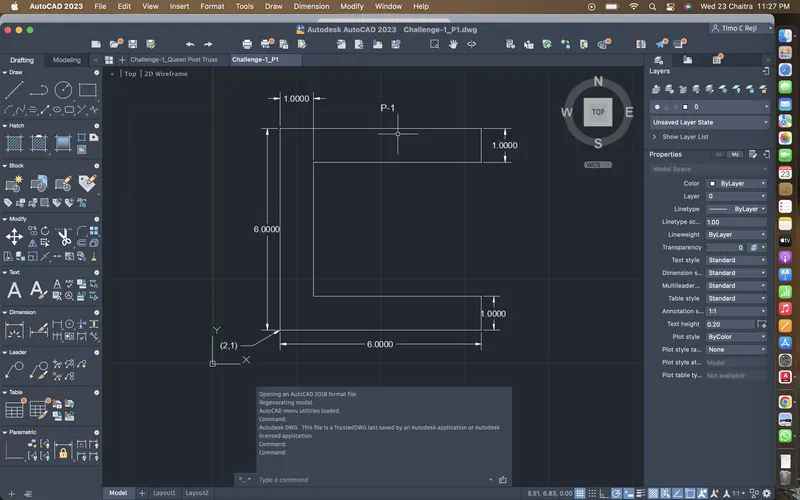
• P1 Geometry
1. Create a new page from the application Menu.
2. Choose acad.dwt template from the drop down menu for imperial and decimal values.
3. Use the command type l for invoking line tool.
4. Type in command line (2,1). A start point will be selected at cordinate (2,1) in X-Y plane.
5. Now type Cordinate (8,1) to get a line in X-Y plane.
6. Now type Cordinate (8,2) in the line command. A vertical line is created of 1 Units.
7. Again type Cordinate (3,2) in the command for drawing another line.
8. Again repeat the above step for Cordinate ( 8,6); (8,7); (2,7).
9. Type c to closs the line and now press escape key for exiting the line command.
RESULT :-
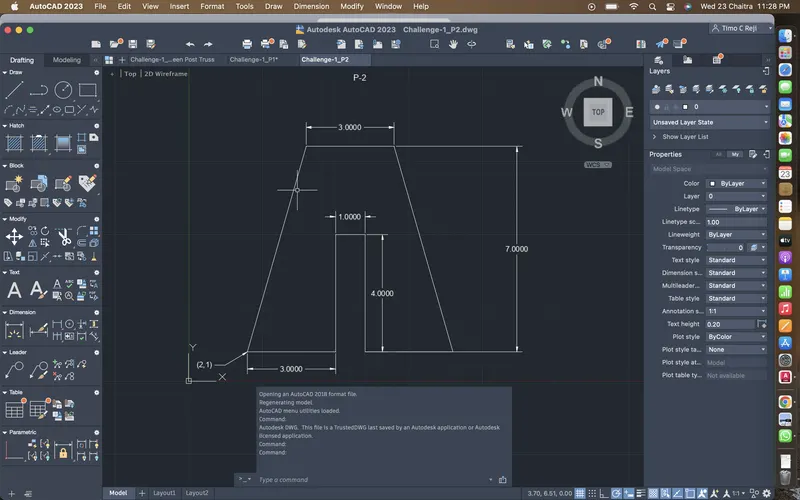
• P2 Geometry
1. Create a new page from the application Menu.
2. Choose acad.dwt template from the drop down menu for imperial and decimal values.
3. Using the command type l for invoking line tool.
4. Now type Cordinate ( 2,1) for the starting point.
5. Now type (5,1) for the second point to create a horizontal line from the starting point.
6. Repeat the above step 5 with the cordinate (5,5) ; (6,5) ; (6,1) ; (9,1) ; (7,8) ; (4,8) in the same order.
7. Type c to close the geometry and press the esc key to exit the line command.
RESULT :-
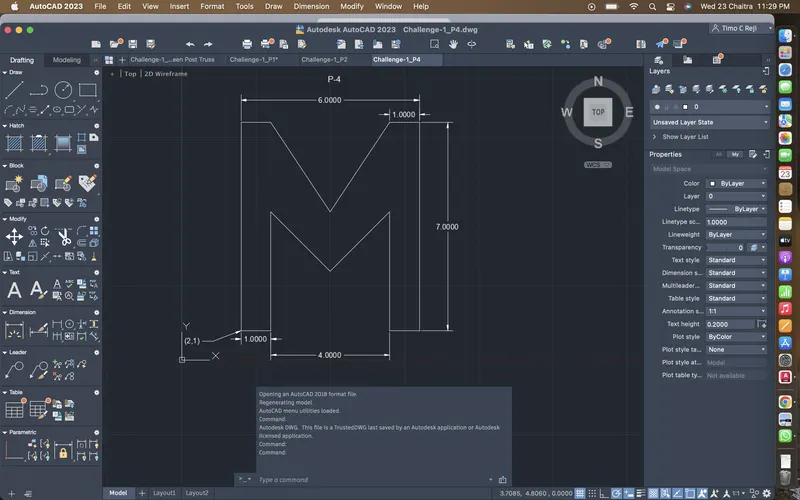
• P4 Geometry
1. Create a new page from the application Menu.
2. Choose acad.dwt template from the drop down menu for imperial and decimal values.
3. Using the command type l for invoking line tool.
4. Now type Cordinate (2,1) as the first point.
5. Now type Cordinate (@1,0) for the horizontal line from the starting point.
6. Now again type Cordinate (@0,7) for the third point.
7. Repeat the above step by the cordinate (@2,2); (@2,2); (@0,-4); (@1,0); (@1,0); (@0,7); (@-1,0); (@-2,-3); (@-2,3); (@-1,0).
8. Type c to close the geometry. Press Esc key to exit the line command.
RESULT :-
• P-5 Geometry
1. Create a new page from the application Menu.
2. Choose acad.dwt template from the drop down menu for imperial and decimal values.
3. Using the command type l for invoking line tool.
4. Now type Cordinate (2,1) as the first point.
5. Now type Cordinate (@1,0) for the horizontal line from the starting point.
6. Now again type Cordinate (@0,7) for the third point.
7. Repeat the above step by the cordinate (@5,0); (@0,-6); (@-3,0); (@0,-1); (@4,0); (@0,8); (@-7,0).
8. Type c to close the geometry. Press Esc key to exit the line command.
RESULT :-
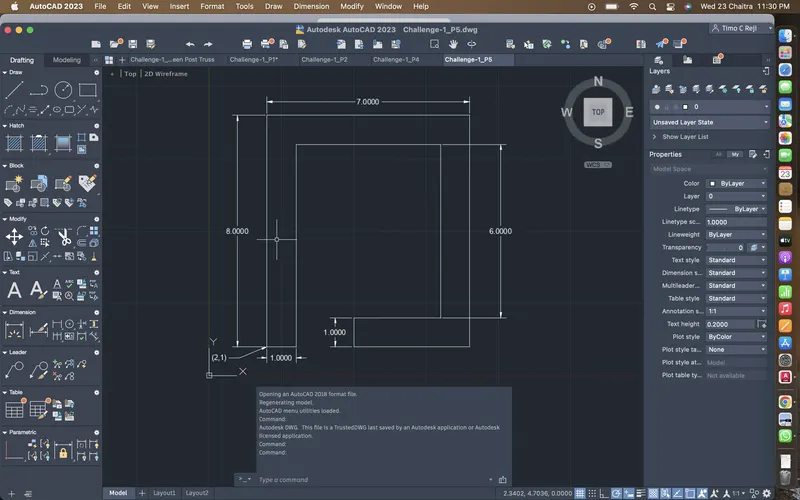
• P-7 Geometry
1. Create a new page from the application Menu.
2. Choose acad.dwt template from the drop down menu for imperial and decimal values.
3. Using the command type l for invoking line tool.
4. Now type Cordinate (2,1) as the first point.
5. Now type Cordinate (@8,0) for the horizontal line from the starting point.
6. Now again type Cordinate (@0,6) for the third point.
7. Repeat the above step by the cordinate (@-8,0) and type c to close the geometry.
8. Press Esc key to exit the line command.
9. Again invoke the line command and type the starting point (3,2) and type the cordinate (@2,0); (@0,3); (@-2,0). Close the geometry by typing c and press Esc key to exit.
10. Repeat the 9th Step by starting point from (6,2) and rest same cordinate from above.
RESULT :-
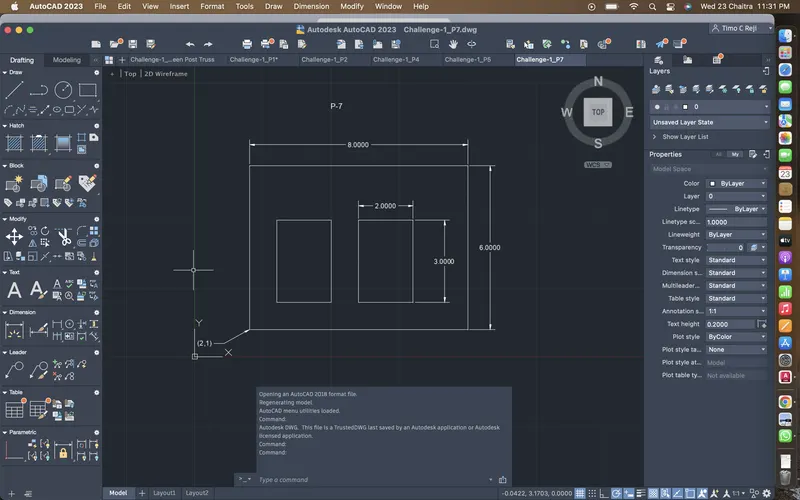
• P-8 Geometry
1. Create a new page from the application Menu.
2. Choose acad.dwt template from the drop down menu for imperial and decimal values.
3. Using the command type l for invoking line tool.
4. Now type Cordinate (0,0) as the first point.
5. Now type Cordinate (@10,0) for the horizontal line from the starting point.
6. Now again type Cordinate (@0,1) for the third point.
7. Repeat the above step by the cordinate (@-4,0); (@0,4); (@3,0); (@0,2); (@-8,0); (@0,-2) ; (@3,0); (@0,-4); (@4,0)
8. Type c to close the geometry. Press Esc key to exit the line command.
RESULT :-
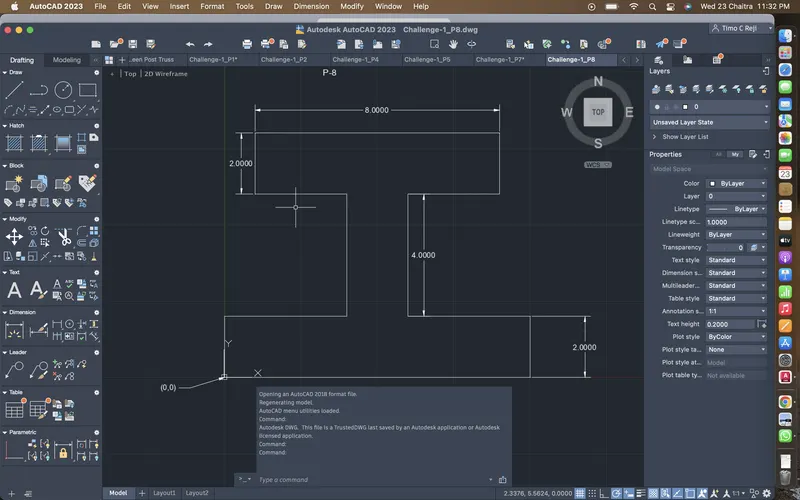
• P-9 Geometry
1. Create a new page from the application Menu.
2. Choose acad.dwt template from the drop down menu for imperial and decimal values.
3. Using the command type l for invoking line tool.
4. Now type Cordinate (1,1) as the first point.
5. Now type Cordinate (@5,0) for the horizontal line from the starting point.
6. Now again type Cordinate (@0,2) for the third point.
7. Repeat the above step by the cordinate (@-3,0); (@0,-1); (@-1,0); (@0,2); (@3,0); (@0,2) ; (@-4,2).
8. Type c to close the geometry. Press Esc key to exit the line command.
RESULT :-
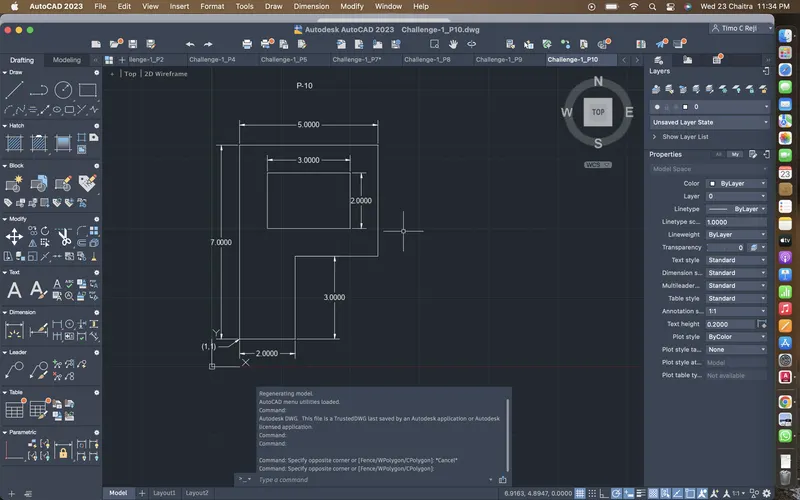
• P-10 Geometry
1. Create a new page from the application Menu.
2. Choose acad.dwt template from the drop down menu for imperial and decimal values.
3. Using the command type l for invoking line tool.
4. Now type Cordinate (1,1) as the first point.
5. Now type Cordinate (@2,0) for the horizontal line from the starting point.
6. Now again type Cordinate (@0,3) for the third point.
7. Repeat the above step by the cordinate (@3,0); (@0,4); (@-5,0).
8. Type c to close the geometry. Press Esc key to exit the line command.
9. Again type l in command for invoking line tool.
10. Type Cordinate (2,4) for the new starting point.
11. Now type Cordinate (@3,0); (@0,2); (-3,0) and close the geometry by typing c and press Esc key to exit the line tool.
RESULT :-
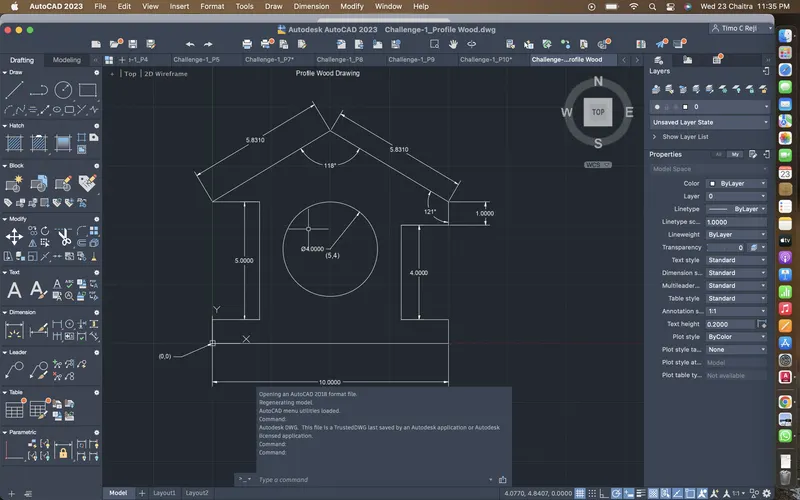
• Profile wood
1. Create a new page from the application Menu.
2. Choose acad.dwt template from the drop down menu for imperial and decimal values.
3. Using the command type l for invoking line tool.
4. Now type Cordinate (0,0) as the first point.
5. Now type Cordinate (@10,0) for the horizontal line from the starting point.
6. Now again type Cordinate (@0,1) for the third point.
7. Repeat the above step by the cordinate (@-2,0); (@0,4); (@2,0); (@0,1).
8. Now select again the cordinate (0,0) by using mouse.
9. Now type Cordinate (@1,0); (@2,0); (@0,5); (@-2,0).
10. Now by selecting the previous point make an angle by keeping the ortho mode on <30.96°.
11. Type c to close the geometry. Press Esc key to exit the line command.
12. Now again type Cordinate (5,4) as the starting point and draw a circle with radius 2 unit's.
13. Press Esc key to exit the line tool.
RESULT :-
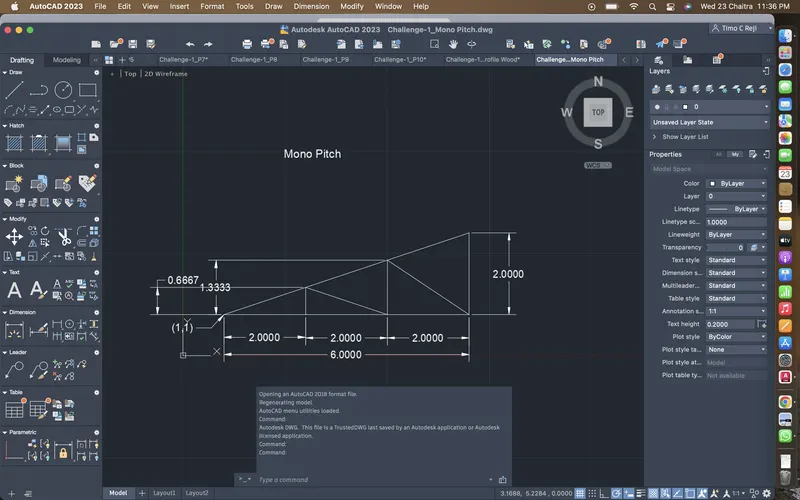
• Mono pitch
1. Create a new page from the application Menu.
2. Choose acad.dwt template from the drop down menu for imperial and decimal values.
3. Using the command type l for invoking line tool.
4. Now type Cordinate (1,1) as the first point.
5. Now type Cordinate (@6,0) for the horizontal line from the starting point.
6. Now again type Cordinate (@0,2) for the third point.
7. Type c to close the geometry. Press Esc key to exit the line command.
12. Now again type l for line tool and type Cordinate (3,1) as the starting point and make a line with <90° and intersect at the the hypotnues.
13. Repeat the step 12 with cordinate (5,1) as starting point.
14. Now select the intersection of (3,1) and connect with the cordinate (5,1) and same to Cordinate (6,0).
15. Press Esc key to exit the line tool.
RESULT :-
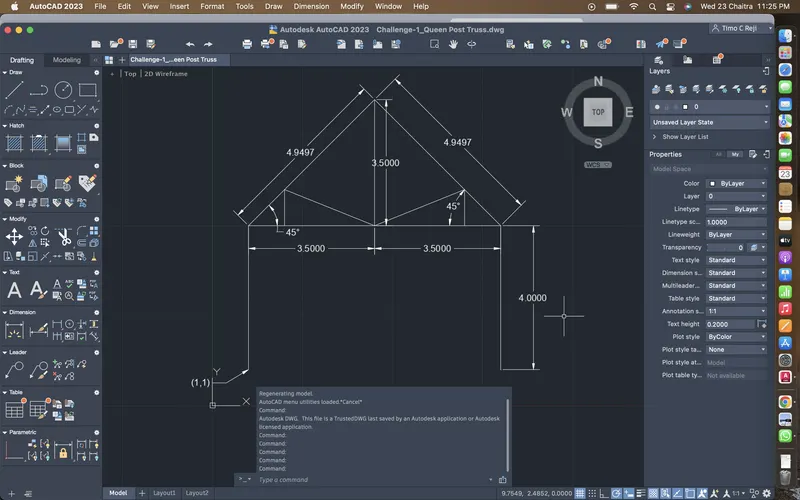
• Queen Post Truss
1. Create a new page from the application Menu.
2. Choose acad.dwt template from the drop down menu for imperial and decimal values.
3. Using the command type l for invoking line tool.
4. Now type Cordinate (1,1) as the first point.
5. Now type Cordinate (@0,4) for the horizontal line from the starting point.
6. Now again type Cordinate (@7,0) for the third point and (@0,-4) for the fourth point.
7. Now make a line with <45° from the cordinate (1,5) and also from (8,5) cordinate.
9. Press Esc key to exit the line tool.
10. Now mark the mid point between the two cordinate (1,5) & (8,5) and intersect the mid point to the vertex of the triangle with the help of the line tool.
11. Again with the line command select (2,5) and make a line with the <90° & trim the excess line and connect the intersection point to the mid point of the cordinate (1,5) & (8,5).
12. Do the same on the other vertex cordinate (8,5).
RESULT :-