Creation of geometries by Coordinate system methods using AutoCad
25/05/21
Answers
Aim
To create the following drawing in the Coordinate systems
- Absolute System
- Relative Rectangle Coordinate
- Relative Polar Coordinate
Procedure
P-1
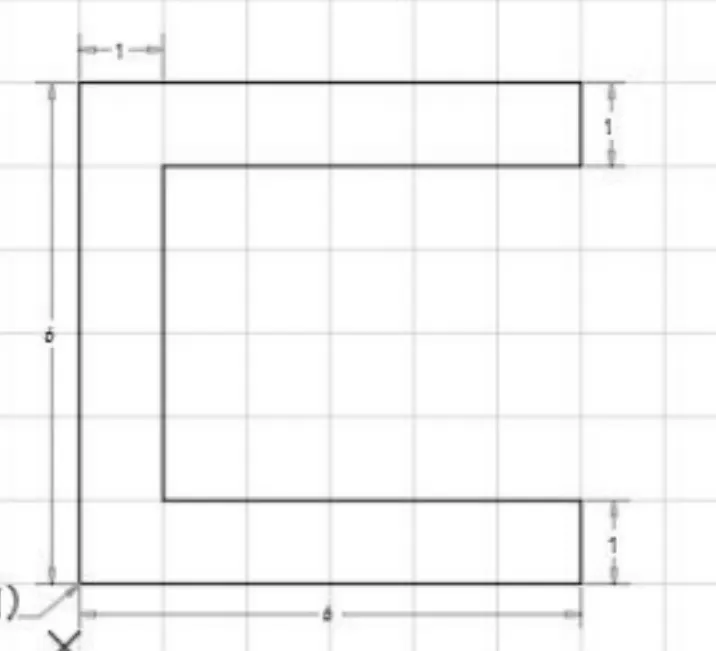
Step-1:opening to the AutoCAD software and entering the workspace.
Step-2:Setting limits >specify lower-left corner:0,0
Step-3:specify upper-left corner:100,100
Step-4:Set>units>Decimal>intersectional scale>mm
Step-5:Limmax>100,100
Step-6:for Absolute coordinate>right click on the dynamic input icon>select the radio button absolute coordinate and click ok
Step-7:consider the limits(20,0)
- Step-8: line specify the first point(20,5), press enter button,
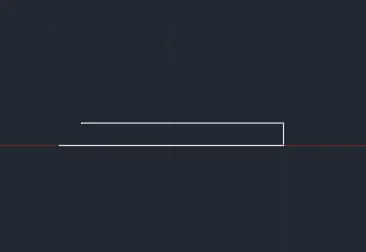
Step-9:followed steps,specify the next point(40,15),(40,13),(22,13),(22,2),(40,2),(40,0)
Step-10:at the end "c"+enter to close the object after the completion of absolute, we want to change the Absolute to relative Coordinate followed by the Step-6
Step-11:Relative Rectangular coordinate, Specify the line>coordinate>specify the first point (50,0)
Step-12:line specify the next point @(0,15),
Step-13:followed by line specify the next point [@(20,0),@(0,-2),@(-18,0),@(0,-11),@(18,0),@(0,-2)]
Step-14:at the end "c"+enter to close the object
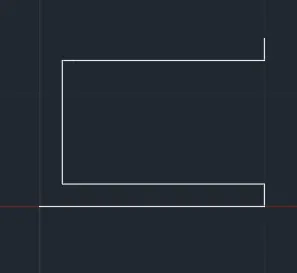
Step-15:Relative polar coordinate,Specify the line>coordinate
Step-16:line specify the first point (50,0)
Step-17:line specify the next point (@(15<90)
Step-18:line specify the next point@(20<0),@(18<180),@(11<270),@(18<0),@(2<90)
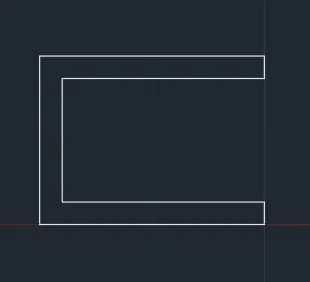
Step-19:t the end "c"+enter to close the object
Step-20: Save and close
P-2
Step-1:opening to the AutoCAD software and entering the workspace.
Step-2:Setting limits >specify lower-left corner:0,0
Step-3:specify upper-left corner:100,100
Step-4:Set>units>Decimal>intersectional scale>mm
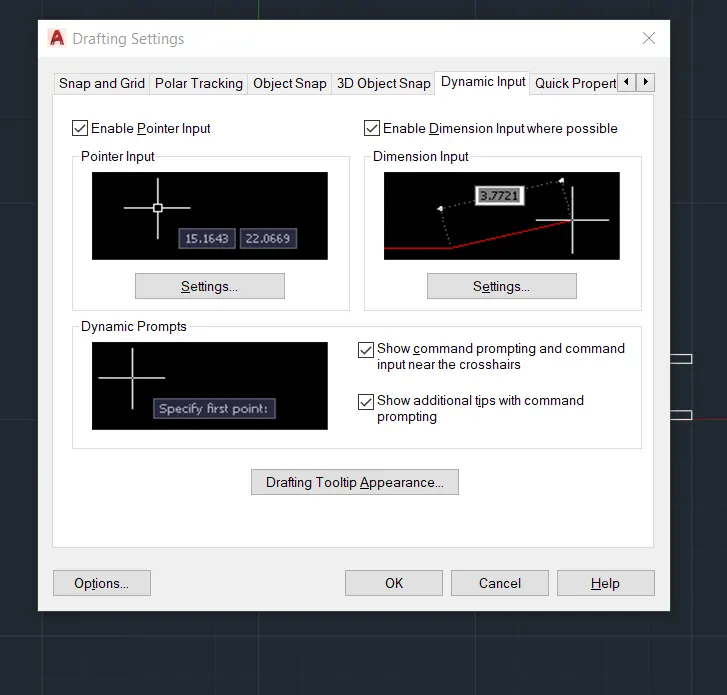
Step-5:Limmax>100,100
Step-6:for Absolute coordinate>right click on the dynamic input icon>select the radio button absolute coordinate and click ok
Step-7:consider the limits(0,0)
- Step-8: line specifiy the first point(0,0) press the enter button.
Step-9:followed steps, specify the next point (3,5),(6,5),(8,0),(5,0),(5,3),(3,3),(3,0).
Step-10:at the end "c"+enter to close the object after the completion of absolute, we want to change the Absolute to relative Coordinate followed by the Step-6
Step-11:Relative Rectangular coordinate, Specify the line>coordinate>specify the first point (20,0)
Step-12:line specify the next point @(3,0),
Step-13:followed by line specify the next point [@(0,3),@(2,0),@(0,-3),@(3,0),@(5,7),@(7,-3)]

Step-14:at the end "c"+enter to close the object
Step-15:Relative polar coordinate,Specify the line>coordinate>specify the First point (50,0)
Step-16:line specify the next point (10,0)

Step-17:line specify the next point (@(3<0)
Step-18:line specify the next point@(3<90),@(2<0),@(3<270),@(3<0),@(7<110),@(5<180)
Step-19:t the end "c"+enter to close the object
Step-20: Save and close
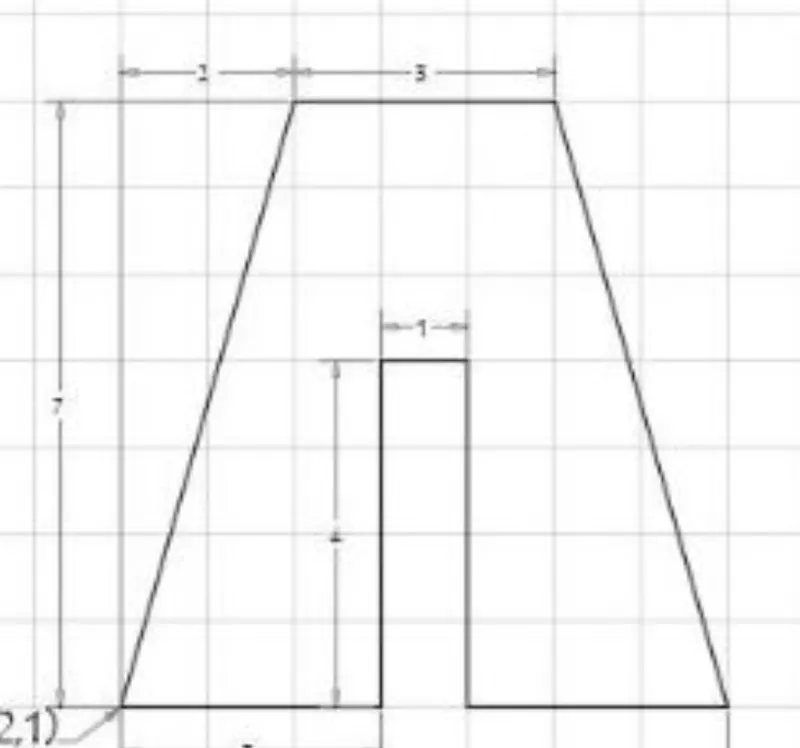
P-4
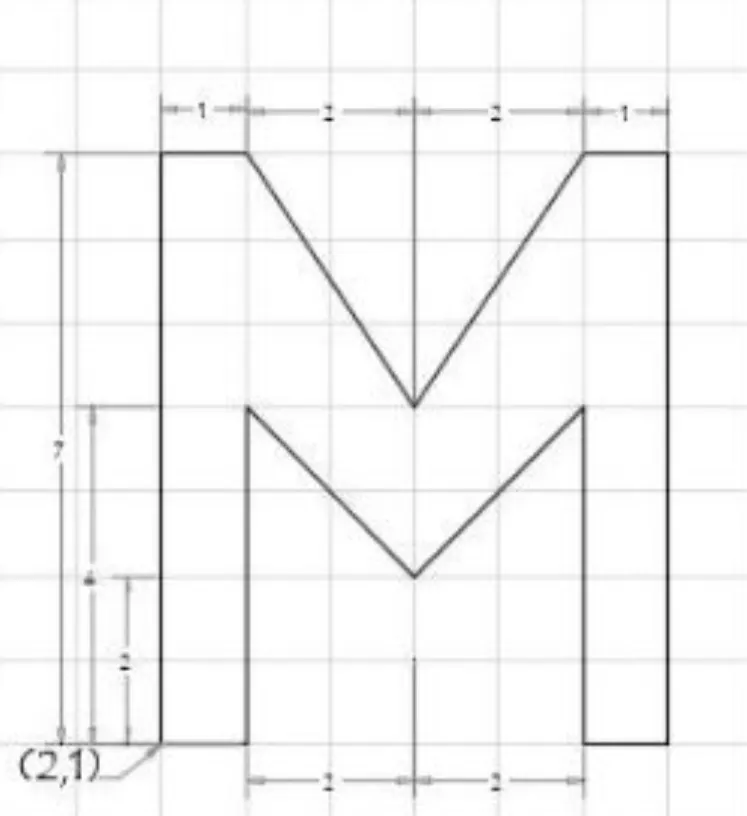
Step-1:opening to the AutoCAD software and entering the workspace.
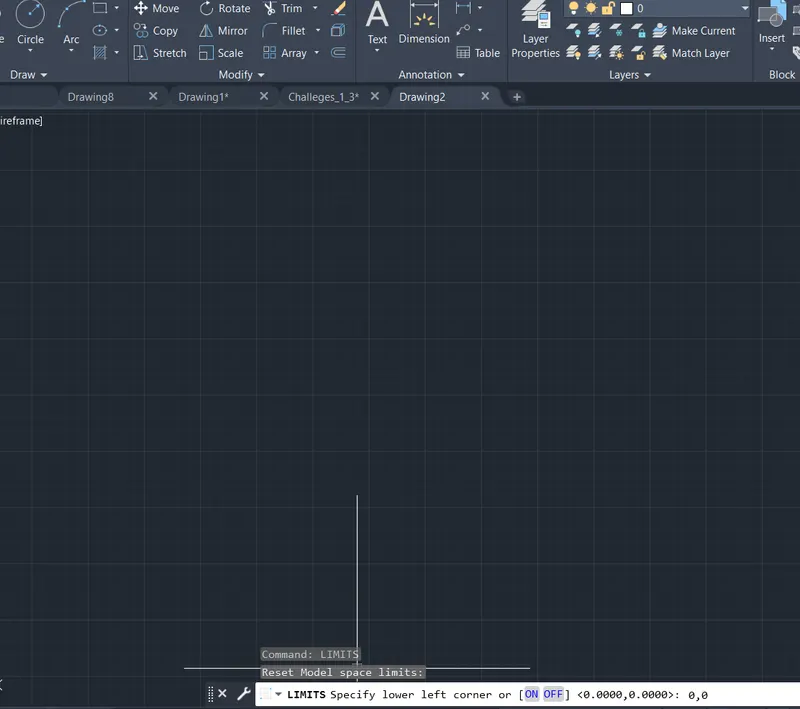
Step-2:Setting limits >specify lower-left corner:0,0
Step-3:specify upper-left corner:100,100
Step-4:Set>units>Decimal>intersectional scale>mm
Step-5:Limmax>100,100
Step-6:for Relative polar coordinate>right click on the dynamic input icon>select the radio button relative coordinate and click ok
Step-7:consider the limits(0,0)
- Step-8: line specify the first point(2,1), press enter button,

Step-9:followed steps,specify the next point @(7<90),@(1<0),@(3<120),@(3<300),@(3<60),@(1<0),@(5<270),@(1<180)
,@(5<90),@(3<240),@(3<120),@(5<270)

Step-10:at the end "c"+enter to close the object.

Step-11: Save and close
P-5
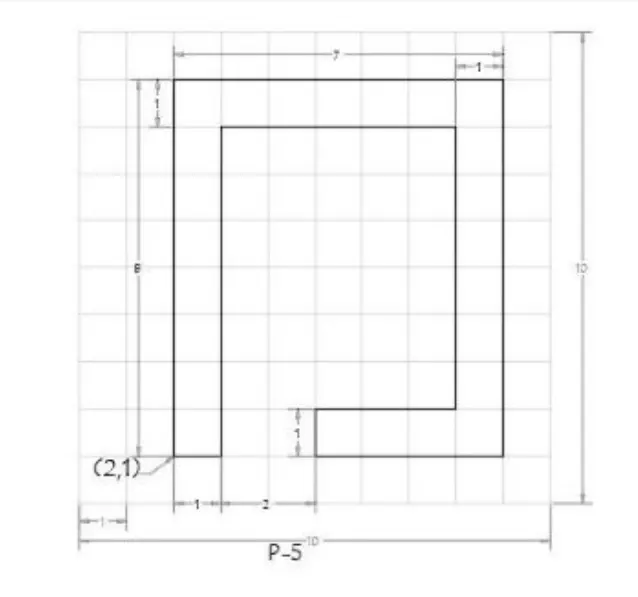
Step-1:opening to the AutoCAD software and entering the workspace.
Step-2:Setting limits >specify lower-left corner:0,0
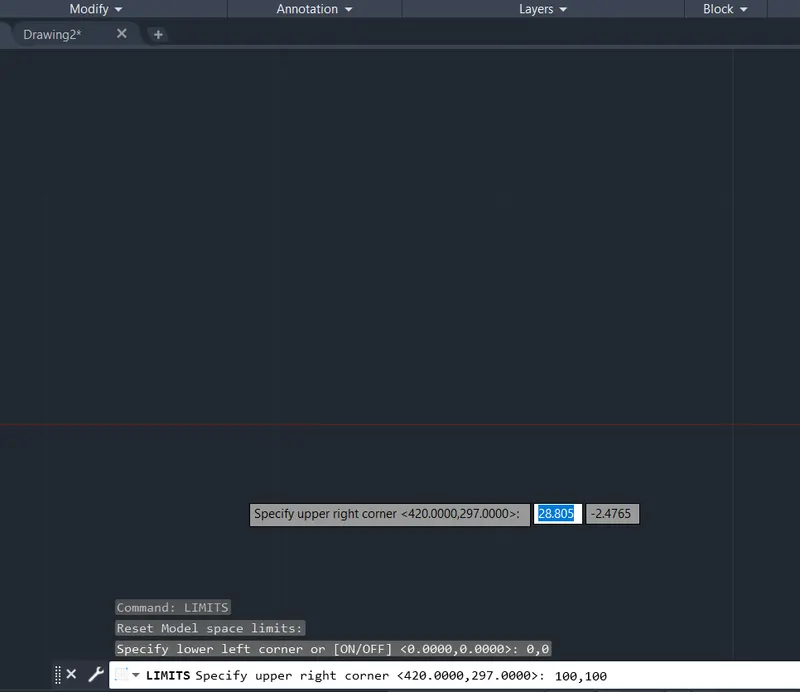
Step-3:specify upper-left corner:100,100
Step-4:Set>units>Decimal>intersectional scale>mm
Step-5:Limmax>100,100
Step-6:for Relative polar coordinate>right click on the dynamic input icon>select the radio button relative coordinate and click ok
Step-7:consider the limits(0,0)
- Step-8: line specify the first point(2,1), press enter button,
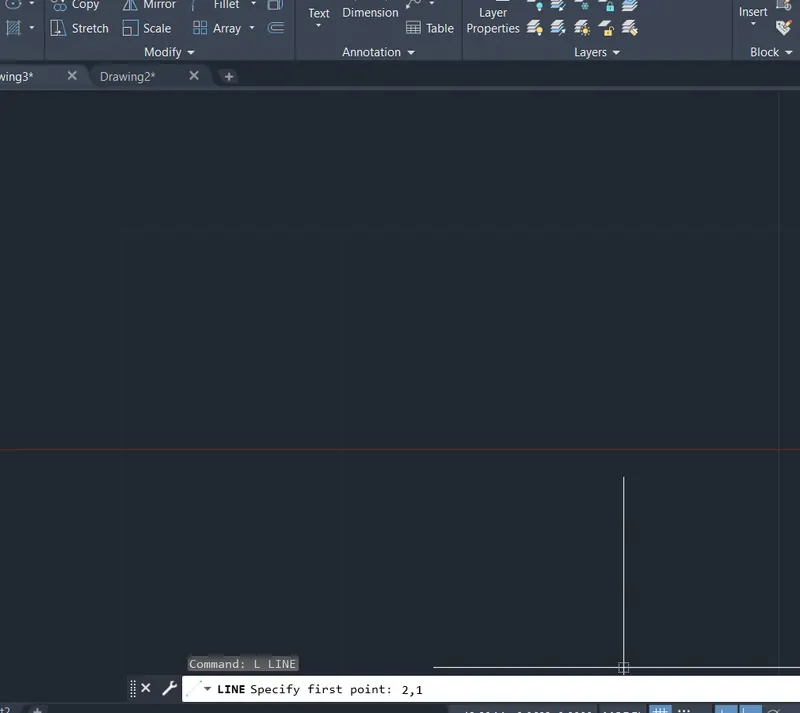
Step-9:followed steps,specify the next point @(8<90),@(7<0),@(8<270),@(4<180)
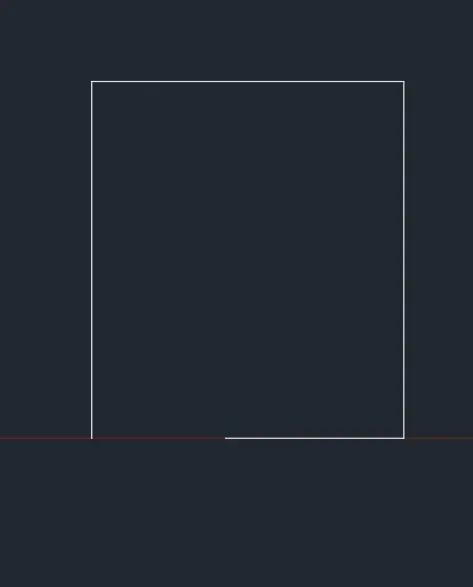
Step-10: specify the next point ,@(1<90),@(3<0),@(6<90),@(5<180),@(7<270).
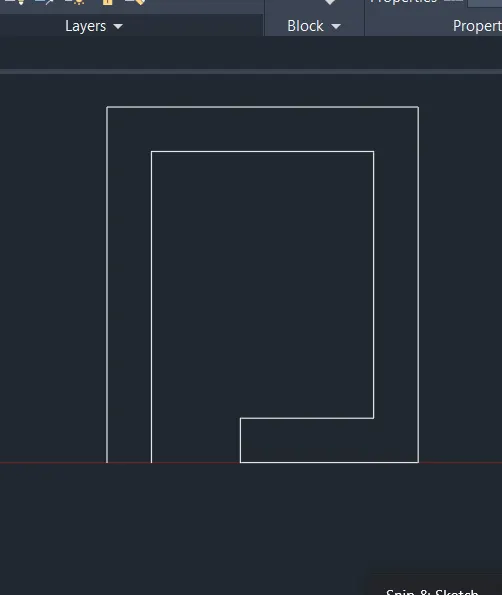
Step-11:at the end "c"+enter to close the object.
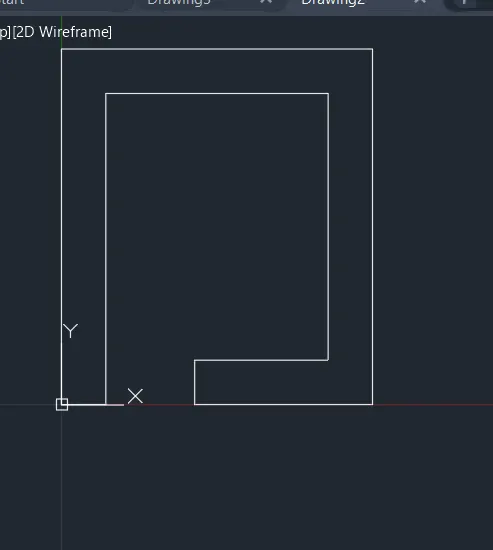
Step-11: Save and close
P-7
Step-1:opening to the AutoCAD software and entering the workspace.
Step-2:Setting limits >specify lower-left corner:0,0
Step-3:specify upper-left corner:100,100
Step-4:Set>units>Decimal>intersectional scale>mm
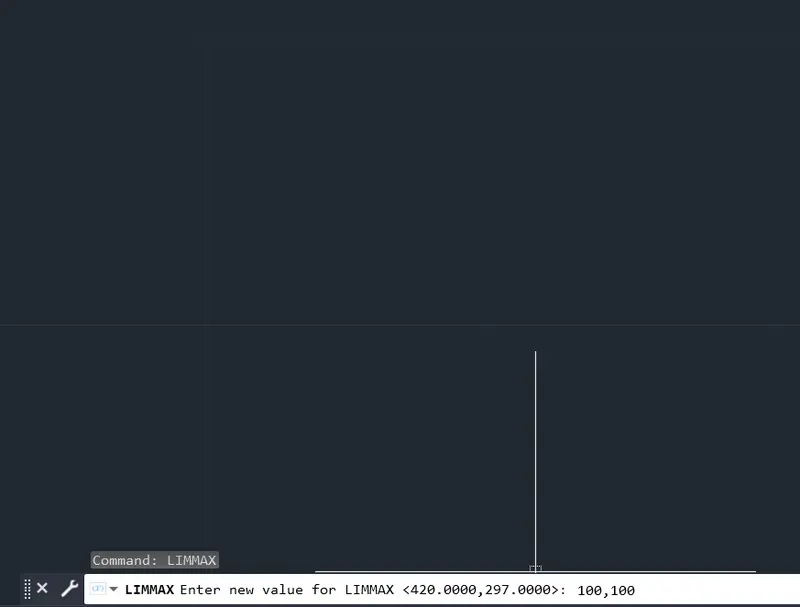
Step-5:Limmax>100,100
Step-6:for Relative polar coordinate>right click on the dynamic input icon>select the radio button relative coordinate and click ok
Step-7:consider the limits(0,0)
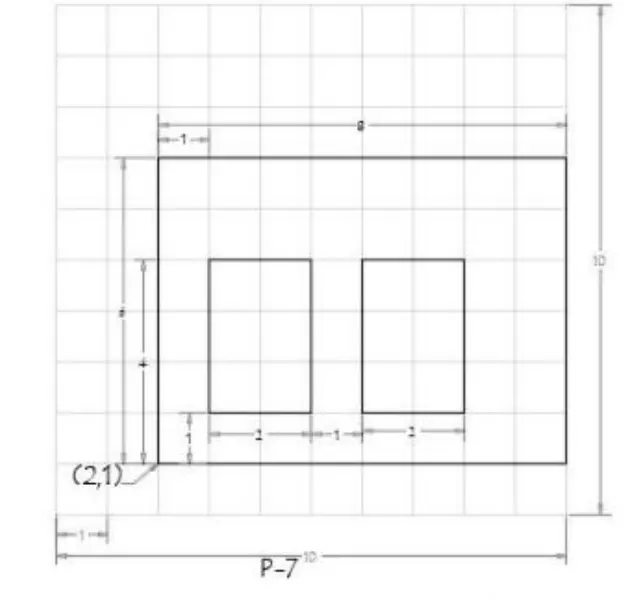
- Step-8: line specify the first point(2,1), press enter button,
Step-9:followed steps,specify the next point @(6<90),@(8<0),@(6<270),@(8<180)
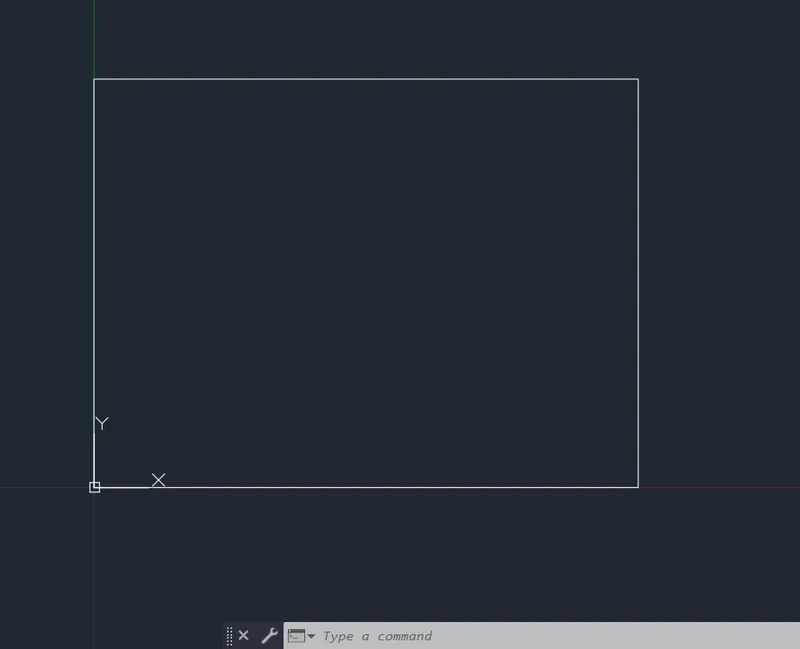
Step-10: Again take the line command>specify the First point (1,1)
Step-11:followed steps,Specify the next point,@(3<90),@(2<0),@(3<270),@(2<180)
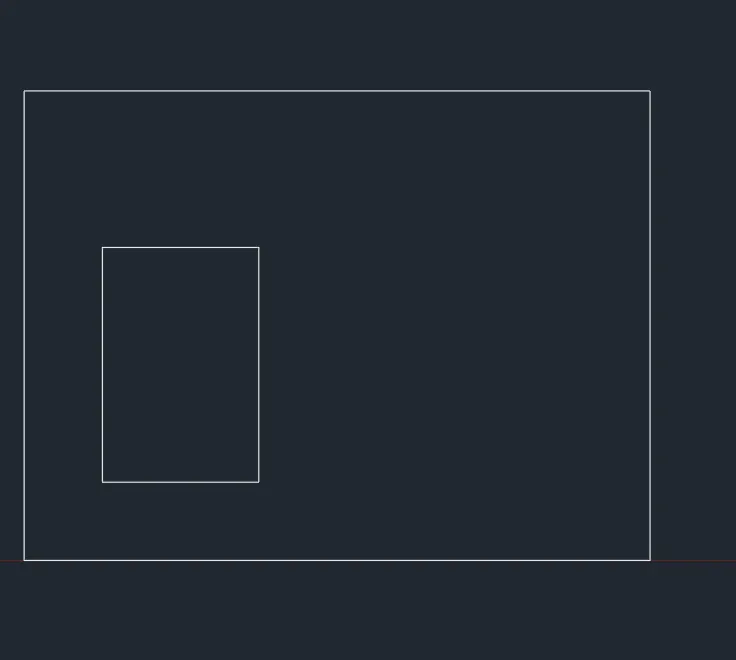
Step-12:Again take the line>specify the First point (4,1)
Step-13:followed steps,Specify the next point,@(3<90),@(2<0),@(3<270),@(2<180)
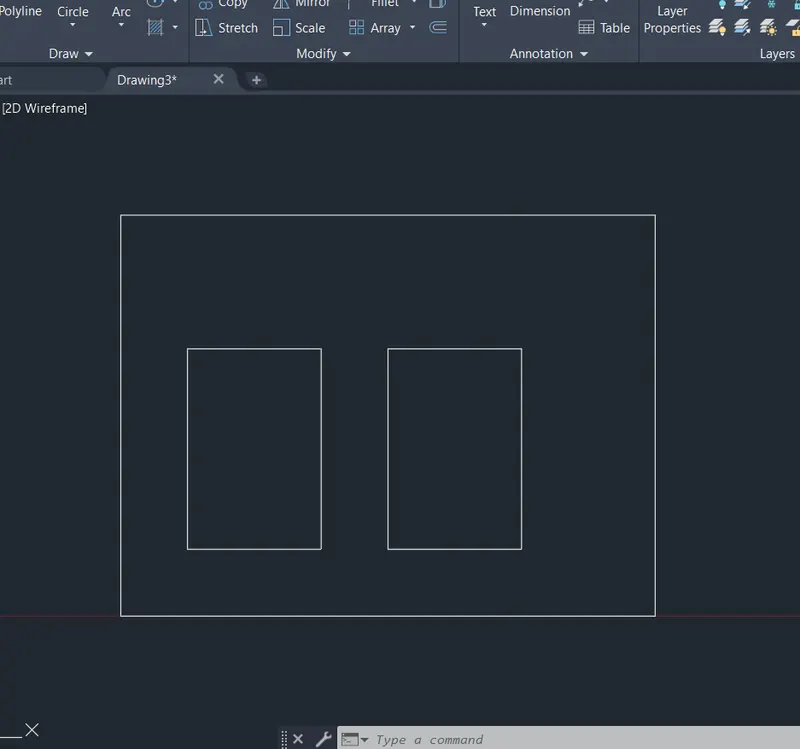
Step-10:at the end "c"+enter to close the object.
Step-11: Save and close
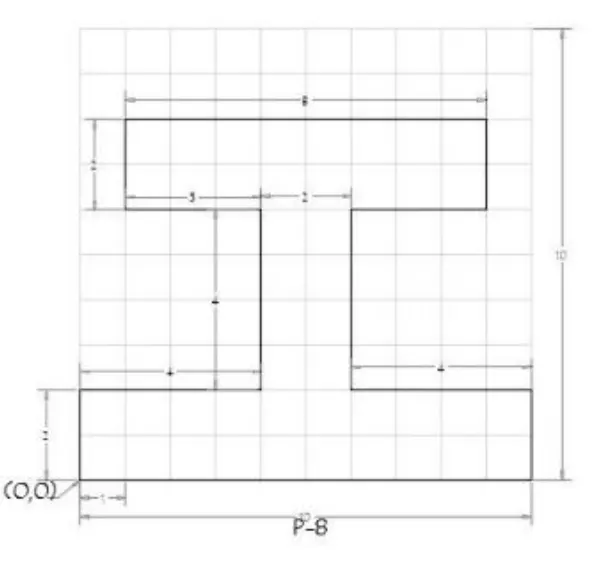
P-8
Step-1:opening to the AutoCAD software and entering the workspace.
Step-2:Setting limits >specify lower-left corner:0,0
Step-3:specify upper-left corner:100,100
Step-4:Set>units>Decimal>intersectional scale>mm
Step-5:Limmax>100,100
Step-6:for Relative polar coordinate>right click on the dynamic input icon>select the radio button relative coordinate and click ok
Step-7:consider the limits(0,0)
- Step-8: line specify the First point(0,0), press enter button,
Step-9:followed steps,specify the next point @(2<90),@(4<0),@(4<90),@(3<180),@(2<90)
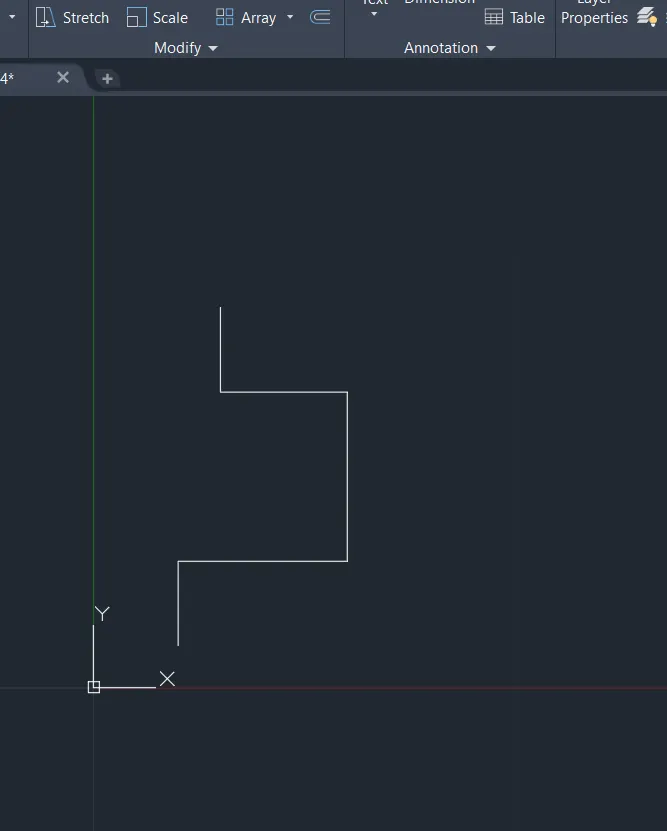
Step-10:followed steps,specify the next point ,@(8<0),@(2<270),@(3<180),@(4<270)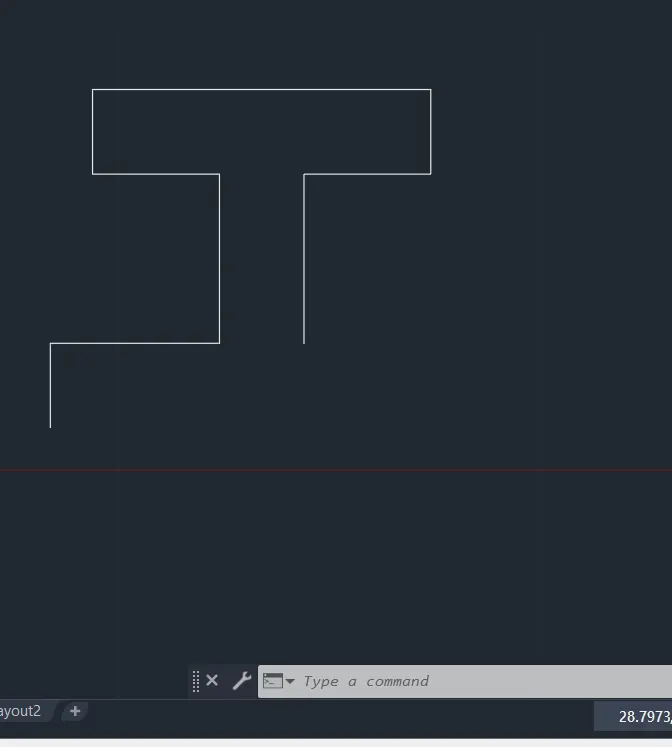
Step-11:followed steps,specify the next point ,@(4,0),@(2,270)at the end "C"+enter to close the object.
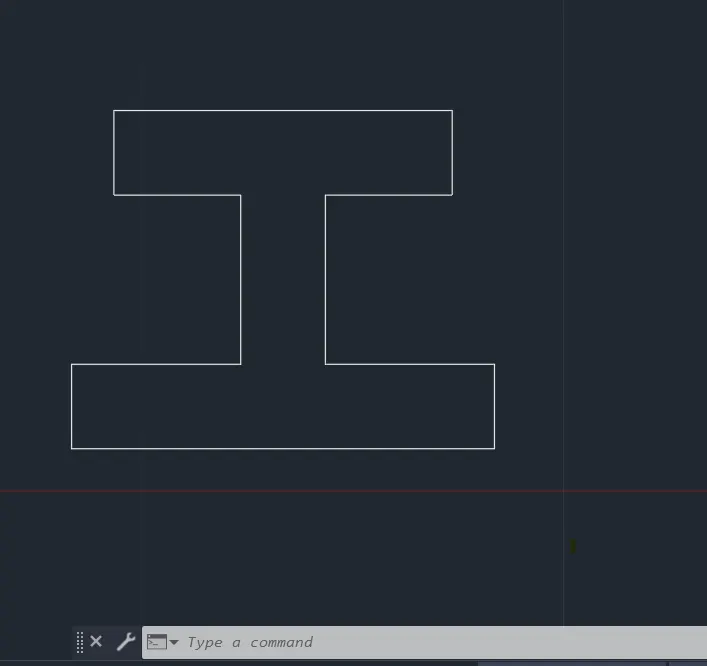
Step-12: Save and close
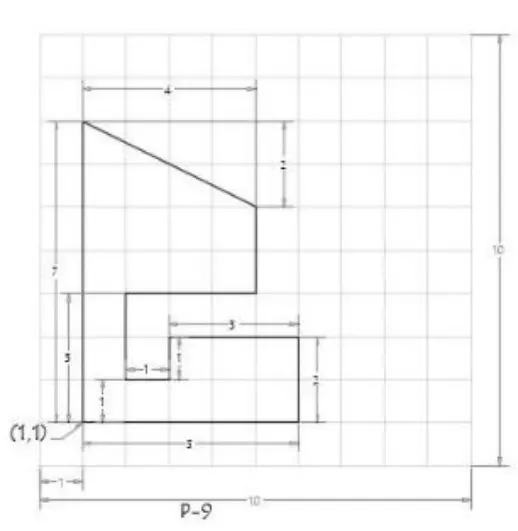
P-9
Step-1:opening to the AutoCAD software and entering the workspace.
Step-2:Setting limits >specify lower-left corner:0,0
Step-3:specify upper-left corner:100,100
Step-4:Set>units>Decimal>intersectional scale>mm
Step-5:Limmax>100,100
Step-6:for Relative polar coordinate>right click on the dynamic input icon>select the radio button relative coordinate and click ok
Step-7:consider the limits(0,0)
- Step-8: line specify the first point(1,1), press enter button,
Step-9:followed steps,specify the next point @(7<90),@(4<320),@(2<270)
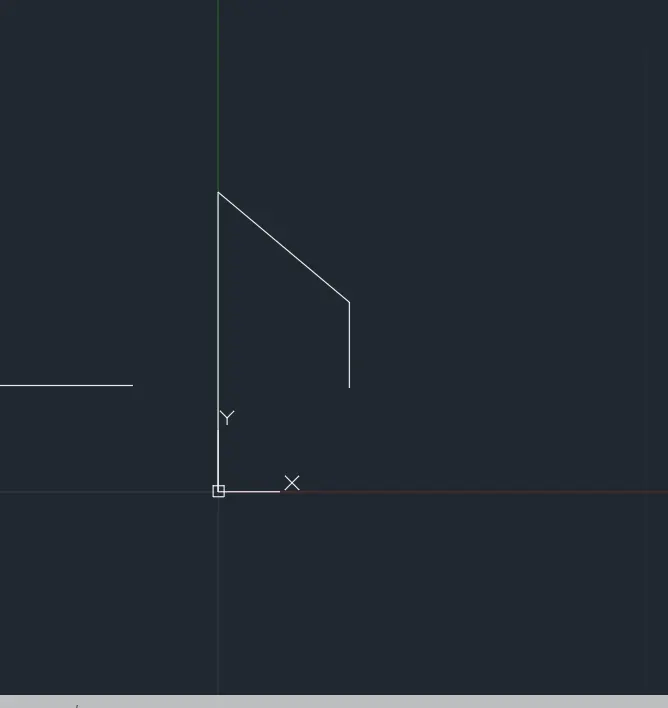
Step-10:followed steps,specify the next point,@(2<180),@(1<270),@(1<0),@(0.5<90),
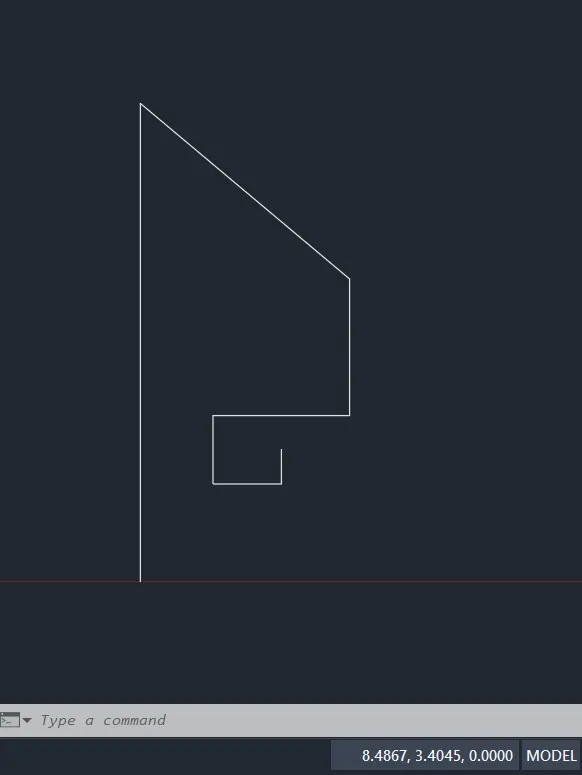
Step-11:followed steps,specify the next point @(3<0),@(3<0),@(2<270)
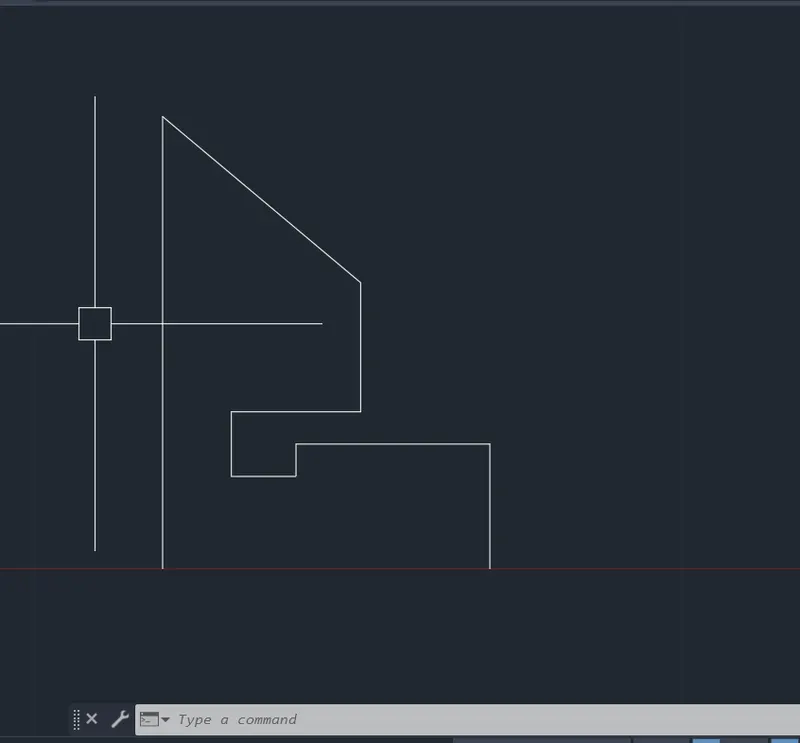
Step-12:at the end "c"+enter to close the object.
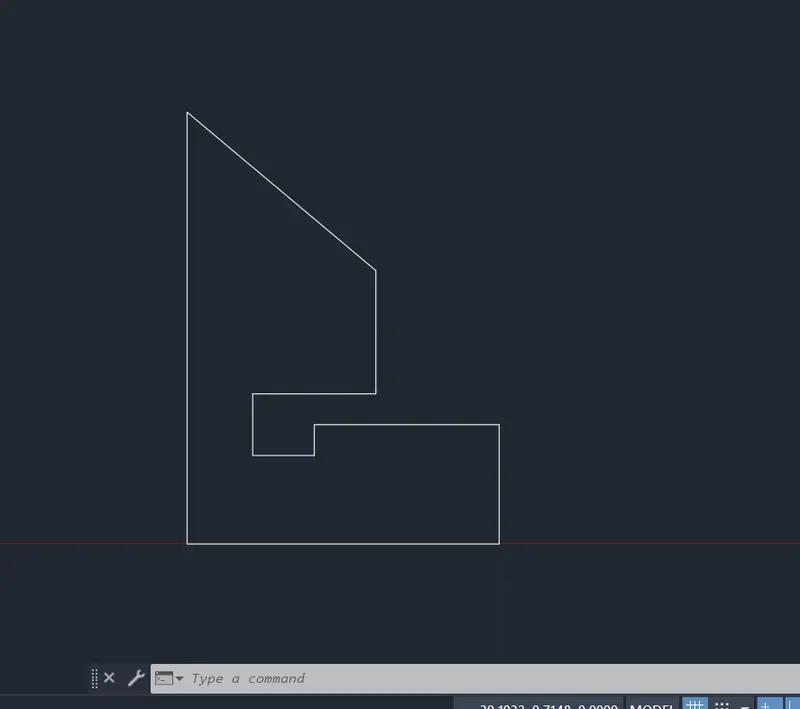
Step-13: Save and close.
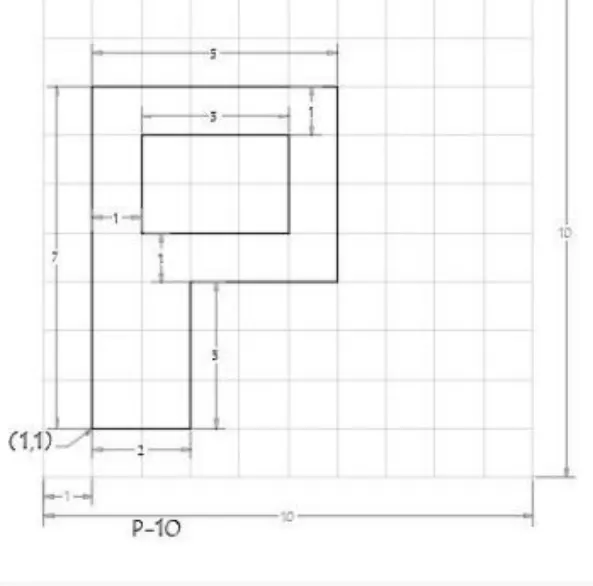
P-10
Step-1:opening to the AutoCAD software and entering the workspace.
Step-2:Setting limits >specify lower-left corner:0,0
Step-3:specify upper-left corner:100,100
Step-4:Set>units>Decimal>intersectional scale>mm
Step-5:Limmax>100,100
Step-6:for Relative polar coordinate>right click on the dynamic input icon>select the radio button relative coordinate and click ok
Step-7:consider the limits(0,0)
- Step-8: line specify the first point(1,1), press enter button,
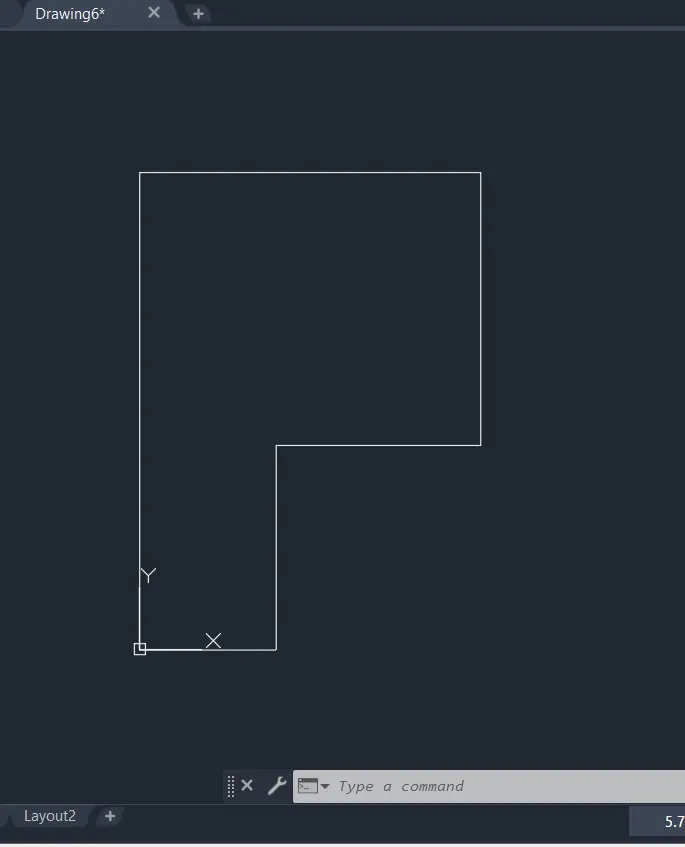
Step-9:followed steps,specify the next point @(7<90),@(5<0),@(3<270),@(3<180),@(3<270),@(2<180)
Step-10: Again take the line command>specify the First point (1,4)
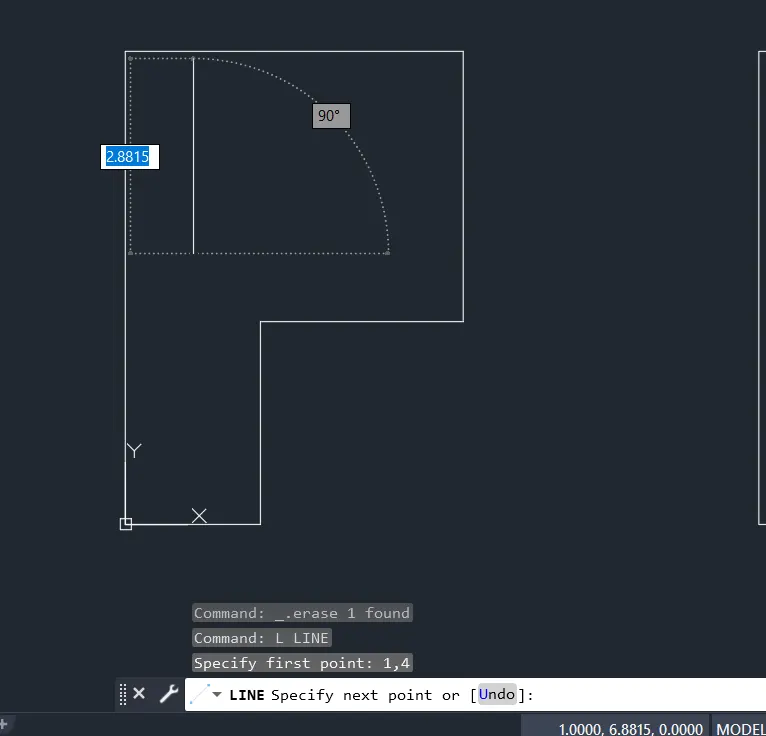
Step-11:followed steps,Specify the next point,@(2<90),@(3<0),@(2<270),@(3<180)
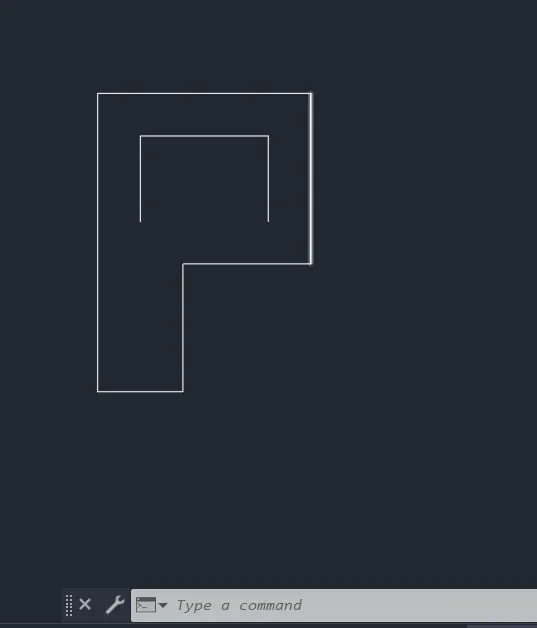
Step-10:at the end "c"+enter to close the object.
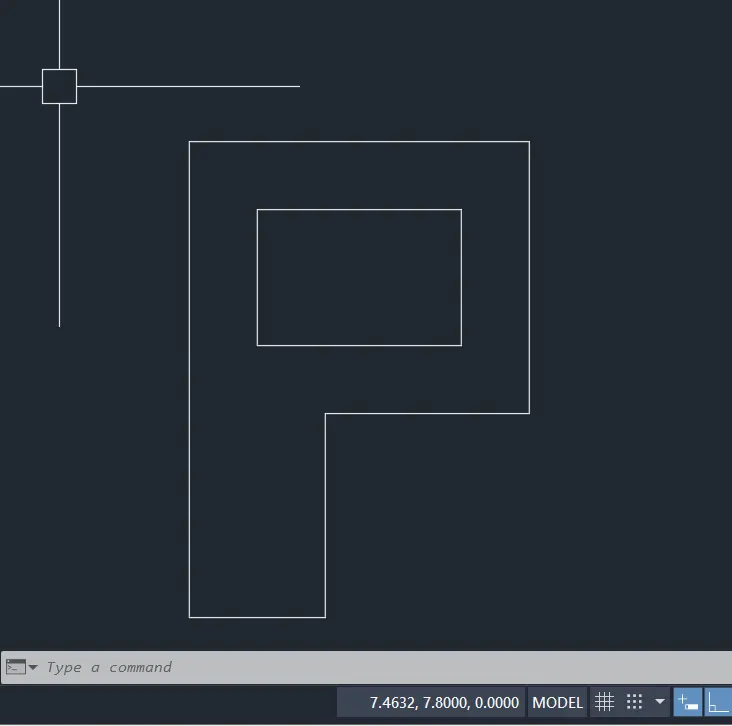
Step-11: Save and close
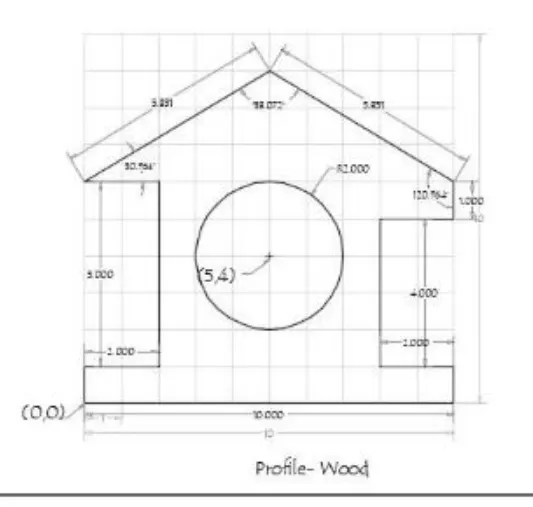
Profile Wood
Step-1:opening to the AutoCAD software and entering the workspace.
Step-2:Setting limits >specify lower-left corner:0,0
Step-3:specify upper-left corner:100,100
Step-4:Set>units>Decimal>intersectional scale>mm
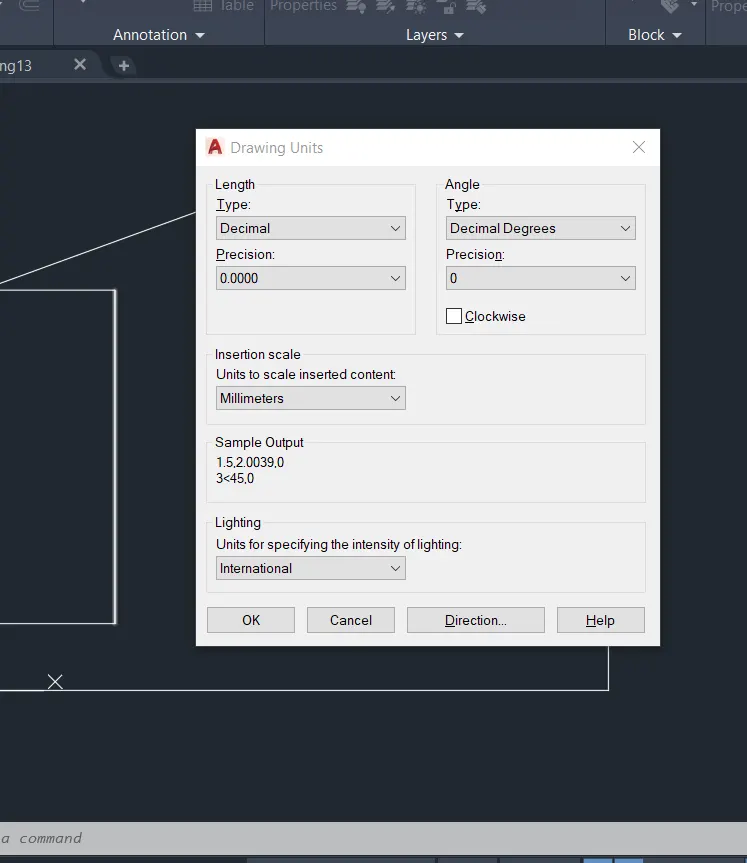
Step-5:Limmax>100,100
Step-6:for Relative polar coordinate>right click on the dynamic input icon>select the radio button relative coordinate and click ok
Step-7:consider the limits(0,0)
- Step-8: line specify the first point(0,0), press enter button,
Step-9:followed steps,specify the next point @(1<90),@(2<0),@(5<90),@(2<180),@(5<20)
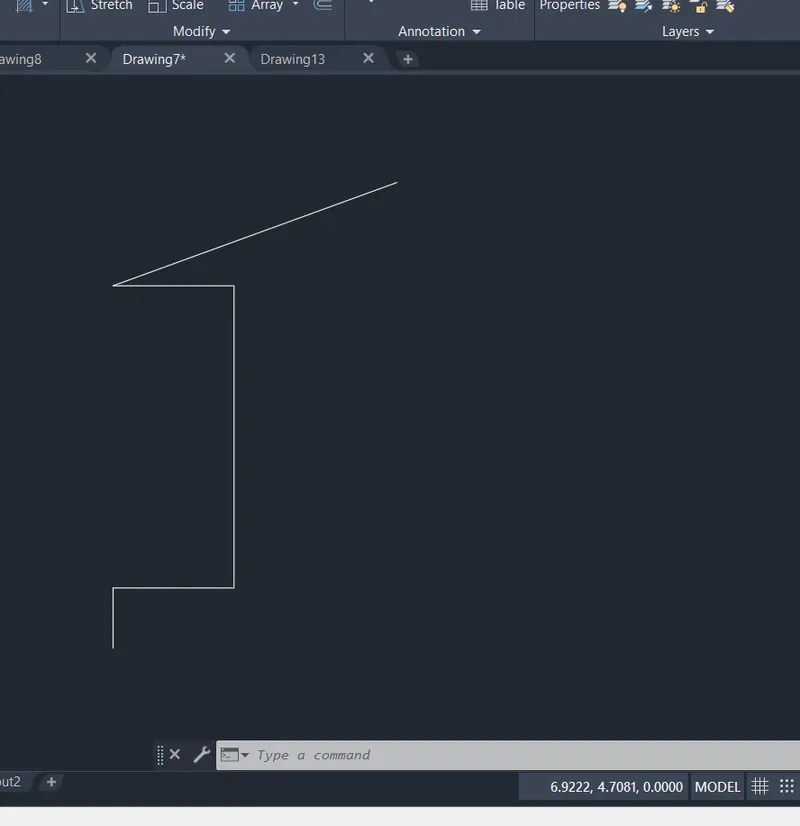
Step-9:followed steps,specify the next point@(5<340),@(1<270),@(2<180),@(4<270),@(2,0)@(1,270).
Step-10:at the end "c"+enter to close the object.
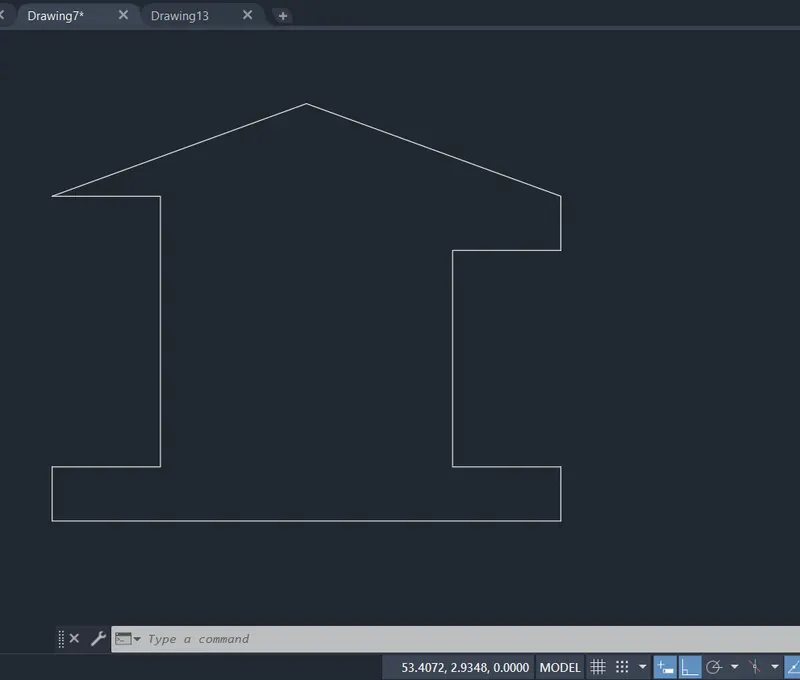
Step-11:Again take the circle, radius command>specify the Center point circle (5,4)
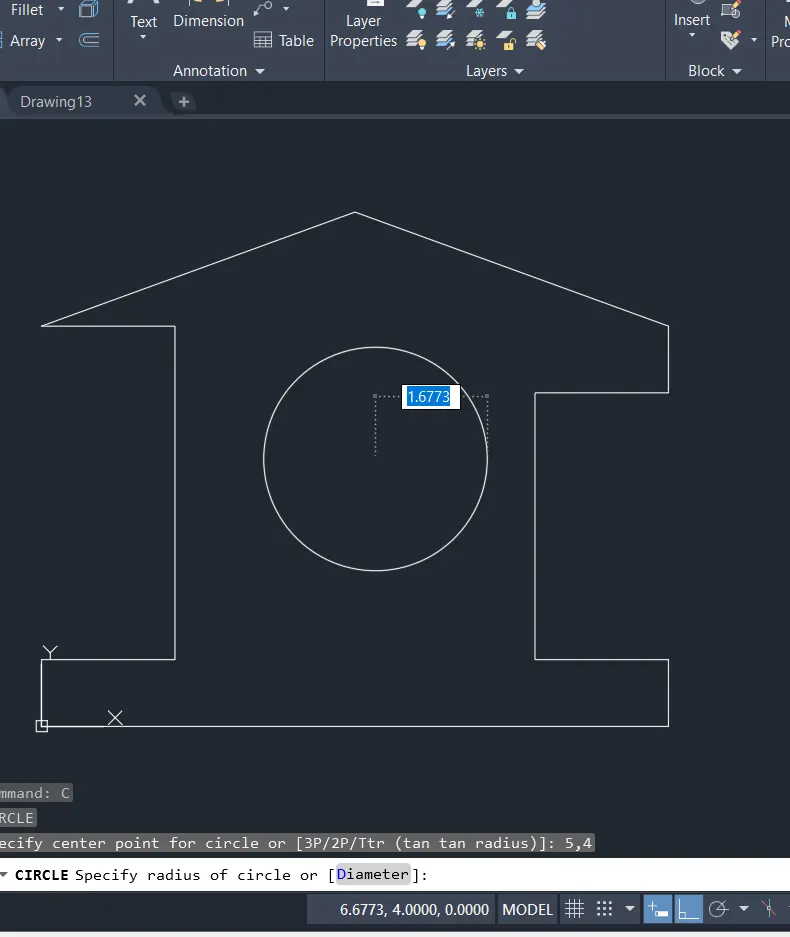
Step-12:specify the radius of the circle (1)
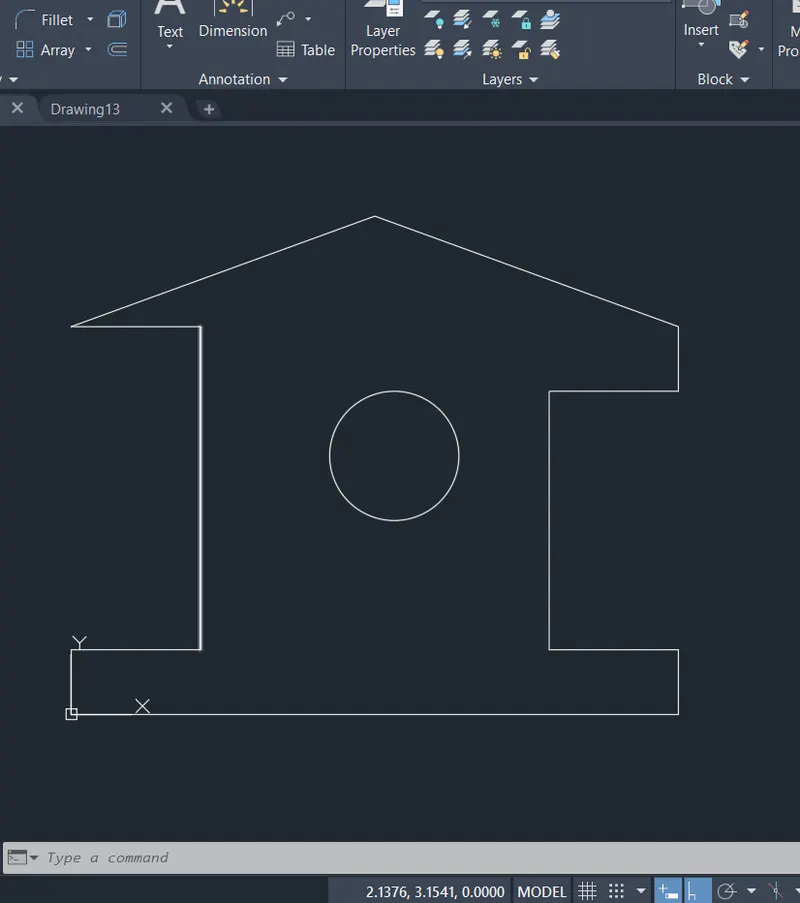
Step-13: Save and close
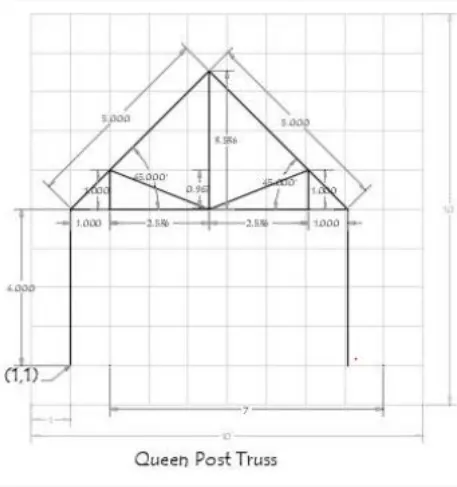
Queen Post-Truss
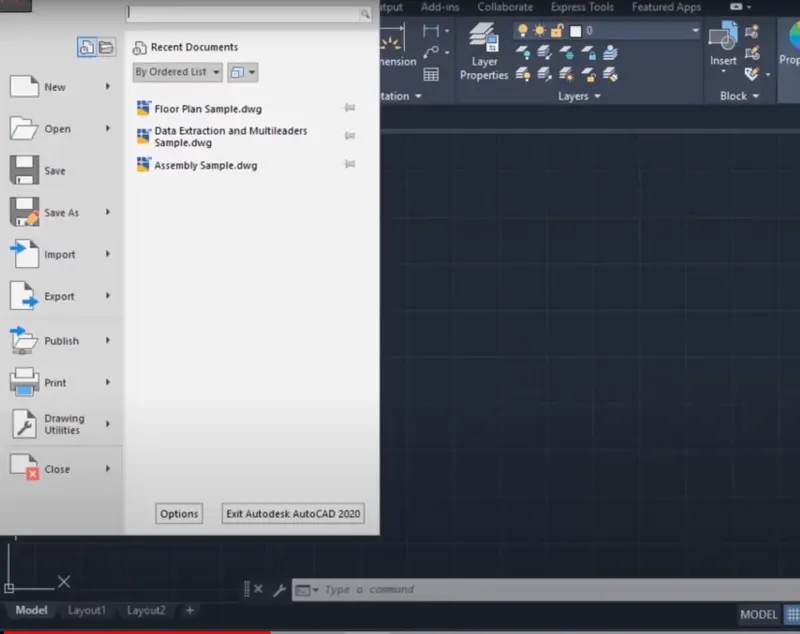
Step-1:opening to the AutoCAD software and entering the workspace.
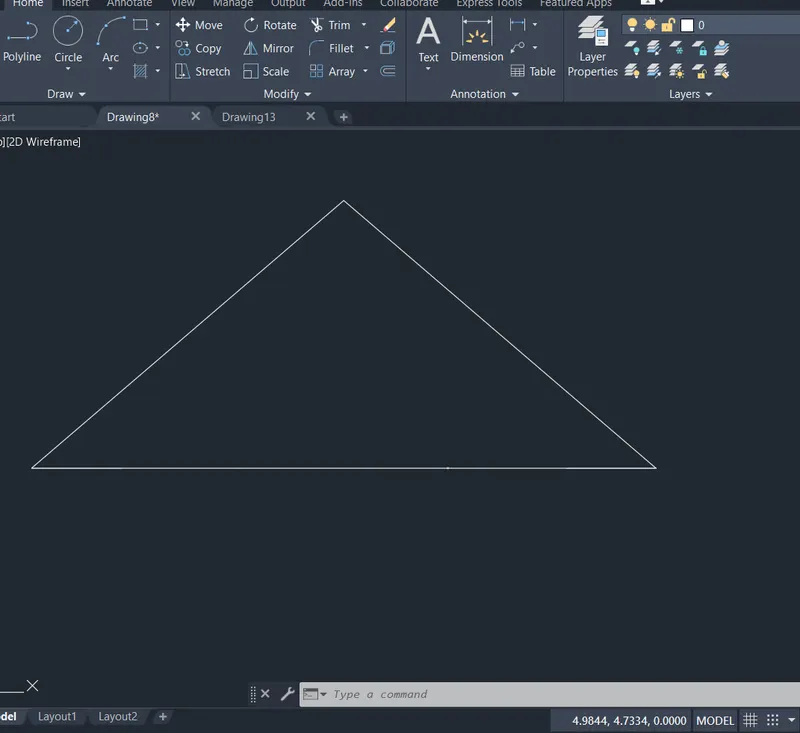
Step-2:Setting limits >specify lower-left corner:0,0
Step-3:specify upper-left corner:100,100
Step-4:Set>units>Decimal>intersectional scale>mm
Step-5:Limmax>100,100
Step-6:for Relative polar coordinate>right click on the dynamic input icon>select the radio button relative coordinate and click ok
Step-7:consider the limits(0,0)
- Step-8: line specify the first point(1,1), press enter button,
Step-9:followed steps,specify the next point @(7<0),@(3.5<340),@(3.5<25)
Step-10:at the end "c"+enter to close the object.
Step-11:line specify the first point(3,0) and line specify the next point(5<90)
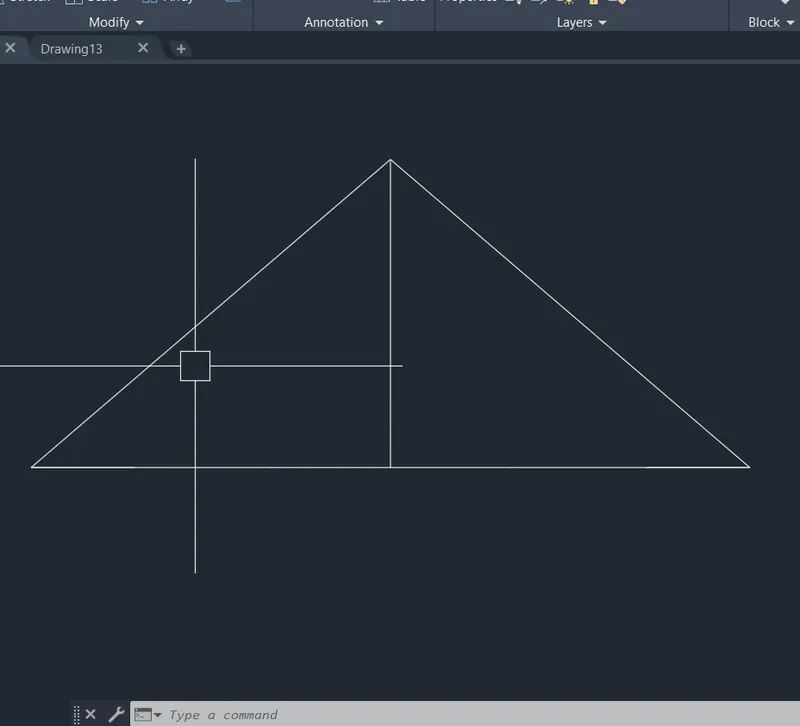
Step-12:followed by,line specify the next point@(1<180),@(2.5<200),@(3<90)@(2.5<170),@(1<90),@(1<180)
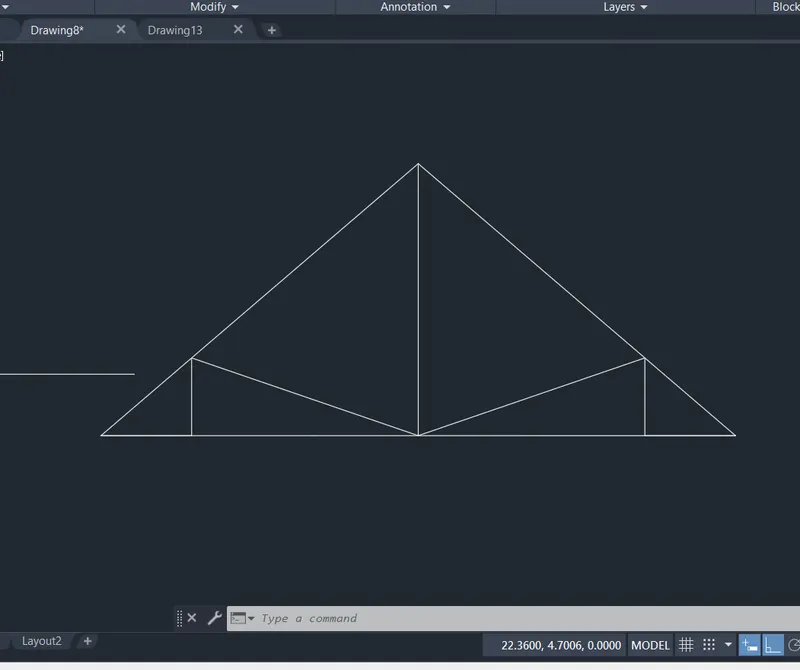
Step-13:line specify the first point(7,0) and line specify the next point(4<270).
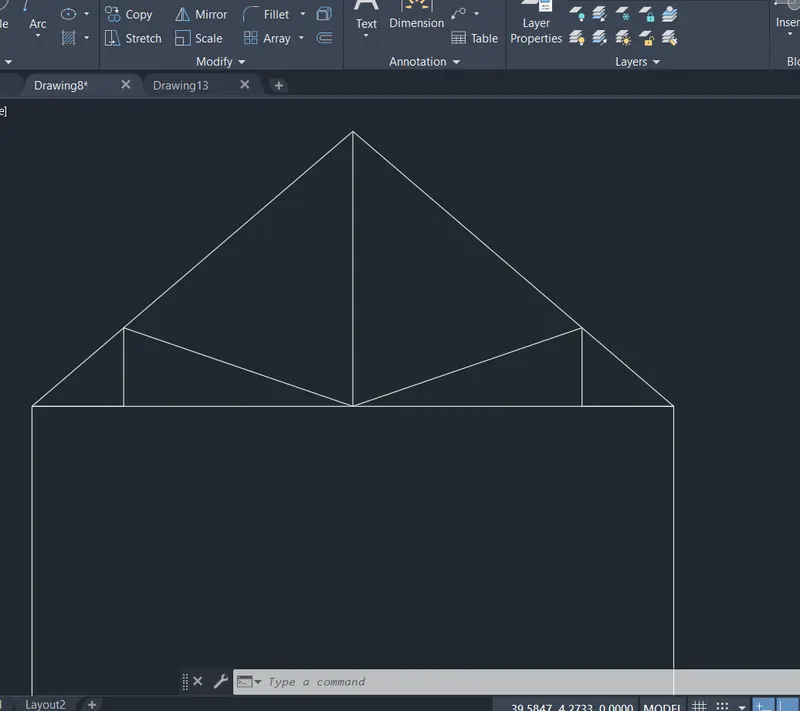
Step-14: Save and close
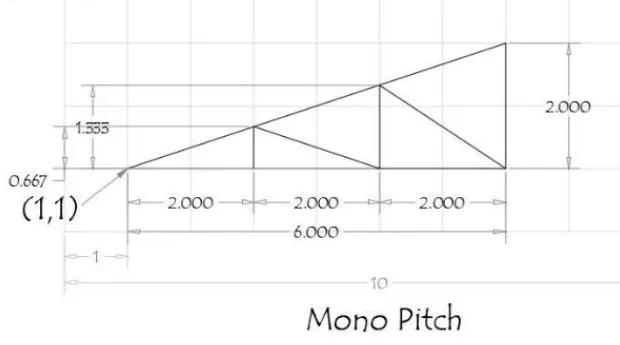
Mono pitch
Step-1:opening to the AutoCAD software and entering the workspace.
Step-2:Setting limits >specify lower-left corner:0,0
Step-3:specify upper-left corner:100,100
Step-4:Set>units>Decimal>intersectional scale>mm
Step-5:Limmax>100,100
Step-6:for Relative polar coordinate>right click on the dynamic input icon>select the radio button relative coordinate and click ok
Step-7:consider the limits(0,0)
- Step-8: line specify the first point(1,1), press enter button,
Step-9:followed steps,specify the next point @(6<200),@(2<90),@(6<270),@(6<180)
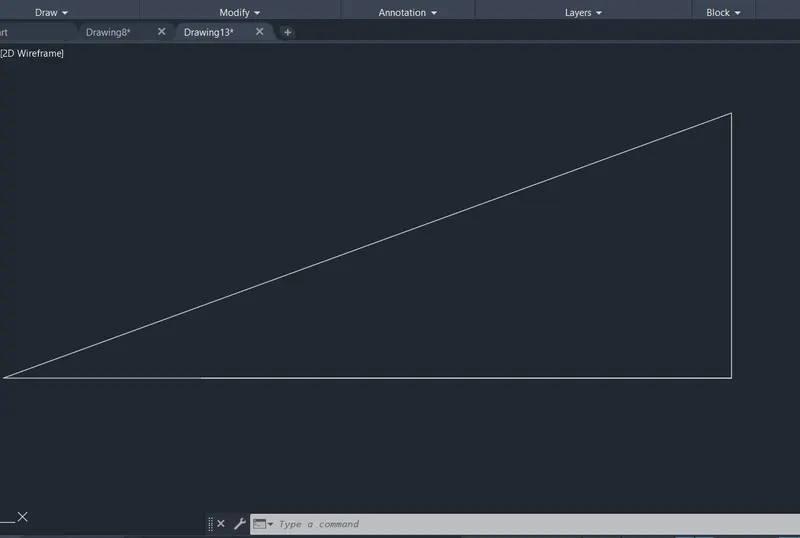
Step-10:Specify the First point,(6,1)
Step-11:Specify the next point,@(1.33<32),@(1<270),
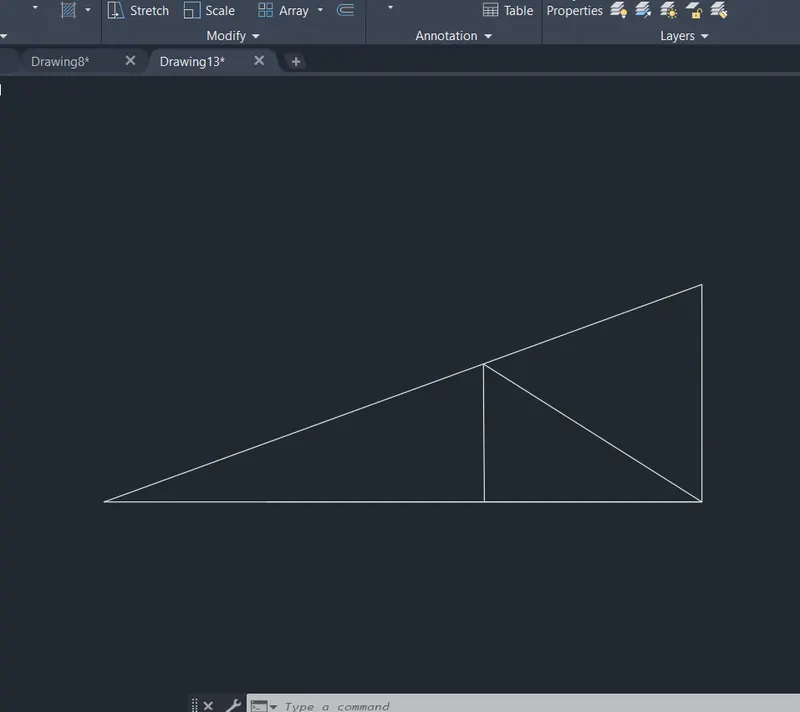
Step-12:Specify the next point,@(0.66<15),@(0.33<270),@(2<180).
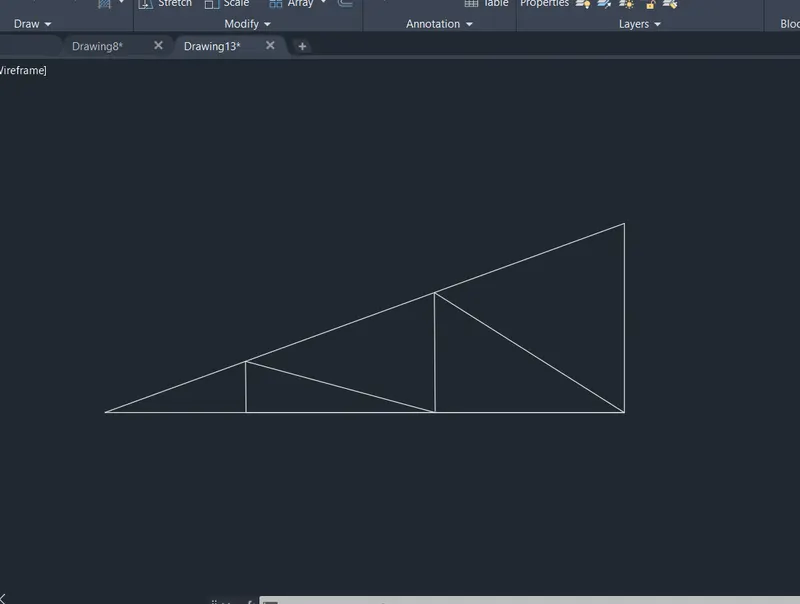
Step-12:at the end "c"+enter to close the object.
Step-13: Save and close