Creation of geometries by Coordinate system methods using AutoCad
1) Aim : creating the geometries from P1-P2 using all coordinate system and also Line tool to create the geometries
Introduction: In Autocad we have 3 types of co-ordinate systems:
1)Absolute co-ordinate system
2)Relative co-ordinate system
3)Polar co-ordinate system.
1. Absolute co-ordinate system: All Inputs specifying drawing using standard cartesian co-ordinates X & Y.
2.Relative co-ordinate system:After first point enter your next point can be entered by specifying the next coordinate compare /relative from th efirst points. Using relative co-ordinate ,points entered by typing @X,Y and enter.
3. polar co-ordinate system: polar system in auto cadd specifies the distance length at which angle.using polar co-ordinate system,points entered by taping @distance.
commands used :
- Line command
- Circle command
- Text command
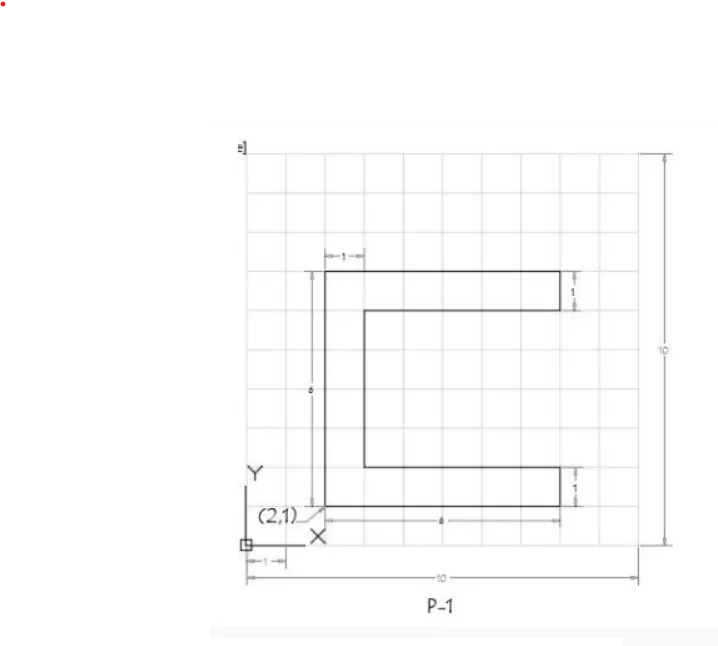
1) Absolute co-ordinate system : Click on auto cadd application and then click open button
- Type QNEW in the command bar and enter.
- select default settings as imperial (feets& inches).
- in default settings click n use wizard and in that advance settings set unit as decimal and precision as 0 and press next.
- set angle as decimal degree and precesion 0 and press next.
- set angle measurement as east and press next.
- set angle direction as clock wise and press next.
- set area by providing length as10 and width as 10.
- press finish.
- From home tab click on line L.
- Specify first point in the command bar (2,1)
- specify next point as (8,1)
- specify next point as (8,2)
- specify next point as (3,2)
- specify next point as (3,6)
- specify next point as (8,6)
- specify next point as (8,7)
- specify next point as (2,7)
- click on close in the command bar.
- The geomentry is done.
2.) Relative co-ordinate system:Click on auto cadd application and then click open button
- Type QNEW in the command bar and enter.
- select default settings as imperial (feets& inches).
- in default settings click n use wizard and in that advance settings set unit as decimal and precision as 0 and press next.
- set angle as decimal degree and precesion 0 and press next.
- set angle measurement as east and press next.
- set angle direction as clock wise and press next.
- set area by providing length as10 and width as 10.
- press finish.
- From home tab click on line L.
- Specify first point in the command bar (2,1)
- specify next point @6,0
- specify next point @0,1
- specify next point @ -5,0
- specify next point @0,4
- specify next point @5,0
- specify next point @0,1
- specify next point @-6,0
- click on close in the command bar.
- The geomentry is done.
3.)polar co-ordinate system:Click on auto cadd application and then click open button
- Type QNEW in the command bar and enter.
- select default settings as imperial (feets& inches).
- in default settings click n use wizard and in that advance settings set unit as decimal and precision as 0 and press next.
- set angle as decimal degree and precesion 0 and press next.
- set angle measurement as east and press next.
- set angle direction as clock wise and press next.
- set area by providing length as10 and width as 10.
- press finish.
- From home tab click on line L.
- Specify first point in the command bar (2,1)
- specify next point @6<0 towards east.
- specify next point @1<90 towards north.
- specify next point @5<180 towards west.
- specify next point @4<90 towards north
- specify next point @5<0 towards east.
- specify next point @1<90 towards north
- specify next point @6<180 towards wast.
- click on close in the command bar.
- The geomentry is done.
NOW -P2
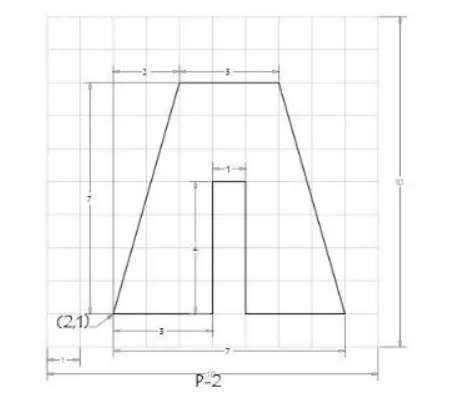
1.) Absolute co-ordinate system : Click on auto cadd application and then click open button
- Type QNEW in the command bar and enter.
- select default settings as imperial (feets& inches).
- in default settings click n use wizard and in that advance settings set unit as decimal and precision as 0 and press next.
- set angle as decimal degree and precesion 0 and press next.
- set angle measurement as east and press next.
- set angle direction as clock wise and press next.
- set area by providing length as10 and width as 10.
- press finish.
- From home tab click on line L.
- Specify first point in the command bar (2,1)
- specify next point as (5,1)
- specify next point as (5,5)
- specify next point as (6,5)
- specify next point as (6,1)
- specify next point as (9,1)
- specify next point as (7,8)
- specify next point as (4,8)
- click on close in the command bar.
- The geomentry is done.
2.) Relative co-ordinate system:Click on auto cadd application and then click open button
- Type QNEW in the command bar and enter.
- select default settings as imperial (feets& inches).
- in default settings click n use wizard and in that advance settings set unit as decimal and precision as 0 and press next.
- set angle as decimal degree and precesion 0 and press next.
- set angle measurement as east and press next.
- set angle direction as clock wise and press next.
- set area by providing length as10 and width as 10.
- press finish.
- From home tab click on line L.
- Specify first point in the command bar (2,1)
- specify next point @3,0
- specify next point @0,4
- specify next point @ 1,0
- specify next point @0,-4
- specify next point @3,0
- specify next point @-2,7
- specify next point @-3,0
- click on close in the command bar.
- The geomentry is done.
3.)polar co-ordinate system:Click on auto cadd application and then click open button
- Type QNEW in the command bar and enter.
- select default settings as imperial (feets& inches).
- in default settings click n use wizard and in that advance settings set unit as decimal and precision as 0 and press next.
- set angle as decimal degree and precesion 0 and press next.
- set angle measurement as east and press next.
- set angle direction as clock wise and press next.
- set area by providing length as10 and width as 10.
- press finish.
- From home tab click on line L.
- Specify first point in the command bar (2,1)
- specify next point @3<0
- specify next point @4<90
- specify next point @1<0
- specify next point @4<270
- specify next point @3<0
- specify next point @7<106
- specify next point @3<180
- click on close in the command bar.
- The geomentry is done.
Now P-4
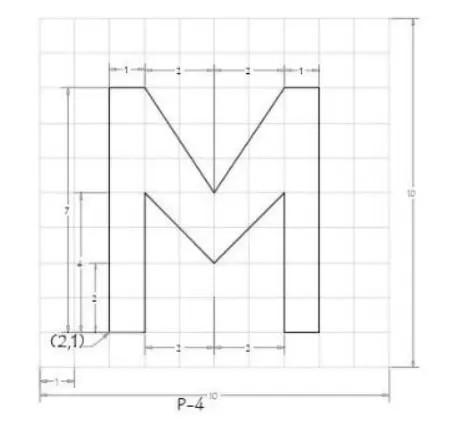
Absolute co-ordinate system:
select line tool from ribbon or type line in the command in command bar.
specify first pont (2,1)
specify next point (3,1)
specify next point (3,5)
specify next point (5,3)
specify next point (7,5)
specify next point (7,1)
specify next point (3,1)
specify next point (8,8)
specify next point (7,8)
specify next point (5,5)
specify next point (3,8)
specify next point (2,8)
click on close in command line.
P-5
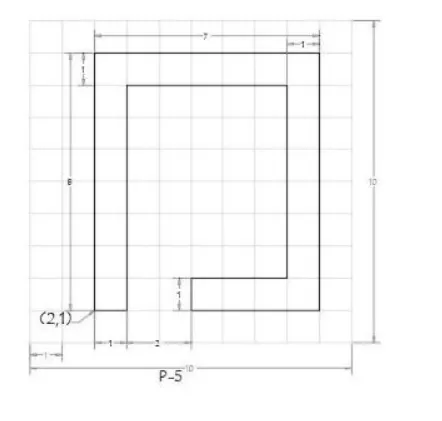
Relative coordinate system:
select line tool from ribbon or type line in the command in command bar.
specify first pont (2,1)
specify next point @1,0
specify next point @0,7
specify next point @5,0
specify next point @0,-6
specify next point @-3,0
specify next point @0,-1
specify next point @4,0
specify next point @0,8
specify next point @-7,0
click on close in command line.
P-7
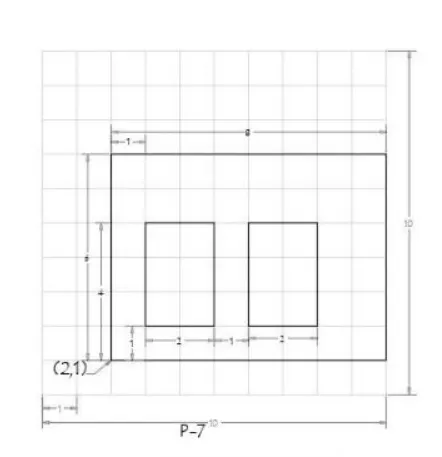
Using Absolute co-ordiante system:
select line tool from ribbon or type line in the command in command bar.
specify first pont (2,1)
specify next point (10,1)
specify next point (10,7)
specify next point (2,7)
click on close in command line
select line tool from ribbon or type line in the command in command bar.
specify first pont (3,2)
specify next point (5,2)
specify next point (5,5)
specify next point (3,5)
click on close in command line
select line tool from ribbon or type line in the command in command bar.
specify first pont (6,2)
specify next point (8,2)
specify next point (8,5)
specify next point (6,5)
click on close in command line
P-8
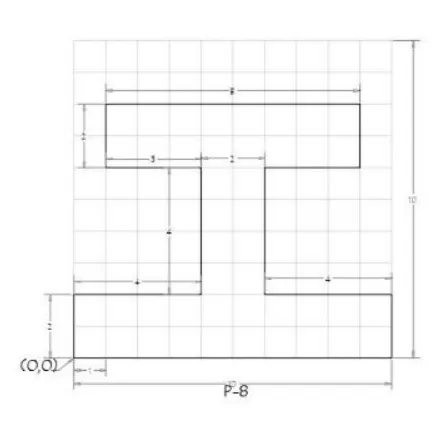
Relative co-ordinate system:
elect line tool from ribbon or type line in the command in command bar.
specify first pont (0,0)
specify first pont (10,0)
specify next point @0,2
specify next point @-4,0
specify next point @0,4
specify next point @3,0
specify next point @0,2
specify next point @-8,0
specify next point @0,-2
specify next point @3,0
specify next point @0,-4
specify next point @-4,0
click on close in command line.
P-9
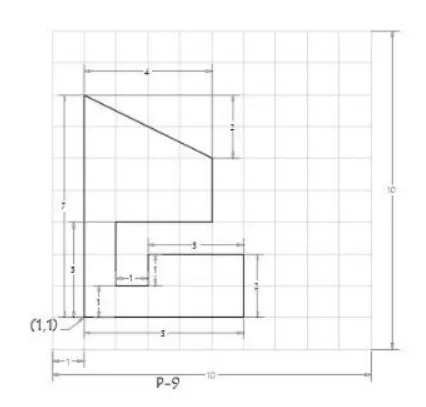
Use of Absolute coordinate system.
select line tool from ribbon or type line in the command in command bar.
specify first pont (1,1)
specify next point (6,1)
specify next point (6,3)
specify next point (3,3)
specify next point (3,2)
specify next point (2,2)
specify next point (2,4)
specify next point (3,4)
specify next point (5,6)
specify next point (1,8)
click on close in command line.
P-10
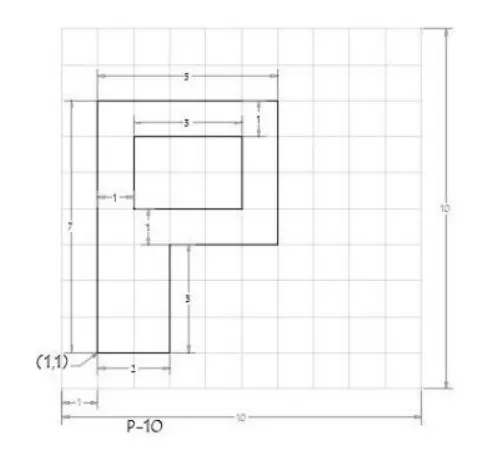
Using Relative co-ordinate system:
select line tool from ribbon or type line in the command in command bar.
Specify first point in the command bar (1,1)
- specify next point @2<0
- specify next point @3<90
- specify next point @5<180
- specify next point @4<90
- specify next point @5<180
- click on close in command bar
- select line tool from ribbon or type line in the command in command bar.
- specify next point (2,5)
- specify next point @ 3,0
- specify next point @2<90
- specify next point @3<180
- click close in command bar.
Directive system method:
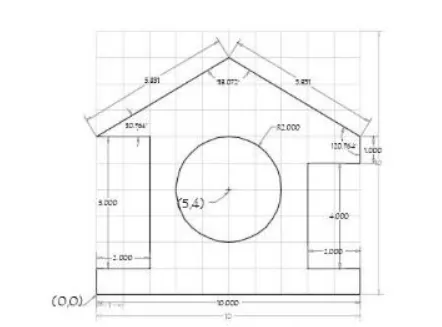
select line tool from ribbon or type line in the command in command bar
specify next point 0,0
specify next point length as 10 towards East.
specify next point length as 1 towards North
specify next point length as 2 towards west
specify next point length as 4 towards north
specify next point length as 2 towards East
specify next point length as 831 a an angle of<149.036from +ve -x direction while keeping polar tacking on.
specify next point length as 5.381 at an agle of <210.964 from -ve x- direction.
specify next point length as 2 towards East
specify next point length as 5 towards south
specify next point length as 2 towards Eas
click close in command line.
select the circle tool by selecting Circle command.
specify centre point 5,2
specify radius of circle as 2.
Using Relative co-ordinate system:
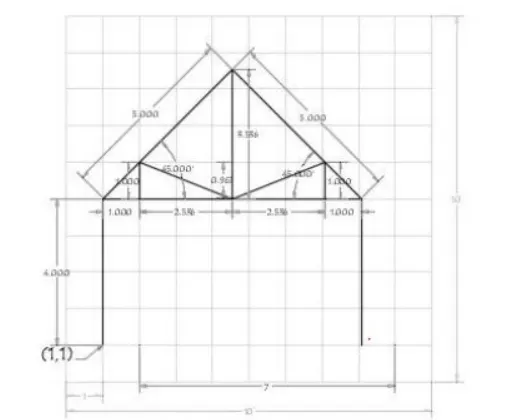
select line tool from ribbon or type line in the command in command bar
specify first point (1,1)
specify next point @ 1,0
specify next point @0,4 and let consider as point 1
specify next point @3.536,3.536 and let consider as point 2
specify next point @3.536,-3.536and let consider as point 3
specify next point @0,-4
press Esc cancel for line command.
select line tool again from tool bar.
joint points 1,3
press Esc cancel for line command.
select line tool again from tool bar.
specify point as 4.536,5 and let consider as point 4
specify point @-2.536,1
specify next point @0,-1
press Esc cancel for line command.
select line tool again from ribbon command.
specify point 4.536,5
specify next point @ 2.536,1
specify next point @0,-1
press Esc cancel for line command.
select line tool again from ribbon command.
joint points 2,4
press Esc to cancel line command.
Using Absolute co-ordiante system:
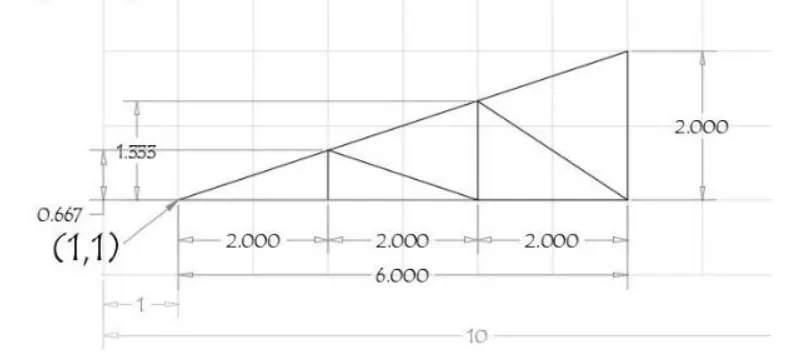
select line tool from ribbon or type line in the command in command bar.
specify first pont (1,1)
specify next point (7,1)
specify next point (7,3)
click on close in command line.
select line tool from ribbon or type line in the command in command bar.
specify next point (3,1)
specify next point (3,1.667)
specify next point (5,1)
specify next point (5,2.33)
specify next point (7,1)
press esc to cancel the line command.