Creation of geometries by Coordinate system methods using AutoCad
P1
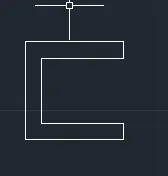
Absolute coordinate system
Take line command from ribbon
Start from the point (2,1) in the command box as starting of line
Then second distance is (8,1)
Third distance is (8,2)
Next distance is (3,3)
Next distance is (3,7)
Next distance is (8,7)
Next distance is (8,8)
Next distance is (2,8)
then close the last point with C enter
The above image formed
Relative rectangular coordinate system
It is the distance given from the last point as @ and distance
First give Line command from ribbon
Then give starting point as (2,1)
Next distance is (@6,0)
Next distance is (@0,1)
Next distance is (@-5,0)
Next distance is (@0,4)
Next distance is (@5,0)
Next distance is (@0,1)
Next distance is (@-6,0)
Then close with C in the command box the above drawing is formed
Relative polar coordinate system
It only deals with length and angle just keep the direction of cursor where do you want line
First select line from ribbon
And give first point as 2,1
Keep the cursor on the direction you want for all aspects
Next distance is (6<0)
Next distance is (5<0)
Next distance is (4<0)
Next distance is (5<0)
Next distance is (1<0)
Next distance is (6<0)
Then close the diagram or give (6<0)
Direct distance method
It is more frequently used method
Here you have to just enter the distance what you want and angle
First select line from ribbon
Here you have for face direction of line where you want
Give the first point as (2,1)
Next distance is (6)
Next distance is (1) cursor towards up
Next distance is (5)
Next distance is (3)
Next distance is (5)
Next distance is (1)
Next distance is (6)
Then close the object
P2
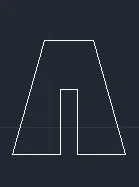
Absolute coordinate system
Take line command from ribbon
Start from the point (2,1) in the command box as starting of line
Then second distance is (5,1)
Third distance is (5,5)
Next distance is (6,5)
Next distance is (7,1)
Next distance is (10,1)
Next distance is (8,6)
Next distance is (5,6)
then close the last point with C enter
The above image formed
Relative rectangular coordinate system
It is the distance given from the last point as @ and distance
First give Line command from ribbon
Then give starting point as (2,1)
Next distance is (@3,0)
Next distance is (@0,4)
Next distance is (@1,0)
Next distance is (@0,-4)
Next distance is (@3,0)
Next distance is (@-2,7)
Next distance is (@-3,0)
Then close with C in the command box the above drawing is formed
Relative polar coordinate system
It only deals with length and angle just keep the direction of cursor where do you want line
First select line from ribbon
And give first point as 2,1
Keep the cursor on the direction you want for all aspects
Next distance is (3<0)
Next distance is (4<0)
Next distance is (1<0)
Next distance is (4<0)
Next distance is (3<0)
Next distance is (7<105)
Then close the diagram or give (6<0)
Direct distance method
It is more frequently used method
Here you have to just enter the distance what you want and angle
First select line from ribbon
Here you have for face direction of line where you want
Give the first point as (2,1)
Next distance is (3)
Next distance is (4) cursor towards up
Next distance is (1)
Next distance is (4)
Next distance is (3)
Next distance is (6<105)
Next distance is (3)
Then close the object
P3

Relavite coordinate method
It is the distance given from the last point as @ and distance
First give Line command from ribbon
Then give starting point as (2,1)
Next distance is (@1,0)
Next distance is (@0,4)
Next distance is (@2,-2)
Next distance is (@2,2)
Next distance is (@0,-4)
Next distance is (@1,0)
Next distance is (@0,7)
Next distance is (@0,-1)
Next distance is (@-2,-4)
Next distance is (@-2,4)
Next distance is (@0,-1)
Then close with C in the command box the above drawing is formed
P4
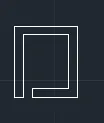
Direct distance method
First select line from ribbon
Here you have for face direction of line where you want
Give the first point as (2,1)
Next distance is (8)
Next distance is (7) cursor towards rightt
Next distance is (6)
Next distance is (5)
Next distance is (1)
Next distance is (4)
Next distance is (6)
Next distance is (5)
Next distance is (7)
Then close the object
P5
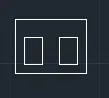
Direct distance method
First select line from ribbon
Here you have for face direction of line where you want
Give the first point as (2,1)
Next distance is (6)
Next distance is (8) cursor towards rightt
Next distance is (6)
Next distance is (8) Close first rectangle
The select line command starting point is (3,2)
Next distance is (3)
Next distance is (2)
Next distance is (3)
Next distance is (2)
The select line command another starting point is (7,2)
Next distance is (3)
Next distance is (2)
Next distance is (3)
Next distance is (2)
The above figure is formed
P6
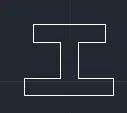
Direct distance method
First select line from ribbon
Here you have for face direction of line where you want
Give the first point as (2,1)
Next distance is (2)
Next distance is (4) cursor towards left shown in figure
Next distance is (4)
Next distance is (3)
Next distance is (2)
Next distance is (8)
Next distance is (2)
Next distance is (3)
Next distance is (4)
Next distance is (4)
Next distance is (2)
Next distance is (10)
Then object is formed
P7
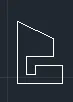
Relavite coordinate method
It is the distance given from the last point as @ and distance
First give Line command from ribbon
Then give starting point as (1,1)
Next distance is (@5,0)
Next distance is (@0,2)
Next distance is (@0,-3)
Next distance is (@0,-1)
Next distance is (@-1,0)
Next distance is (@0,2)
Next distance is (@3,0)
Next distance is (@0,2)
Next distance is (@-4,2)
Then close with C in the command box the above drawing is formed
P8
Direct distance method
First select line from ribbon
Here you have for face direction of line where you want
Give the first point as (1,1)
Next distance is (7)
Next distance is (7) cursor towards top
Next distance is (5)
Next distance is (4)
Next distance is (3)
Next distance is (2) it is closed
Then select line command and starting point is (5,2)
Next distance is (2)
Next distance is (3)
Next distance is (2)
Next distance is (3)
Then the given object is formed
P9
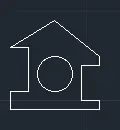
Relavite coordinate method
It is the distance given from the last point as @ and distance
First give Line command from ribbon
Then give starting point as (1,1)
Next distance is (@10,0)
Next distance is (@0,1)
Next distance is (@-2,0)
Next distance is (@2,0)
Next distance is (@0,1)
Next distance is (@-5,4)
Next distance is (@-5,3)
Next distance is (@2,0)
Next distance is (@0,-5)
Next distance is (@-2,2)
Then close with C in the command box
Select corcle with radius option in ribbon
Select centre of circle as (5,4)
Give radius of circle as 2
P10
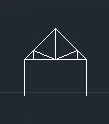
Relavite coordinate method
It is the distance given from the last point as @ and distance
First give Line command from ribbon
Then give starting point as (1,1)
Next distance is (@0,4)
Next distance is (@0,3.5)
Next distance is (@-3.5,3.5)
Next distance is (@0,4) triangle is formed then
from point of top of triangle draw line to downards to end of triangle
From 1 cm from either side of triangle draw straight line as shown in fig and join them diagonally as shown in fig
P11
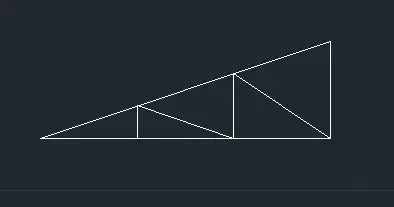
Relavite coordinate method
It is the distance given from the last point as @ and distance
First give Line command from ribbon
Then give starting point as (1,1)
Next distance is (@6,0)
Next distance is (@-6,2)
Then triangle is closed
Take line command and draw line from (1,2) and (1,4) to top of the triangle and then join it diagonally as shown in figure