Creation of Column Schedule and Drawing Template using AutoCad
AIM: Creation of Column Schedule and Drawing Template using AutoCad.
Introduction: In this challenge i have draft the above meationed drawing i.e, Creation of Column Schedule and Drawing Template using AutoCad. here in this challange i have attached all the drawings in a image format and with the proper procedure as possible.
The comman commands which are used in this challange are discussed below
Selecting of Tools:
- Line: Ribbon< Home< Line, Command: Line or L, Home< Draw< Line.
- Polyline: Ribbon< Home< Polyine, Command: polyline or pl, Home< Draw< polyline.
- Rectangle: Ribbon< Home< rectangle, Command: rectangle or rec, Home< Draw< rectangle.
- Ploygon: Ribbon< Home< Ploygon, Command: Ploygon or pol, Home< Draw< Ploygon.
- Circle: Ribbon< Home< Circle, Command: Circle or C, Home< Draw< Circle.
- Fillet: Ribbon< Home< Fillet, Command: Fillet or F, Home< modify< Fillet.
- Chamfer: Ribbon< Home< Chamfer, Command: Chamfer or cha, Home< modify<Chamfer.
- Move: Ribbon< Home< move, Command: move or M, Home< modify<Move.
- Copy: Ribbon< Home< Copy, Command: Copy or co, Home< modify<Copy. etc
------------------------------------------------------------------------------------------------------------------------------------------------------
Question 1:
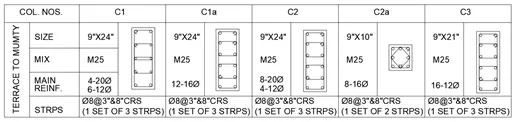
Create a column schedule as shown in the figure.
Note: Create a column schedule with the help of lines. Also, insert text with the help of Dtext command or Single Line text.Hint: Use font name: romans.shx; Height: 8”, Justify: Left
ANS: Here i have attached the image which i have made in autocad 2019,
Procedure:
The procedure for creating the above shown column shedule in autocad is discussed below,
Procedure:
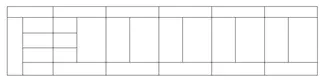
Step 1: for creating the above shown shedule table using line tool in autocad is discussed below,
Procedure:
- open autocad 2019 and select a new file and saved as challange 5 and saved in the skill-lync folder.
- set the unit of drawing by giving command un in command and selected Engineering with precion 0'-0.0".
- select limit by giving command limmax and giving the limit 20',20' and entre.
- adjust the dimension size by giving command d and selecting the same unit as mentioned that is Engineering.
- Select the XL command and draft the two lines a vertical and horizontal and interset each other.
- Select the offset option and given the data as shown in the images.
- After giving the proper offset trim the excess.
- Give the command panel and select the trim option and trim the excess.
- creat a box as shown in the question.
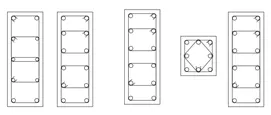
Step 2: for creating the column and reinforcement detail using different tools in autocad is discussed below,
Procedure:
- use Rectangle option and give the size as 9"x24" as shown in above figure.
- select a offset option as 1" and offset inword
- use fillet tool with radius as 0.2" fillet the all four edges.
- select a circle tool and give a dia of 0.5 and place that circle at the edge as shown.
- use mirror option and mirror the circle in opposite direction.
- use array tool and use path with proper spacing by selecting 3 components as shown above.
- use the line tool and draw the stirrup and is anchor as shown.
- simillary do all the drawing with same procedure.
Step 3: for creating the complete column and reinforcement detail using different tools in autocad is discussed below,
Procedure:
- Use move tool and place all the drawings drawn in the proper places.
- use Mtext option and type which ever required or shown.
- after editing the text copy the text and placed in columns or where ever required as shown above.
- edit the copied text by giving commant textedit and star editing the copied text.
- after completing the drawing check the question as complete every thing.
- this completes the question 1.
--------------------------------------------------------------------------------------------------------------------------------------------------------
Question 2:
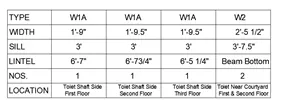
Create a window schedule as shown in the figures:, Window Schedule
ANS: Here i have attached the image which i have made in autocad 2019,
Procedure:
The procedure for creating the above shown Window shedule in autocad is discussed below,
Procedure:
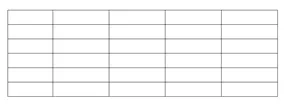
Step 1: for creating the above shown shedule table using line tool in autocad is discussed below,
Procedure:
- Select the line option and draw a straight line of 5' horizontal
- take offset command and give ofset of 3" vetically upto 6 times.
- select the vertical line and join all horozontal lines at the edge as shown in figure.
- Select a offset of 1' and give vertically and create the table as shown in figure.
- After giving the proper offset trim the excess.
- Give the command panel and select the trim option and trim the excess.
Step2: for creating the complete Window Schedule detail using different tools in autocad is discussed below,
Procedure:
- use Mtext option and type which ever required or shown.
- after editing the text copy the text and placed in columns or where ever required as shown above.
- edit the copied text by giving commant textedit and star editing the copied text.
- after completing the drawing check the question as complete every thing.
- this completes the question 2.
-----------------------------------------------------------------------------------------------------------------------------------------------------
Question 3:
Create the drawing template as shown in the figure:< Use the Notes as in the figure>
ANS: Here i have attached the image which i have made in autocad 2019,
Procedure:
The procedure for creating the drawing template as shown in the figure in autocad is discussed below,

Procedure:
- use Mtext option and type which ever required or shown.
- after editing the text copy the text and placed in columns or where ever required as shown above.
- edit the copied text by giving commant textedit and star editing the copied text.
- after completing the drawing check the question as complete every thing.
- and use rectangle tool and draw the rectangle around the texts
- whith proper lining drwa as shown in the question.
--------------------------------------------------------------------------------------------------------------------------------------------------
Question 4:
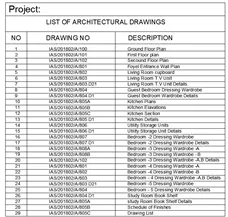
Create the list of drawing schedule as shown in the figure:
ANS: Here i have attached the image which i have made in autocad 2019,
Procedure:
The procedure for creating the list of drawing schedule as shown in the figure in autocad is discussed below,
Procedure:
- Use Mtext option and type which ever required or shown.
- after editing the text copy the text and placed in columns or where ever required as shown above.
- edit the copied text by giving commant textedit and star editing the copied text.
- after completing the drawing check the question as complete every thing.
- and use rectangle tool and draw the rectangle around the texts.
- whith proper lining drwa as shown in the question.
--------------------------------------------------------------------------------------------------------------------------------------------
Question 5:
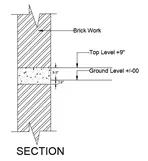
Create the Beam detail as shown in the figure and provide text wherever given:
ANS: Here i have attached the image which i have made in autocad 2019,
Procedure:
The procedure for creating the Beam detail as shown in the figure in autocad is discussed below,
Procedure:
- Select a rectangular tool and draw a rectangle as shown.
- explode the Rectangle and select centre line.
- give the offset 3" as shown in figure.
- Give offset 9" from from the line recently drawn
- hatch the centre rectangle and select concrete and select a proper scale.
- and use line command to create a breake line above and bottom.
- select a above and below rectangle brick wall hatch and entre.
- use the qleader Top level, and ground level at proper +/-00
- Dimension should be given properly and that complete my drawing.
-------------------------------------------------------------------------------------------------------------------------------------------------------------
END