Creation of Column Schedule and Drawing Template using AutoCad
Q.1
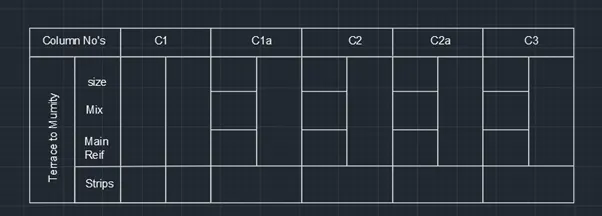
Aim: To Create Column Schedule as Shown In the Figure Using Auto Cad
Procedure:
- Give the Command of Rectangle Rec Enter
- Specify the StartingPoint and Give the Length and Breadth Press Enter
- Press Esc.,
- Select the Object and Give the Command of Copy and Press Enter
- Select the Left Bottom Corner Point Select the Array and Give the No’s as 5 Press Enter
- Keep the Cursorn on Right Bottom Point click

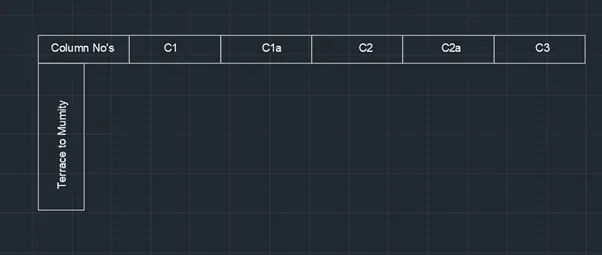
- Specify the Text Tool From the Ribbon Tab
- Select Single Line Text
- Keep the Pointer in the Left Box and Click as Per the Alignment Required
- Type Column No’s Press Enter
- Keep the Pointer in in the Next Box and Click as Per The Alignment Required
- Type C1 and Press enter
- Keep the Pointer in the Next Box and Click as Per the alignment Required
- Type C1a and Press Enter
- Keep the Pointer in the Next Box and Click as Per the alignment Required
- Type C2 and Press Enter
- Keep the Pointer in the Next Box and Click as Per the alignment Required
- Type C2a and Press Enter
- Keep the Pointer in the Next Box and Click as Per the alignment Required
- Type C3 and Press Enter
- Give the command of Rectangle as REC Enter
- Specify the Starting Point as Left Corner of Column No’s and Specify the Length and width Press Enter
- Keep the Pointer in the Rec Box and Click as Per the alignment Required
- Type Terrace to Mummity and Press Enter
- Select the previous Object and Give the Command of Copy and Press enter
- Specify the Corner Point and Give the Length and Breadth as per requirement Press Enter
- Repeat the Procedure as Per Requirement Press Esc
- Give the Command of Text as DT and Press enter
- Now the Keep the Pointer in the 1st Box Click as Per Alignment Required
- Type Size and Press Enter
- Now the Keep the Pointer in the 1st Box Click as Per Alignment Required
- Type Mix and Press Enter
- Now the Keep the Pointer in the 1st Box Click as Per Alignment Required
- Type Main Rein and Press Enter
- Now the Keep the Pointer in the 1st Box Click as Per Alignment Required
- Type Strips Rein and Press Enter
- Select Text Tool from the Ribbon Tab
- Select Single Line Text Toll from the Ribbon Tab
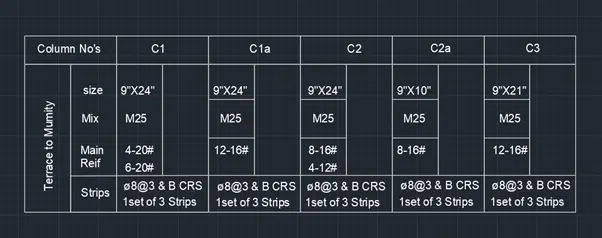
- Now Keep the Pointer in the Left Box of C1 Column and Click as Per the Alignment Required
- Type 9”X24” Press Enter
- Now Keep the Pointer in the Left Box of C1 Column and Click as Per the Alignment Required
- Type M25 Press Enter
- Now Keep the Pointer in the Left Box of C1 Column and Click as Per the Alignment Required
- Type 4-20#Press Enter
- Now Keep the Pointer in the Left Box of C1 Column and Click as Per the Alignment Required
- Type 6-20#Press Enter
- Now Keep the Pointer in the Left Box of C1 Column and Click as Per the Alignment Required
- Type 8@3& B CRS Strips Press Enter
- Now Keep the Pointer in the Left Box of C1a Column and Click as Per the Alignment Required
- Type 9”X24” Press Enter
- Now Keep the Pointer in the Left Box of C1a Column and Click as Per the Alignment Required
- Type M25 Press Enter
- Now Keep the Pointer in the Left Box of C1a Column and Click as Per the Alignment Required
- Type 12-16# Press Enter
- Now Keep the Pointer in the Left Box of C1a Column and Click as Per the Alignment Required
- Type 8@3& B CRS Strips Press Enter
- Now Keep the Pointer in the Left Box of C2 Column and Click as Per the Alignment Required
- Type 9”X24” Press Enter
- Now Keep the Pointer in the Left Box of C2 Column and Click as Per the Alignment Required
- Type M25 Press Enter
- Now Keep the Pointer in the Left Box of C2 Column and Click as Per the Alignment Required
- Type 8-16# Press Enter
- Now Keep the Pointer in the Left Box of C2 Column and Click as Per the Alignment Required
- Type 4-12# Press Enter
- Now Keep the Pointer in the Left Box of C2 Column and Click as Per the Alignment Required
- Type 8@3& B CRS Strips Press Enter
- Now Keep the Pointer in the Left Box of C2a Column and Click as Per the Alignment Required
- Type 9”X10” Press Enter
- Now Keep the Pointer in the Left Box of C2a Column and Click as Per the Alignment Required
- Type M25 Press Enter
- Now Keep the Pointer in the Left Box of C2a Column and Click as Per the Alignment Required
- Type 8-16# Press Enter
- Now Keep the Pointer in the Left Box of C2a Column and Click as Per the Alignment Required
- Type 8@3& B CRS Strips Press Enter
- Now Keep the Pointer in the Left Box of C3 Column and Click as Per the Alignment Required
- Type 9”X21” Press Enter
- Now Keep the Pointer in the Left Box of C2 Column and Click as Per the Alignment Required
- Type M25 Press Enter
- Now Keep the Pointer in the Left Box of C2 Column and Click as Per the Alignment Required
- Type 12-16# Press Enter
- Now Keep the Pointer in the Left Box of C2 Column and Click as Per the Alignment Required
- Type 8@3& B CRS Strips Press Enter
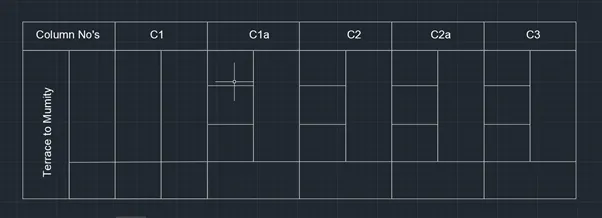
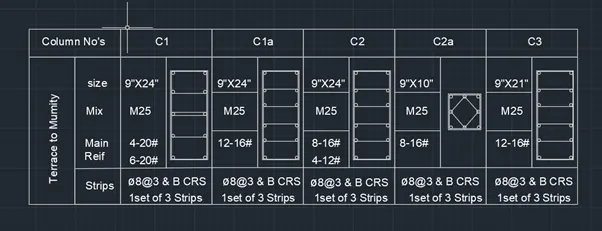
- Give the Command of Rectangle as Rec Press enter
- Draw a rectangle as per Reinforcement Specification
- Divide the Rectangle as Four Equal Parts Press Enter By Using Line Tool
- Give the Command of Circle as Cir Press enter
- Give the Specific Point as Respective Place
- Select Previously Created Object in the work Space Give the Command of Copy and Press Enter
- Specify the Left Bottom Corner Point and Move the Cursor to X Plane in C1a, C2 and C3 and Press enter
Result:
Q.2
Aim:- To Create a window schedule
Procedure:-
- Select a Rectangle Tool From Ribbon Tab
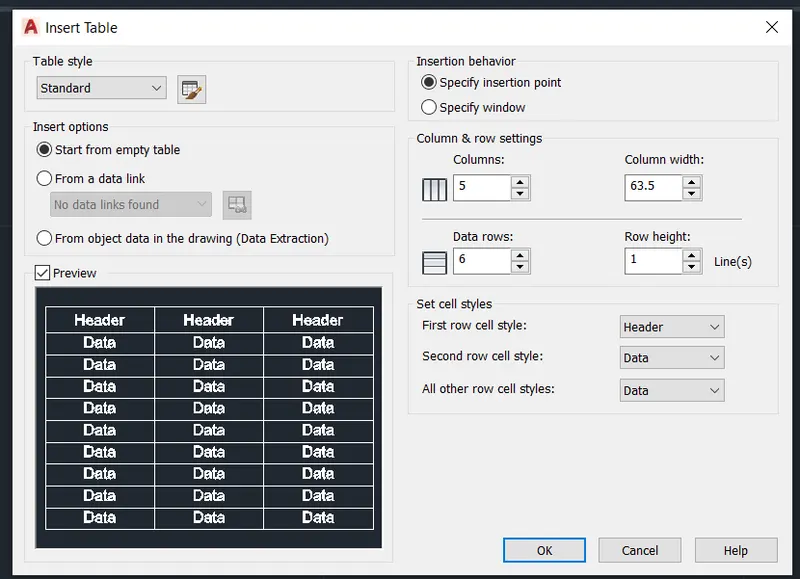
- Its Shows a Insert Table Select the No. of Rows as 6 and Columns as 5
- Select a 1st Row Cell Style as Header
- 2nd Row Cell Style and Remaining Cells Styles as Data
- Select the table Style and row Heighrt as Per Requirtement and Press Ok
- Specify the Starting Point and Press Enter
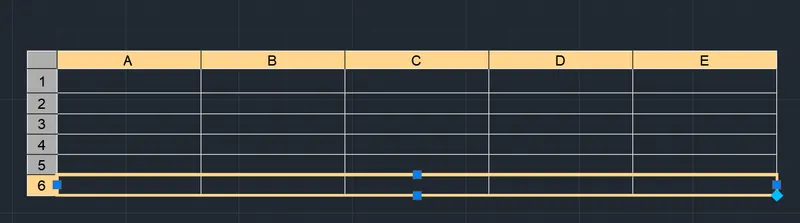
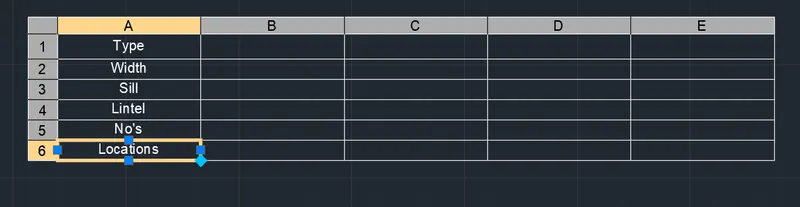
- Selec the A Row 1st Column Give the Text as "TYPE" and Press Enter
- Give the Text as in Next Row "Width" and Press Enter
- Give the Text as in Next Row "Sill" and Press Enter
- Give the Text as in Next Row "Lintel" and Press Enter
- Give the Text as in Next Row "No's" and Press Enter
- Give the Text as in Next Row "Location" and Press Enter
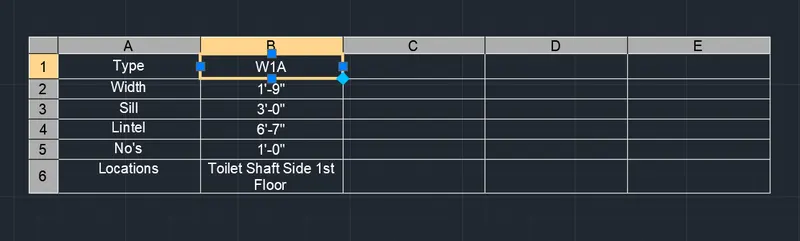
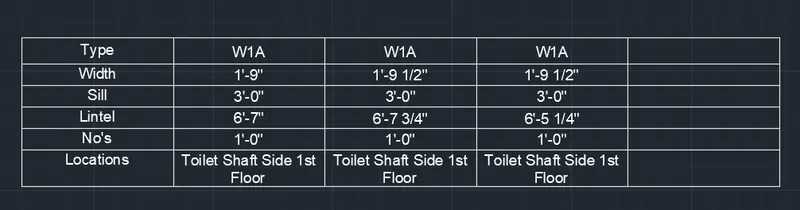
- Select the B Column 1st Row Give the Text as "W1A" and Press Enter
- Give the Text as in Next Row "1'-9"" and Press Enter
- Give the Text as in Next Row "3' " and Press Enter
- Give the Text as in Next Row "6'-7" " and Press Enter
- Give the Text as in Next Row "1' " and Press Enter
- Give the Text as in Next Row "Toilet Shaft side 1st Floor" and Press Enter
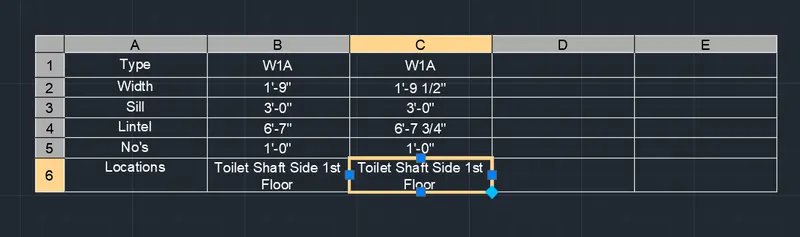
- Select the C Column 1st Row Give the Text as "W1A" and Press Enter
- Give the Text as in Next Row "1'-9 1/2" " and Press Enter
- Give the Text as in Next Row "3' " and Press Enter
- Give the Text as in Next Row "6'-7 3/4" " and Press Enter
- Give the Text as in Next Row "1' " and Press Enter
- Give the Text as in Next Row "Toilet Shaft side 1st Floor" and Press Enter
- Select the D Column 1st Row Give the Text as "W1A" and Press Enter
- Give the Text as in Next Row "1' -9 1/2" " and Press Enter
- Give the Text as in Next Row "3' " and Press Enter
- Give the Text as in Next Row "6'-5 1/4" " and Press Enter
- Give the Text as in Next Row "1' " and Press Enter
- Give the Text as in Next Row "Toilet Shaft side 1st Floor" and Press Enter
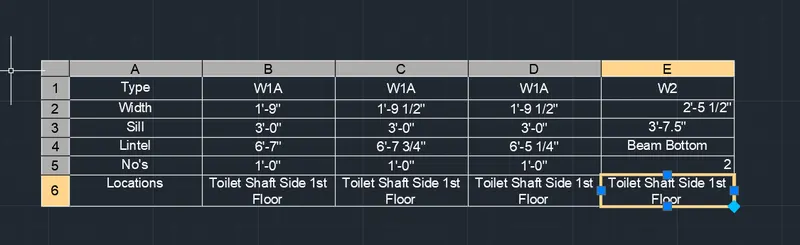
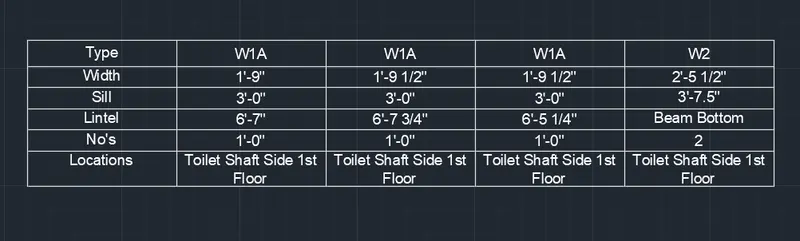
- Select the E Column 1st Row Give the Text as "W1A" and Press Enter
- Give the Text as in Next Row "2'-5 1/2" " and Press Enter
- Give the Text as in Next Row "3'-7.5" " and Press Enter
- Give the Text as in Next Row "Beam Bottom " and Press Enter
- Give the Text as in Next Row "2' " and Press Enter
- Give the Text as in Next Row "Toilet Shaft side 1st Floor" and Press Enter
Result:
Q.3
Aim: To Create the drawing template
Procedure:-
- Select a Rectangle Tool From Ribbon Tab
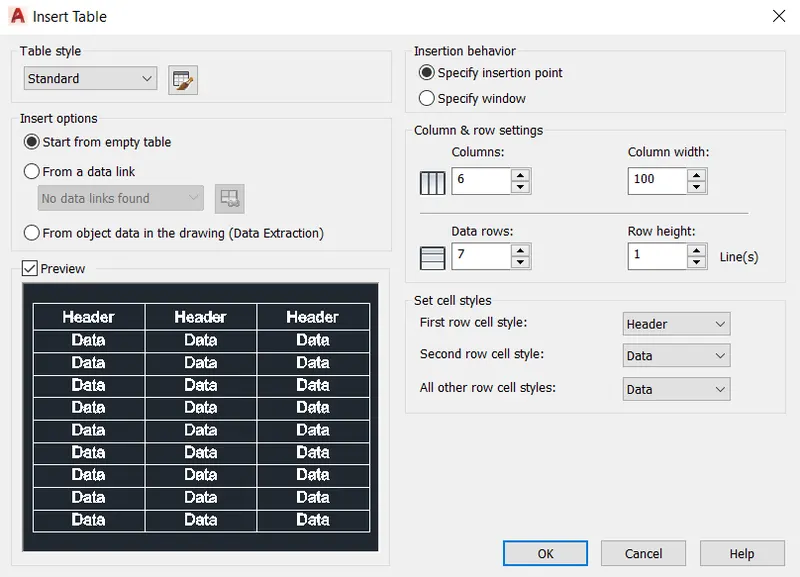
- Its Shows a Insert Table Select the No. of Rows as 7 and Columns as 6
- Select a 1st Row Cell Style as Header
- 2nd Row Cell Style and Remaining Cells Styles as Data
- Select the table Style and row Heighrt as Per Requirtement and Press Ok
- Select Merge tool From Ribbon Tab
- Merge the Rows and Clounmns As Per Reqirement
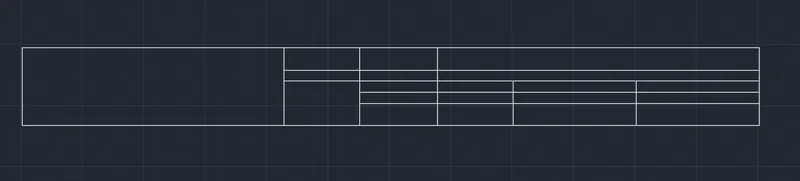
- Select the First Coluns First Row From table enter Note text Press Enter
- Select the 2nd Column 1st Row Give the Text as Project: Pearl Villas Press Enter
- Give the Text in 2nd Row as "Architect" Press Enter

- Select the 3rd Column 1st Row Give the Text as "Drawing Title " Press Enter
- Give the Text in Next Row as "Drawing No" Press Enter
- Give the Text in Next Row as "Issued date" Press Enter
- Give the Text in Next Row as "Rev No" Press Enter
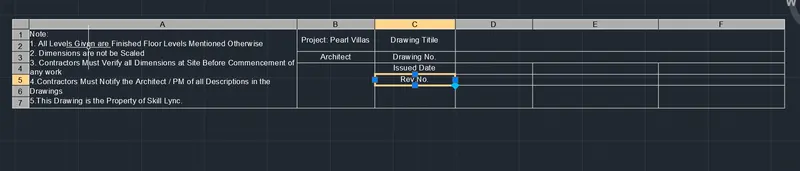
- Select the Next Column 1st Row Give the Text as "Drawing List" Press Enter
- Give the Text in Next Row as "Date" Press Enter
- Give the Text in Next Row as "Issued by" Press Enter
- Give the Text in Next Row as "Scale" Press Enter
- Give the Text in Next Row as "1.7500" Press Enter

Result:-

Q.4
Aim: To Create the list of drawing schedule
Procedure:
- Select a Rectangle Tool From Ribbon Tab
- Its Shows a Insert Table Select the No. of Rows as 30 and Columns as 3
- Select a 1st Row Cell Style as Title
- 2nd Row Cell Style as Headert
- Remaining Cells Styles as Data Select the table Style and row Heighrt as Per Requirtement and Press Ok
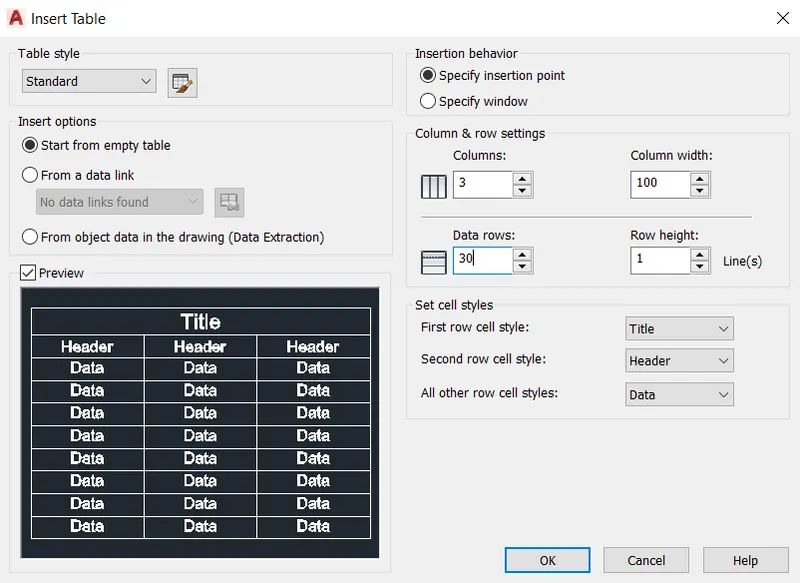
- Specify Insertion Point Press Enter
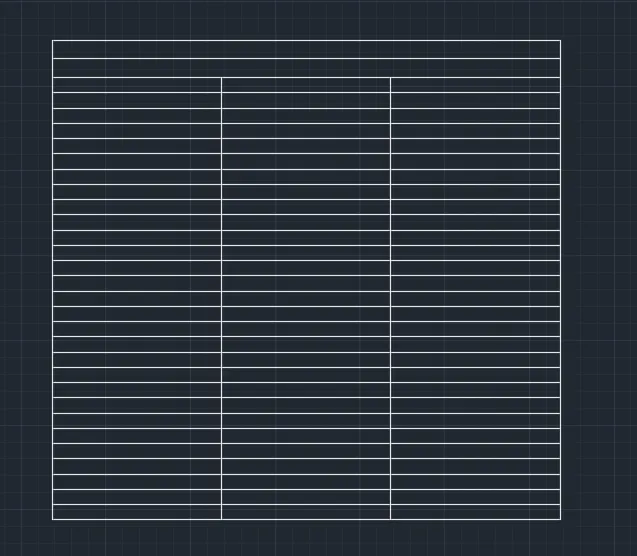
- Select the Title Bar Give the Text as " Project"
- Select the Next Title Bar Give the Text as " List of Architectural Drawing" Press Enter Seclect Both Titile Bars Select as Bold Text Enter
- Give the Text as Per Table For Entire Table as per Requiremnet Attached Below
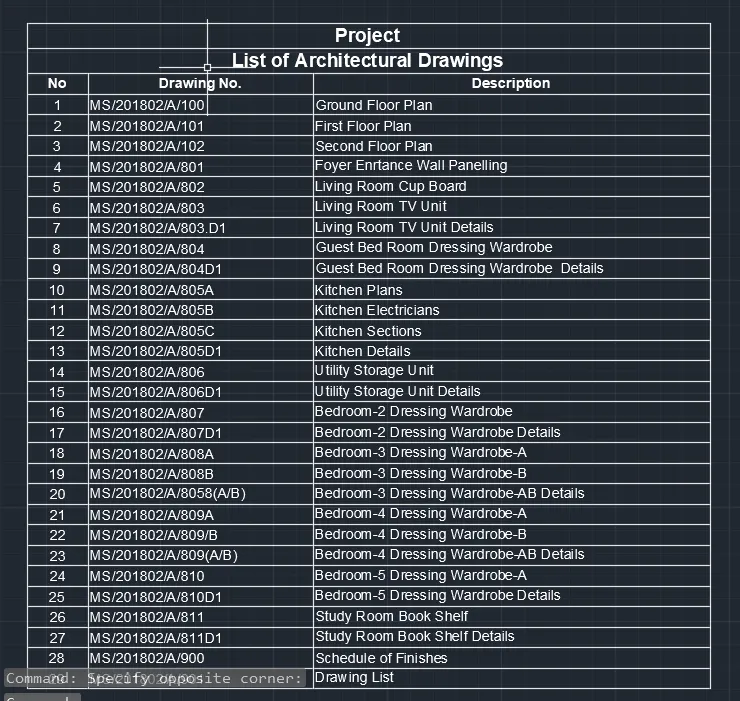
Result.
Q.5
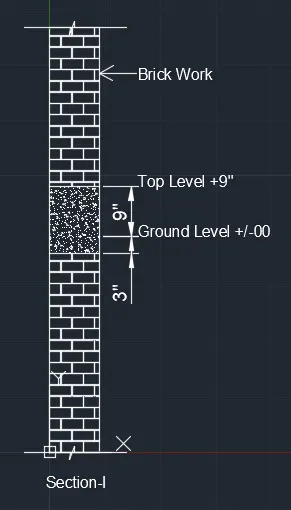
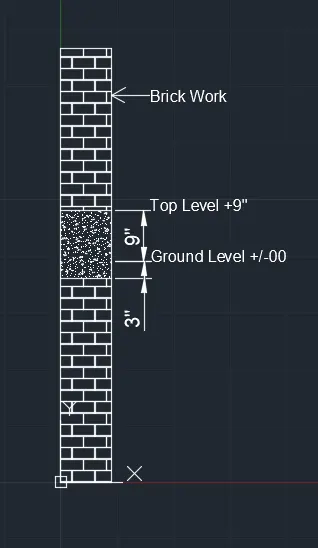
Aim. To Create the Beam detail as shown in the figure and provide text wherever given.
Procedure.
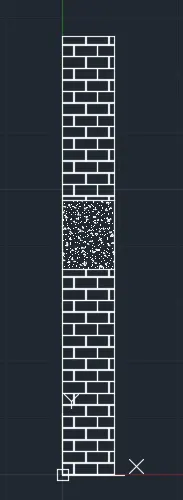
- Give the Command of Line as "L'' Enter
- Specify the Starting Point as 0,0 Enter
- Keep Ortho On
- Move the Cursor Up Ward and Give the Length as 3' Enter
- Stay Cursor Up Ward Give Length as 3" Enter
- Stay Cursor Up Ward Give Length as 9" Enter
- Stay Cursor Up Ward Give Length as 2.4' Enter
- Move the Cursor +X Direction and Give the Length as 9" Enter
- Move the Cursor to -Y Direction and Give the Length as 2.4' Press Enter
- Stay Cursor -Y Direction Give Length as 9" Enter
- Stay Cursor -Y Direction Give Length as 3" Enter
- Stay Cursor -Y Direction Give Length as 3'Enter
- Move the Cursor -X Direction and Give the Length as 9" Enter
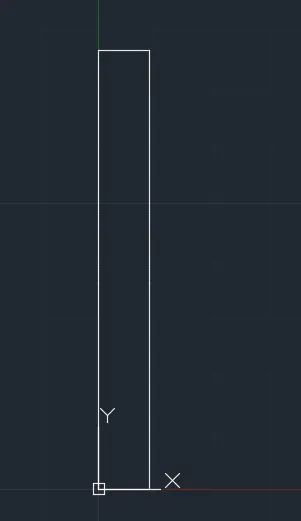
- Give the Command of Line as "L'' Enter
- Specify the Starting Point as 0,3' Press Enter
- Move the Cursor to +X direction Give the Length as 9" press Enter
- Press Esc .
- Give the Command of Line as "L'' Enter
- Specify the Starting Point as 0,4' Press Enter
- Move the Cursor to +X direction Give the Length as 9" press Enter
- Press Esc
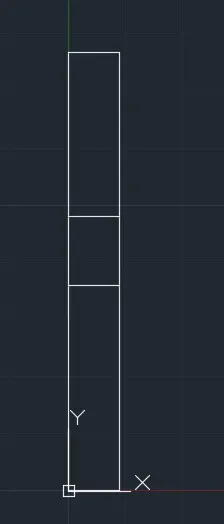
- Give the Hatch Command and Press Enter
- Hatch Creation tool Box Opens
- Select the Suitable Hatch in the Figure Represent Brick Work
- move the Pointer to Closed to Area to be hatched
- Adjust the Scale to View the Hatch
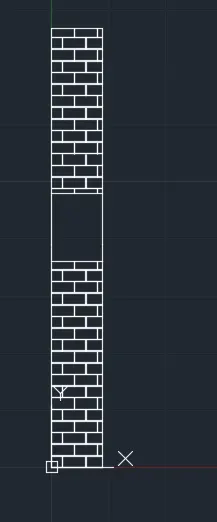
- Give the Hatch Command and Press Enter
- Hatch Creation tool Box Opens
- Select the Suitable Hatch in the Figure Represent Brick Work
- move the Pointer to Closed to Area to be hatched
- Adjust the Scale to View the Hatch
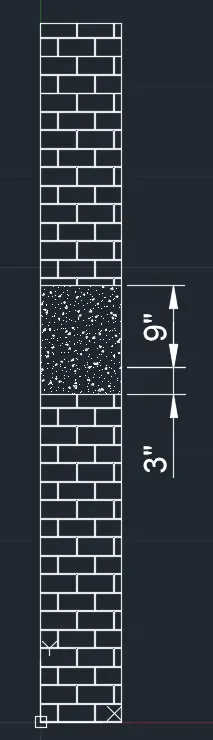
- Give the Dimensions Comamnd of Dim Press Enter
- Specify the Starting and End Point Now Displays the Dimensions
- Select the Text tool From the Ribbon Tab and Slect Single Line text and Enter The Height and Angle of Alignment of Text Press Enter
Result.